Gib’s been in touch again, he added to the collection of N scale figure 8 track plans on the blog – his last post is here.
“Hi Al,
I was blown away by the nice comments on my little first try layout and appreciate each and every one.
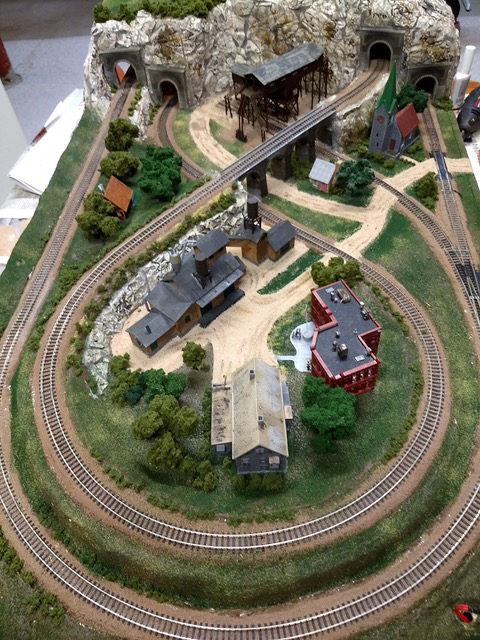
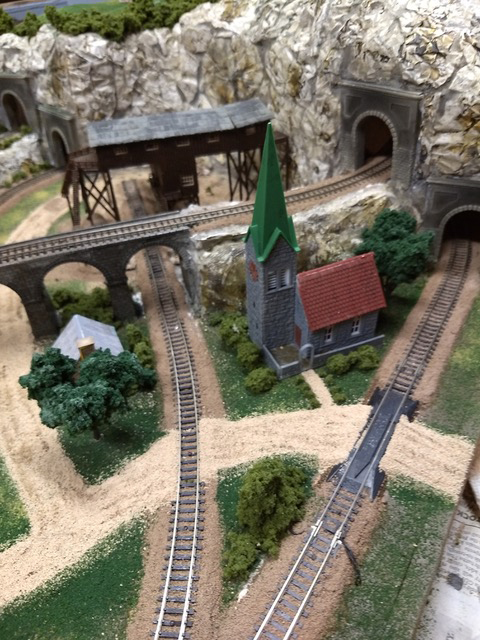
There were some questions I thought I’d answer. The curve radii are 10.5” for the outer curve, 8” for the inner curve and 9” for the curves under the mountain.
I have to admit that I didn’t even think about grades when building the layout and they are too steep. The grade on the outer loop is 2.8% and a whopping 6% on the inner loop. Luckily my trains do navigate OK. There is access on the back side of the mountain to retrieve derailments.
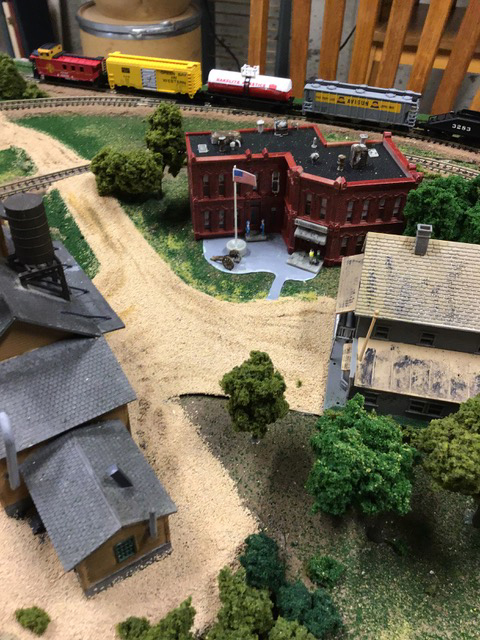
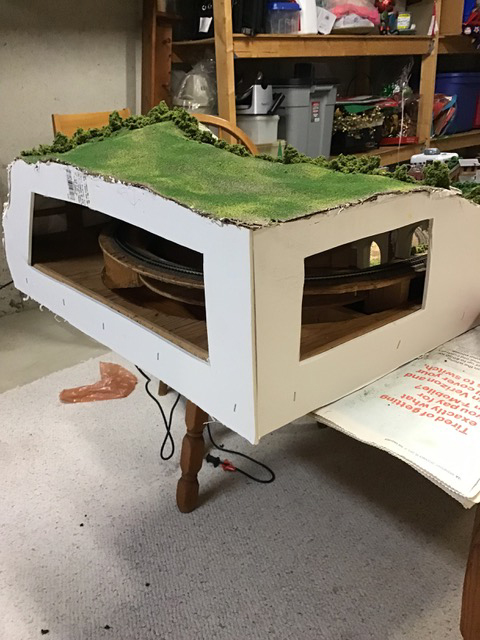
I have attached several pictures. The first three is where I am today. The fourth shows the backside access.
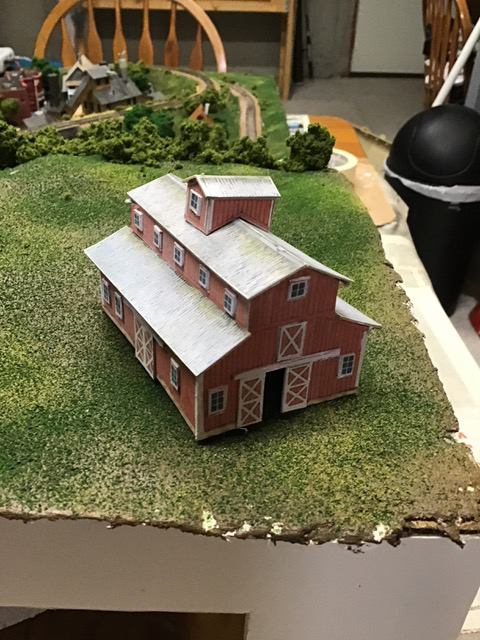
The fifth is your red barn and finally I tried to send a video of my Bachman 0-6-0 Iron Man making the rounds.
Some comments on the red barn which was my first try at a printout building. I surface mounted the windows and doors since N scale is so small to work with to mount the windows inside. I also felt that the cereal box cardboard I glued the printout on was a little too thick for N gauge. Does any one have a better yardstick idea?
So I hope you find this interesting. I look forward to your post every day. Keep up the good work.
Gib”
(It’s always great to see the printable buildings on a layout!)
Gib’s layout reminded me of Clarke’s figure of 8 too: N scale figure of 8.
And now on to the talented Rob. Hope you enjoy this video as much as I did:
“Hi Al,
Running videos and how to videos are great, but to really see the work that has gone into a layout, one needs to get up close. That is exactly what I’ve done in this my latest video. Figures really can put life into a layout and I love them.
I spent almost two years building Farland II. I started in mid March and this is where I am today. Two major features of the layout are yet to be finished, but I am currently working on one and the other will follow. They are a castle ruin and a smallish freighter at the quay unloading or loading. By summer I will be almost done.
Thank you so much for all you do. The modeling communities of the world are very grateful.
Rob McCrain – Farland Howe”
A huge thanks to Rob – he has a train room I would give my right arm for. Fantastic stuff – and a what a video too. A real treat.
And thanks to Gib to for adding to the N scale figure 8 track plans on the blog.
Lastly, don’t forget the silly sale has returned for a few days only.
You get the Beginner’s Guide and 38 printable buildings for just $9. It really is a silly deal.
Of course, I’m biased, but there’s some fab new buildings too.
Here’s the rusty engine house:
That’s all for today folks.
Please do keep ’em coming.
And if today is the day you get started on your layout, the Beginner’s Guide is here at a very, very silly price for the next day or so.
Best
Al
PPS More N scale layouts here if that’s your thing.

Brilliant detail. Excellent work! I love it! It seems that, like me, you really enjoy creating scenes and atmosphere. My chief enjoyment in model railways is in the construction of the layout and the scope for creativity in doing so.
Gib and Rob Fantastic detailing, I am always in awe of the artisanry and the craftsmanship of the model railroaders, thanks for sharing. Gib, you might want to try a manila folder for thinner cardboard and if it’s too thin you may want to double it up. Thanks again. Cheers! NJ Mark
Well done Rob, amazing work.
There were numerous visual elements that seem to be drawing reference from the UK’s beautiful South Devon coastal line at Dawlish & Dawlish Warren. The red rock faces might possibly be the strongest clue but so many others too ? Reminded me of my schooldays & youth there. Thank you.
I was particularly impressed by your unbelievable accuracy & attention to detail with the tidal marks at the harbour. Even in extreme close up I could not discern from the real thing ! Bravo.
Rob, your layout is extraordinary. Thank you so much for sharing.I have learned so much from watching your posts and videos. If I ever get good enough I’ll put my layout on Al’s site. Thanks again Paul—-Brookfield,Ohio USA
Fantastic layout Rob. Betcha you’ve heard that more than a few times! The figures really do bring it to life & each scene has an interesting story of it’s own. Lots of great ideas for future layouts & rebuilds. Jim from CB.
I have a suggestion for thinner but sturdy material for your N gauge buildings. How about manila folders? They are thin but stand on their own. I have printed some building pieces, glued them to cut-up folders, and they stand just fine. You could cut them to print directly on them if you don’t mind the color. Or maybe there are white ones available these days. Thanks for your pics!
Great work Gib! Your attention to detail is marvelous. You have a really nice layout with the space that is available. Jim from CB.
100 lb cardstock works for prrint-out buildings
Absolutely amazing!! Thank you for sharing!
wow! looks like a lot of hard work.but again wow….i hope my city comes out at least half as good.great job.love the detail…
Gib,
I use card stock that you find in the dollar stores, school supply sections (not free but cheap). I also print on 8 1/2 x 11 mailing label paper, so all I have to do is peel and stick.
Great job on the layout. A small layout can get away with steeper grades because your trains are short. So as long as they pull the grade it is fine.
Russ
Gib, Great job on your layout. It really looks good. You did a super job on the red barn. Keep up the good work.
Rob, I loved your video and you have done a wonderful job on your layout as usual.
this is the best site ever for all gauges
Gib
Very nice. Try directly printing on cardstock that comes in various weights.
Rob
Many thanks for your time & effort. Your layout is up there with the best of the best. Your attention to detail reminds me of a cartoon where the customer asks the store clerk-” I’d like to start a Hobby with perhaps electric trains.” response” Trains are not a Hobby- They are a way of life.” Yours is a way of life.
Big Al
Awesome. Thanks
Well executed, the trains seem secondary to the industries. Could those be put into actual operation mode, same difference as train running session with A>B? Limitless possibilities here, it’s a gold mine as is or coal? ⚒️ All the tunnels going through Sierra Madres, priceless.
Rich
i have always like layouts that have goo noumtain scenery. i like the access holes as well.
Great layout Gib and awesome video Rob on your layout
I found some card stock at the stationary store that is about half as thick as cereal box card board. It is intended for use as covers for books that are spiral bound. Comes in lots of colors, if that helps
Al
Enjoy the great tips for your printable buildings. My first is train station from your Fall print buildings deal., For my O gauge, I used 180% enlargement and plotted a couple sheets at Office Depot. Next time, maybe 175%. Due to the larger scale, I needed stiffer structure so used recycled USPS box for backing and foam core for bracing and dividers. Had some fun and added gutters, double doors for baggage room, textured windows, interior partitions, LED lighting, outside train schedules, and the ticket clerk at his station in the bow window.
As all your readers know, this stuff is addictive! Your linked step by step videos help flatten the learning curve.
jim in SC
very nice work.
Gibb: I’ve found the best material is Pabst Blue Ribbon beer cartons. With 30 cans of beer inside it makes a great excuse for buying it.. besides that if someone asks what you’re doing—you just tell them you’re working on your trains!!
In addition by the time you finish the contents you won’t care how thick it is. LOL
Terry/Idaho USA
Looks nice, I seen that layout plan in pentress! Is that where you seen it?
Another not overdone layout which shows so well.
Nice layout, Gib. Simple yet very well laid out creating realistic scenes with real life spacing. The detailing is amazing as well.
Rob’s work is really amazing. People figures truly add a sense of realism and tell a story about what’s happening. Those rolling hills of farmland remind me PBS’ All Creatures Great And Small. Thanks for sharing.
Jim AZ
The videos are nice to watch and the layout is great and all the little details make it so fine.
Scenery looks great, including the barn.
No visual problem with the slopes from the perspectives of your photos.
Where are the trains?
sweet
Gib, beautiful work on your N-scale layout! I especially like how your roads are wide enough and don’t all run parallel to the layout edges. It adds more interest to the layout scenes which you’ve detailed quite well. The only thing I found out of place or distracting was the blue parking area / sidewalk in front of the two-story brick building with the cannon and flagpole in front of it. I think just leaving that area to match your dirt roads would look more natural.
Rob, you layout and videos are always a delight to watch. Thanks for the nice tour of your fabulous layout.