Terry’s been in touch – he’s been kept awake at night by a model train reverse loop nightmare:
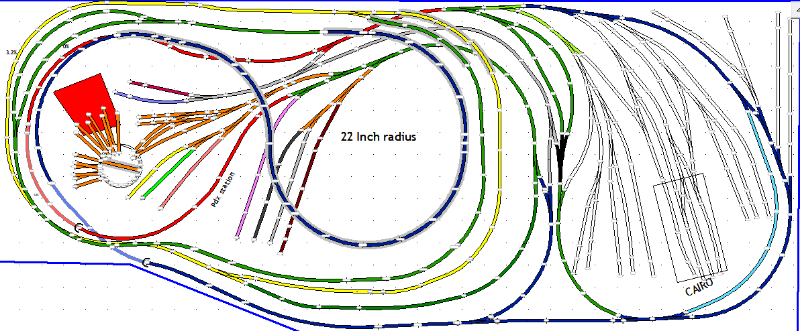
“Alistair: I’m hoping that someone in the group with a little time can take a look at my track plan and tell me if and where a return loop exist.
The colored tracks are all ready built and work fine and don’t make a return loop, it’s the yard tracks in outline form on the right side of the picture that I’m concerned about.
At first glance it might look like a return loop in places but if I’m right and you follow the tracks throughout the layout I think I’m ok.
Appreciate previous help from your members and hope they can point out my mistakes.
Terry”
And how about this for an answer:
“It looks like you have used some kind of software to create your layout, so I would suggest making a copy of the layout with all of the sidings and run-arounds removed so you only have to consider “main line” track and turnouts as you look for potential reversing loops.
I think your layout can be configured to give you a big continuous loop with no reversing loop, a second configuration with one reversing loop that would reverse a train the first time through the loop, but then revert to a continuous loop with no reversing loops for subsequent trips, and a third configuration with two facing reversing loops.
I see four critical turnouts to create these three configurations.
The first critical turnout is the green turnout at the top-center of the layout, connected to the top red segment of track. Call it T1.
The next critical turnout (T2) is the blue turnout on the bottom right of the layout. It faces “west” (left) and either goes straight as a blue segment, or turns north to connect to a green track segment.
The third critical turnout (T3) is the blue turnout at the bottom of the page and facing T2.
Finally, T4 is the green turnout facing south and above T3 and to the right of the yellow segment.
For a configuration with no reversing loops, start on the top red track segment, heading east into T1 and continuing straight through it, around the east side of the layout on the blue segment, straight through T2 and T3, around the blue 22R loop, into and around the green segment, through the top yellow turnout, which is not relevant, around the yellow segment and straight through the lower yellow turnout (noting that taking the turn on the lower yellow turnout will just carry you back around the yellow loop) and into the next green segment, then north through T4, continuing around to the red loop, and returning to the starting point, headed in the same direction.
For one reversing loop, T1 starts set to straight through, T2 set for the turnout to the northbound green leg and back into T1 in the opposite direction.
T3 and T4 are both set to straight through. Starting at the same point, eastbound on the top red segment and into T1, the blue segment takes us around the east side of the layout, but T2 turns us north and back through T1 going in the opposite direction.
Continuing, the red loop leads to the green segment and south, straight through T4 into the yellow loop, the next green loop, the blue loop and onto the bottom blue segment, eastbound straight through T3.
After going eastbound through T3, T2 and T1 must be set back to straight through to carry us back into the red segment, headed west. Once the loop is completed the first time, the reversing loop goes away, none of the turnouts need to be changed again, and the configuration becomes a continuous loop going in the opposite direction of the first configuration.
For two reversing loops, T2 and T3 must be set to their respective turnout positions, and T1 and T2 will be switched back and forth in the course of the loops.
So, from the red segment, east (straight) through T1, around the east side, then turning north through T2, switching T1 to go back into the red segment westbound, around the red loop, then the green segment that leads into T4.
After passing through one side if T4, a train will always return through the other side of T4 going in the opposite direction (provided T3 remains set to the turn direction).
If a train goes straight through T4 going straight, it will return to T4 on the turnout leg going north, and if the train goes through the turnout leg of T4 going south, it will return to the straight leg of T4 headed north.
So, continuing straight south through T4, leads to the next green segment, then the yellow loop, then the next green segment and loop, around to the blue loop, then turning north through T3 and back into T4 headed in the opposite direction.
If you leave your design like it is, I think you will be faced with some tricky wiring problems at those four switches.
Jim”
Now on to Patrick with a bit of light relief if your is spinning at the thought of a model train reverse loop:
Short on space – Do what Patrick has done – another clever way around the thorny issue of space:
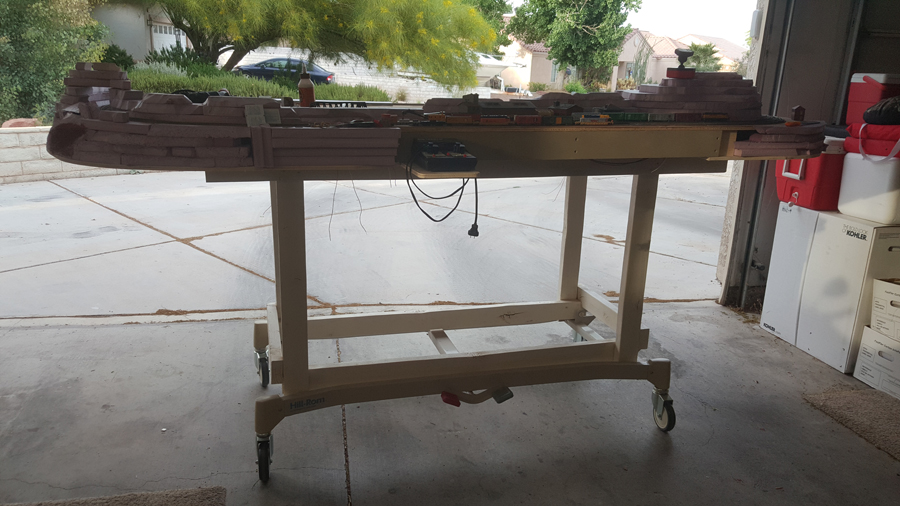
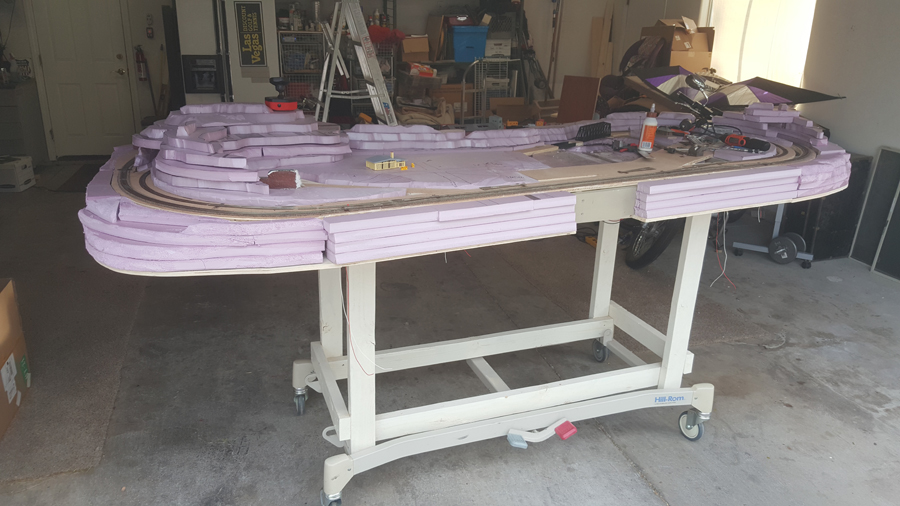
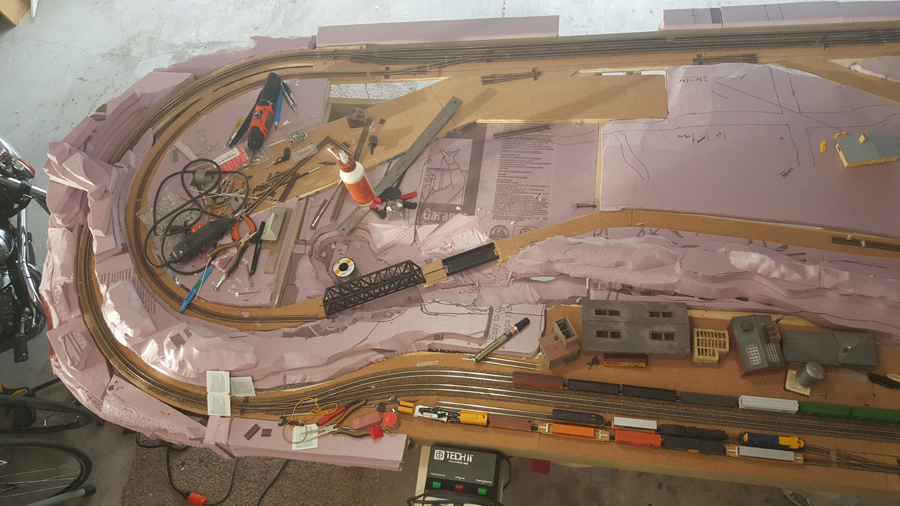
“Here is what I have done as a result of lack of space.
I built up a hospital bed frame to support my set in my garage.
I can move and level as I like.
9′ x 4′ Working on a southwestern US layout.
Patrick”

That’s all for today folks.
Please do keep ’em coming.
And if all this fun over a model train reverse loop has made you want to roll your sleeves up, the Beginner’s Guide is here.
Best
Al
PS Latest ebay cheat sheet is here.
PPS More HO scale train layouts here if that’s your thing.
Need buildings for your layout? Have a look at the Silly Discount bundle.

The first two points that track into the yard and rejoins the main loop around the yard and connects back at the same point later on, Green and light green sections. If all the points are set in a certain manner to by pass the yard, then a return loop is formed.
I think there is a return loop as the outer rail become the inner rail when you examine the junctions at the top/middle of the track layout (the bits in red and yellow that start/end the main blue outer loop and its continuation north again).
Terry, return loop on coloured tracks right hand side, start end of red section heading right, through green points onto blue section then on to green, straight through dark coloured set of points, back onto green, then through points connecting up again with red section you will now be heading left, bit involved but it is there.
(There will also be a return loop inside yard area, the end of light green siding in yard area will connect into loop already described via 4 sets of points and proposed yard extension)
Points=switches
Hi All & Terry,
I am afraid that the new track that Terry has planned wil cause problems.
If you look at the track that is at the bottom of the picture, you see 2 branches curving upwards toward each other.
At this moment, the are not yet connected. But soon as the branches get connected with the new track, there will be a problem.
You can see this as follows:
Imagine the train coming from the legt on the track at the bottom of the picture and in the middle tacing the left curve upwards. Then it drives backwards using the richt track towards the track at the bottom of the track. And now you see that the direction of the train changed. This is a signal that you have creates a power shortcut problem.
Kind regards,
Ruud
Hi my recommendation is to purchase a copy of anyrail software and put your track plan in it there is an option to highlight reverse loops and it will show them up for you. On my own layout I needed to take out just one connecting line and all was ok again.
The other place you will have one is on your turntable if you want to power each leg off the table so you can move the loco and have sound running then you will need to put a reverse loop unit in on the bridge track section to avoid short circuits each time a the rails pass round. I use lens L200 module it works great.
Roger
Terry,
I dont see any return loop issues in your track plan. Looks good to go. Reversing loops can be a problem
Thank You for the ride on your railroad. What a good time my wife had.
Keep it going. Will there be more extensions coming with the layout?
Lets get headed men.
Patrick , Great Idea ! makes it easier on your back , not having to bend over so far
and if little kids want to see it to be able to lower it down to their eye level .
Steve
I love model trains a lot. I like both freight and passenger trains. I would love to have a train layout with both a freight and passenger train with a spur. I saw a few plans in an Atlas book. I like the Twice Around in 4 x 6 feet. It’s got one spur. Now that’s a layout worth running. I personally think that a layout like that is bound to attract people from miles around. After all, when it comes to layouts like that, I just can’t resist running them.
Chris
How did you cut the pink foam board? I tried a HOT old knife. Did NOT work well.
Great start! Impressive!
Personally I have a dog bone layout that is five foot circles a t each end in HO scale and is as long as the width of my house which is twenty six feet. The track hugs the wall and the couch sits in the space between which also faces the fireplace and the television. The room is only thirteen feet wide so when you put in my exercise equipment because I am so darned old it is very cramped. I live in Canada which is about five thousand miles wide and two thousand miles from north to south. I also have a pike along a wall in an area where my computer is and I have no space for a proper workbench. My question is – why is this?
I need help. I want to make a realistic road crossing. I saw a train layout at a hobby shop that sells trains, and I thought that the layout knocked me off my feet. I
want to use Atlas True Track for my layout. I love the track with the roadbed already molded in. How do I go about making my road crossings realistic? And what about wiring traffic lights and lamp posts?
Chris
DAVE–you mention it got hot in the loft during warm weather. With wood having a tendency to swell & contract, do you have any running problems during the summer?
ALSO–thanks to everyone who commented on my reverse loop problems. I will try some of the suggested fixes and let you know.
Terry
If you have problems with heat up in your loft look into the self evaporating air conditioners I have one in my cyber space /radio station room its 8x 10 US its foot print is 20 x 15 inches and about 40 inches tall all it needs is a 4 inch outlet for the hot condenser air and it evaporates the water from the evaporator coil no drain needed and it keeps the room very cool my house is underground but with 3 servers running along with a transmitter it can get quite warm in here They are available in 220 volt UK too seen them in AU a lot when I visit there Dave in Indiana US
I don’t remember seeing a reverse loop feature in AnyRail, but when Roger mentioned it I looked again. AnyRail prompted me to get an updated version, and the feature is in the updated version (6.14.4) under the “Show” menu. When you click “reverse loops” ONE of your reverse loops will be highlighted in a different color. If you disconnect those tracks and click “reverse loops” again you may then be shown another loop, and so forth until all are removed. The color highlighting may not be very obvious depending on what colors are already used on your diagram.
AnyRail’s online help site doesn’t show this new feature yet.
Thanks Dave for continuing to show us your amazing layout. I think there must be more hours in the day in your part of the world! Interesting to compare the three cameras – helpful for anyone who is considering splashing out on one. Your previous film shot on the NYMR was very well done – nice to see such steady hand held camera work, and good to see very useful line side details. Keep them coming. DustyK UK
I’m looking for a manuel for a Troller Autopluse Twin Momentum 5.
Any help would be greatly appricated
Thanks
Since it looks like a train yard why not make it on complete with roundhouse. Then you will not need a loop
Dave, the degree of authentic realism illustrated on your layout is exemplary, your track aging treatment is the best by far – EVER. I love visiting your layout and seeing what you are up to, clearly it gives you huge satisfaction, and so it should. Thanks for sharing it with us. In the hall of railway modelers fame your name should be writ large!
Regards
Peter in Australia
You have to be patient to build a layout on a hospital bed…….
There somebody had to say it!
I can hear the groans from here.
Mal
Hi Terry,
As stated by several before me YES you have at least 2 reversing loops on the right hand side.
Before going any further familiarise yourself with what a reversing loop is.
In essence it is where a track closes itself in the shape of a drop. Instead of going a neat circle you reverse and you get track A to connect to track B and thereby creating a short circuit. To resolve this you need special electronics and must then keep in mind that your longest train is what fits inside the reversing loop section.
The way your trackplan now is you will have pretty short trains to fit in the reversing loops.
Feel free to send me your schematic at jan.boen(at)sbv54.net and I will gladly help you out.
Hi Dave, I am always amazed by what you accomplish in such a short time! Don’t know how you do such quality work in that time. Keep it up. Maybe you could give us all a few hints on how you find, or make, the time. Oh, by the way, we have found it very beneficial to run a medium sized roof fan in the summer. It keeps the humidity down as well as the heat in our attic space. It runs on a thermostat set at 80 degrees F. Doesn’t cost but pennies to run, and keeps the space bearable. If we know we are going to be up there during the day, we shift it to manual and HI and run it the night before to super cool the area. Works well. Lee
Thank you for your comments re humidity in the loft , I have not had this problem before , think it was some cheap plyboard I used and to be honest short of a few more supports , have been told about the moisture resistant MDF board , so think that will be my. favoured timber to use , been a bit warmer of late , so doing a fair bit outdoors , this job is something to tackle on a west day ?/…Dangerous Dave
I found my Operating Instructions and accompanying literature for my AutoPulse Twin Momentum 5. Help connect me with the one who is looking for them. Thank you.
I am building an HO layout. with led lights. What kind of transformer do I need>
Terry,
My opinion: You are attempting to jam way too much track into your layout! Unless you plan to contact Guinness to see if you’ve set a world record for track per square foot I would suggest
you back off. More is not always better!
Hi You do have a returned loop on your your right hand side of your layout. If you go to the bottom two points you have track going to first a R/Hand and then a three way point, these go to a single point then on to the main line this is causing the loop if you leave any of these points open.
Terry, I agree with Pete on the return loops on the right side of your layout. I see a return loop from the main line as Pete explains and I see a return loop in the yard also as pete explains. So I agree, You are ok. Rocco from New Jersey (Haskell).
what a fantastic layout, so intricate in design, must have taken thousands of hours and dollars to build.
The bridges are beautiful. Well done. Layout is very interesting, love the detail.
Make a true Turn around Y , At nearest green to purple buy moving switch switch down or nearer outside of layout, then move cross over purple to dark green up in place of remove Y switch Should in prove flow. On a new drawing remover all track not needed to make routes easier to see. I have looked at your truck plan before and have seen lots to like.
To Mal: That’s just sick. lol
Terry, I agree with Pete, Ruud and several others there is a return loop in the train yard. You don’t need software to see it.
Patrick, that is a great idea you have for the roll around frame. Also, a great layout in the making. Thanks for sharing.
Joe Genarri, you need a constant heat source, and a good one. Although styrofoam is easily melted, it takes a considerable amount of energy. You can get soldering iron tips as long as two inches designed for cutting foam, but note that they don’t cut quickly after the first contact because of the energy involved. Cutting big areas is faster with a serrated blade like a bread knife, though that is messier (but smells better!)
I use a Portasol butane soldering iron (about $50 for a nice set). The set came with a wedge blade about 3/4″ long that works pretty well, greater depths in multiple passes. I’ve also purchased the plug-in heated wire cutters, but they are too clumsy to use for me between the cord and the limitations of the wire loop. The wire also has less stored energy so starts cooling immediately on contact vs. larger metal blades.
This 12 x 24 Layout is wonderfully detailed EXCEPT
for the background painted mountains which makes
the layout incomplete. What a shame. One of the best
detailed layout hat I have seen outside of that.
Patrick, Great idea to use the hospital bed frame. I didn’t see that the lifting mechanism was part of the setup — it looks like you built a 2×3 wood frame atop the hospital bed rolling base if I understand your photos correctly. Still, a better solution than the 4 foot 2×2’s on casters that I used on my Christmas layout to get it into the garage. Now I’ve got it too high to work on the top of the layout but wiring the underside should be a breeze. 🙂
Terry, if you proceed to add track as shown on the plan you will create a reverse loop on the right third of the layout as well as a reversing wye at the bottom right of center of the plan. I agree with others that you’re trying to cram too much track into the plan. Sometimes less is more.
Dominic, What a wonderful layout you have created in just 4-1/2 years. The scratch-built trestles are great! I especially like your extreme attention to detail in creating so many interesting scenic vignettes that tell a story about the layout. The trains could run a little slower to be more prototypical, but other than that, I loved your video. Thank you for sharing it with us.
Terry, I check out my layout for potential wiring problems by taking a red pencil, choose one rail of a track and follow around throughout the entire layout. When you come to a point where the red pencil is on the opposite rail, that is where you have found where the reverse loop problem is. If you do the entire layout and the red pencil meets on the same rail everywhere, you are good to go. It is time consuming, but pretty much foolproof.
Terry, your layout looks awesome the way it is.
Patrick, what a awesome idea, looks great.
ow some layout. with small space comes big trains.
Go Dead Rail Terry
The green track at the bottom by the yard and the blue track to the left form a wye where they connect at the gray track switch. I didn’t look for any more…too much track!