Tom’s been having fun with some OO scale model trains – but now he wants to build more than the ‘knock up’ layout he’s shared:
“Hi Alistair,
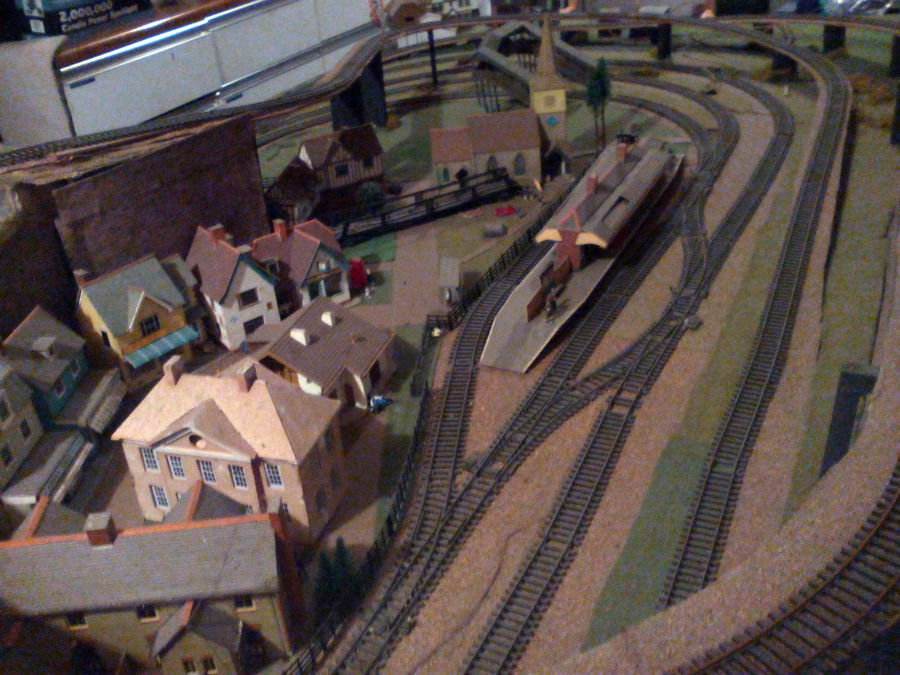
I have been a sailor most of my adult life, but now, at 77 with failing health, I have to find a new hobby.
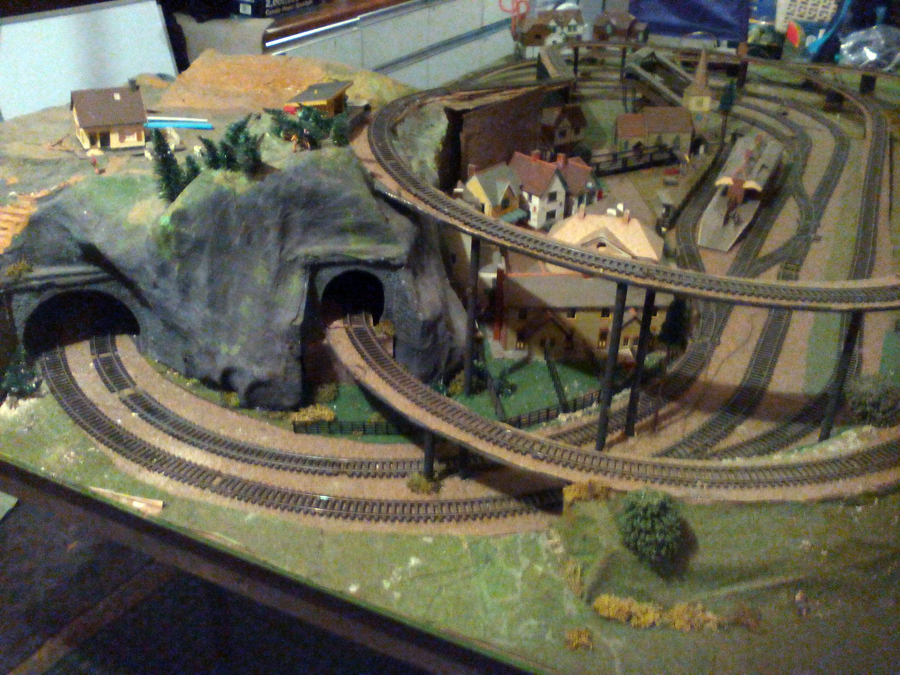
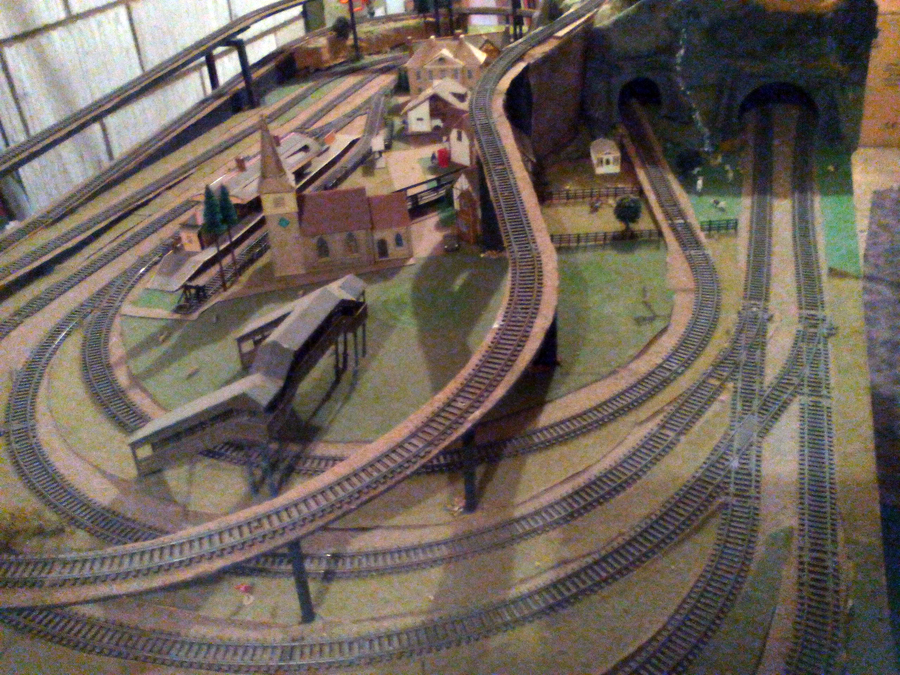
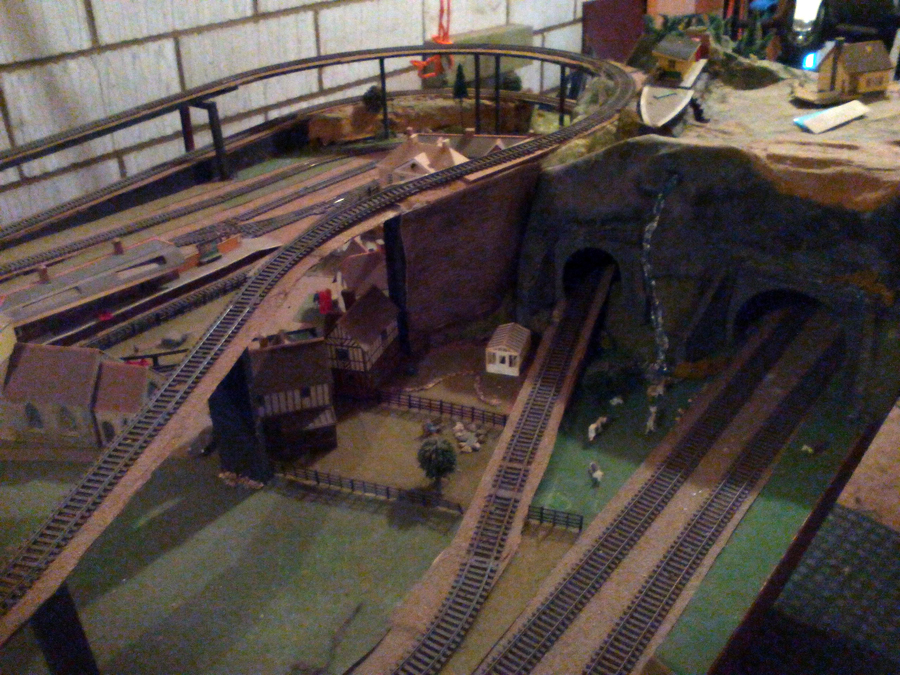
Some 35 years ago I built my first model railway on an 8×4 plywood base.
It was a double O, essentially 2 ovals with extensions on 3 levels, but getting to the top Alpine village never seemed to work well.
Now I plan to start as a beginner, and for the last 3 months have converted our old concrete Marley garage.
The walls are now lined and insulated, we have a new flat and insulated roof with 2 skylights in place of the old leaking asbestos corrugated roof, and a new double glazed UPVC door.
The size is now only 14×7 feet.
Now my question is this.
Where can I find a 3 level 00 plan that would fit my space, or could be modified to fit into the space?
If such a thing is not available, then can you give any advice to an old boy on how to go about designing one?
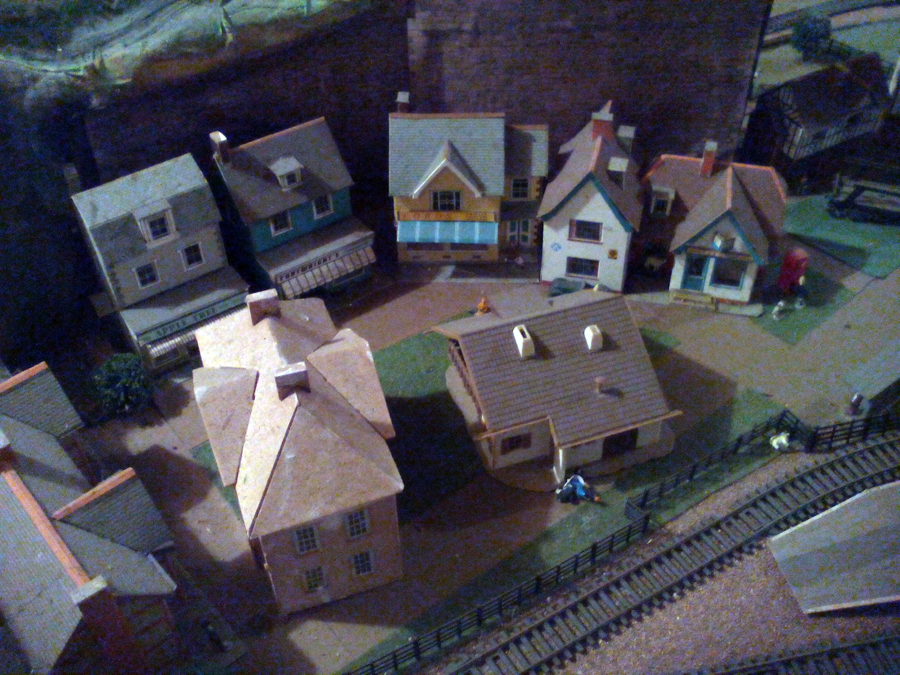
For your interest, I have attached pictures of my first pathetic effort. They are 35 or so years old.
I want to start again as a beginner.
35 years ago I was a young man full of energy and vigour, with skills learned from my father but skills that haven’t been used in decades.
So I’m looking for help in designing a new layout, using correct geometry, rather than the “knock up” I made for my son then.
Over time, I have learned that we forget most of what we once may have known, especially if we don’t use those skills, be it speaking another language, sharpening a wood saw or OO scale model trains!
Warmest regards,
Tom”

Now on to another Tom:
“I found a great way to keep the truck screws from comming loose.
Take a toothpick and put a very small dab of rubber cement on the threads of the bolster…making sure not to get any on the face of the bolster where the truck makes contact.
Tighten the screw appropriately. The screw will not come loose…but yet stays soft anought the the schre can be removed without any problems.
Rob”
“When coloring plaster rock or retaining wall castings with diute washes of acrylic paint, you can sprinkle on fine ground foam (greens and yellows) to simulate growth of lichens, moss or tiny plants. No additional adhesive is needed. Works well with OO scale model trains.
Thanks,
Dan”
“I use extra stick craft glue-the stuff in the brown containers.
Just spread it down, use a putty knife to make an even cover on the roadbed.
Place track on top, anchor with a few track nails that can be pulled once the glue has dried.
Al N.”
“I do a lot of kit bashing and detailing, I especially enjoy taking an Athearn blue box car or locomotive (or something similar) and making it into a quality model.
This is not an earthshaking revelation, but I find 91% alcohol usually works well for stripping most paint. Just soak the body shell, scrub with a tooth brush and then scrub with soap and water.
Sometimes I have let it soak for several days, but it usually works. The alcohol can be bought at CVS or Walgreens at a reasonable price.
Jack”
That’s all this time folks. I do love all your tips – and let’s not forget that’s how the site started so please do keep ’em coming.
In fact, I thought it would be fun to publish one of the first ever posts from all those years ago. So here you are:
Eric shows us how to weather your trains.
A big thanks to Tom for sharing his oo scale model trains, and to the others too.
And don’t forget the Beginner’s Guide. Not only is it a great read, all the Hall of Fame members have helped out with it too, so it’s full of good stuff.
Best
Al
PS Latest ebay cheat sheet is here.

Tom, Model Railroader Magazine has 100’s of plans online that likely could be adapted to your situation.
The gradients in the pictures look rather steep though I might not be correct about that. Space can be saved and levels multiplied (gaining space) by using spirals (for spiral read helix). They can be “inside mountains” by landscaping whatever you use to cover the track area or they can be “outside mountains” giving the reality of climbing the terrain if you please.
I welcome others’ comments on this because I haven’t done it yet but I have been thinking it through for some time, pending the gaining of a Parliamentary bill to build the proposed railway.
Tom, where are you? Any idea what country or era you’d like to model?
Are you mainly interested in running trains, fine detail scenery, or what?
Best of luck .. One quick hint.. make your layout all the way around your garage walls, control area in the middle with an opening bridge across the doorway to avoid stooping underneath; assuming you’ll stay at 00, it’s not nearly as tricky as some might think!
Best again, John
Tom you would do well trying Model Railroader as per one reply the track plans are HO the track is the same as 00. If you are running English steam Engines you will have to keep the incline/decline to 3% if you want more than three coaches or six trucks if you run diesels then 4% incline is (4″ rise over 8’foot) no problem if you can do 4″ over 10’6″ all good Hope this is some use to you Regards Brian F. PS get those trains rolling.
Tom – Just remember that when you go to get started what you may have forgotten will come back to you , little by little. Why don’t you try putting in a helix and then your trains can go up to different levels more gradual. Do worry everything will work out. Remember Model Railroading is Fun. Don’t worry what people say if it’s not finished – layout is never finished just more fun to do more and to change things around. Darrel
That first effort does not look bad at all !! I am sure the new one will look great !!
Give DCC control a try, not only does it reduce the amount of wiring required on a more extensive layout, but it means you can have your steep bank up to the Alps and do as a rear railway might – get trains up the hill by adding a banking engine on the rear. Most modern models are available in digital-ready versions so you can add a DCC chip easily. My own layout is plain old dc but I’d probably go digital if starting afresh.
Rod
Damn you autocorrect, that should say a real railway.
Rod
To Jack –
Ever think of going to the local liquor store instead od CSV and getting some nasty 180 proof hooch?
If you try this method and finish it all, who cares if the paint came off or not? 🙂
Barry
Chesterfield, Missouri USA
The best thing I’ve found for stripping off old paint is brake fluid. Works much better than 91% alcohol and washes off with water. I won’t damage the plastic, not even clear plastic unless maybe you forget and leave it in there for a month or so and even then you may be alright.
I’ve also found toothbrushes are way too soft, get a small nylon brush in the tool or paint department. The bristles are much stiffer and do a much better job. They usually come in a 3 pack with a stainless steel brush and a brass brush. Don’t use them, they will scratch the plastic.
For designing track layouts, there are a number of track planning software applications that are cheap relative to trial and error. I use AnyRail (currently at version 6) and it has a trial version that will let you get started.
The two biggest challenges in your scale (any scale, actually, just worse in yours) are curve radius and grade. O gauge is forgiving in both, but realism suffers. A design program lets you both fix a minimum radius to keep you honest and to monitor the grade on your design and experiment with alternatives.
I use flextrack so can freelance, but the other advantage is track libraries if you are using sectional track. When your design is complete, it provides you with the items you need in your track of choice to build that design.
Your base layout actually looks pretty good, but appears to have dramatically greater grades than prototype of about 2 percent maximum. I’d recommend this approach over trying to find something off the shelf. But you can combine this approach with off the shelf designs by, for example, scaling a design from another scale.
Best of luck!
maybe a good idea would be to do as I have
I have 5 tracks of oo gauge on a 8 x 5 board and a fair ground in the centre
On a higher level over the top I have a 2 track n gauge as a fairground scenic railway
Good luck I am in fact a year older than you and I only started last year
Regards
Mitch
like the design, my thoughts keep it simple and easy to get to every part of your track and very long risers if really required. I am a lot younger than you my layout is flat .
Nice job, I hope mine will look as good.
Mitch’s comment about a fair in the middle of the layout reminded me of one layout I saw. The main layout was in HO, but in the middle was an amusement park. It had an N scale train running through the amusement park. It had a couple of passenger cars, the roofs and interiors were removed, and some boards were laid across the cars with HO people seated in/on the boards. The steam engine had the cab roof removed, and an HO engineer had his head sticking out of the cab. It represented a half-scale railroad which we have seen in zoos and other places.
Keep on training,
Carl in Kansas
Tom, I restarted model railroading after many years and what I don’t remember is slowly coming back to me. Make mistakes and learn from them and most of all….have fun. It’s your world and you are in charge! Cheers! NJ Mark
Tom, if you haven’t seen it before, Woodland Scenics make a superb range of polystyrene foam gradients that take all the guesswork out of building and planning hills etc. Check out their You tube pages where there is an hour long video on using their system. I’ve used it on my own O scale narrow gauge layout. It really is so easy.
Cheers
Martin
I have used the computer software from “anyrail” and found it excellent. It includes all major track components that you can just click on and place. It is fairly easy to use and can print out to any scale including full size that lets you put your track directly over the print out for accuracy. All for the cost of one rail coach.
Well, you had a great dad helping you make the layout. keep it the same and just double head the engines Im 74 got to give you credit, if you don’t do you don’t get and if you don’t get why in the heck are we here Your old layout looks great cheers THEODORE
tom a tree level on the size you are planning is aggressive at best. try to keep the grades at 4% or less. a bi level or a helix would probably suit your needs. there are many examples of a helix around hyper space. i am not sure how you are planning the layout i can’t go around the walls. i need a walkway so i cam only do a smi circle that makes a big difference on the track plan .
Well detailed layout. Like the tunnels and different levels of track overpasses as well as the various lanes. That small town is very quaint and inviting. Sort of a bit like “The Village” from Patrick McGoohan’s tv spy series.
When planning a layout, ask yourself – do you want to have a couple of loops and just watch the trains go around, or do you want to have a few industrial sidings? Are you more interested in running the trains or building buildings and scenery? Do you want to have a specific era, such as the transition era where you can run both steam and diesel?
Still in training,
Carl in Kansas
I like it, has everything. Perfect for a 10 yo and then some. Something remembered for a lifetime. Some whimsical ramps and bridges sure, they actually worked? Would definitely not tear apart, actually almost there- as is.
My modeling is atrocious, glue all over…… Found a light sandblasting will dull, remove glue and age a dwelling a century or so, looks very realistic. For ivy, put the Elmers glue on building as I want it to appear and sprinkle with grass. Looks real, half the cleverness is thinking up new ways. No right or wrong as far as I can see.
Regards, Rich
Hi I guess your in the UK from your old pictures.
Personally I’d forget aggressive climbs. You could keep it flat and build up cuttings.I’m in the process You are in but 3 years down the line and now at the scenery and buildings stage. So it made me laugh to see your 35 year old Superquick shops and pubs. Amazing but they still make them at around £7.50 a pack. Totally unchanged from when you made them last. I know I have the same ones I stored from 30 years ago and they look just like the one I made last night!!
The tip is use glue not Sellotape for the windows I’ve had to redo my old ones as it drys out.
Good luck
Note to Tom re: track layout tools.
https://www.scarm.info/
Works great for planning.
From a former sailor, Best Wishes to Tom! The boat is sold, I move on, and am designing an n-scale dogbone, using Kato track. It will be level, and have a separately wired yard and port area with ferry landing. No grades, and the turnouts are power routing. If it could go wrong, get rid of it. ( Sailor’s philosophy in that.) Along the back of the L-shaped layout will be a single track of HOn3, to run some models I have collected. I used AnyRail to print full-size turnouts, etc. then slide them around until I have the yard configuration I want. You can also xerox turnouts and use the prints as design templates. The base will be cork on homosote on plywood. Fair Winds and Following Seas to all!
Great comments in here. All the best Tom. Enjoy. Hugh
Would like see more.!!!!!!!
Tom
Some good advice given here.
Except for that inner loop location & too steep rise you have any interesting layout there. IMHO keep the slopes to less than 3%, turns as wide as possible, transitions smooth into turns & slopes, then plan like crazy with your given space as you wish to see what’s in your head. Keep access & maintenance a priority.
Above all-have fun! You have NO deadline, take your time, create to your hearts content, then build it with vigor.
The most important thing is track work. That must be quality & perfect because when its not then disappointment comes fast and all of the rest doesnt mean anything. Check out all the videos on the net for track work.
Let us know how you’re doing.
Big Al
2 a days. You da man. You’re making me work harder-LOL. Much thanks
nice layout & love the tall bridge but it needs a rails on the sides to protect the train from falling
make sure your radius”s are smooth in the turns so wheels won”t bind. they will wear better and lee chance of friction in cars binding
To, in reality unless you use a helix and a gradient at an absolute minuimum of 1 in 36 only modern diesels would be capable of running to three levels – steam with a load would struggle with anything less than 1:50. A helix would not leave you much room to develop the layout in the 14′ x 7′ unless you literally are using the whole of the 14′ x 7′ as a single sheet. Good luck young man.
A lot of great comments, I can’t think of any better comments to add. I’m 77 yrs old too and I’m just starting out and I’m going to follow some of the comments also, best of luck !!!
different type of layout, nice.
Following on from Rob’s loose screw problem I have found that a small dab of liquid Loctite works well. It holds screws tight and it is easy to remove the screw if and when the time comes.
Tom, your old layout looks pretty good. I think I would eliminate the third level with all that track on pillars. No real railroad would build something that scary. I made the same mistake with the Christmas railroad layout I started 28 years ago. I went crazy with layout design software and added a third level that made actual construction almost impossible, with tracks supported on top of other tracks like your layout. After studying that layout, I realized I had made it unnecessarily complex. Eliminating the third level made it all much more buildable and didn’t really remove much in the way of operating potential.
Since you have more space in you new garage, I’d try for an around the walls approach. I would not recommend starting with a helix. They add more unnecessary complexity unless you’re doing a real multi-level layout. Take a look at Brian Messenger’s HOn3 layout that is multiple unconnected levels in a room about the same size as yours. It might give you some ideas of what fits in that amount of space. Good luck with whatever you decide to build and please keep us posted with your progress,
Tom. Peco do a track plan book that i find very helpful for adapting and getting ideas from. I prefer it over computer plans as it’s more tactile having a book and I’m old school.
I wish you luck with the new project.
Tom, Hull