Tony’s been in touch with his toothpick bridge design:
“Hi, my name is tony and I thought you might like these pics.
I have been modeling n-scale for 35 years. I saw your tip about using sedum for trees.
This scene is the Bailey Logging Company, it is on the Green River and Meristein Valley Railroad.
I used sedum for almost all of the trees on the hill when I built it three years ago.
If you are iterested the trestle is built from round toothpics cut to scale lengths between 8 and 20 feet then I nic them up with my modeling knife and painted them.
The sedum I use is autumn joy. After it blooms the stems turn woody. They have to be cut back each year in the late fall.
After I cut them I spray them flat clear enamal.
Then I dip in a mix of white glue and water and then toss them in woodland scenics course turf. I use dark and medium green.
I keep a large container mixed up and I just add an entire container of one of the shades when it starts to get low. This causes the collor of the conapy to vary for each tree.
I place the trees on the layout when they are wet this allows some of the foliage to fall around the base and create undergrowth.
After they have dried for a couple of hours I spray them with a heavy coating of the cheapest hairspray I can find. The dollar store has plenty!
I also keep an eye out all summer for sedum.
If you stop by someones house and ask them they typicaly will let you cut for them and hull it away.
Thanks again,
Tony”
Tony’s bridge reminds me of Greg’s trestle bridge (which you can see in the middle of his post).
And Bob has put together a wonderful ‘how to’ on Trestle bridges. I’d love to see a toothpick bridge version.
Next, some more tips:
“Hi Al
I have used many of the tips in your newsletters.
Just thought I would give something back.
I have a top tip for you to create hedging on the 00 railway layout. It’s my idea and not copied from anywhere else.
I did a lot of experimenting and came up with this:
If you take some polystyrene packing about ¾ inch thick and cut it into ¼ inch or less strips, this will form the basis of the hedge.
Using the finest artists brush and some Humbrol paint thinners, or Cellulose thinners, or as a last resort nail varnish remover
Carefully, with not too much thinners, just touch both sides of the upper edges of the styrene at ¼ inch intervals along its length, you will see the top dissolve irregularly.
When it is dry, cover one side of the strip with PVA and sprinkle it with brown grass, do the same on the other side and leave to dry.
Cover the irregular top with PVA, pushing it into the holes with the brush tip and sprinkle two shades of green grass at intervals along its length.
You will now have a hedge at little cost and much more realistic than the bought stuff.
I suppose if you substitute ballast for grass you can achieve a stone wall effect also, using this method.
I use wood working glue to fix it down and on curves I hold it in place with dressmaking pins, until set overnight.
You can disguise the joints in situ using the same method.
Steve”
“I found a great way to keep the truck screws from comming loose. Take a toothpick and put a very small dab of rubber cement on the threads of the bolster…making sure not to get any on the face of the bolster where the truck makes contact. Tighten the screw appropriately. The screw will not come loose…but yet stays soft anought the the schre can be removed without any problems.
Robert”
“Hi Al,
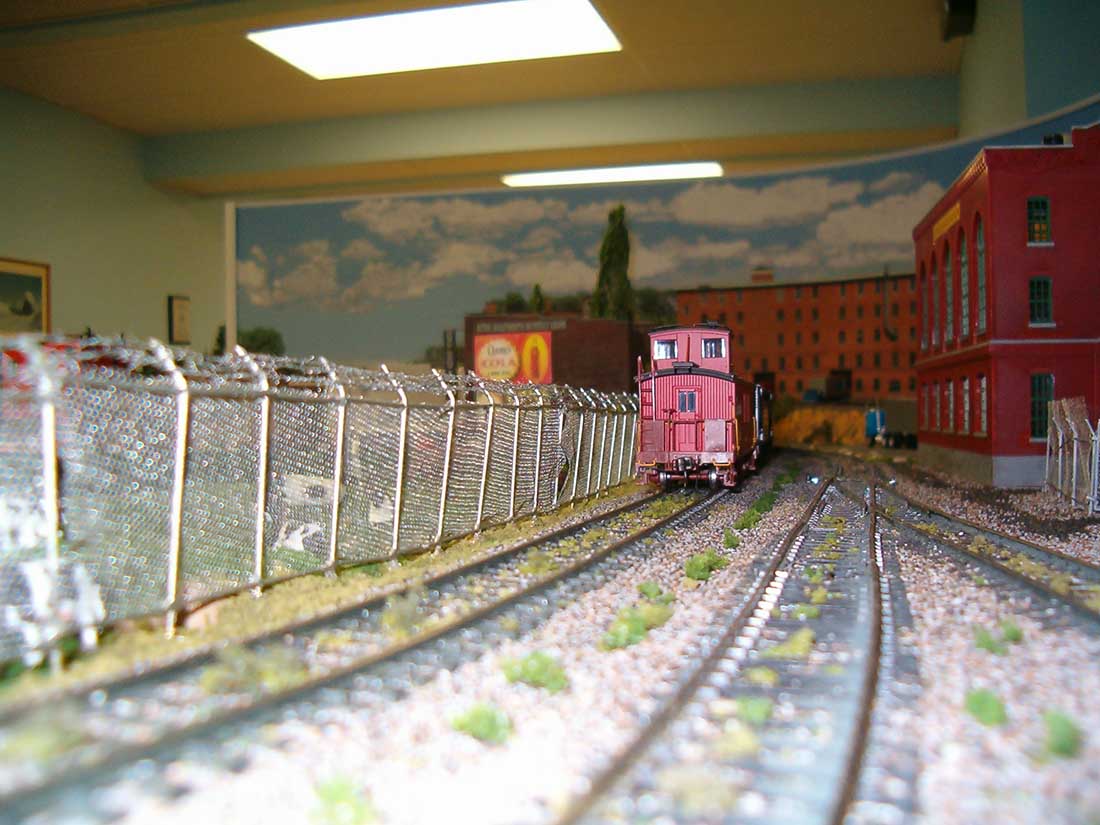
I though that i would share with you how I made my chain link fences. I first draw a template on paper and placed it under a piece of tempered glass. I then cut some .033 mm and .040 mm brass wire. I taped them on the glass using skinny masking tape.
I then solder them and remove the tape. Next I cut some Tull ( also known as bridal veil ), stretch it over the now soldered wired and tape it to the glass. I glue the Tull with Cyanoacrylate to the wire.
If you wish to had some barb wire just cut the posts 3 scale feet longer and glue some sewing tread on the extensions ( again using CY glue).
I spray paint the whole thing using Krylon Paint ( a paint that is good for wood, metal, plastic, etc.)
Michel”
A huge thank you to Tony for sharing his tooth pick bridge design. A wonderful narrative too.
If it’s given you a hankering to start building, don’t forget the Silly Discount bundle on the printable buildings is still available for the moment. It’s just $29.
That’s all for today folks.
Please do keep ’em coming.
And if today is the day you poke boredom in the eye and join in the fun, the Beginner’s Guide is here.
Best
Al
PS Latest ebay cheat sheet is here.
PPS More HO scale train layouts here if that’s your thing.
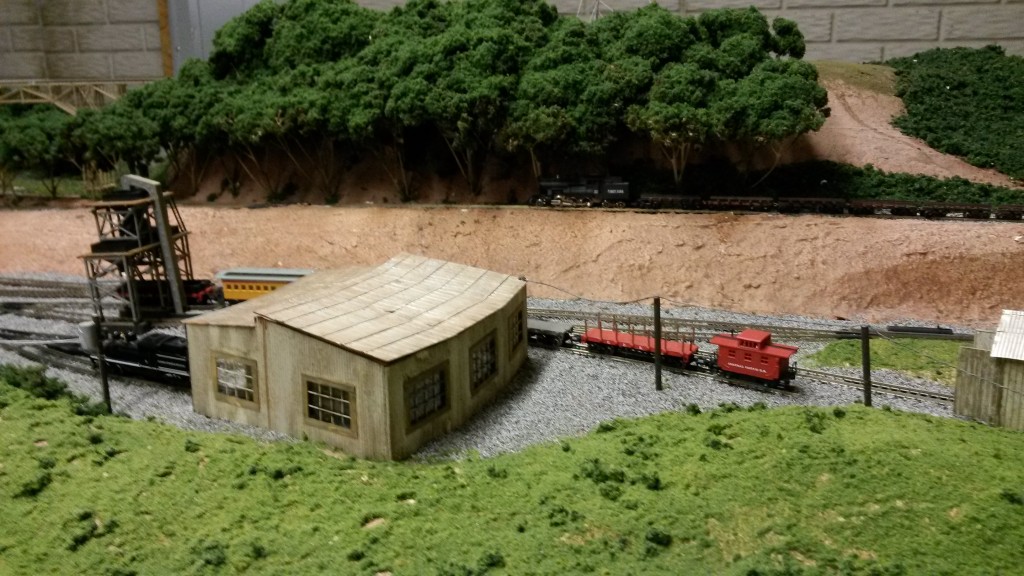
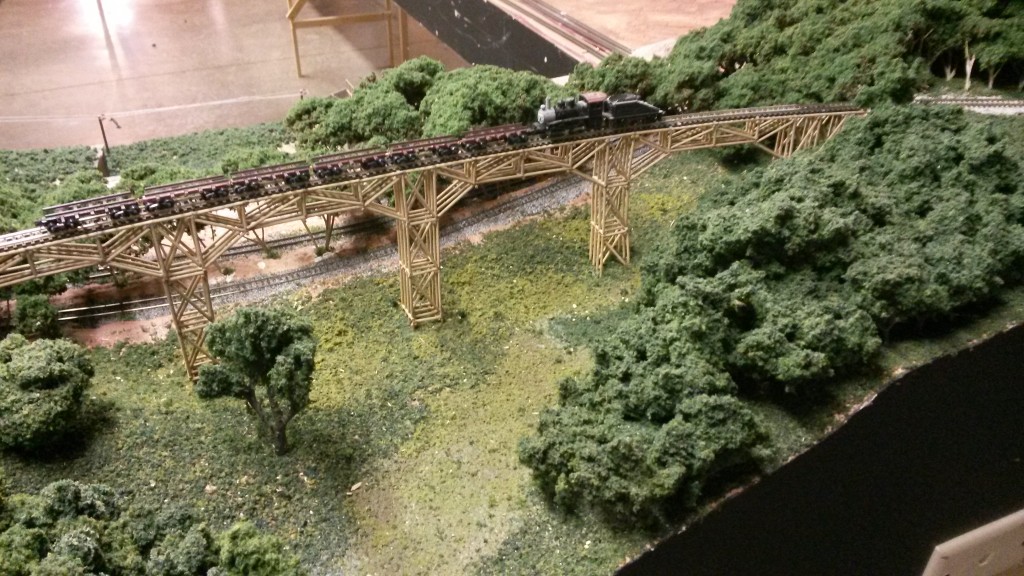

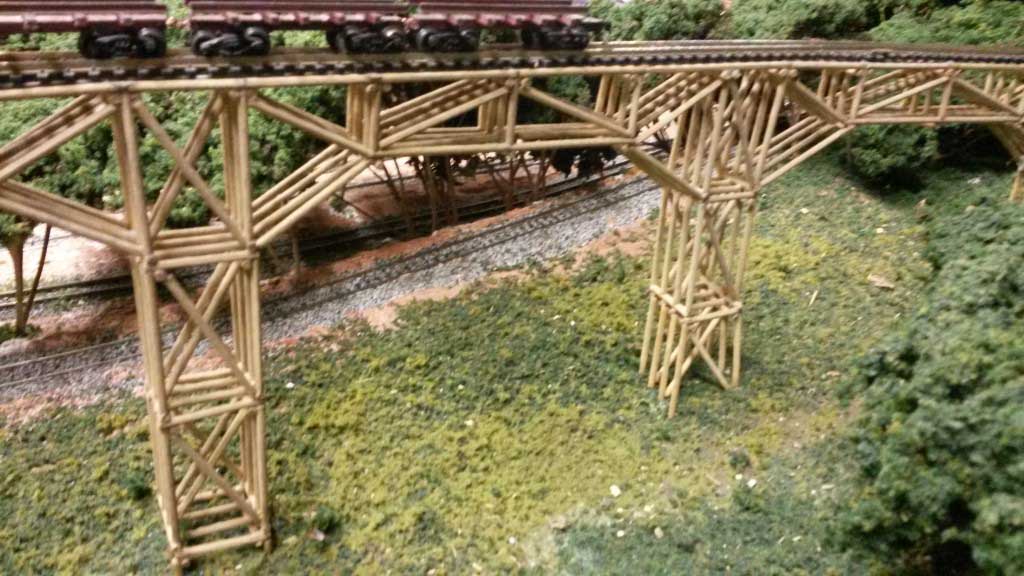
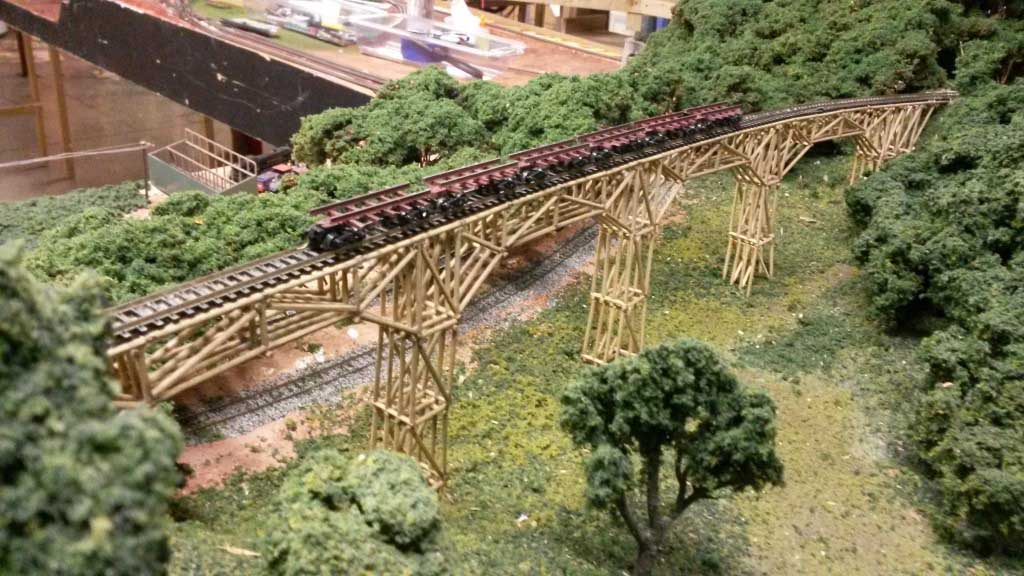



That’s an impressive trestle!
Great bridge I consider myself a patient person but thinking about going from ho to n scares me the parts for ho are small enough for me. any man that can pull something off like that has the patience of a saint.
Always informative as well as entertaining.
I’ve seen the layout in the header you use to advertise. The one with the two square access holes. Where can I get some information on that exact track diagram. Is it done in HO, O, S etc. What are its dimensions. I work at CMC in Cincinnati and we are looking into building an HO layout for Holiday Junction.
Very well designed. I too model in nscale. I make my bridges out of bass wood. You have great patience to work with tooth picks. Great job and keep up the good work.
I just wish for a year that I had the patience to build that bridge.
I have been collecting Popsicle sticks and have a bunch. I now see you can buy them.
Does anyone have a picture of how to use them?
Great work on the bridge, patience is a must. Sedum looks great as well!
interesting toothpick trestle….and the sedum trees are brilliant….which strain of sedum do you use as there are MANY….and do you grow it yourself?…what a novel and economic idea and way to get trees for both N and Ho guage I would suspect..!
Great bridge Tony, can we have more pics closer look please?
good looking bridge
Great work top of the class
The trestle and trees look great but I have two questions.
First: I am surprised toothpicks will carry the load. What is the distance between the trestles?
Second: Like the previous reply, I would like to know what variety of sedum is being used. Also why doesn’t the sedum dry out ant rot away?
That’s a lot of martini olives for that bridge!
Hi Wayne Wallace.Are those the long sticks.I made up a jig to make Ho scale windows with.Im building a two level home now.Could show you a ton of ways.I sent a photo to Al of the house im doing now.
Tony;
You have a fine looking layout. The trestle is ingenious. My first thought was that it reminds me of the movie The Bridge on the River Kwai”.
Dear Dave,
I always look forward to your videos on the modification. I learn new things every time. This time the paint market was an eye opener.
I salute you for your detail modelling and willingness to share. I wish you the very best of railway modelling and look forward to being educated by you on railway modelling through your videos.
Dear Tony,
That was truly a herculean task and you have a mountain of patience and finesse.
I like the Bridge and really enjoyed part 9 Dave. Thanks to both of you. Cheers Rossco
Tony
that is a lovely peice of work well done
cheers
Albert
Tony
That bridge is a lovely peice of work well done
cheers
Albert
Dave
this layout gets better and better every time i see it great idea for doing the lines on the roads ill try that thanks now i wait for the next exciting episode
cheers
Albert
that bridge is a nice piece of work. The update with Daves was interesting.
The variety I use is called autumn joy. I do grow some but in the fall the stems turn woody so it has to be cut back each year. So I just drive around and ask people if they would like me to trim it for them. I get it by the box full and I t is free. My favorite modeling term.
It’s just phenomenal! Thanks for sharing both your expertise and the wonderful results of your work.
Wonderful… truly wonderful! This is one of the best scratch built bridges I have ever seen!
Tony……..how many hours do you have into making the Trestle…….
Great Job…..You must have great patience
Dave…..would like to know how you came about with the Cable Bridge, because I have been wanting to either build the Mac or something like yours.
IT’S AMAISZING WHAT YOU CAN DO WITH TOOTHPICTS. NICE LOOKING BRIDGE.
An AMAZING piece of work!!! Reminds me of the great “Bridge on the River Kwai”
Nice set up, just need some weathering on the trains, and bridge.
Always good to see the updates on dave’s new layout, still inspiring me to get stuck in to my own layout.
The bridge made from toothpicks is well made…how long did it take to build from start to finish.
Al, a great site as always, lots of great tips; I’ll need to start keeping note of them all.
Well done everybody.
Very nice Tony!
Dear Dave
Modelling is made simpler for us by you and I hope the general manager of Bachmann is reading this because you must be their greatest advert. I have purchased this year because of your videos 2 two tone green class 47s (Thor)and 18 brown Bauxite vans, 12 GW grey vans couldn’t find the SR wagons. Class 37 highlander 37 train set. Two blue DMUS (Yellow ends) and one blue grey DMU, ! class 24 blue and yellow and one on order, I class 37 in EWS maroon on order. I am also going to purchase a green class 25, two steel girder wagons, eight similar wagons and one blue grey buffet coach. I have also purchased some Peco point side motors, One of those Ballast spreaders (ps I prefer your tracks fully ballasted) an ECOS (50200 off the top of my head the number I can,t get to my emails right now) is on its way now to me and I will purchase a Noch static grass machine later this year. I have purchased Bachmann Dave because of your recommendation. Al If you know the Bachmann manager please send him my response. Thank you Dave Bachmann are excellent. The videos are always great! I cannot be the only person buying because of your videos.
MOST IMPRESSIVE WORK!! And in “N scale too. If there were a river under it, I almost thought I heard Jack Hawkins telling Robert Holden, “Yes, we’re going to take out the Kwai Bridge. Glad you’re coming along. Good show!. Jolly good show!” And I say to you, sir, Well done!!
Brendan
all of my comments get cut out never see them, so I just say good bridge dan o in arkansas
That is simply fantastic work. Planning a trestle bridge myself but not so sure that I will use toothpicks, although cutting anything and putting it together is going to take time, so if it can handle the load; why not.
Tony
That is a better use of toothpicks than popping your fillings out !
I bet that took some time to build , I love it guy !
George
Can i have the plans for the bridge.
love the trestle bridge.
Awesome trestle bridge Tony. I don’t think that I would have the patience to make a bridge like that, well done.
The tips from Steve, Robert and Michel are good too.
As was said before, the River Kwai bridge was my first reaction in its appearance. Well done.
Jim AZ
Great idea, great job…well done
Tony, What a great looking trestle you’ve made! I’ve not seen many N-scalers into logging railroads. I wondered how the toothpicks would be strong enough to support the track, but obviously they are working fine on your layout. Thanks for sharing your photos and methods.
Brendon, it was William Holden, not Robert Holden, in “The Bridge on the River Kwai”.
Michel, Excellent looking chain link fences. Thanks for sharing your method of creating them.
Really do love all the hints given