John’s been in touch with a very helpful piece on model train coach lighting:
“Dear Al,
Thank you for all you do for the most amazing hobby and for all the tips and advice given.
Below is a short tip that some might find helpful.
Wheel Contacts for coach lighting
I have loads of carriages and wheel sets where both wheels are insulated from the axel. So as not to have to replace all the wheel sets, I have tried various options for picking up current for coach lighting I have tried contacts on the wheel rim – too much drag; I have tried electric paint between the axle and wheel rim but that does not last; I have looked on the internet but not found anything that is really helpful.
So, my solution may be of use to some out there:
The wheel sets have a small rubber bush fitted to each wheel that insulates it from the axle. Using a drill press, I drill a small hole in one bush on each axle. The drill size needs to be small (0.5-0.75mm) so as to drill against the axel through the rubber bush and through the wheel.
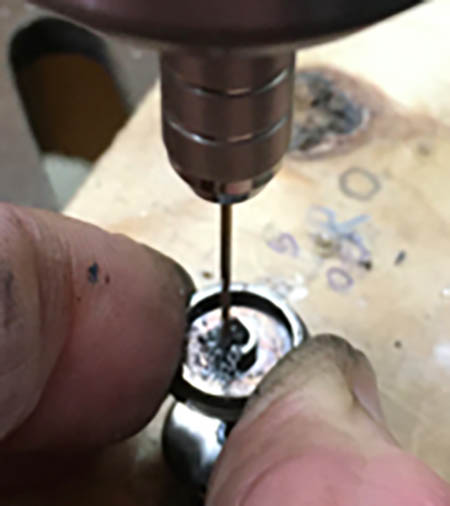
Insert a piece of copper wire extracted from an electrical cable – it needs to be a tight fit (wiggle it round and back and forth, until it goes through).
Trim it off leaving about 0.5mm protruding each side. Using a par of pliers on each end of the piece of wire and crimp the wire to ensure a really tight fit.
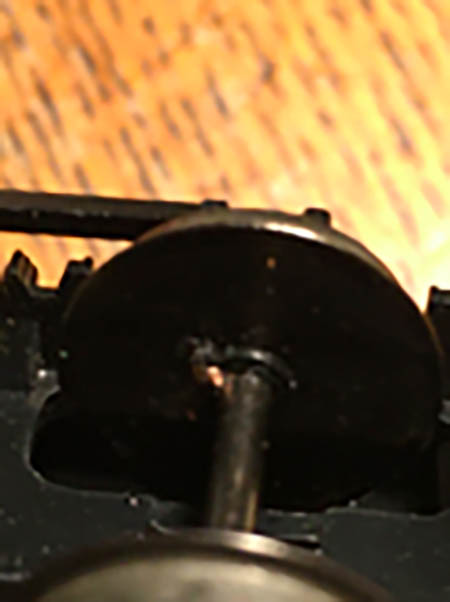
Check the gauge of the wheels as they sometimes do move on the axle during the work. The small piece of copper wire cannot be seen behind the axle box and you have good contact.
I have successfully installed lighting in fifteen carriages.

Best Wishes
John”
A big thanks to John for sharing his model train coach lighting tips.
Now on to Bob:
“Hi Al,
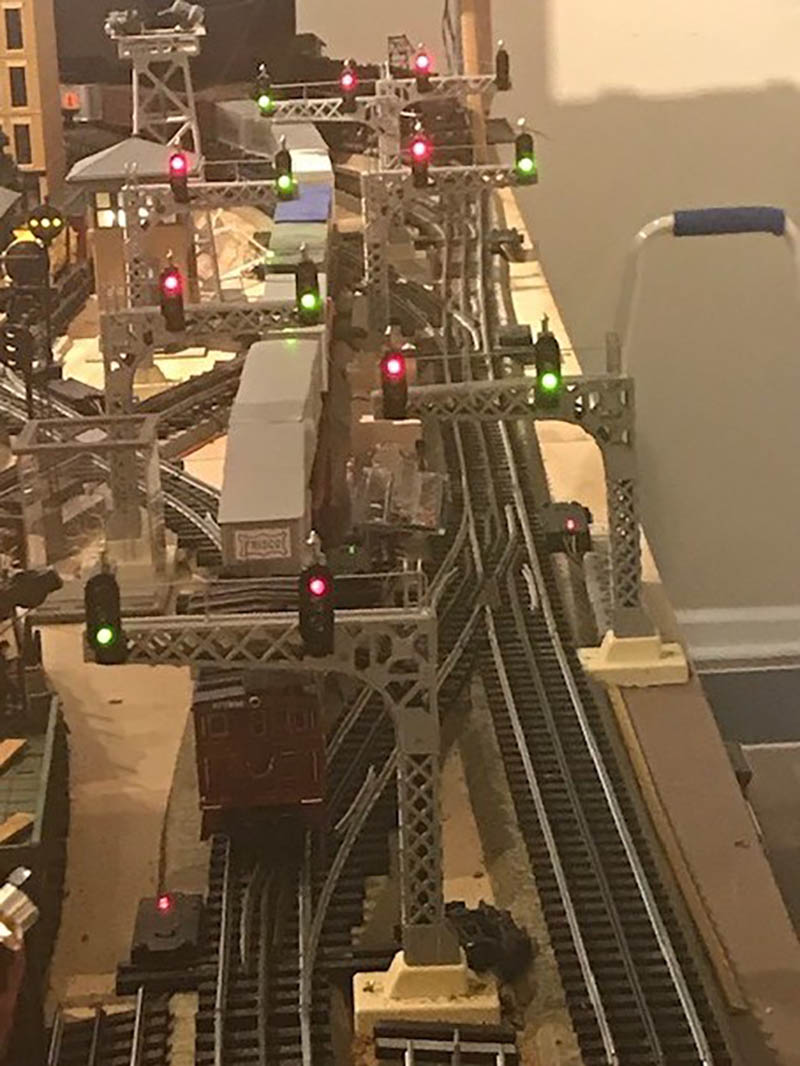
I was moving the tructrain out of my way the other day and it looked so good when I was running it that I decided to take some pics of it.
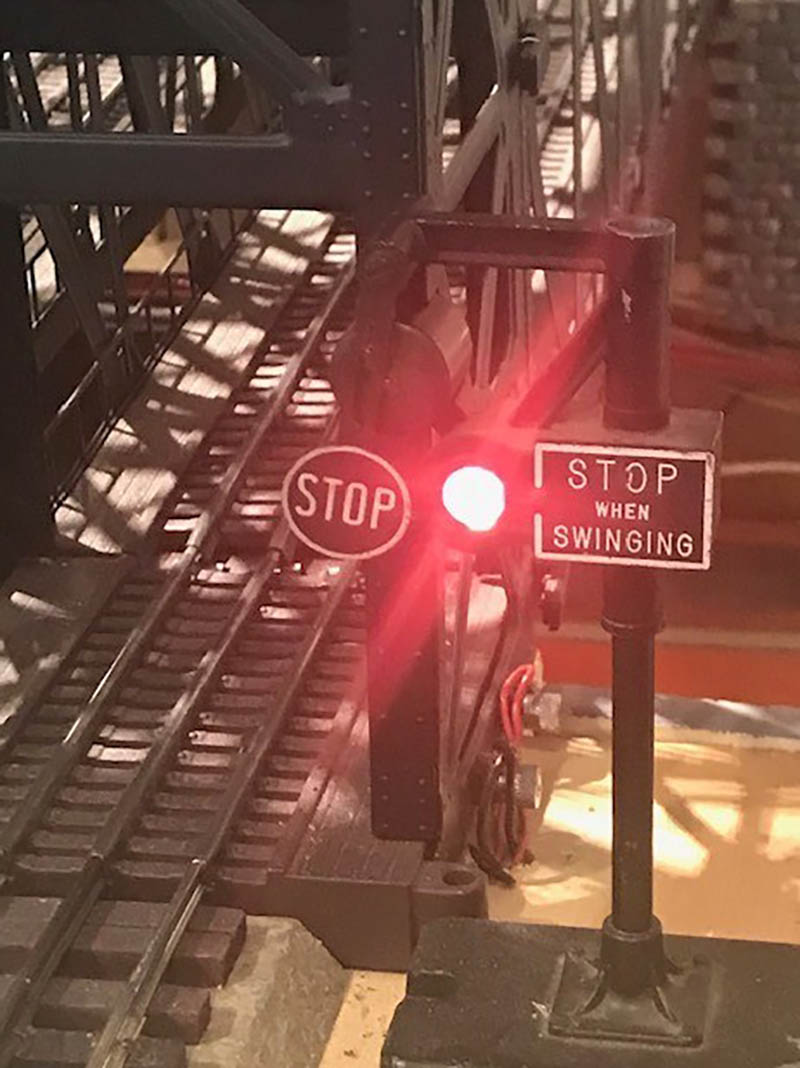
So here it is running on track 2 over the lift bridge passing through part of the town toward two crossings; and past the ice cream stand I had previously posted.
The PRR style signal bridge does not give accurate indications. I configured it to show stop when the bridges raise.
I activated the raised bridge circuit to make the signal look better in the pics.
The left hand signal on the bridge is actually showing a turnout position for track 1 on the other end of the bridge.
The green light signal is showing another turnout on track 2. My son who is an engineer had some angst about that one!
I used a different configuration on the other end of the bridge for the bridge up signal.
There is a lift bridge in the Newark, NJ area that I passed at times during my commute. I always wanted to get a picture; but a main truck route runs right next to the bridge. Just before the bridge is a smash board that drops when the bridge is raising.
I always wanted to model that, and thought about using an HO crossing gate; but then decided to use a Lionel Banjo signal, as seen in a still shot.
All the single mast signals also are turnout indicators. Many of the turnouts are crossovers so the signals help me stay out of trouble.
I wired the turnouts to throw together so the dual signal changes as well. The red roofed station platform is at least 70 years old. I added a close up still shot. It’s made out of wood with a metal mesh on it. I don’t know if my Dad made it or picked it up somewhere. It looks like it’s closer to Standard gauge, but it’s a keeper.
The Girard station is tin and was made by Marx. It is also up there in years as it was on my original layout as a boy. As you can see the layout isn’t quite finished to say the least; although I got quite a bit done these last few months.
Keep all the great information coming!
Regards,
Bob in Colts Neck Crossing, NJ”

And now on to Hall of Fame member, Rob.
Embarrasssingly, he sent me this ages ago, and it got buried in my inbox.
It’s a wonderful vid on how he takes his fab videos. Have a look:
That’s all for today folks.
But please do keep ’em coming: it’s getting very thin on the ground here, and I don’t want to have to feed you on a diet of reposts.
And don’t forget the Beginner’s Guide is here if you want to stop dreaming and start doing.
Best
Al
PS Latest ebay cheat sheet is here.


Thanks a lot! I’ve always wondered how to fit lighting into a train and amazing layout Bob!!
Great ‘how to’ from John regarding wheel pickups. One solution I’ve found is to use a thin strip of aluminum foil – carefully pull off the wheel and plastic insulator, thread the foil strip through the insulator and wrap around – carefully re assemble the insulator and wheel and set correctly (It’s a bit fiddly and sometimes the foil breaks). The pickups on the now ‘live’ axle are created by coiling very thin brass wire 10x around the axle. (I’ve found some suitable wire from some fancy wine bottles – after drinking the wine of course!)
Perhaps it’s just me, but there seems to be a couple of steps missing in the coach lighting story; After the copper wire is fitted to the wheel axle, what happens next?
Does the copper wire turn with the wheel or is it static? It would appear that another wire is attached that goes to the actual lamps in each coach but is it soldered to the copper wire or is it just wrapped around the copper?
Thanks
Terry/Idaho USA
As to the passenger car lighting As John refers to the wheel bushings Most if not all passenger coaches, Athearn / Bachmann etc already come with ready to light wheels for positive / neg current . you can buy wheel sets built just that way for the wiring hookup for the lights . The LED Lights come with a 1/4 inch tube soldered to the leads to slide on the axle opposite wheels are insulated for electric contact . I’ve lit 12 coaches this way. Cheap Check AL’s eBay cheat sheet. The light strips come in different lengths.
Just an alternative ( The Critic )
For lighting coaches, look into Rapido Trains “Easy Peasy” system … affordable, no need to do anything with wheelsets/trucks, doesn’t have anything to do with track power at all, no intermittent flickering etc. Probably the most simple, reliable and trouble-free approach.
Looks Great.!!!!
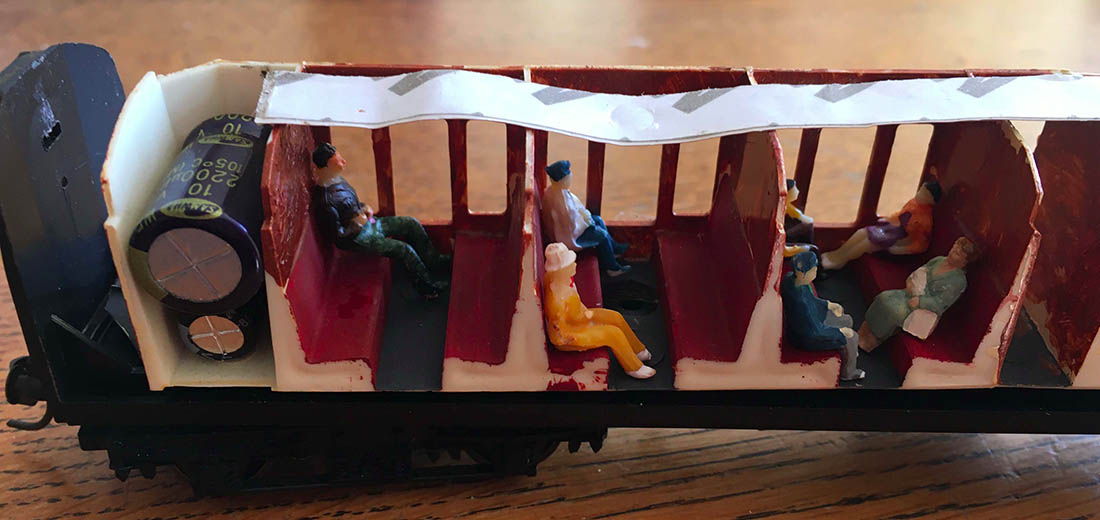
Seems like a great idea. I can understand why you have a resistor for the LED lighting, but what are the capacitors for? Rocco from NJ
Quick response:
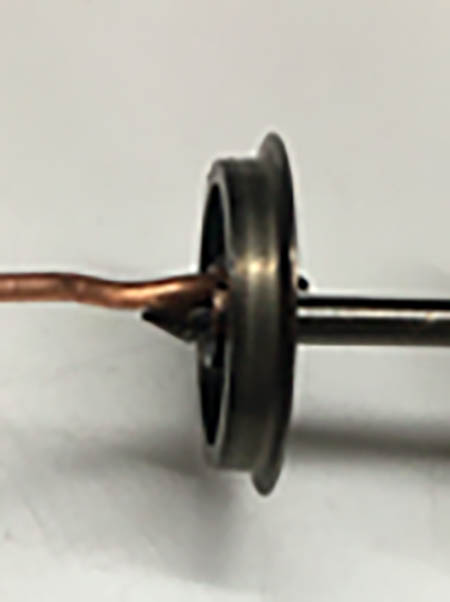
1. The copper wire inserts are to make contact between the metal wheels and axel. It is inserted on only one of is the pair of wheels on the axel. Current is then picked up from the axel with little friction.
2. I already had double insulated wheel sets so decided to use what I had instead of buying new sets. It only cost me a little time.
Outstanding help and great video. Saving this one!
Thanks,
Doug
John……I don’t understand why you drilled the holes through the wheel if (picture 5) the current is picked up from the axle? What did I miss???
Bob in Colts Neck Crossing, NJ…. love your single system…..really looks authentic…..great job.
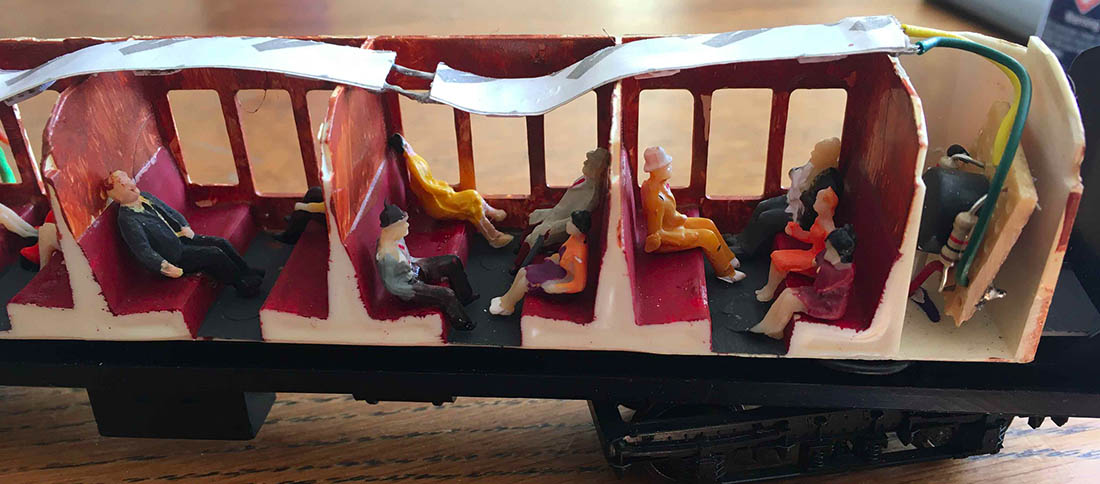
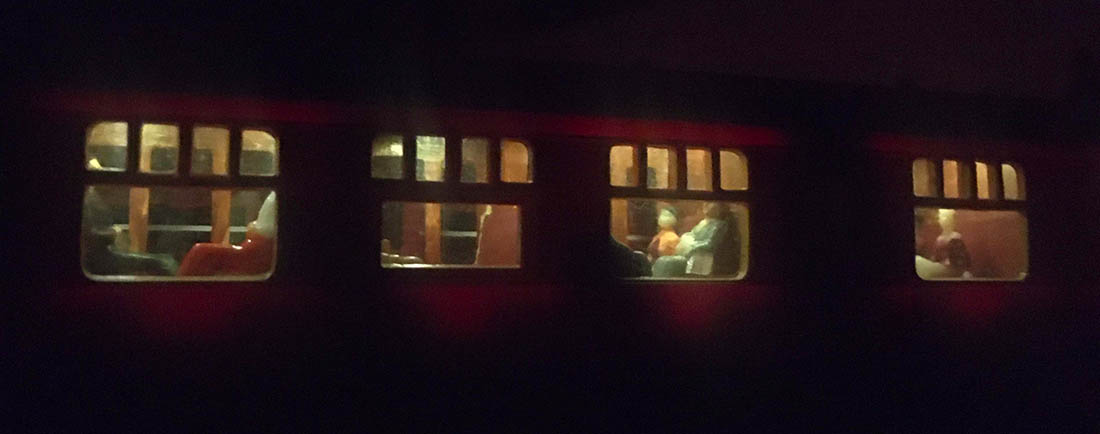
Rob….loved your layout and especially the lights in the windows of that first coach….great touch.
Easy way to power a axle : pull off the wheel and insulating bushing , stick a thin copper wire through the bushing center and then over the top , push the bushing into the wheel , then onto the axle . The copper wire energies your axle , it works for both positive and negative . I have been doing it for 70 years with great satisfaction
Hi Gary,
Both wheels on the axel are insulated. The wheels are metal, and as I said in the article, I found that having contacts on the wheels themselves, created too much resistance (drag). The small piece of copper wire, effectively through the insulation enables the axel to become live. A thin piece of spring wire on the axel creates virtually no drag and constant pick-up. On one bogie, both wheels pick up current on the one side and on the other they pick up current from the other side. Hope that helps.
Outstanding job Bob, 3 rails is better than none!
John and Peter…..thanks for the info. So you are electrifying the axle from the wheel and then running the power up into the passenger car. I have a bunch of cars that I want to install interior lighting……. I am going to try this.
Thank you
Dwight ref, Rapido lighting. Those lights your referring to are battery operated. They become a hassle taking apart your coaches every time you have to change Battery’s.. Not to mention having a supply on hand.
Direct contact to the wheels is the way to go There’s kits on ebay..
The Critic
you are welcome
The Critic
Have always enjoyed your Videos Rob, remember the early ones and the stop-motion stories!
Best to all
Brian, Wokingham, UK