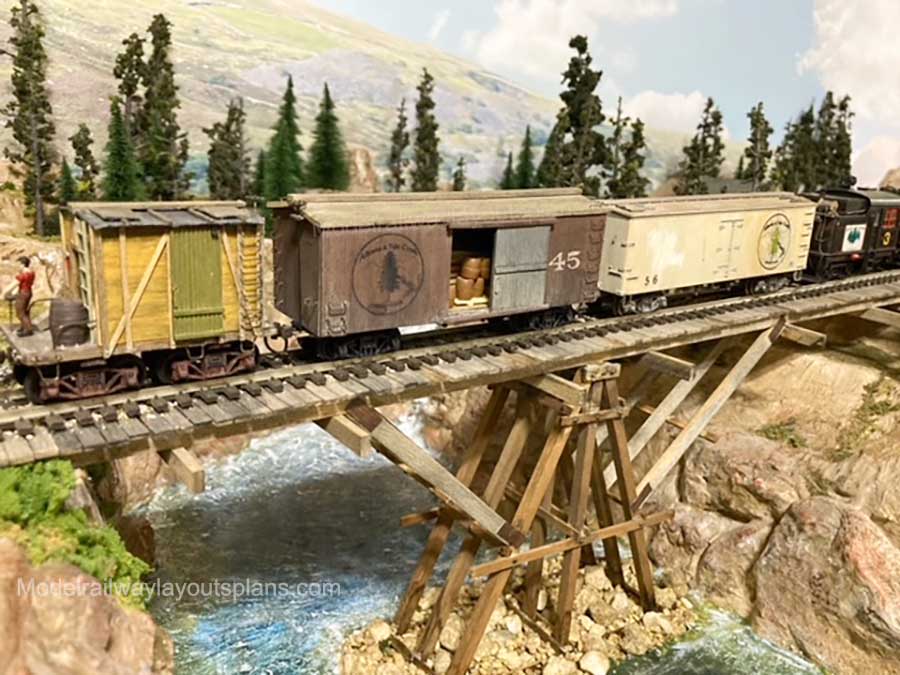
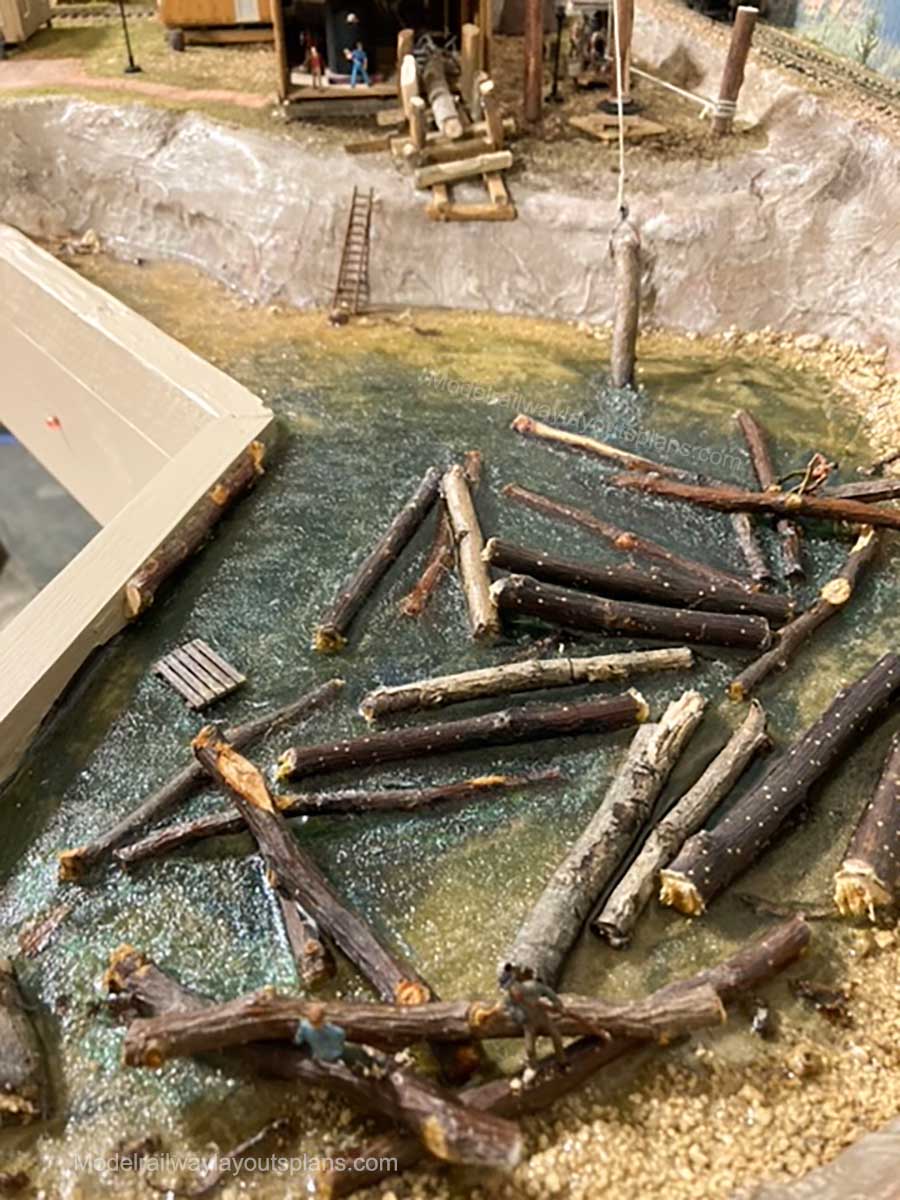
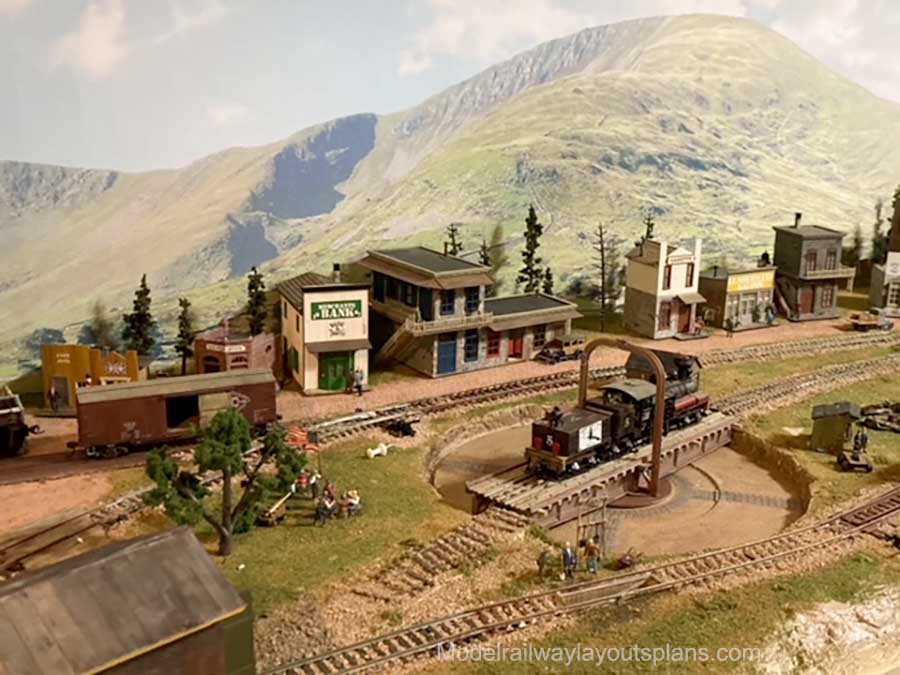
Al’s been in touch with his HO model train log cars.
It’s a stunning layout and I’m really hoping Al can send us some more pics and details because I absolutley love it:
“I look forward to your site every morning. This is a fantastic hobby and it is so nice to see what others are doing, the ideas are almost endless.
I model in HO and have been working on the AT&C for several years, it is my fourth layout and keeps me out of trouble with the better half.
I am sending along a few pictures of what is done so far, as we all know a layout is never truly finished.
It is freelanced and based in the early part of the twentieth century. I have more photos of the construction from the beginning if interested. Keep up the good work.
Al”
A big thanks to Al for sharing his HO model train log cars layout. It’s a really popular theme, and it’s not hard to see why: they look great!
I thought it would be fun to list some of the them, so here you go:
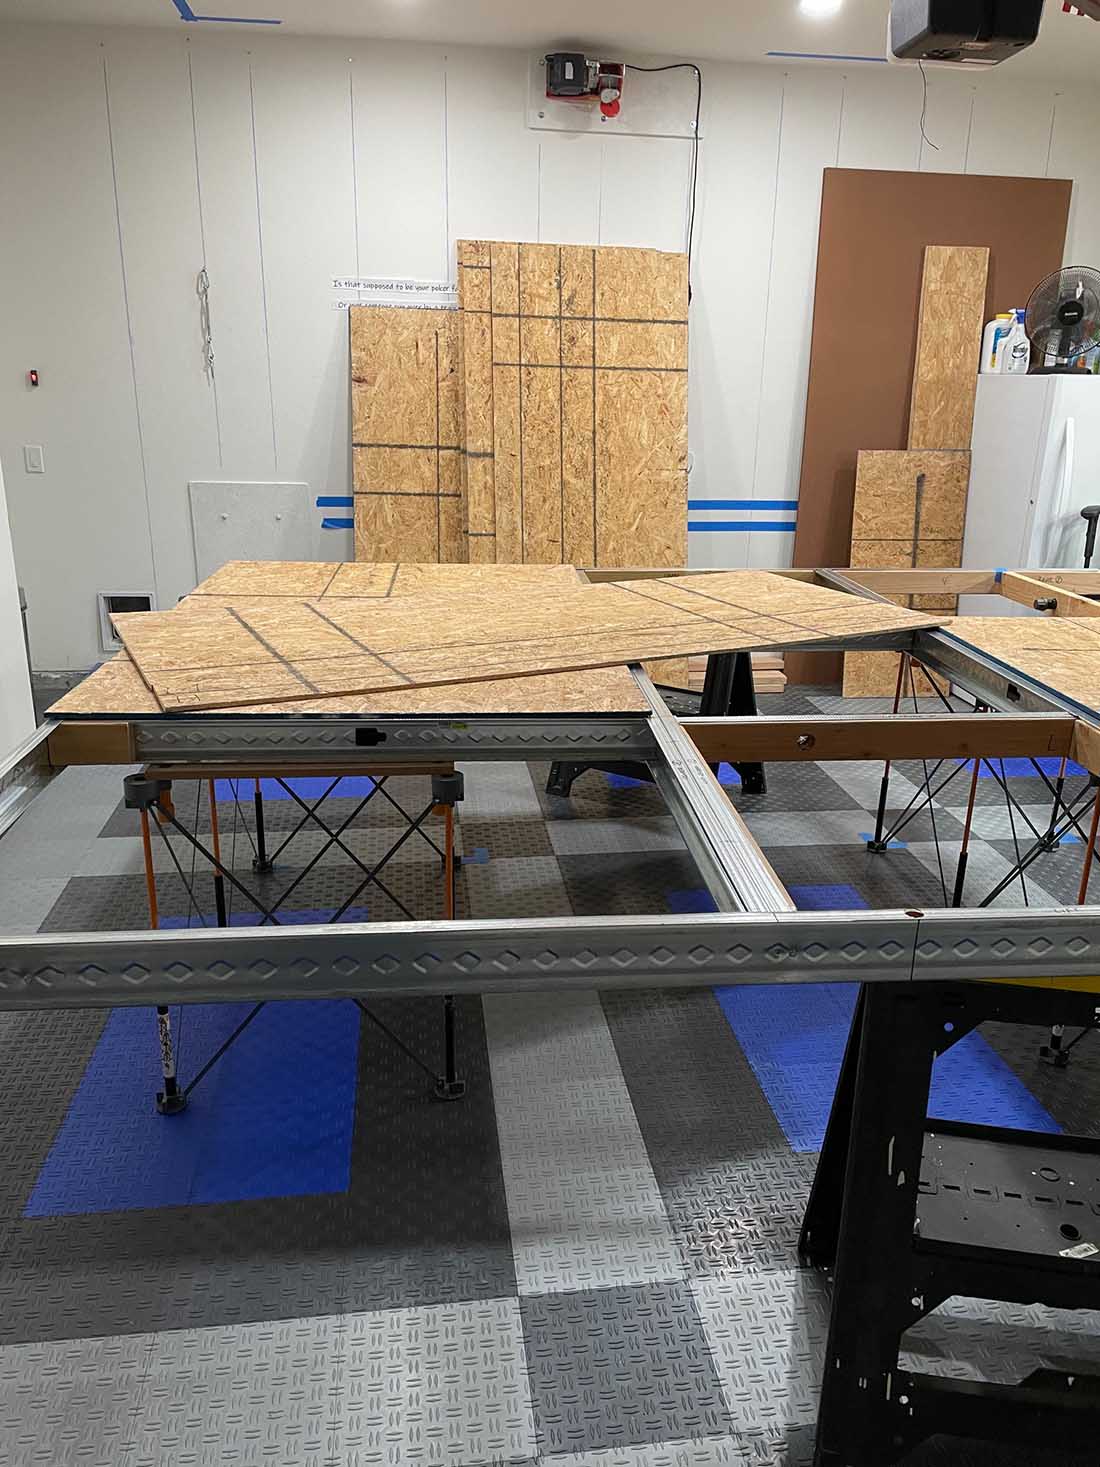
Gary’s been in touch with a very impressive start to his layout. Have a look at his folding model railroad table:
“Hello Allister –
Long time subscriber, first time contributor.
Been getting your emails for several years now and I often go straight to looking at just the pictures.
But as I’ve matured, I’ve come to appreciate the accompanying stories as well.
As you say, it’s all about making a start, isn’t it? Well, I’ve started and there’s no turning back now.
This will be my first, and last, train layout; mainly because we’ll be downsizing in a couple of years, and this is the only chance I’ll have to build my own layout.
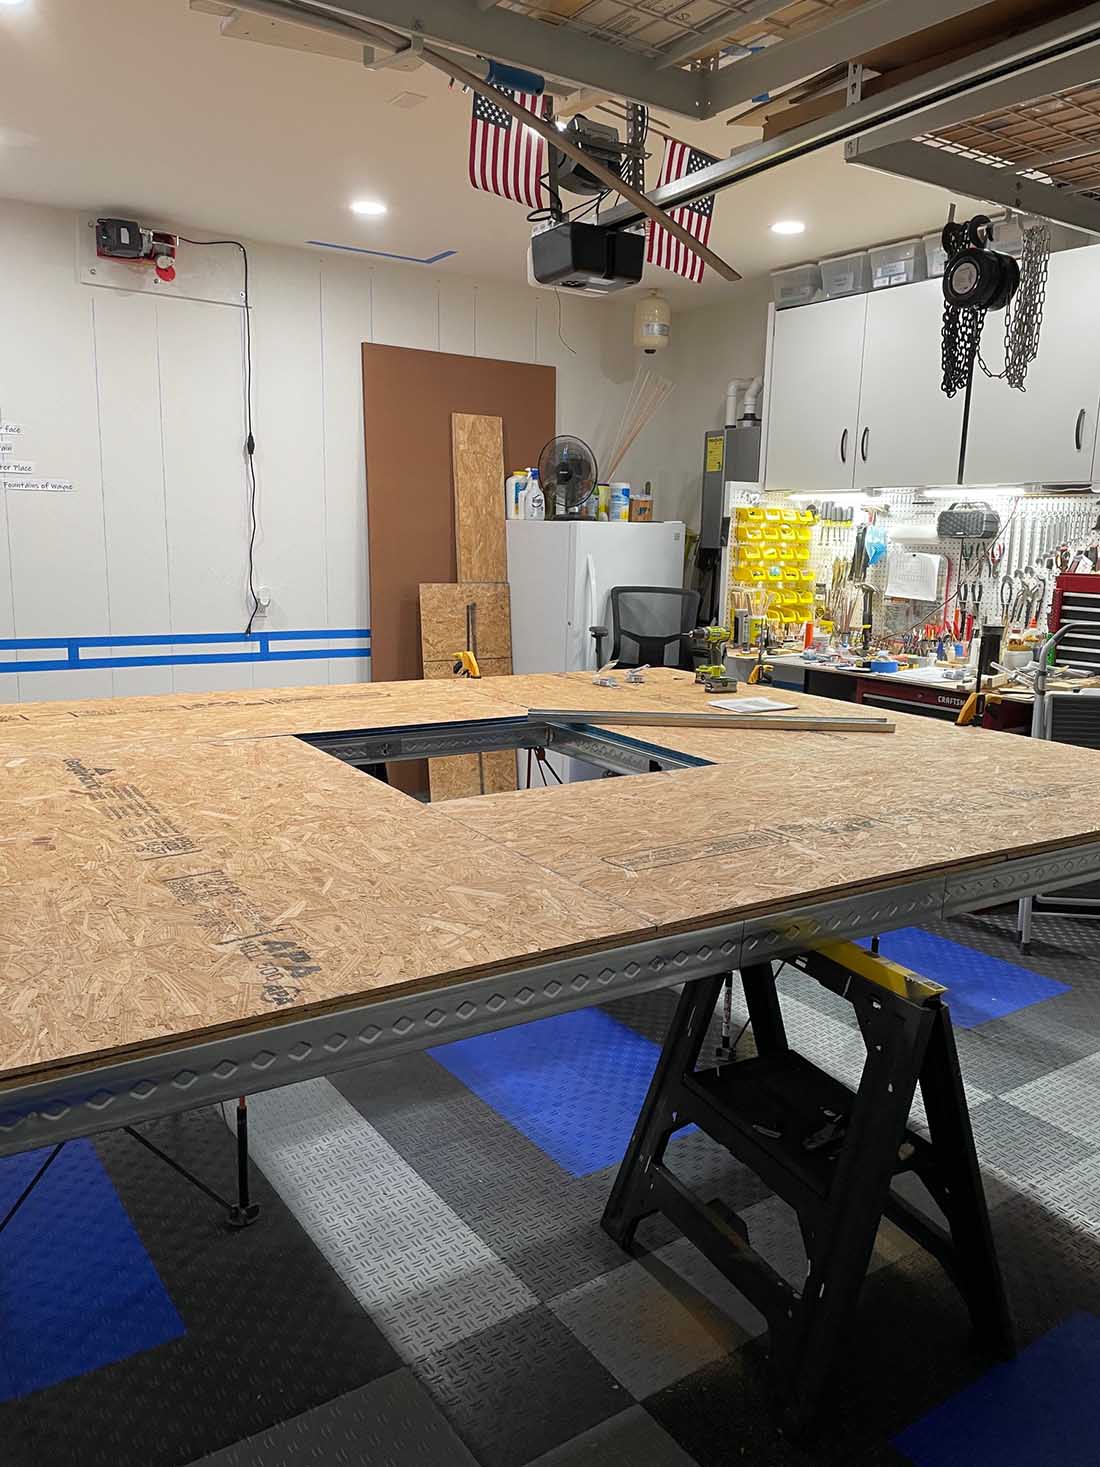
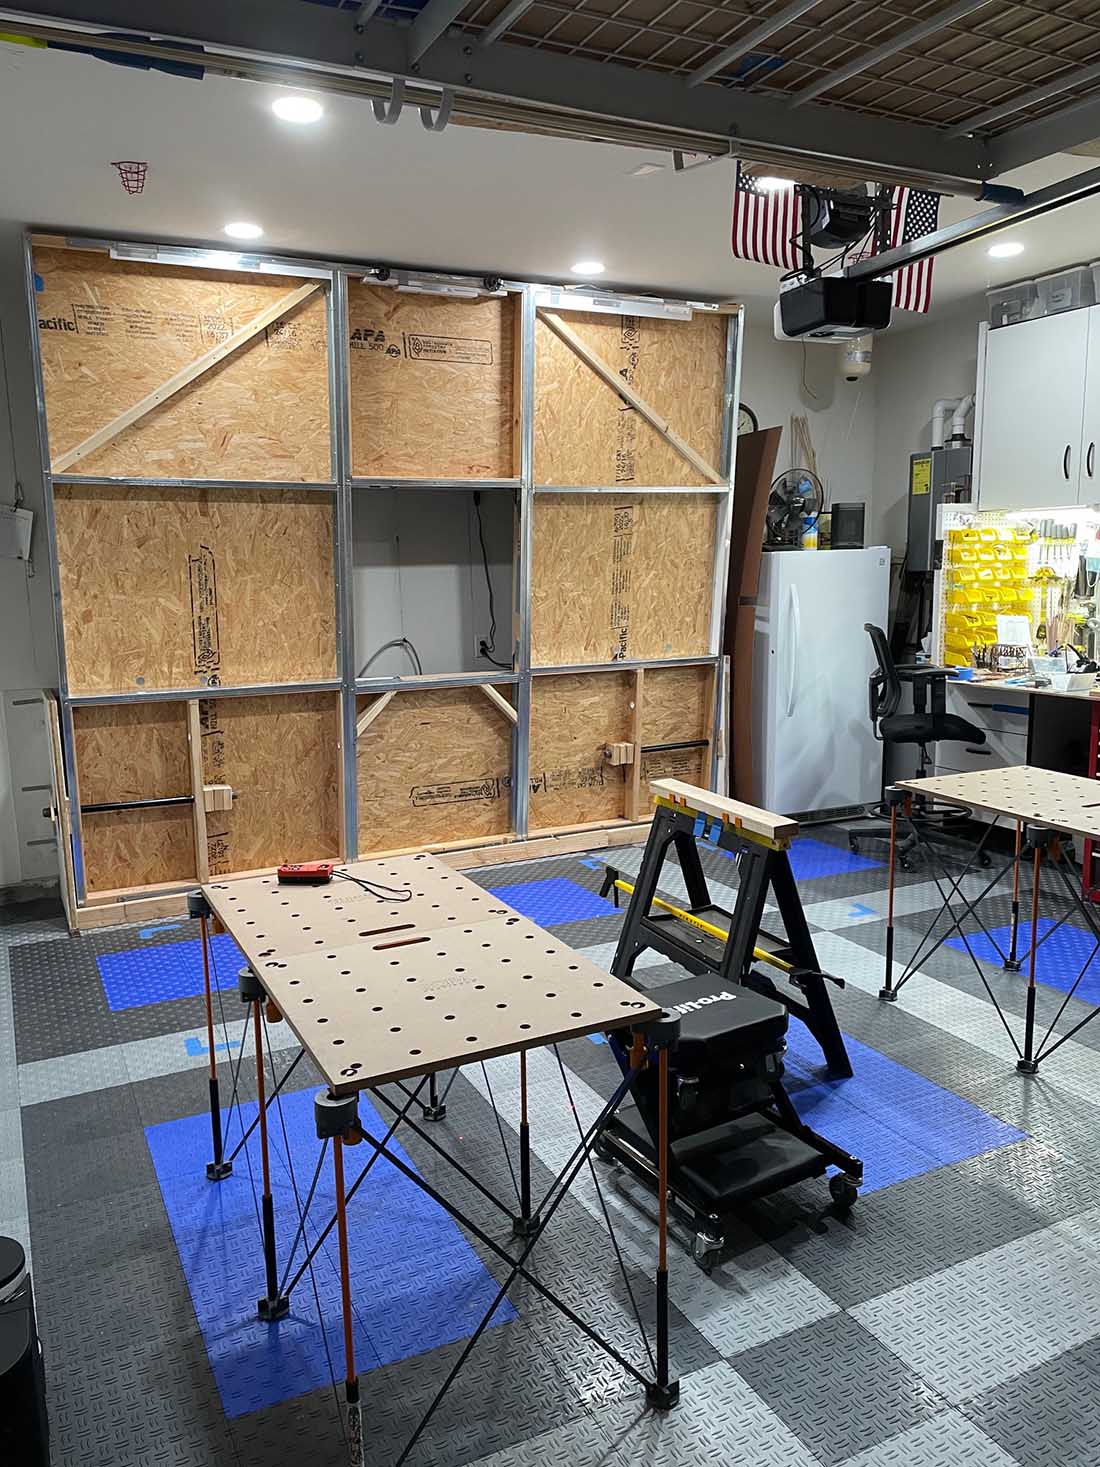
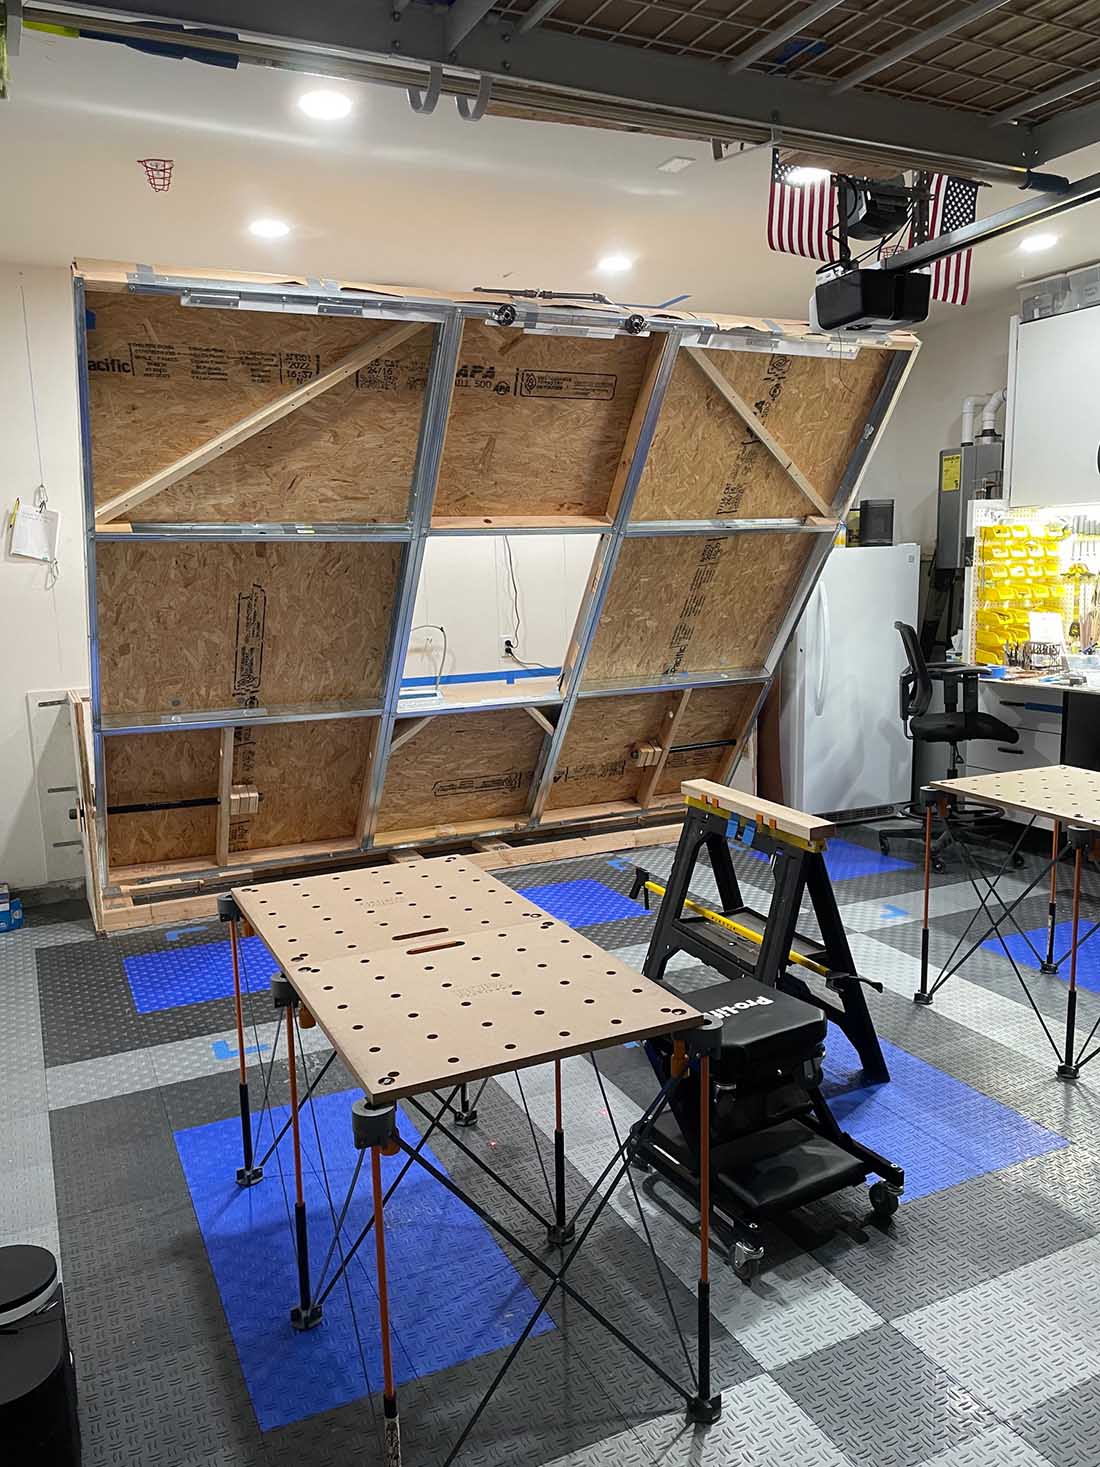
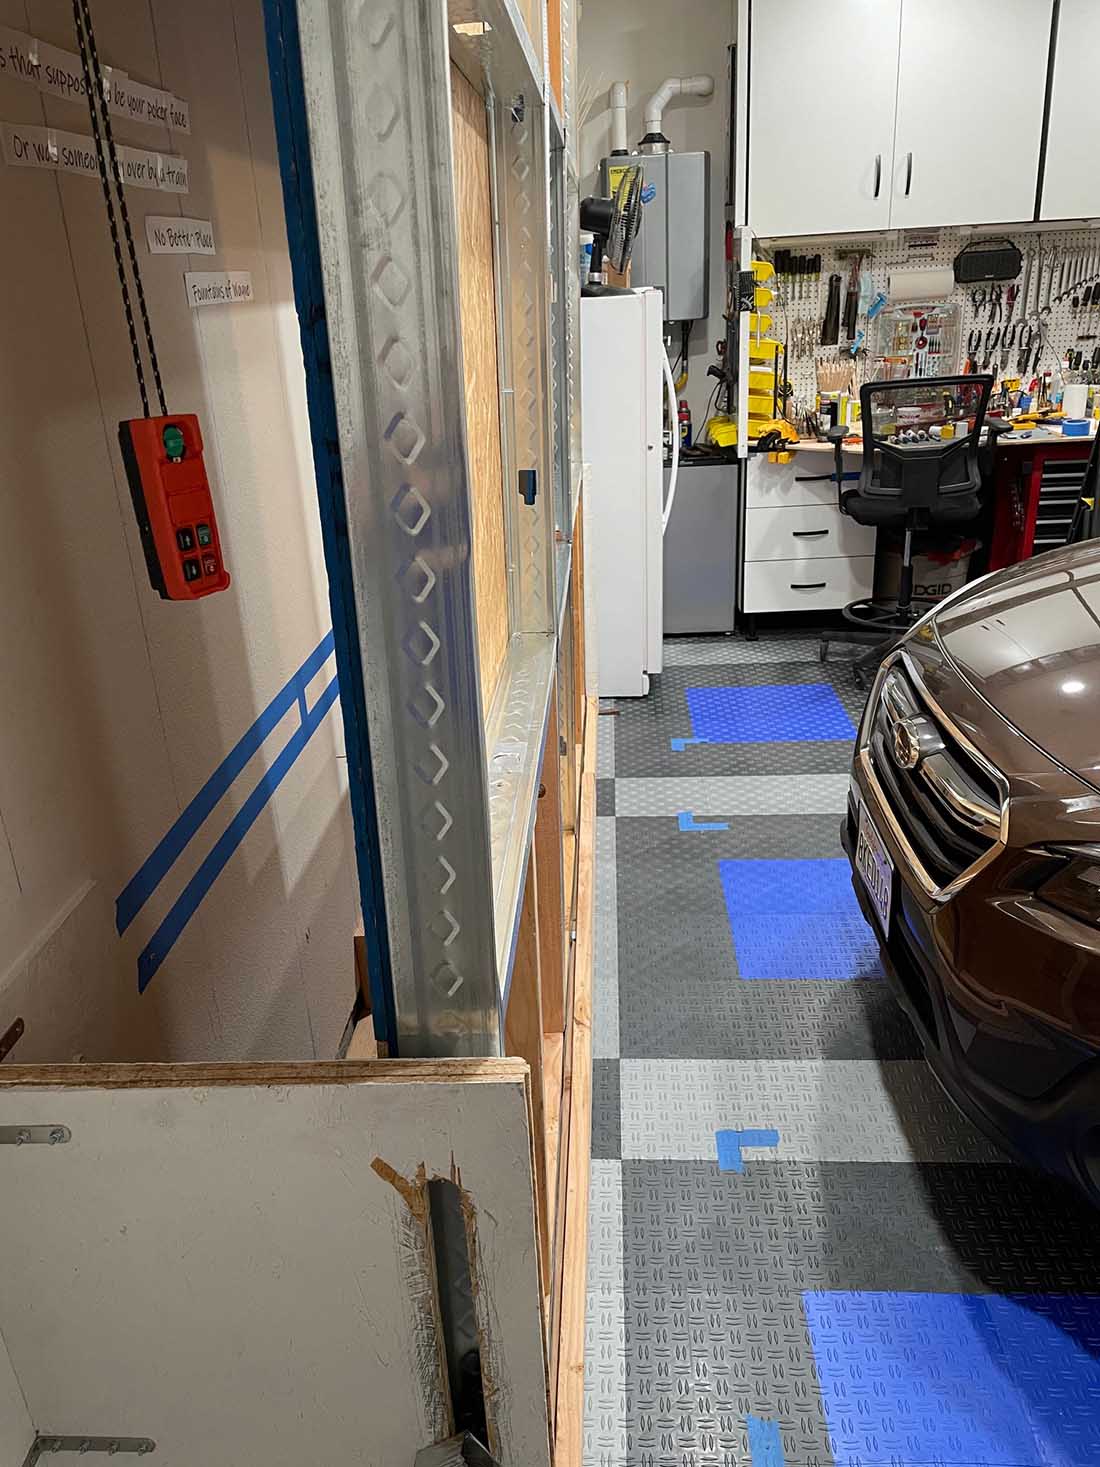
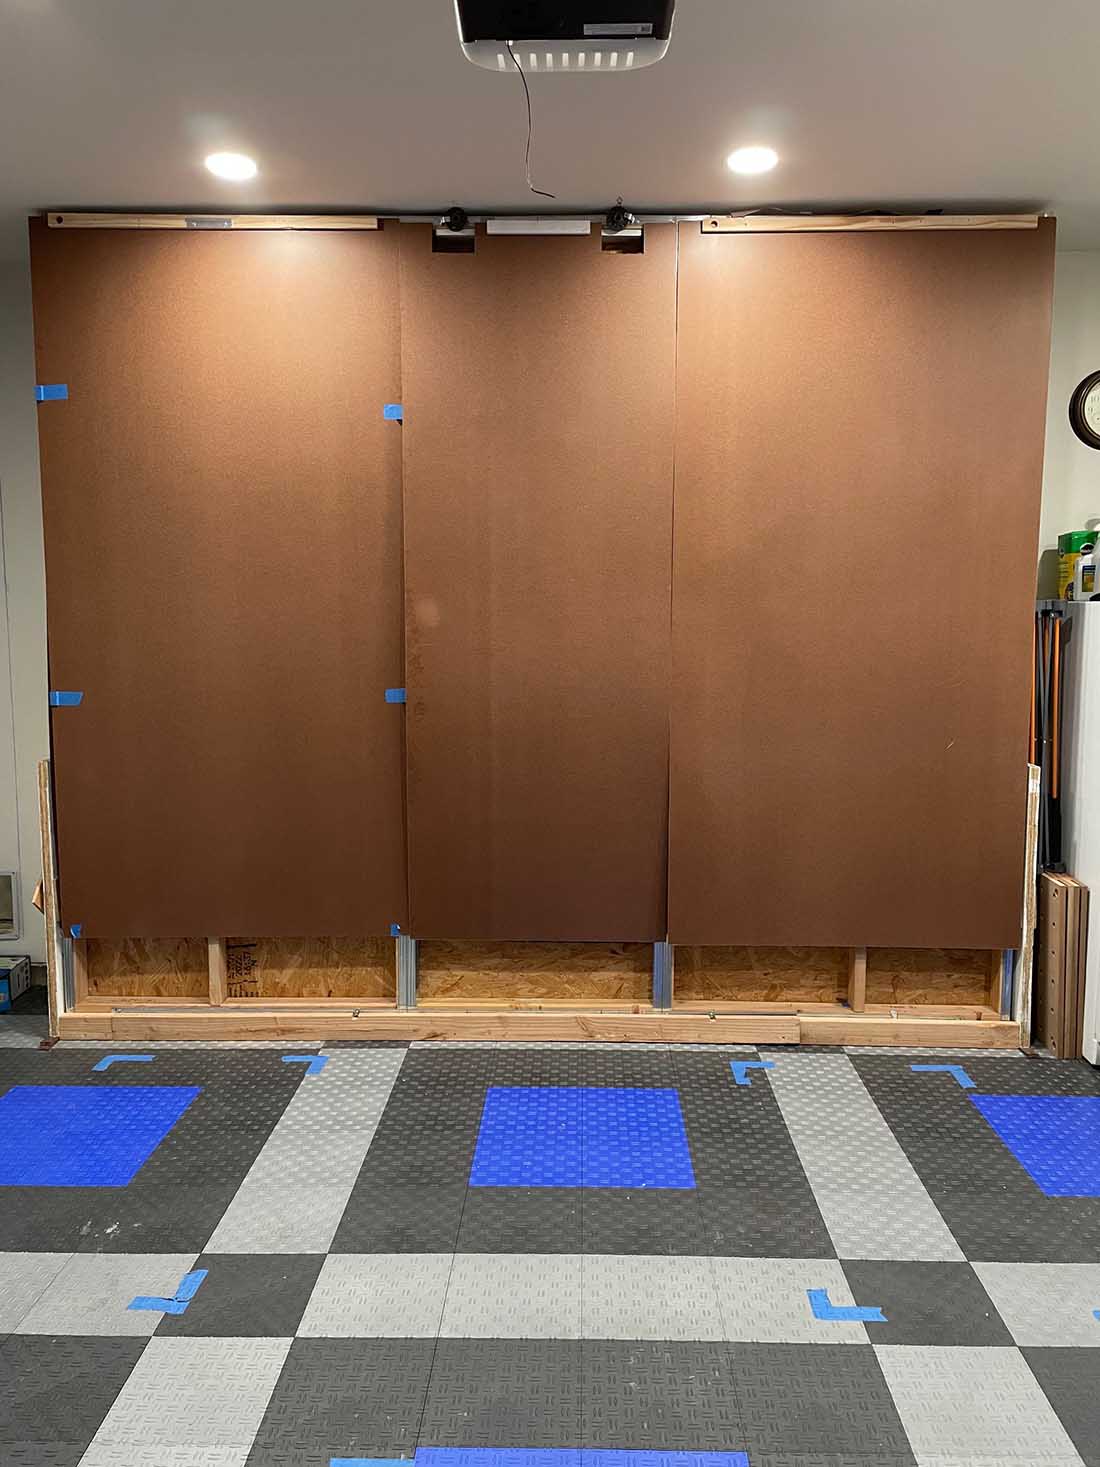
We don’t have a spare room in the house, so the garage was the next logical place to build a folding train table.
However, I still wanted to be able to park the car in the garage, so that led me to do some creative thinking. I settled on a “Murphy bed” style for my table.
It seemed like a good idea at the time, and there’s been some issues I’ve encountered and fixed during the build. This may not be the best way to build a model train table, but I’m committed to it now.
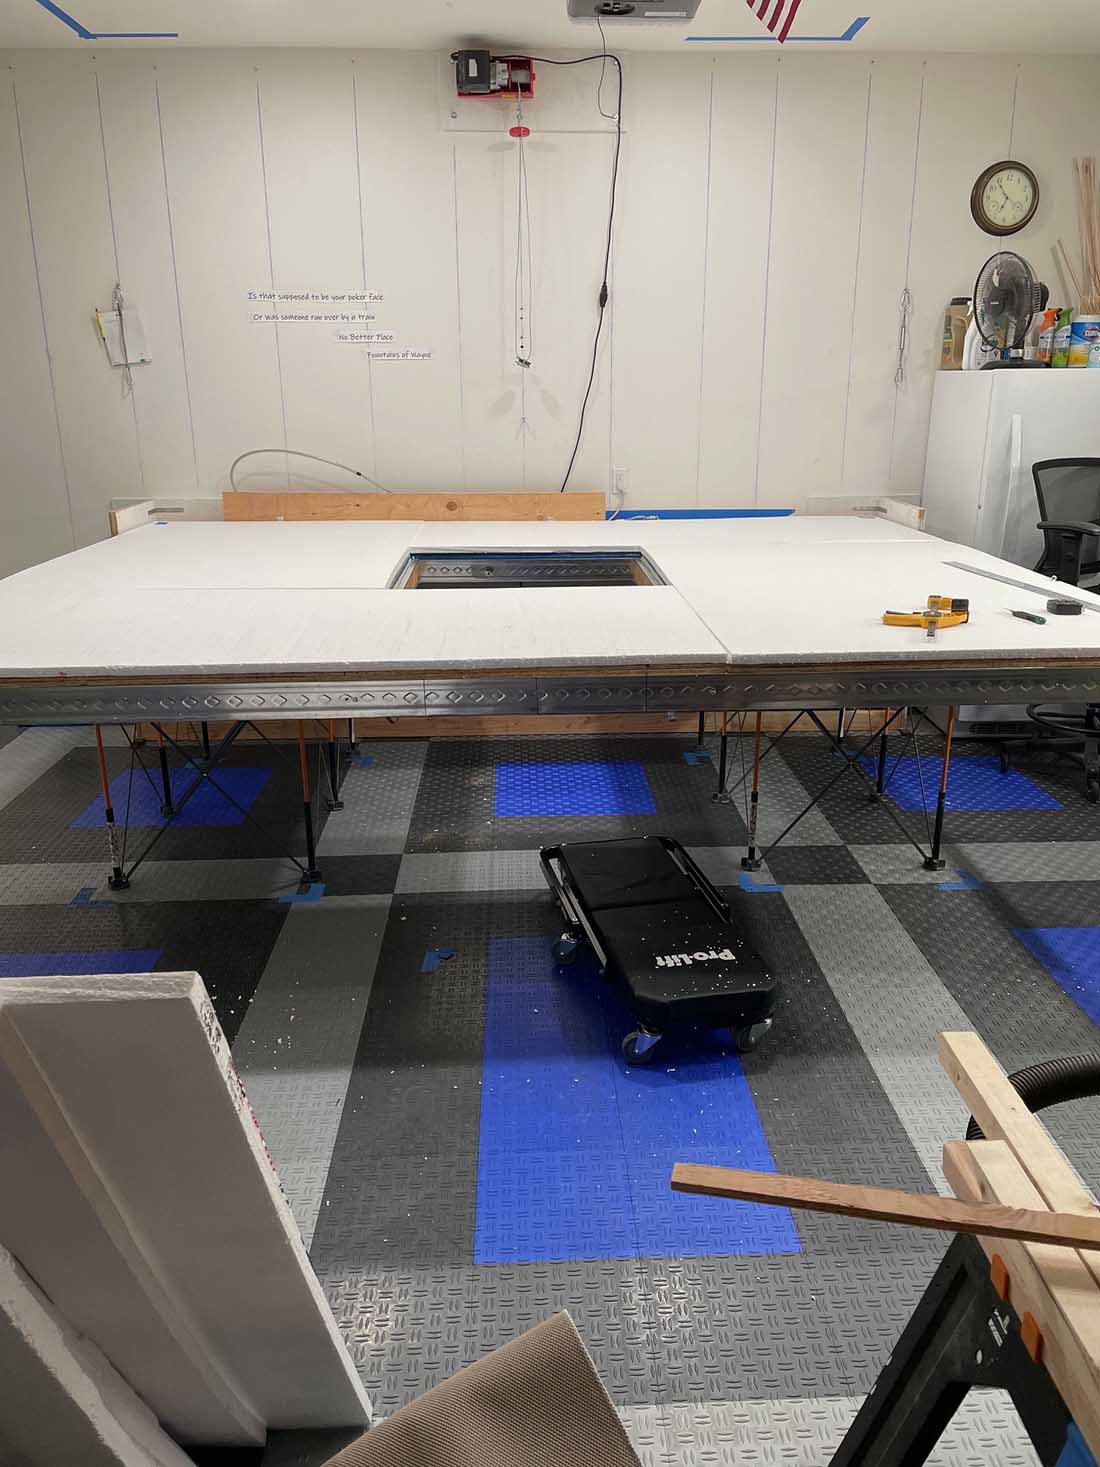
It’s 9’ x 11’ made of two alternating layers of 7/16” plywood, and a 1” foam layer on top. I’m hoping the overlapping plywood will add more structural integrity to the table. It does, but there were other areas that needed reinforcement.
The galvanized steel studs provide a frame for the 2 x 4s that make up the front and rear lift areas. Everything, and I do mean everything, is glued, and screwed so it’s as solid as I can get it at this point.
Lifting the front and rear sections is done with a 440lb cable hoist with a wireless remote (I’ll describe that process in my next post).
The folding model railroad table sits on two 4’x2’ Centipede workbenches with a 1” tabletop. There’ll be another supporting structure in front of the table that will hold all the operating controls (haven’t quite figured out how that is going to work yet).
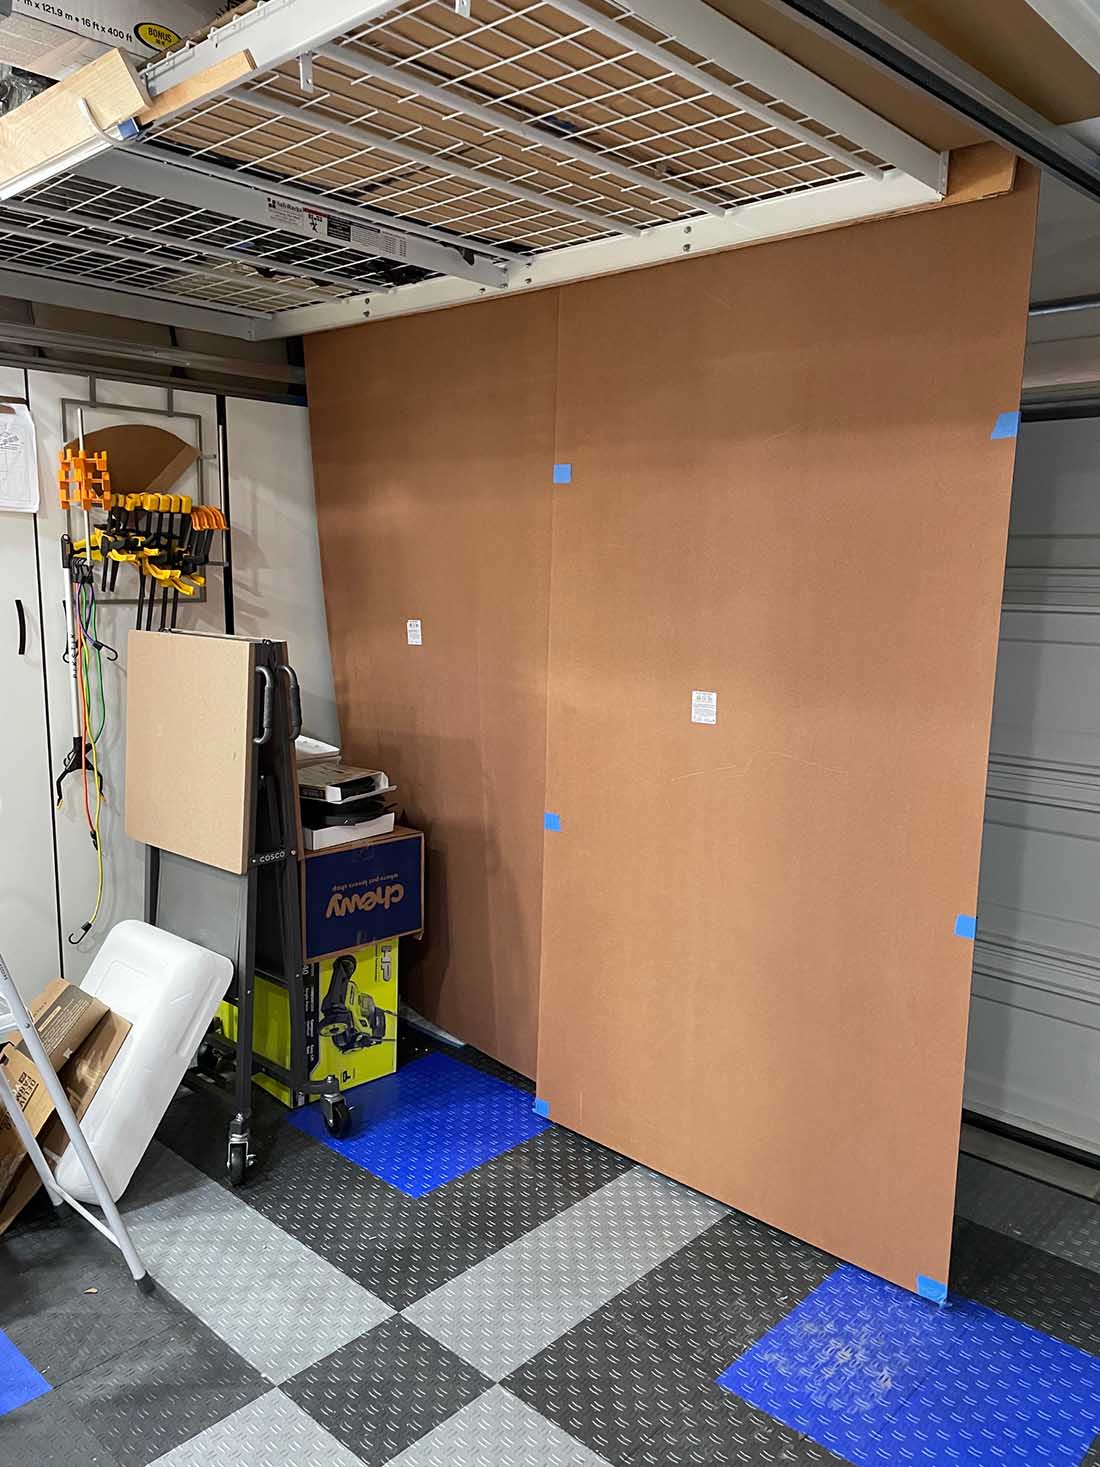
There’s about 20” between the car and the table, so there’s enough room to easily walk between the two. The hardboard panels are hung using French Cleat hangers and kept in place with 1”x2”x1/2” magnets (These panels are just to hide the wiring, but it also provides a 30 second upper body work-out for me when I move them).
The panels are stored on a Safe Rack storage shelf, using the same type of hangers.
For the railrod layout, I started with a sketch I made on the back of a large desk calendar. I covered the table with brown wrapping paper and then I transferred the sketch to it.
Once the pencil sketch was finalized, I went over it with a wide tipped Sharpie. It took a couple of passes, but the ink bled through the paper and onto the white foam board. From there I was able to figure out how to place everything.
I think I’ve covered the basics of this project, and I’ll post more later, but I don’t recommend building a table like this to anyone.
I’m retired so I have a lot of time on my hands, but this project has certainly had its share of challenges and frustrations.
I apologize for the pictures being out of sequence. I’ll try to do better next time. Also, I’m considering heavily investing in companies that produce adhesive products as I’ll be spending a considerable amount of money in that area.
Gary”
Folding model railroad table:
A big thanks to Gary for sharing his folding model railroad table.
I do love seeing the problems the different problems this hobby throws up – and how you lot find a solution. Clever stuff.
Now on to Daryl – who had me smiling from ear to ear with these pics, because it looks great fun:
“Hello Alastair,
I really enjoy getting your post from all your readers. There are some very talented modeler’s out there. I especially enjoy seeing the ON3 layouts.
Someday I hope that I can have the time to build a layout as fabulous as the one I see on your post.
Thought I would send some pictures of the railroad I work on and see if any of your readers find behind the scenes of an operating railroad interesting.
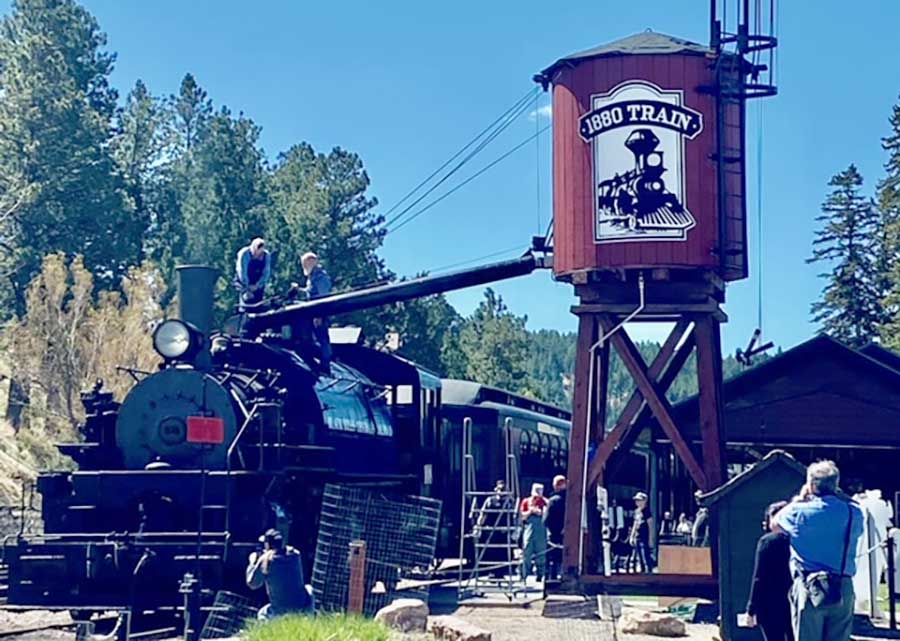
The pictures you see are from the Black Hills Central Railroad ( The 1880’s Train, located in the Black Hills South Dakota) also have a FB group just started (1880 Train gettin greasy)
Filling the water tank on engine 108 before are trip from Hill City to Keystone. 10 mile run with 6% grade for over a mile.
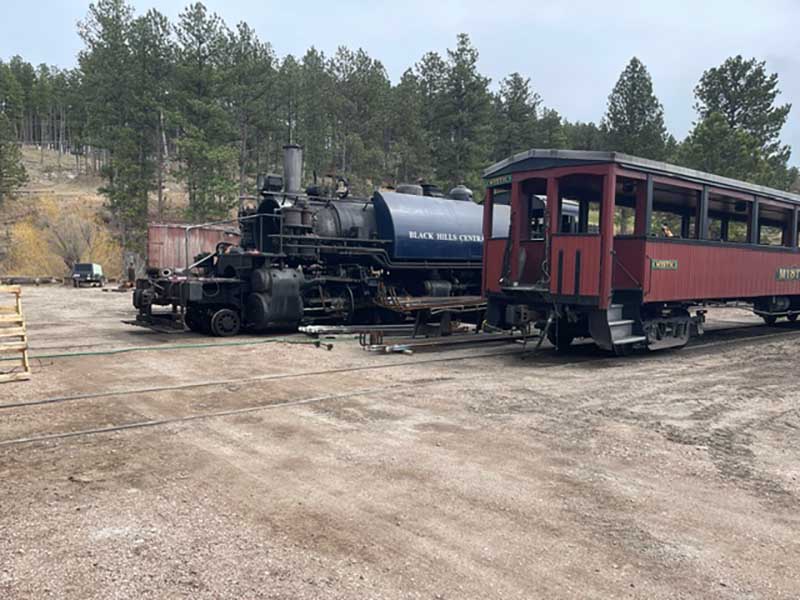
Engine being set on the pit being ready for a bath and firing up for the first time of the 2024 season.
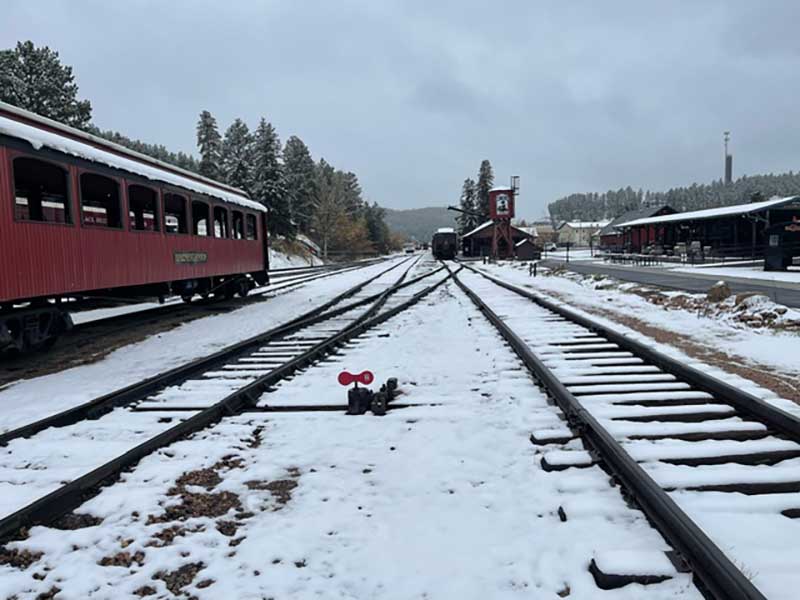
A late May snow.
The Engineers stand. Controls for the top then left to right. Throttle, Main brake, reverser (Johnson Bar), hidden behind the reverser is the sight glass blow down, below that is the sander ( forward and reverse ) the the bell ringer and to the far right is the independent brake.
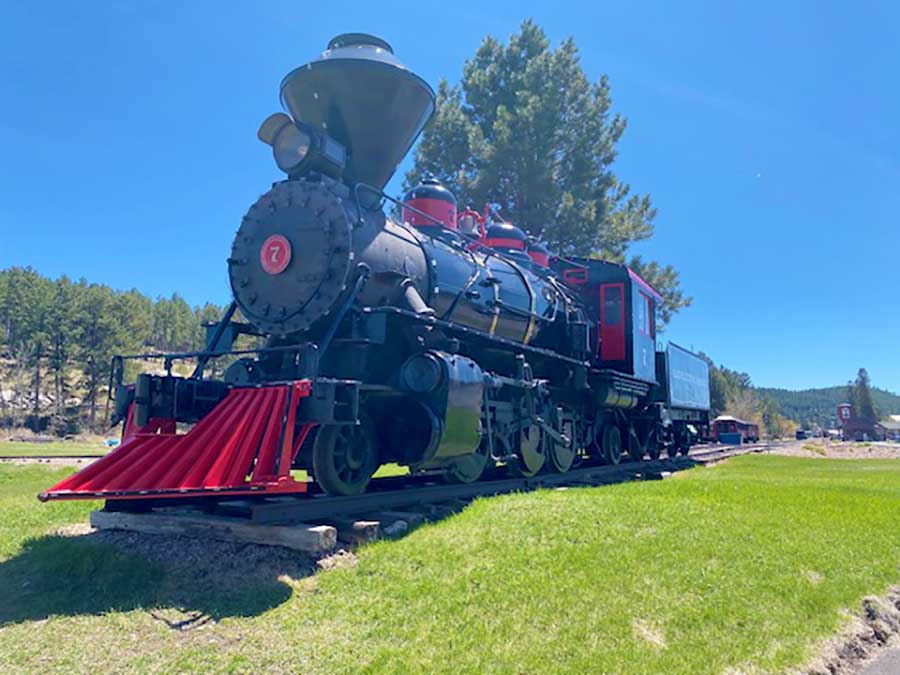
Our flagship engine, #7 a Prairie (Retired, has been used in many movies)
Installing super heaters in engine #110 after boiler repair.
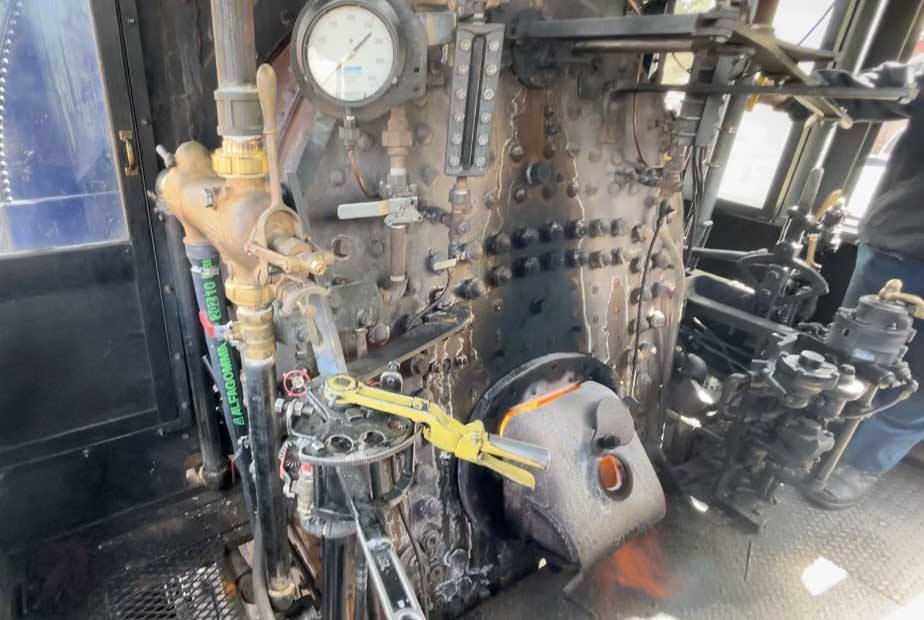
And to round things up a view from the fireman’s side of the cab. “We don’t get to drive the train or ring the bell, but run short on steam and see who catches hell” the Fireman shows up 4am to check the water, check both sight glasses and blow them down, check the atomizer, blow out and check the blower, start the fire the fill all the sanders, tap around the whole engine checking for any lose nuts or bolts fix as needed, grease (and there are a lot of fittings).
When pressure reaches 150# start the compressor, test the brakes, test the whistle, the sanders, the bell, the head light, keep an eye on the pressure, if time allows steam the rods, clean the windows. Right before you leave to lash-up a quick oil around.
In the picture you see what the fireman is in charge of doesn’t look as complicated as the engineer but very important too.
The large gauge is the pressure gauge and right next to it is the sight glass. Just under that is the main manifold control, the large valve on the left is the injector (Seller’s 8.5) under that yellow handle is the fuel valve (firing valve) under that black is the draft door
Hope your readers enjoy something a little different. We are always working on something if interested.
Michel has been in touch – he’s added to the European model train layouts on the blog:
“Dear Alastair,
I send you my train story, please feel free to correct my English.
What you do with your blog is of great interest, in particulate to me.
I thank you very much for all the work done. I enjoy reading what all the contributors write and it helps me get updated with all the model train story.
I have enjoyed your daily e-mails for years now and finally have decided to share my layout with everyone.
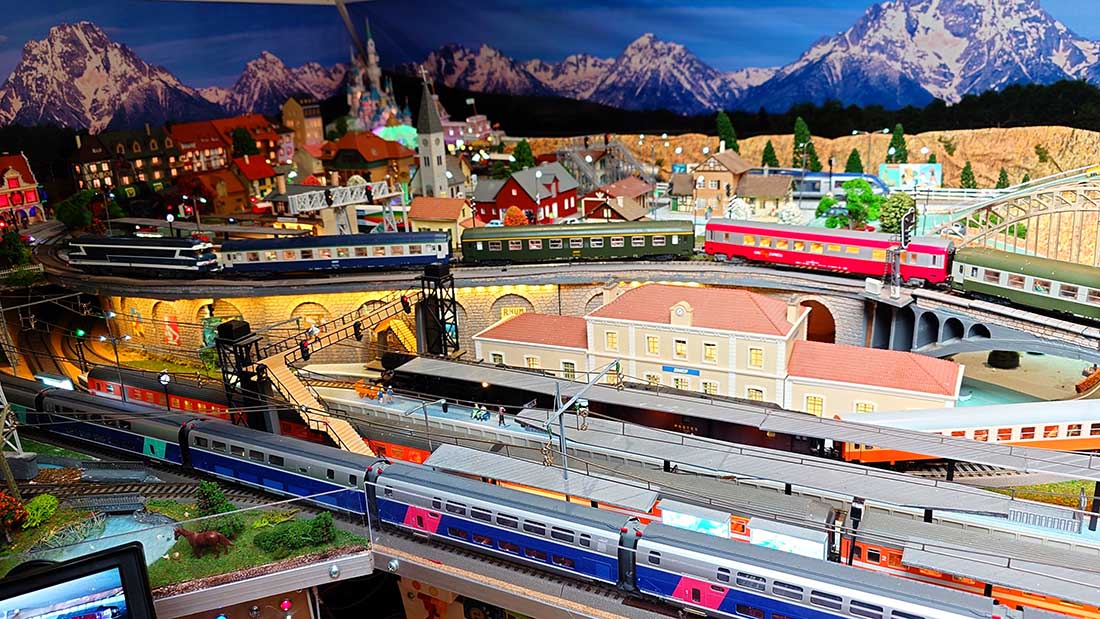
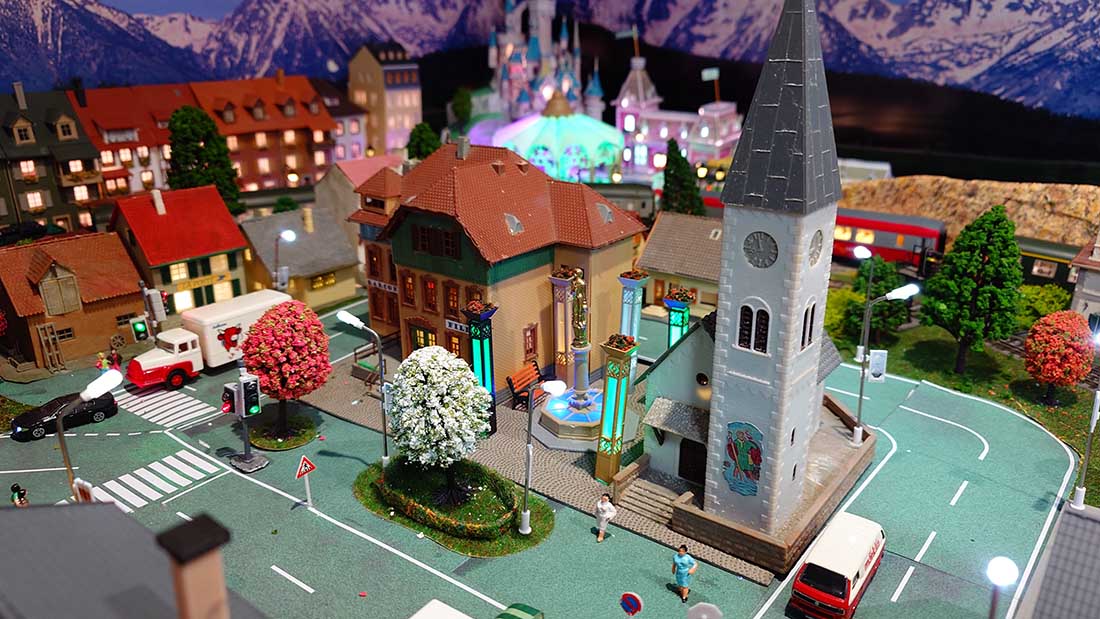
First a little about myself, I am French, 77 years old, and I have always been interested in running model trains. I live in the east of France, in the Alps, close to Geneva and the Swiss amazing mountain trains.
I am not a “real” modeler (my hand skill is not very good) and I don’t spend a lot of time to make things look real although I appreciate a lot reading all what is done in your daily post.
When I was 10, I received an electric model train (HO) as a Christmas present and since, I made a lot of layouts till university.
When I got married and had children, I made another one hanged in my boy’s bedroom, but this was not very convenient. I kept some HO locomotives, carriages and buildings. Few years after retirement I decided to build the layout I am sharing now.
My grandchildren used to play in a small attic room at the top of our house but now they don’t use it anymore and in agreement with my wife I decided it was the place to build a train layout. I started to use my previous DC models but soon lots of electrical problems appeared and I decided to switch to DCC.
I choose to use Roco’s DCC system because it appeared to me it was one of the more complete and simple at a reasonable cost.
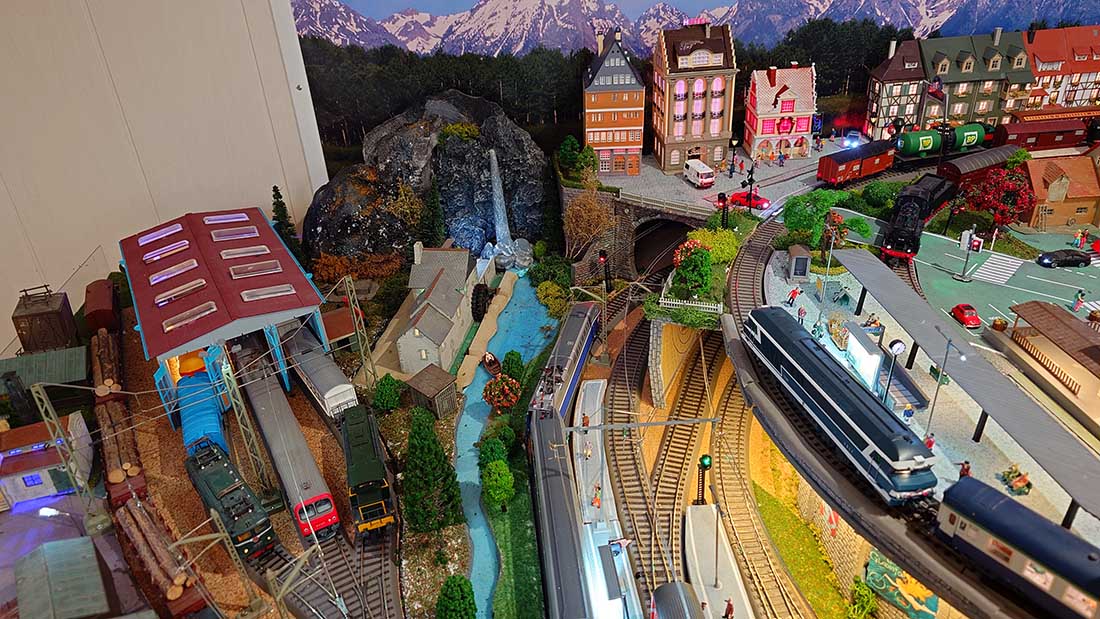
Ballasting is not my favourite task, although it gives a real look, and I choose Roco HO Geoline track system with its realistic plastic ballast bedding. Turnouts are equipped with electromagnetic motor and decoder in the ballast and do not need any additional cabling. Locomotives and turnouts are controlled by the same application.
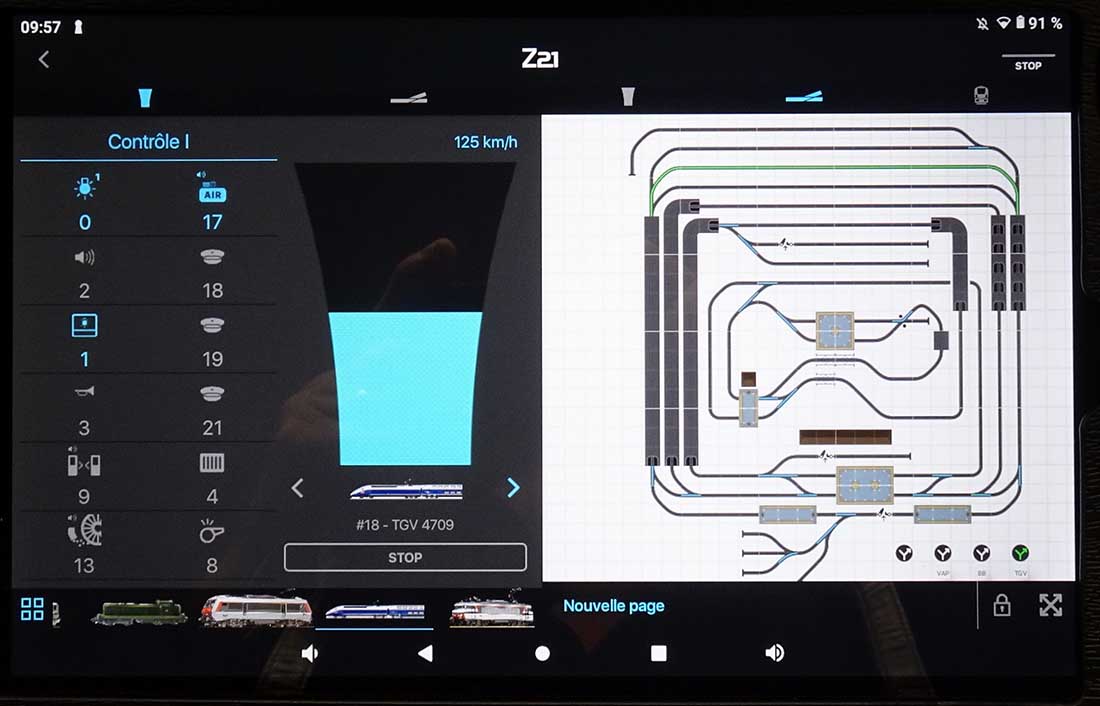
DCC Control system Roco Z21, on the left train control and on the right control of the turnouts at the touch of the screen of the tablet.
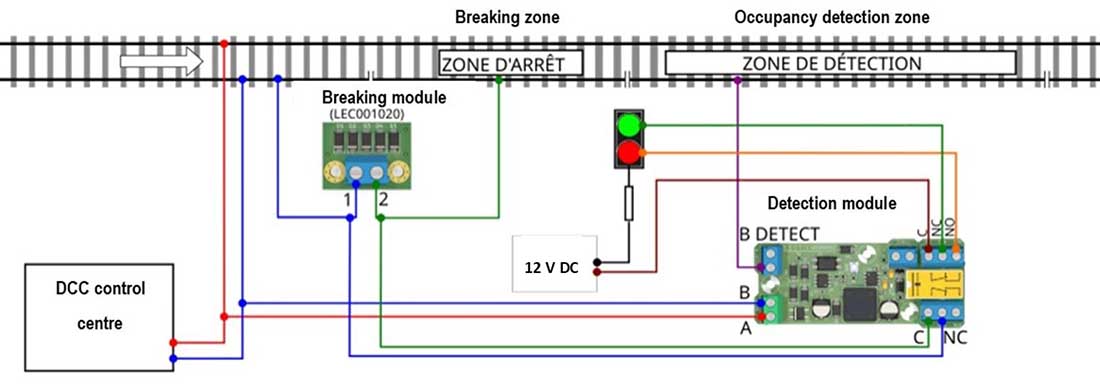
The layout comprises four loops and block systems with detection and breaking modules allowing up to 8 trains to run simultaneously. Light signals are monitored by the system or by the turnouts.
Block-type installation (Lectix or Lenz):
This block system is only working with locomotive decoder compatible with the Lenz’s ABC breaking system. My locos are mainly 8 Roco, 1 REE, 1 Jouef, 1 Pico, 2 Trix and 2 old ones now fitted with Zimo decoders. Only the Trix (Marklin) locos are not compatible with this breaking system.
A loop timer relay module allows the trains to stop at the station and starts the selected station announcement using recordable sound modules.
Infra-red sensors are used to help train parking, a small video camera is also used to see trains hidden under the first layer of the layout.
Electronic board:
Electronic modules are connected to the layout using ethernet (phone) connectors.
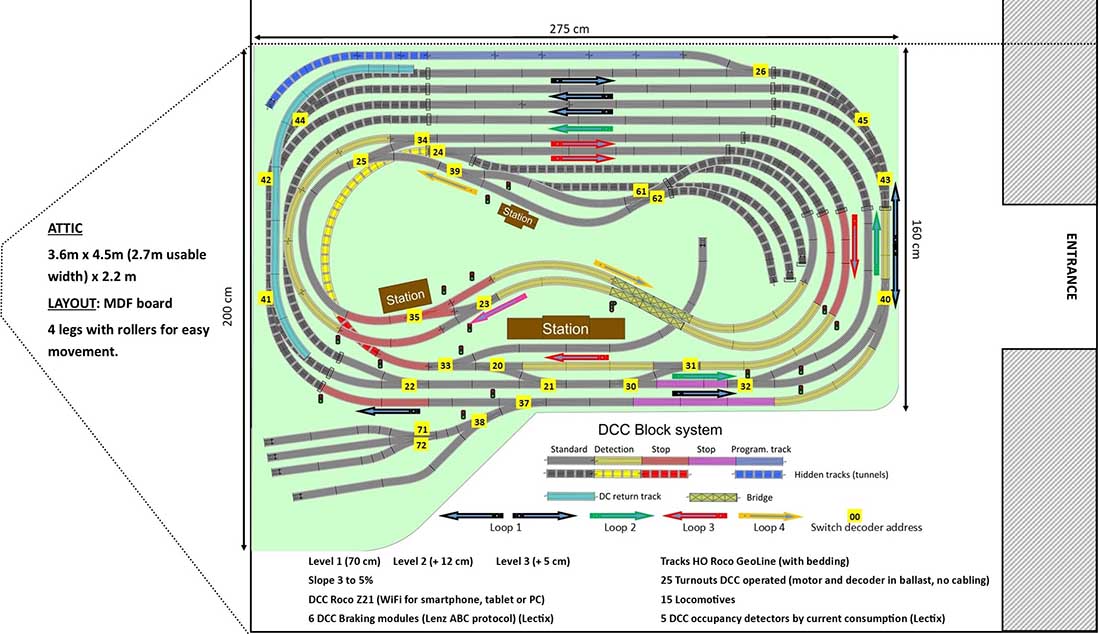
Details of the layout (AnyRail).
3D view (AnyRail).
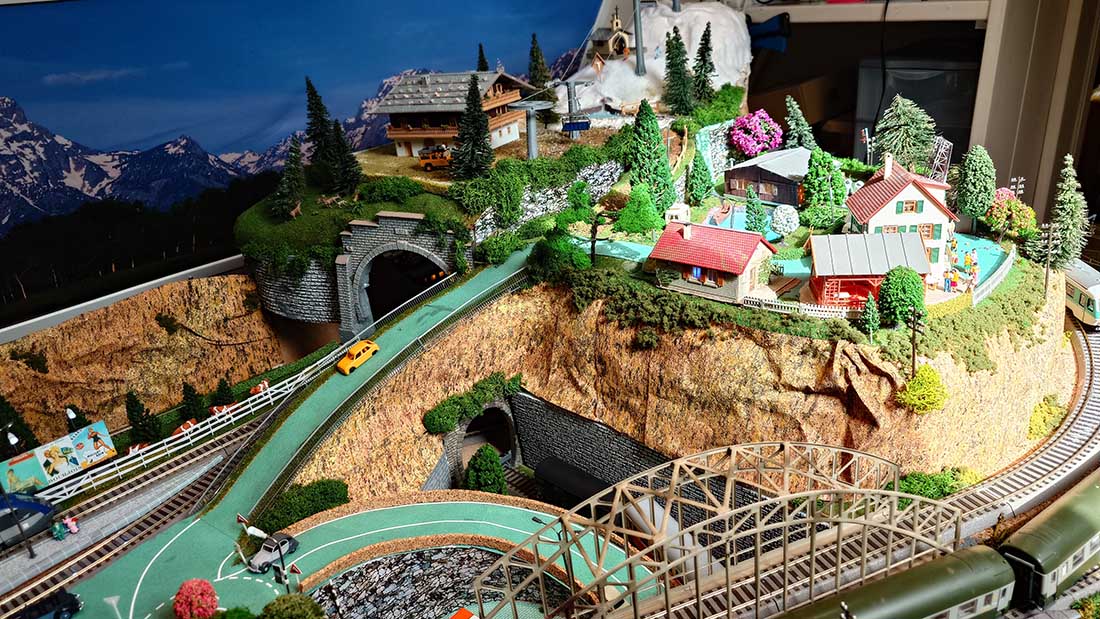
Some elements of the layout are 3D-printed such as bridges, platforms, train station footbridges and advertising boards. Roads and some walls are paper printed.
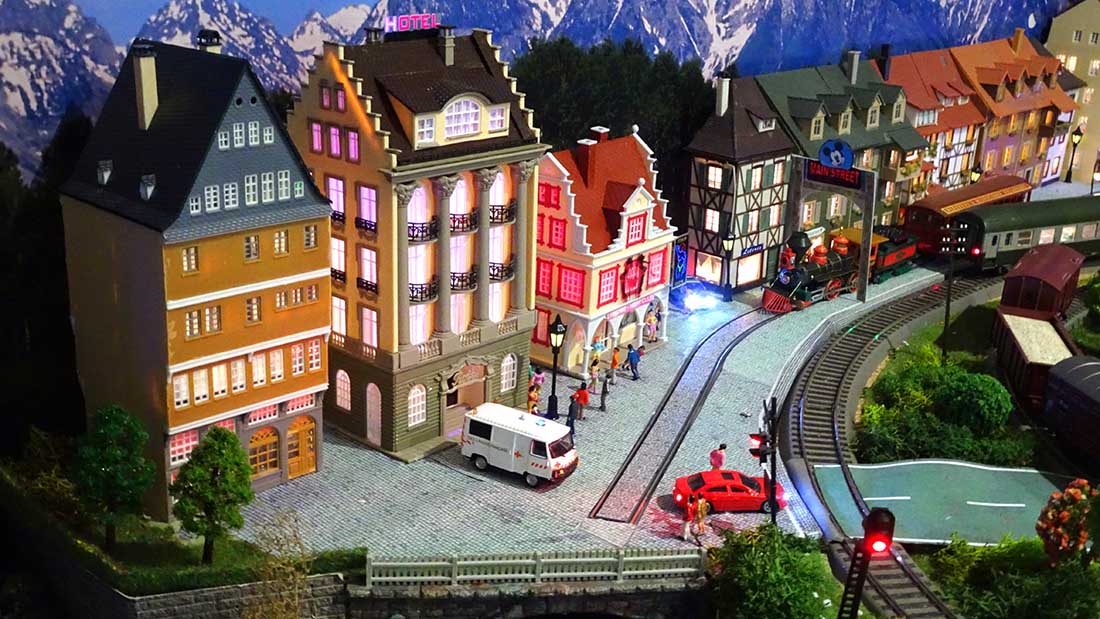
Traffic lights in the village are controlled by a microcontroller AT-Tiny 84 programmed with an Arduino. Sounds have been added to some buildings (Disney castle, entertainments …).
I use an old smartphone as a video advertising board with old ads videos.
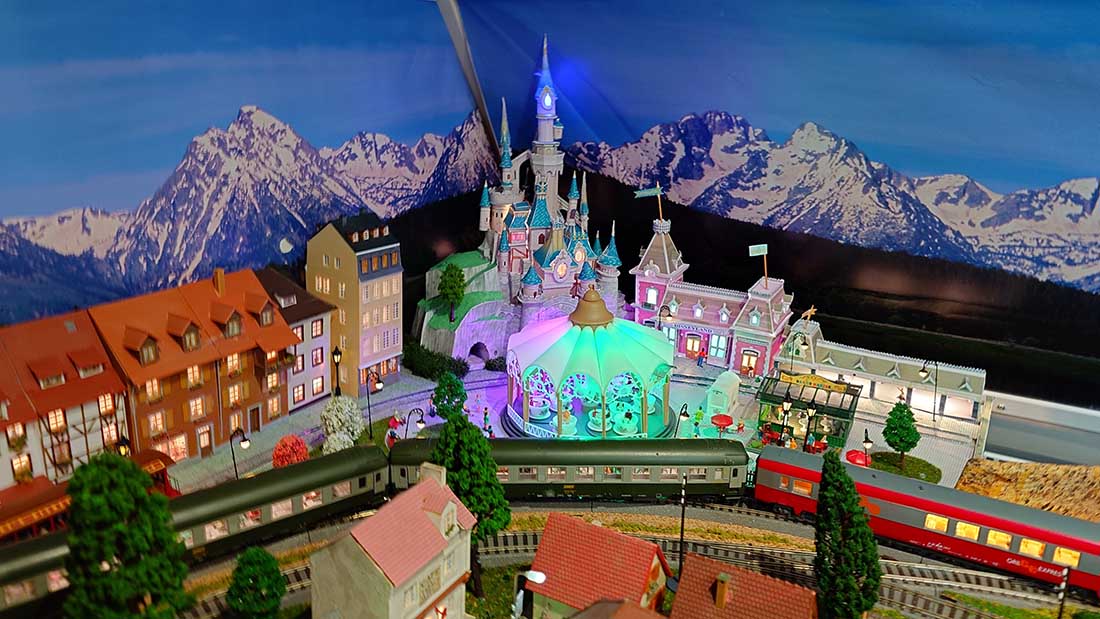
Most of the buildings are from previous layouts kept for several years. The Disney’s castle and station have been built with paper by my wife, a huge work!
The main supply for buildings is 12V, other voltages 5V, 4.5V and 3.3V are obtained with adjustable voltage converters.
The carriages are illuminated by LED strips with diode bridge fitted with capacitor and resistor. The buildings are lit by LED strips.
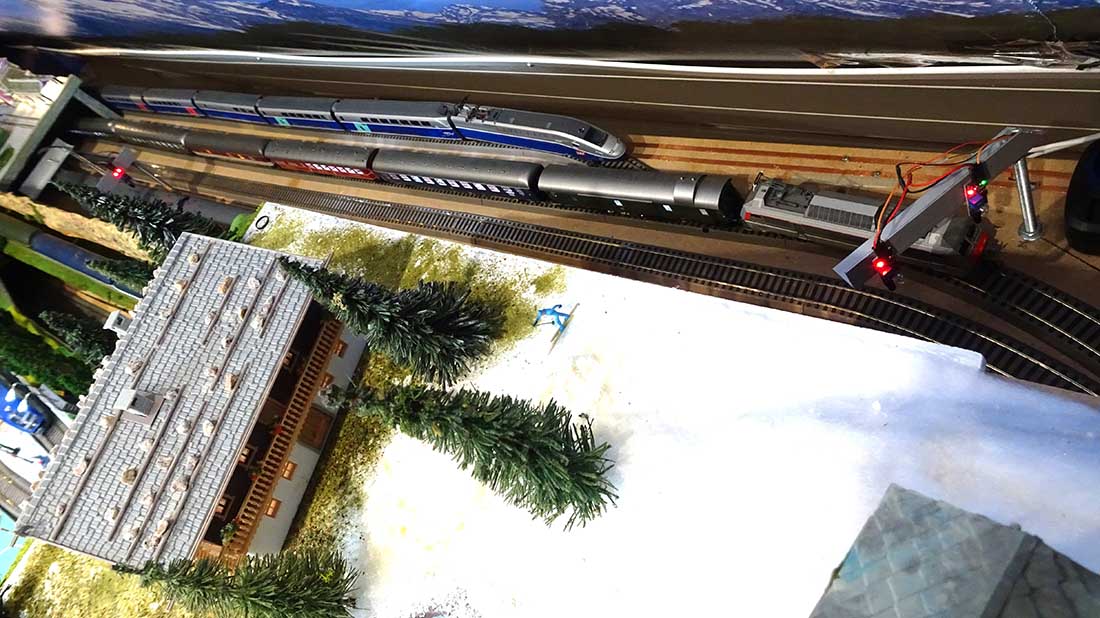
The mountain is made up of several sheets of MDF, adjusted in height by threaded rods, then covered with wire mesh, plaster tape and paper.
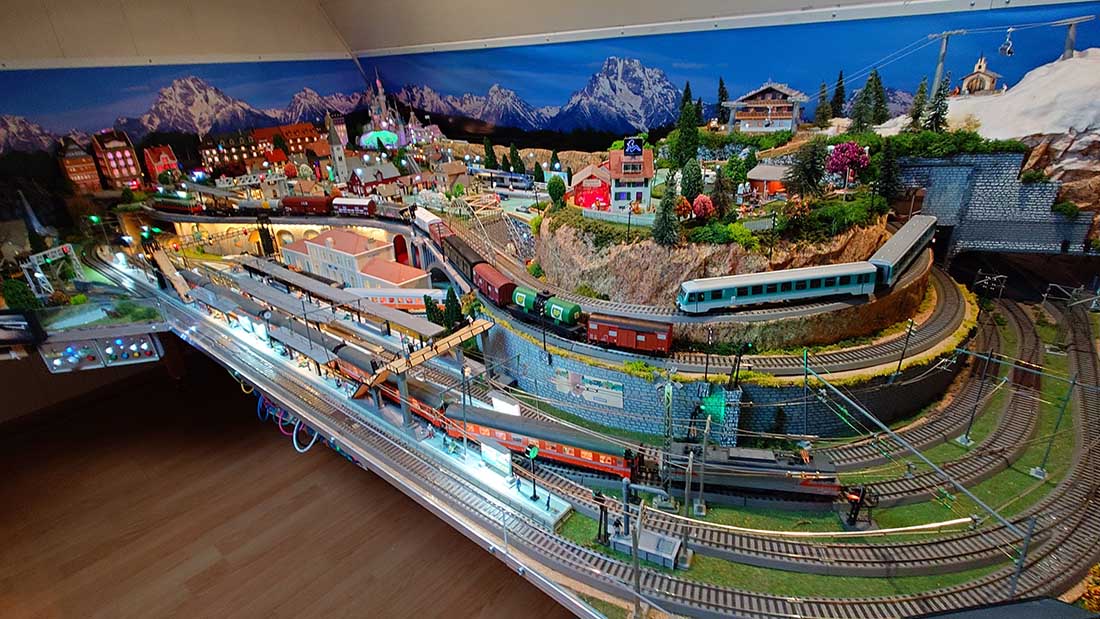
Overview
Main station
Mountain
Video wall
Naturist camp
Main station
Siding
Lack of space can lead to funny situations like the night club located near Disney’s Main Street!
The village
Village station
Small station
Disney castle
Railway sidings with infra red detection
All these elements can be seen on the video. A Sony FDR X-3000 was used to record the on-board videos.
Again, thank you so much for your daily email and congratulation to all the contributors.
Michel”
A huge big thank you to Michel for adding to the European model train layouts on the blog – I love what he’s done.