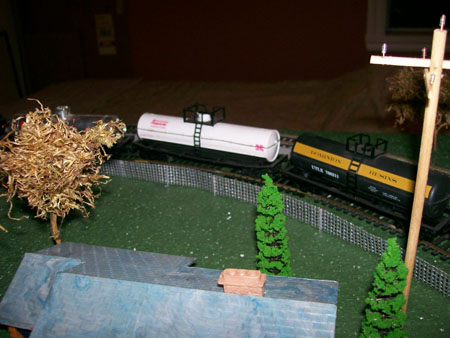
“Hi Al. Update on making metal looking fence’s.
1 nylon road crew flag. Cut up to make fence’s or can leave it to look like the construction orange fence ya see.
And already weathered. Paint with crafter’s acrylic water base paint. You can wash it off. Make sure you rub with small paint brush all the bubble’s out.
Take metal wire to make post’s and instant glue them on.
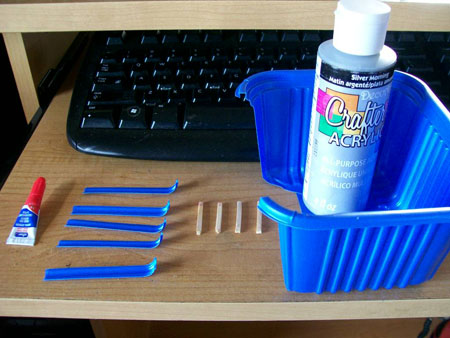
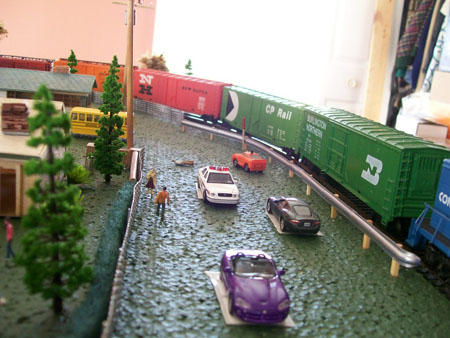
The road barrier is made from plastic food container’s.and glued with instant glue and painted crafter’s paint.and for the post’s i used wooden match sticks.
Kim”
“Hi Al,
I purchased a magnetic tray, which I can use for servicing my locos.
I can put the screws and other metal parts in it.
Result I don’t lose the screws and other metal fiddly parts.
Paul”
“Hi Al,
For realistic point operation, I insert insulated joiners about 18 inches leading into points on the switching tracks. If a train approaches the points, and the points are NOT set for thru, he train will stop at a realistic location before the points.
Its amazing how most of us use ‘junk’ and ‘REAL’ materials. Simple economics I guess !
Keep up the good work.
Steve”
“Hi there, I run 00 H0 and I’ve found that the empty 2 litre plastic milk bottles when cut down on the ‘bulk’ part and sprayed matt black on the inside and glued into place make ideal single tunnel entrances, and the 5 litre plastic liquid containers when cut down and sprayed do the same for double tracks. You can of course join several together if you wish for a longer run
Regards
Derek”
“I’ve found that old cotton sheeting or muslin dipped into a solution of polyfilla or similar is cheaper than mod roc, easy to mold and dries a lot quicker than papier mache. You will need to play about a bit with the polyfilla solution. Also, beware……..it can get a trifle messy.
Kind Regards
Larry”
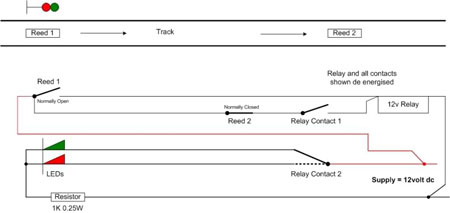
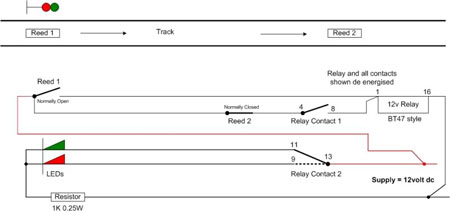
“Let’s try this again.This is a diagram for relay and reed switch’s for signal’s:
“Alastair,
Attached, I hope, are two photographs I think you might enjoy.
One is of a working railroad here in Western Maryland. My wife and I have taken this tour and we loved it. The foliage in autumn is beautiful.
The other is a steam engine, #777 that you may have to keep watered all summer long.
Enjoy
Richard”
That’s all for today folks.
Please do keep ’em coming.
And if today is the day you get started on your layout, the Beginner’s Guide is here.
Best
Al
PS More HO scale train layouts here if that’s your thing.


some great ideas,they look very good and easy to do.
GOOD IDEAS WILL KEEP THEM IN MINE AS STARTING TO WORK ON MY PLAN. KEEP THE GOOD WORK UP
Al,
You continue to have insight: examples: instructions: of so many different people. Each person showcasing their knowledge: talents: skills: for everyone to share.
I want to thank you and all the people who share on this website and for the dedication of model railroading. This is like familly sharing with one another.
So Al, to you and all that share with all of us … I thank you!
Tom N
Keep on Training!
VERY NICE
Very inventive…………
Cotton sheeting and muslin with Polyfilla good … try ‘way out of date’ bandages cut into strips and finishing plaster … cheaper than Polyfilla and can be layered.
If you want a more ‘textured’ finish use Carlite bonding or similar … slightly more expensive then ‘normal’ plaster but very realistic.
The advantage of Modroc … with the ‘alabaster’ within the fibre it is easier to control during ‘wetting’ and stays workable for longer. You take your choice … all model railway modellers are after all very resourceful!
Neat work Kim
Thank’s Paul and everyone.I have many idea’s and wish there was 2 of me.Right now trying to work out issue’s on makeing a ferris wheel run with a hidden rc servo.I bought a model aec welder,Takeing it apart to make my own.I payed tomuch for such a simple idea.Going to show it on here for everyone to make one.My fred or end train flashing light i made while back.im working on makeing power pickup’s for the track to power it.Glad the idea’s help.also save’s money.injoy more to come.
I wanted to start a train display looking at all the great idea’s but i really don’t know were to start and what type of train set i wanna go with.. it would cost alot of money to start one. can some one pint me in the right direction .
thank you
Sandor
Hats off again to the people who are placing their inspirations on the top of my list of references for my future “N scale” project of recreating the Homestead Works steel mill documented by photos taken by the last man off the giant United States Steel’s property,my Grandfather, who worked there from 1936 at age 20 until the mill’s closing in 1986…great work and advice here on Al’s page for wayward boys…Thank you,Al
Great road barriers. I need to see if containers like that appear in our kitchen recycling.
Cheers
Ralph
One previous tip warned about derails in tunnels and how to avoid them. I think using plastic bottles to line the entire tunnel would help prevent construction material from interfering with the trains. Larger diameter bottles would allow your arm to reach more easily (and more comfortably) into the tunnel.
Sandor.I would go DCC.Yes it is expensive to begin with.Buying the ez control centre.But you can run many engines same time.Your limited with Ho DC.Myself becuase i couldnt let go of my DC.I have both DCC and Ho DC running next to each other.And would only take a track piece to join both dcc and dc.That’s not a good idea joining both.most likely burn out your control station.And DC engines.So if you cant let go of DC run it along side your DCC.But i would start with DCC and spend the money on a unit.Ebay you can get a ez command unit and engine for deal’s.I payed brand new $70 but that was bidding against 12 others.And if you have DC unit’s that dont have the pancake motor can always upgrade them to decoder’s.So check for cheap decoder’s that will fit your dc engines on ebay.Keep your pancake engines for running on your DC track.Pancake motor’s cant handle the 28 volt’s your DCC unit will put out.Go DCC sell off your older models put money towards DCC.hope this helps
Ralph thanks.It’s easy.If you like my road barriers going to like my metal fence from nylon road flag’s.I have disected a ho welder kit to make more.will show it on here on a how to make your own super cheap arc welder kit for Ho soon.
Hi,do you have a picture of the plastic bottles being used in the tunnels.I don’t see it and it sounds interesting and creative.What is the ground cover in pictuure 3 it runs under the guardrail also.
Thanks Joe
TRULY IMPRESSIVE old boy, This shows true imagination and intuition, the guard rails have impressed to no end.
Derek,
Can you please describe how you cut a plastic milk jug in order to make a tunnel entrance? Providing a picture of the cut out piece before painting would be even better.
Thanks,
Ralph – Eureka, MO, USA
Hi Kim
that’s is really good idea!
I never thought of that.
Eugene & Doreen
brill ideas on here. just wondering tho if there’s anyone from northants u.k would like give pensioner who’s just starting up doing some track laying? also maybe after seeing area I’m laying tracks on might have an idea or two which may work after mentioning few ideas I have? thanks
terry
Sandor,
Definitely start with a digital “Starter Set”. Most Controllers will handle 6 engines or more. The wiring is easier and you can expand your pike to include some very cool digital accessories!
By the way, most Digital Engines will run on normal DC, so you can run your trains as a guest on other non-digital layouts.
Bill
I love these ideas. Don’t throw away those scraps of pine boards, cut them down on table saw into scaled dimensional lumber for trestle building, racks of wood for lumber yards, flatbed loads, etc. to purchase precut wood for these purposes can get expensive. This saves money, gets rid of scrap lumber and you can make any size you prefer.
Stan
Interested in contacting the person who is attempting to re-create the Homestead Steel Works. I also worked there from 1964 until 1984 in the Transportation Division & may be able to assist.
Most DCC systems have a switch that lets you select the voltage for your scale N, HO/S and O/G. If are running at 28 volts you must have it set for O/G gauge. Trying setting it for HO.that will give only 14 volts.
Great ideas. Especially like the Guide Rails.
I down loaded the three garages, i use a epson work force printer. i do have problem. i ordered ho gauge automobiles. the garages are way too short, can’t
close the doors.
TO THE GUY TAKING THE WELDER APART. You did not leave your name. I have a Lincoln Hobby Weld that runs great on 110 volts. Be careful what you’re doing. It’s not the volts but the amps that will kill you. If you are not 1000% sure of what you are doing, don’t do it. It is a recipe for disaster. I don’t know what your ultimate goal is, but if it’s what I think it is, spend the money and either buy a new one or get a registered tech to do it for you. Good luck. I have cabin fever too, but safety is always #1. I’ve been hurt enough times to know. Best from cold snowy Southern Ontario.
the road barrier is great
Thanks
LOVE the blue plastic food container as a donor for the road barriers!!!! That looks GREAT! Question is, what type food? Brand name and all as I’ll look to find something similar to make them as well!!!! Nice way to recycle the plastic!!!!! True “Up-Cycling”!
I have a long 2% grade that runs for 25 feet against my back drop. How would you suggest to decorate the back drop behind this slope and how to decorate the slope – -a long berm? – -a hillside? – – a trestle climb? – –
Are there any links to examples of this?
I would like to use multicolored led strips to illuminate the back drop. Would you place the strips on the benchwork and shine up – -or install a small valance at the top of the back drop and shine down?
thanks
For the person with three way-too-short garages: In the 1950/60s it was not uncommon for people to build a smaller, door-less and window-less, shed-like extension, at the rear of the garage to house the nose of the longer vehicles of that time.
To Sandor:
Just some thoughts: Many thinks you should consider before you jump off into the hobby: What space is available for a layout? What are your skills? Do you have time to work on a layout? What are your finances? Are you married and is your family in favor of your desires? Obviously, railroad scale is a factor in what size you want and can afford. DC & DCC is also a decision you should consider. N scale would probably be the least expensive. E-bay is an excellent place to look for train equipment, new and used. I would suggest that you find a starter set and try it out first before you make your final decision. It is a lot of fun! Ray .
I’d like to see photos of Derek’s milk carton tunnels
You people are crazy awesome with all the great help with everything Trains and RailRoad ! Invaluable help that everyone can use in this wonderful hobby, I can’t say how much it means to some of us. But thank you for caring and sharing ! I wish I had kept my first Lionel train when I was still six/fifty five years ago, this could’ve kept me out of trouble.
Happy Holidays !!!
Pretty cool idea. Call a EMT for the Man in the road.
Please forgive me if I sound stupid but what is a Nylon Crew Flag??? I have never heard of such a thing
Nylon crew flags are nothing more than the red warning flags used by construction and railroad crews to warn about dangers ahead, etc. Their plastic open weave makes them ideal as chain link fences, window barriers, etc.. You can probably get them at construction equipment outlets or tool rental stores
I have found that the plastic type of window screen cut in strips, applied to tooth picks (paint brown/gray) for posts, make a great fence. Local hardware throw scraps away. I have also used wire to make the posts.
very good
Kim ….. those road barriers look great. I have been making them but with thin plastic striping but yours look great. I am going to look for those containers.
To Al and Everyone …. Have a great holiday season and successful new year.