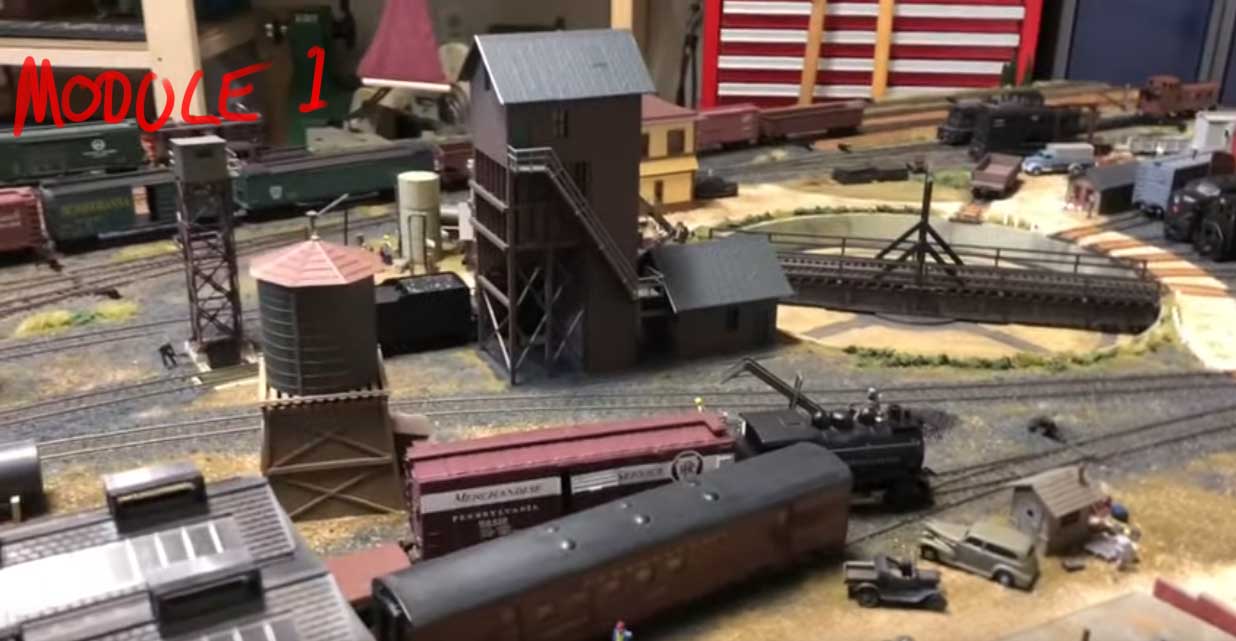
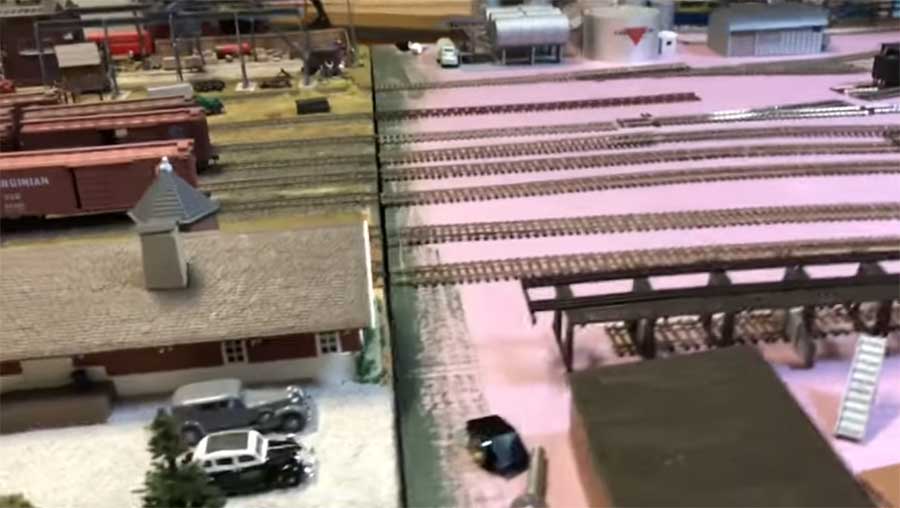
Bill’s been back in touch with some very clever HO scale modular layout plans.
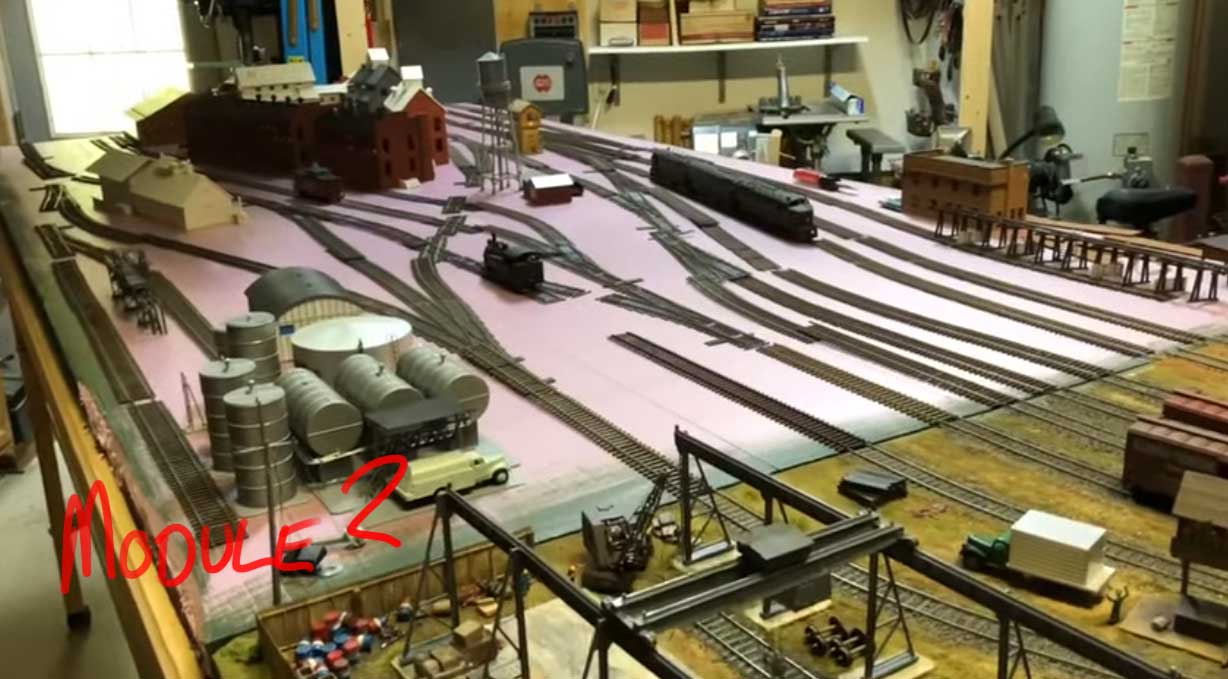
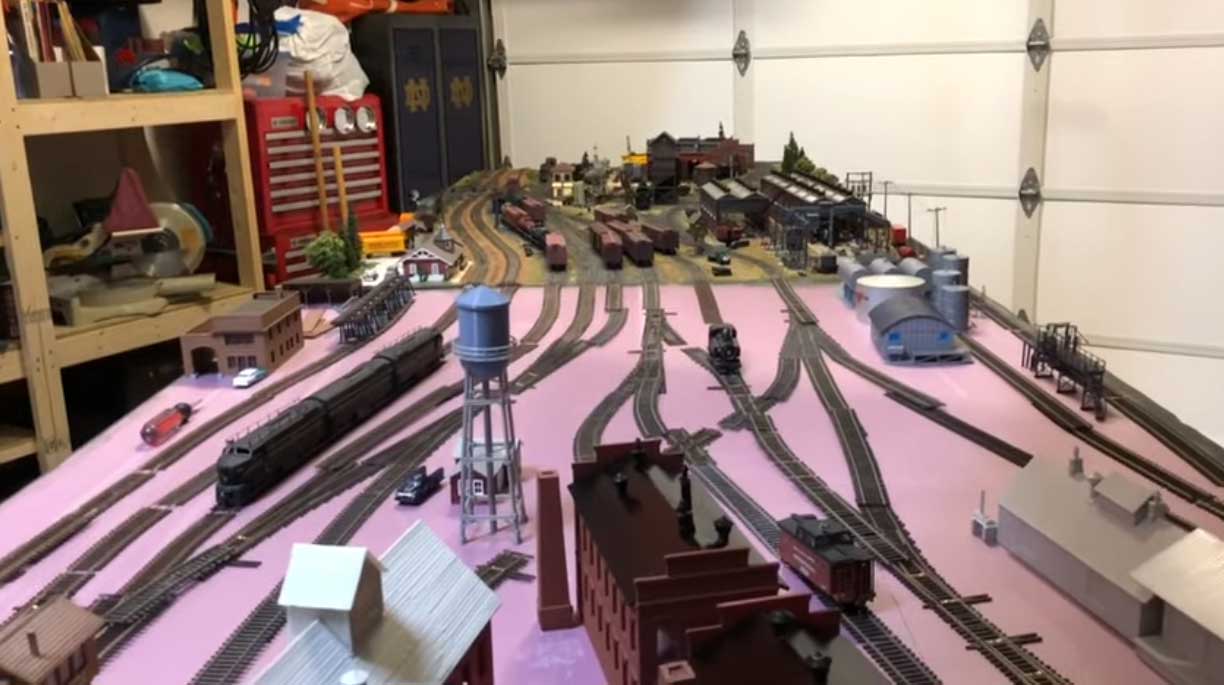
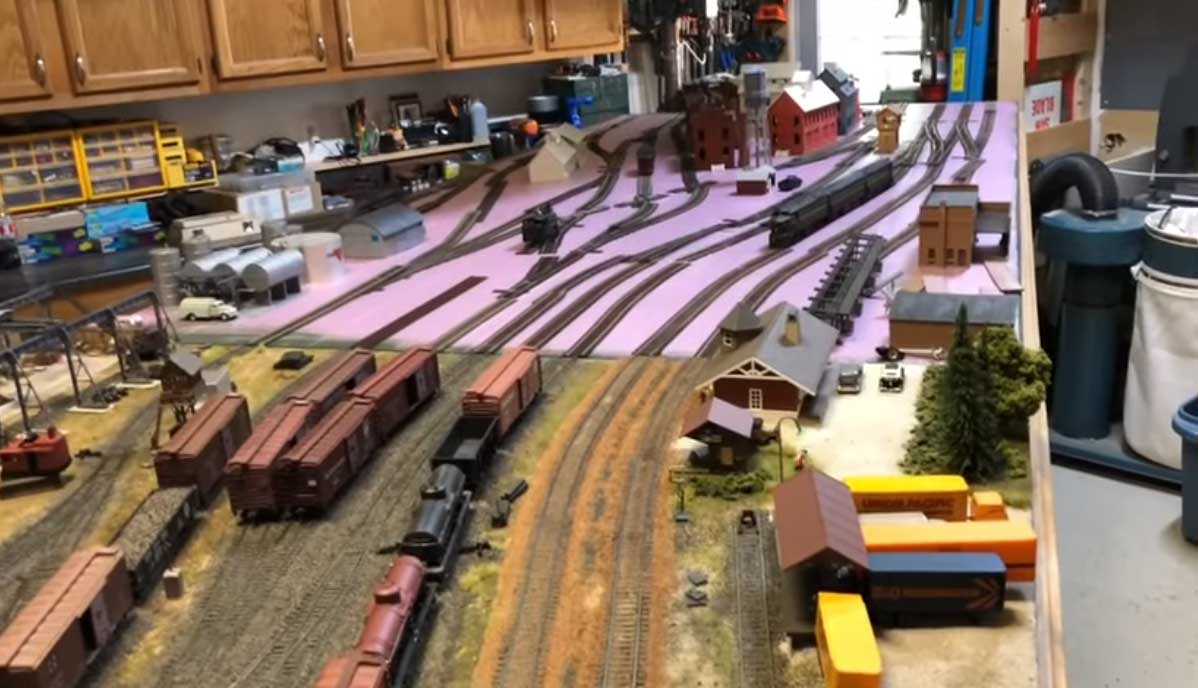
He’s made his second module reverable – so you can attach it to either end of the first module.
As he says in the video, this means he has lot of options when it comes to having some operation fun.
It’s been wonderful to see him create his layout.
If you missed his last post, it’s here.
“Hi Al
Sharing a video update of how the second section of my 4×16 modular layout is coming.
Shows the track plan on the new piece and how it will tie into the existing one.
I also had some fun with the track plan that you can see in the video. All in all I’ll have quite a bit of fun.
Best
Bill in Virginia”
Latest ebay cheat sheet is here.
A big thanks to Bill for sharing his very clever HO scale modular layout plans. It reminded me of Ken’s HO:
And next a question from Terry:
“Hi Al–thanks for all the time you spend letting the rest of us know what’s new, improved, or sometimes just “amazing”.
I have a question for the group:
I’m modeling ho with old fashioned DC power. The majority of you videos you post show more than one train running at the same time. I’m assuming they are probably being powered off the same power pack but can’t figure out how they get enough power to run.
My Tyco power pack has an output of 18v DC. On my layout if I try to run more than a single engine it just doesn’t have enough “juice” to do it.
So what type & brand of DC power packs do modelers use to produce enough electricity to run more than one engine at the same time?
Thanks
Terry
Idaho USA”
That’s all for today folks. Who can help Terry?
That’s all for today folks.
Please do keep ’em coming.
And if today is the day you get started on your layout, the Beginner’s Guide is here.
Best
Al
PS Latest ebay cheat sheet is here.
PPS More HO scale train layouts here if that’s your thing.


You should use a Tech II power pack by MRC for running more than one diesel or steam engine. They do have a two control Tech II power pack by MRC for HO that will power two train operation. Or better yet repower your HO layout with a DCC / DC power pack by Digitrac called the Zephyr, it powers up to 10 Loco’s & Throttles and more. It will use DCC but will also power one Loco on DC includes an easy to read manual. See your local train dealer about the price. I don’t remember what I paid for it.
If you are having trouble with running more than one engine, you need to look at how many Electrical Pickups you have for your layout. A pickup every 6 feet is what we put on the Club layout and we didn’t have any problems with the train slowing down or the ability to run more than 2 engines. As for your Transformer/Powerpack, depending upon how big your layout is will also depend upon how you Power it. If you have a large layout you may want to break it down to powering it in Sections, rather than from 1 power supply. A small layout should be fine with 1 power supply and several electrical pickup points. As for the Brand of Power Supply or Transformer, you will need to use a good quality transformer that fits your needs, but has room for growth. Do your homework before you buy one so that you are not disappointed with the results. In the back of many of the Model Train Magazines, there is a listing of the advertisers. Go to their website and see what they have to find the correct size Transformer for your needs. Do not throw out your present Transformer, it can be used for many different things on a bigger layout. Such as a Test Track in your shop area or to power a display used within your larger layout. Also see if there is a Model Train Club in your area that you could join and talk to the people there. You might find that one of them has the Transformer that you are looking for, at a very reduced price. This is a good start for now, Good Luck!
I use the TECH II loco-motion 2500 power pack by model rectifier corp. It has enough current to run 2 trains at the same time on the same track. You can also use the block method and use 2 power packs.
Hi,
In order to get good power distribution you need a couple of things, regardless whether operating DC or DCC…
1- Decent cabling – sufficient cable gauge (bus of 1.5 mm2 at least and short drops and even the drops should be “thick” enough)
2- Enough pick-up points – every 2 to 3 meters max (6 – 10 feet). I use 1.5m as max personally.
3- A good power supply – calculate 0.5A per loco running at the same time.
4- Limit track voltage for HO to between 15 and 18V
Using a decent multimeter you can check the losses.
Voltage drop should be no more than 3V between start and end with a load of at least 0.5A on the tracks. Less drop is better.
Hi Terry (in Idaho)
I’ve had good success with MRC power packs (the Tyco power packs are ok for starter sets, but as your layout grows it’s best to upgrade. In my opinion, depending on how many locomotives you have, you may want to upgrade to DCC. You’ll have full (controllable) power all the time, and current DCC locos aren’t that much more than DC locos-most newer locos are DCC compatible (just add a small board).
I use Digitrax Zypher with no issues, and run an assortment of Kato and Atlas DCC ready/equipped locos with zero issues. I’ve installed DCC boards into some of my older locos with zero problems. For what it’s worth, I use Kato track, and switches/turnouts using the Kato power pack and controllers. Again, zero issues.
I’m sure our friends and colleagues will have their own recommendations as well. What do I do/have done with my older locos which don’t have DCC compatibility? I use them as static displays on sidings or in the yards/sheds, or on my display case wall (or sell them on eBay).
Hope this helps!
Lee in Boston
I have decided that having my railroad divided into loop/blocks and a different power-pac for each is best. Where the blocks connect can be a challenge, if the second block direction switch is reversed, but all that happens is the engine stalls when crossing over . So, having 2 or more power-pacs allows for different directions and speeds. I’m wiring my railroad now, and am planning on 3 power-pacs. It allows one train to run along for the folks who just like to just see trains running, and then switching cars in a yard or in my case coal mines. Good luck, and let us know what you came up with.
Bless all you who can figure out the codes and commands for DCC – even with my electronics training, it’s all Greek – or maybe Martian to me, and my old engines from 30 years ago won’t fit the decoders. then there’s something about putting $100 electronics into an engine I bought for $6 in the 1970’s that stalls my sense of propriety.
John from Baltimore
Thanks Bill for the video of your movable layout and the fact that you can swap the units to vary the operation. I am curious to actually see it work in that you have so many joints (track connections) that have to line up perfectly. When I made the liftout section of my layout I ran the 3 tracks across the joints and stabilized them with urathane glue and screws prior to cutting the joints with a cutoff wheel on a Dremel machine. Even after that procedure I noticed how critical the lineup was in effecting the train operation. The slightest misalignment caused the wheels to jump track. I hope you have good luck in bringing all those tracks together at one time and can’t wait to see an operating video. Paul
It isn’t just the voltage, it is the current/amperage required per locomotive. The more current the power supply provides the more locos/lighted cars you can have on the track at the same time. As others have stated, having wiring connected along multiple sections of track will keep the voltage drop to a minimum. This is a very simple answer as there is a lot more involved such as double or triple heading locos or running multiple trains which would require blocking. I’ll bet there is a good book out there about this subject.
too many dead ends and turnouts going nowhere,I don’t see any complete circuits or returns other then going in reverse.the first semi finished portion seems dark and dreary.Brighten up the area.
Thanks to all of you for the recommendations and tips for solving my power problems. They were very helpful and I’ll refer to them as I rewire. I think my major problem is I have a 12×8 foot layout with only one main rail power wire. As I have numerous blocks already wired, I assume that I would only add an additional main rail wire from the power pack to the layout every few feet.
I’m with John from Baltimore when it comes to DCC and the fact my newest engine was purchased in the late 1970’s complicates the issue.
Thanks guys!
Terry/Idaho
I wish I would have seen this a year and a half ago before I started my layout. What a great idea having sections on rollers that you can move around. Also I like the height of your layout. Great job; great layout coming along.
Hi Paul it’s Bill
I totally agree with you on the alignment piece. It has be dead on. In order to minimize movement caused by wood sweep and shrink the 5/32 plywood is glued to the underside supports and the foam board should be unaffected temperature changes. I also let all wood acclimate for months in the garage so I think I should not see any of those issues. The two sections are joined together when in place by thru bolts on the end so that once in place it’s not going to move. From that as a starting point I’ll use a jig I have in my mind to ensure the tracks remain true as I glue the new side down. As you probably noticed I made sure that the tracks are crossing the seam at a right angle so that too should minimize any deflection. I’ll post video for sure at that point when I have the new section powered up
Thanks for your reply Bill. I failed to mention in my first response that I replaced the 2 ties on either side of the cut with solderable PC ties. This added strength and permanence to the positioning of the rail spacing. Recently I had some issues of derailment with a 6 axle diesel crossing a joint whereas the 4 axle diesel and the 4-6-2 steamer had no problem. I went about replacing rail and rejoining in an area that I thought was causing the problem only to discover that it was a misalignment at the liftout joint of only about a 1/64th (.015″). So now I make sure when ducking under the liftout that I don’t hit it with my head and once inside the layout I pull the liftout toward me to help align the joint. Just saying it takes very little to upset the works.
Hi Terry,
Have a look at CATrain. It’s a simulation program that (I believe) is still freely downloadable. The writer sells modules to make your layout into a real setup.
I use it for designing my layouts and watching the trains -albeit on a computer screen.
Best of luck
Alan …
Hi Bill
I live in Adelaide Australia and I have been looking for the cork road bed.
Do you know where I might be able to get it. I only use the split type that you are using.
thanks for the thoughts on the culvert construction.
Bill’s work is master modeler level!
But Bill moved to Iowa several years ago and has been in Thailand on a project for over a year now. He is building an N Scale layout on for 4-7 foot tables that form a square with backdrops that block the view of the open area in the center. He intends it for ease of transport and public display to encourage others to develop an interest in the hobby.
Checkout his handy work by going on YouTube and searching for “Bill in Thailand!” Great instruction on how to build a great layout from start to finish.