G scale train modeling

Cary’s been in touch with his G scale train modeling exploits.

(Cary’s last post is here).

I have to say, I do love his layout and what he’s done. Six years of fun so far – and that’s what it’s all about, going at your own pace…

“Hello Al and All,

I’m about 6 years into my garden G scale railroad and hope to finally start laying track this summer. Last summer I brought in 7 tons of rock for the track bed.

As mentioned in some of my previous posts, during the winter months I’m making buildings, vehicles, people etc… I was only able to get in a few projects this winter but they were rather large and made to fit exact locations on my layout. Here they are, hope you enjoy.

Trestle Bridge

The bridge is designed to go in this location. It is both curved and on an incline.

G scale train modeling trestle

G scale train modeling loco

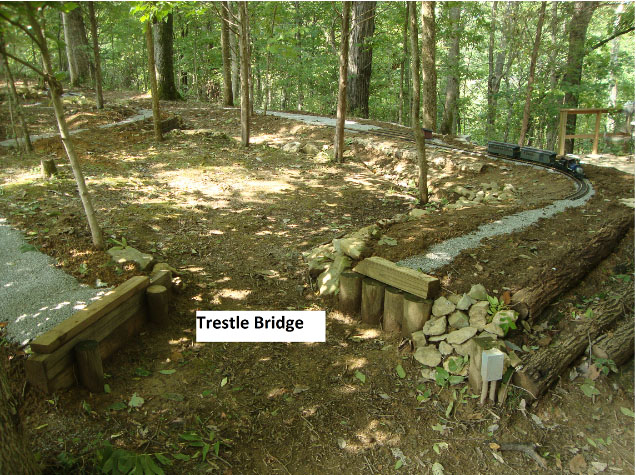
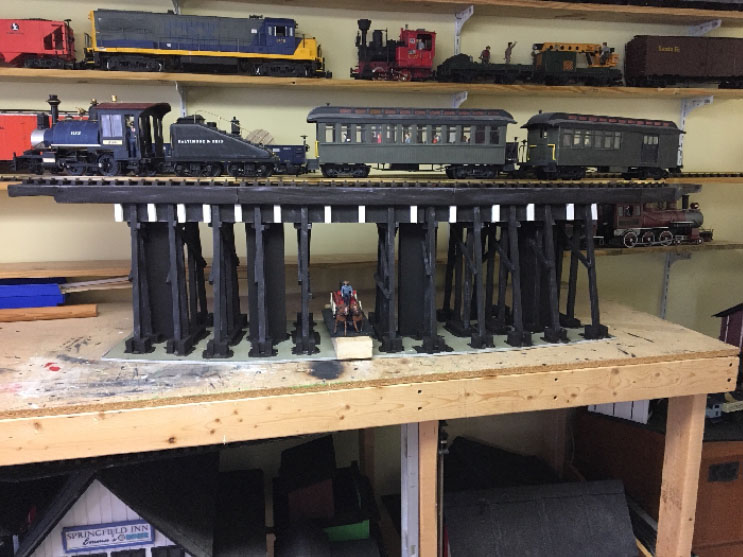
The lower 2-3 inches will be covered in dirt. You’ll notice that I cheated a bit by using four vertical pieces in the center that actually hold up the bridge. Since the bridge will eventually be outdoors permanently, I thought the added structural support was necessary.

I then built the trestle timber around the vertical supports which made the build easier and to the right dimensions.

The vertical pieces, fiberglass base and top track bed are all screwed together. The trestle pieces are glued to the base with construction adhesive.

I had planned to paint the bridge black but found that I had very little flat black paint remaining. I did have some red left over from a previous project and when I mixed the two together, I got this wonderful chocolate brown color. It’s always a nice surprise when use of improvised materials turns out better than expected.

G scale train modeling bridge

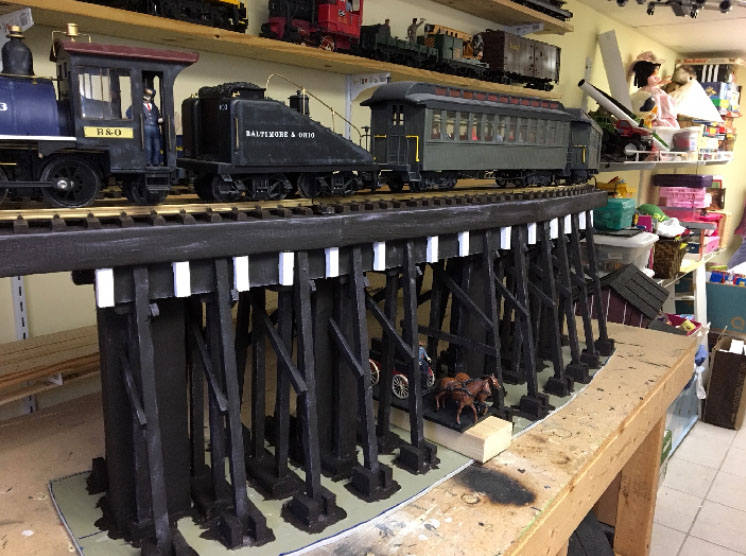
I dry brushed with some gray to add highlights and as usual, may have overdone it a bit. The small, white accent pieces really serve no purpose, but as the project neared completion, I thought the extra detail would provide some needed character. The horse and wagon show where I think the top of dirt will be.

Tunnel / Machine Shop Combo

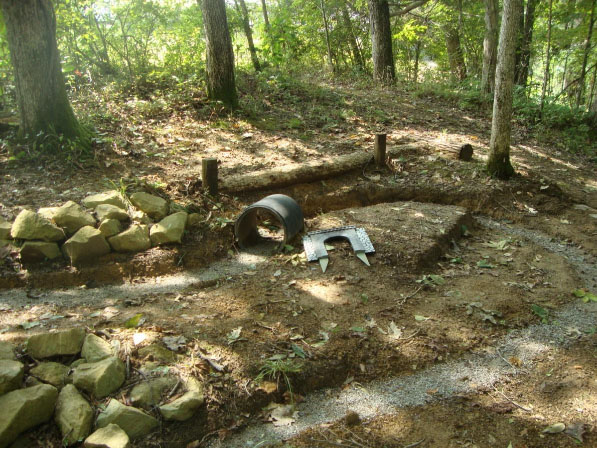
This project is a strange concept, but hopefully turns a problem area on my layout into a positive. The idea is to have a great tunnel face but a short tunnel with easy access (maintenance, critters, leaves) and create a focal point on the far end of my layout.

I’m going to remove the plant container (much larger than needed) and extend the rocks to the right up and over the tunnel face. The train will travel into the tunnel face, under the machine shop and into a trench. I intend to further hide the train in the trench with a shed and some plants.

G scale train modeling tunnel entrance


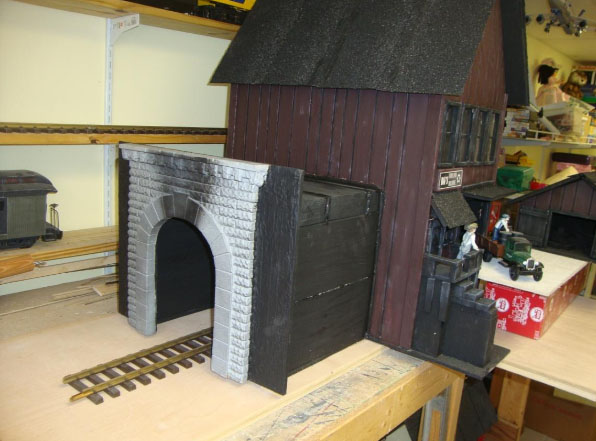
Once in its final location, the lower 4-6 inches of the building will be below grade. The truck and the shed are elevated here to show ground level.

G scale train modeling

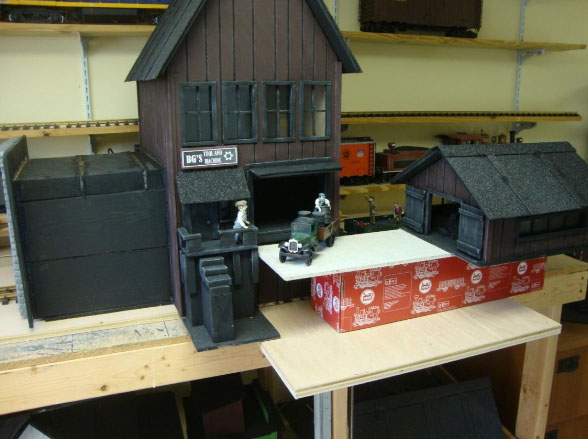
The structure is birch plywood with exterior house paint. The base is fiberglass and the roof is concrete board and real shingles. The four figures were sculpted from clay.

G scale train modeling

G scale

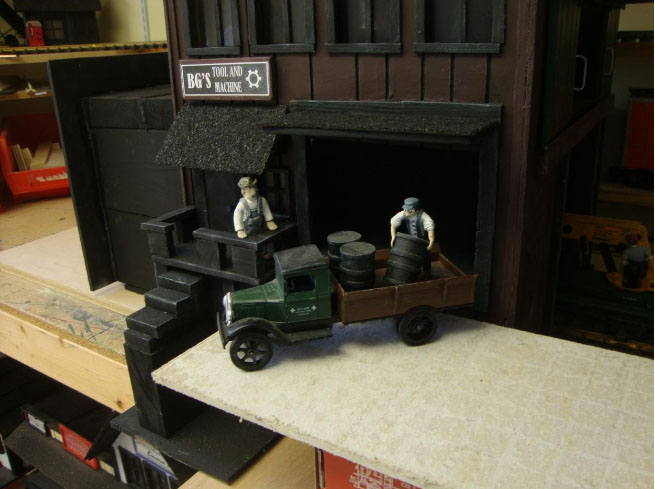
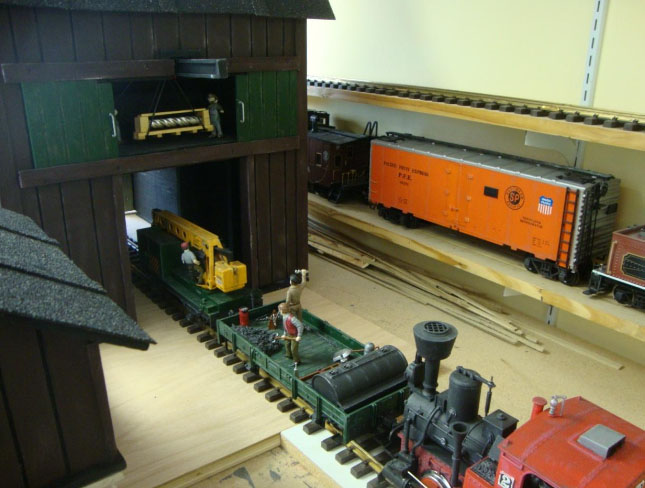
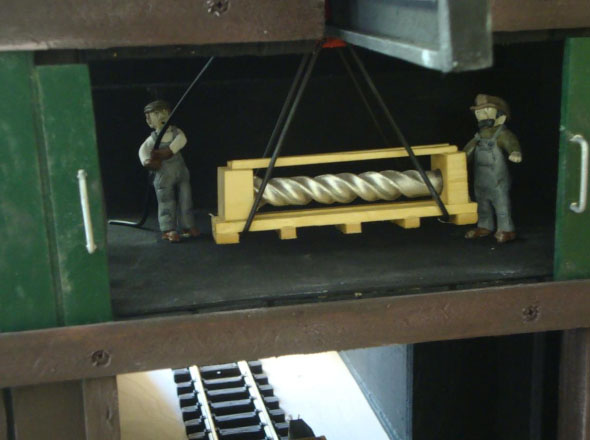
I hope this large opening will be big enough for track cleaning and removing debris, the roof is removable for additional access if needed. With the train coming out the bottom of the building I wanted to add some detail to give it a purpose. I came up with the idea of a gantry crane and suspended load. The doors slide closed to keep the birds out.

Building for the outdoors is a tradeoff between detail and something that will hold up in the elements. I kind of like the idea of doors that open, detailed things that slide that will be protected during non use and winter months. I’m going to try to work more of this into future builds. The clay figures take a lot of time to produce and here they are much harder to see than I had hoped. Hopefully those who visit my layout will take time to appreciate some of the “not so apparent” details.

G scale

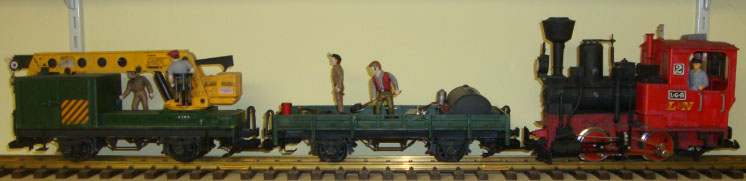
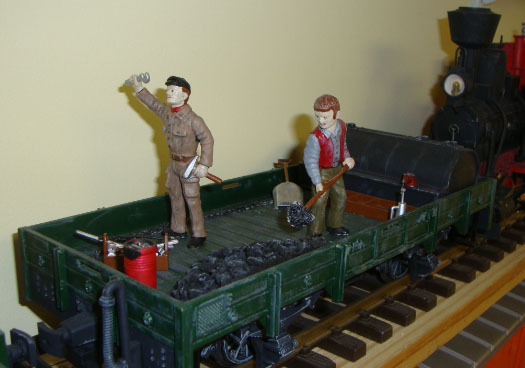
I wanted a maintenance train for my layout and came across a good deal on an LGB starter kit. It came with figures and turned out to be a fun little project. The flat car is full of accessories I’ve picked up over time including the fuel tank that came off a truck coin bank.

G scale train modeling truck

Once again I wanted to say how much I enjoy getting Al’s posts and seeing everyone’s progress on your projects. Have fun and happy modeling.

Cary in KY.”


A huge thanks to Cary for sharing his G scale train modeling. I do love his updates – it’s a huge project and it’s wonderful to see it coming together.

And now on to Dave. This time it’s not his layout, but seeing as I enjoyed watching his video, I thought you might too:

“Hi Al, not sure if you want to post this, but just been up to NYMR to day to capture the famous Tornado which was visiting this last week, she put a great show on, and I am, sure you will enjoy watching her

Regards

Dave”


Latest ebay cheat sheet here.

That’s all for today folks. Please do keep ’em coming. And don’t forget the Beginner’s Guide is here and stuffed full of tips and tricks.

Best

Al


Eric’s moors layout

“Hi Al,

although I have been building a layout for several years now I still consider myself a newbie.

I am now in the process of a total rebuild having learned from my previous mistakes and in the process I want to feature my underground trains by means of split levels, a cutting and a cutaway section of a tube station.

I started the project by dismantling the present layout, and I have made a discovery. Now experienced modellers may already know and use this method, but I have not seen mention of it anywhere so thought I’d pass it on in case it is of use to anyone else.

When I laid my original track I was concerned that track pins would not hold the track securely on the cork sub-base. I didn’t like the idea of gluing it and then of course there’s the ballasting to consider.

The discovery I have made is just how well my alternative solution has worked. I used double sided carpet tape.

I stuck it around the intended route then peeled back a couple of inches of the backing tape and folded it over at 90 degrees. I then laid the track on top and used long ‘t’ pins to hold the track in place temporarily, then removed them one by one as I removed the backing tape by pulling the folded out bit at right angles to the track.

Once the track was firmly stuck down I applied the ballast. I was not very confident this would work or be durable, but it has stood the test of time, holding both the track and ballast firmly in place.

In fact the ballast is stuck so fast I doubt I can retrieve any for re-use.

John”


“Al,

Love your compilation of tips.

In my younger days (some 60 years or so ago) I tried to paint a cedar shake roof for a structure on my long gone layout. I could not seem to be able to make it realistic enough…..Hmmmm maybe a REAL cedar shake roof would be the answer, but where could I get the material for it?

Ahhhhhh, I remember my grandfather smoking cigars that came in an aluminum tube and had a very thin REAL cedar wrapper. I called him and asked him to mail me a few aluminum tubes with the cedar wrappers in them.

The first thing that I needed to do was to flaten the cedar, To do this, I steamed the cedar with a tea kettle on the kitchen stove, then I placed them on a flat surface with a book on top to press them flat while they dried overnight.

Some experimenting with a surgical scalpel and a metal straight edge was used to cut the cedar into thin strips which were then cut into individual shingles. Trying to place the tiny shingles onto the roof of a structure proved to be an almost impossible task using tweezers given my large hands and fingers. After some discussing it with my wife at dinner, she said “that’s simple, just spread your shingles ot on a piece of wood and use a very small sewing needle to pick the shingle up.”

After dinner I took a small piece of card stock and coated it with a slow drying glue……WOW, I started to put shingles onto the card stock starting with the lowest course and working my way up the roof. Releasing the shingle from the needle became somewhat problematic until my wife again came to my rescue with a box of toothpicks

All I had to do was put a tiny bet of pressure on the shingle with the toothpick while I removed the needle. I wish I still had that first structure or even a photo of it to post here. I built five or six structures with ceder shake roofs.

These were projects that took lots of time to complete but when completed they were the highlight of the scenery on my layout. I never got around to my second idea of using the cedar (cut into thin strips) to create cedar lap siding for some structures. One of the things I liked using the cedar was the fact it could be weathered easily using water based wood stains.

The cedar shake roof project brought with it another spin-off project. The aluminum cigar tubes had a dome shape on one end and a screw-on cap on the other end. I simply cut the tube to the desired length, plugged the open end with a piece of balsa and sanded it dome shape to match the other end. A coat of aluminum paint, and I had the first Propane storage tank for my Propane Tank Farm on my layout.

I hope model RR buffs find this interesting.

Dick
Maryland, USA”


Now on to Eric – his last post is here.

“Hi again Al.

Wensdale Moors Railway has finally arrived. It’s N gauge on a board at best 7.5ft by 5.5ft. The right of the layout shows my interpretation of the Yorkshire moors in the title but no signs of Heathcliffe.

After trying for a long time to make this a walk around layout instead of having the centre hatch, I failed as I did want at least a couple of levels and full circuits rather than end to end as I prefer to let my engines run rather than shunt from end to end, I’ll leave that for the purists. I am not a rail buff but I love modelling my various layouts a few shown in the past on this great site.

This time I settled for a bleakly sparse, 3 level, scenic layout with the centrepiece of a small river cascading out of a cave over slate rocks, the only buildings, a castle and remote farm.

The setting is early autumn. The grasses used are a mix of dark brown, winter, autumn and summer flock. The rock faces in many cases lift away for access to the tracks below so you will see where they join, you can try hide the joins but if you have a problem below they become more visible with use. That’s my story and I’m sticking to it. haha

The whole river area lifts off for access to my hatchway. Track wise this is just two tracks even though it looks like more, they are run by four analogue controllers so theoretically there could be four trains running at once but on my video I settle for three so as not to cause me problems when filming which hopefully aren’t as jerky as some of my past efforts.

To put it bluntly I nearly gave up on the layout due to all the hassle taking out the front section caused, but I’m over that now thankfully but will be happy to destruct this layout and start on the next in the near future. That is my problem, I love building layouts but once they are more or less completed I like to start over again. This is due mainly to my rheumatoid arthritis so I can keep my twisted fingers working before they seize up altogether.

To sum up I use Peco track and points with ballasted underlay, all pinned down so I can easily take it up and reuse it all. I use loose matching ballast between the tracks, again this can be easily sucked up into a hand vac and reused if not glued down. The grades are approx 2 percent and you will see I can happily run 6 coaches without problems.

Keep up the good work Al.

Happy Modelling

Eric (Leeds) UK”


Latest ebay cheat sheet here.

A huge thank to John, Dick and Eric.

Even after all these years, there are still some great new tips. Please do keep ’em coming.

Course, the Beginner’s Guide is jam packed with them.

Best

Al

How to make curves out of train track roadbed

Rob’s been in touch with how to make curves out of train track roadbed:

“Hi Al,

I have heard people say my favorite track bed, Woodland Scenics Road Bed is hard to work around curves.

Hearing that, and having the need to install some around a curve today, I put together a short 4 minute video demonstrating how I do it.

I love this stuff because it is such a great acoustic barrier between the track and the wood of the bench that supports it. I don’t want to hear wood reverberating when my trains run over the track, I just want to hear the wheels. I have absolutely no connection with the company that makes this stuff.

I hope this is helpful to someone out there,

All the best, Rob – Farland Howe”

How to make curves out of train track roadbed

Rob’s how to make curves out of train track roadbed youtube:


Now on to Terry:

“Al: Thought I would pass along this tip for members who are still old school and using block sections to control their trains:

I’ve been in the train mode for over 50 years and of course during that time I’ve torn down as many layouts as I built and reused track, insulated spacers etc.

A few day ago I was trying to fix a section of track that caused constant derails. It was the end of a curve going into a switch with an insulated connector on one of the tracks.

Several readjustments of the curve had no effect and it wasn’t until I finally took a real close look at the connector that I found the problem.

The insulated connectors, which as most know, looks like a regular one but have a short pin that sticks up to block the space between the rail almost like an upside down “T”. (—/—)

To my surprise I found that over time and reuse, the “T” pin had worn down or broken off at the base and left too much space at the top for the rails to join without a wheel being caught while passing over!

Replacing it with a new insulated connector solved the problem immediately and of course reduced the number of civil suits filed by injured passengers against the Damnit Railroad to zero!

So my tip to others…is check the “T” to make sure it’s still intact. Sure saves a lot of unneeded worry and concern.

Terry

Idaho USA”


“Hi alistair thought you might like to see the progress of my 6’ x 3’ layout still a lot of work to do, with careful planning and the right choice of track it can be achieved as I could not find any track plans to fit my space

Regards

Michael”

Some folk ask me why I keep posting pictures of layouts that are bearly more than a bench with some track. I’ll tell you why: this hobby is all about making a start. It’s more than half the battle.

And speaking of making starts, the Beginner’s Guide will point you in the right direction – it’s cram packed with tips.

But now on to something else – something I do get a lot of mails on: finding stuff on the site.

If you fancy ferreting through years and years of posts and would like to find the pages relevant to your layout, then I suspect you’ll like this: a search box! I’ve called it the Golden Key.

In a nutshell, it lets you search through every post I’ve ever done (and believe me, there’s a lot of them).

But it comes at a cost. Sorry. Don’t worry though, it won’t break the bank – just $9.97. And that’s for life too. So one payment gets you a life time of searching. You can search until the cows come home, it’s yours for good.

Truth be told, without the Golden Key there wouldn’t be a site at all.

Anyhow, here’s what ‘the golden key’ will do for you. Press play and have a look:


And just to soften the blow, I’m throwing in with it, one of the printable buildings – this house below:

(If you’re new to the print out scenery, you just download it, print it and stick it together. It’s a lot of fun. Here’s John making one of the prints:


My word, I don’t think I’ve ever posted 3 youtubes in one go before.

So there you have it, the Golden Key and the green house, all for just $9.99.

Just so you know, the Golden Key sells for $19.97 on the site, and green house $9.97, so you saving just under $20.

And what’s more, you’ll be able to search and ferret through the blog until your hearts content.

Click here to buy the Golden Key Search Page.

That’s all for today folks.

A big thanks to Terry, Michael, and to Rob for his ‘how to make curves out of train track roadbed’ youtube.

Please do keep ’em coming.

Best

Al