How to make water for model railroad

Glyn’s been back in touch with a fantastic post on how to make water for model railroad.

“Hello Al

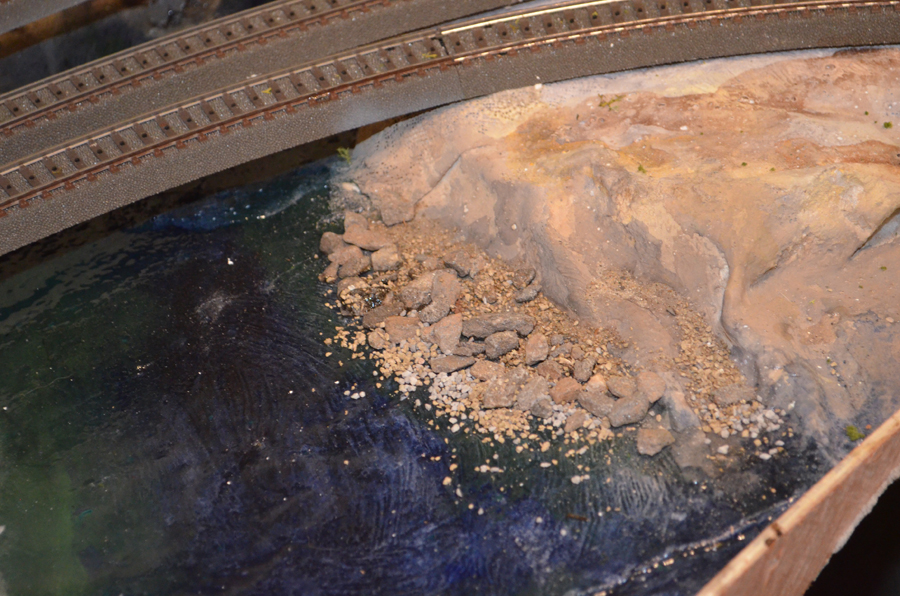
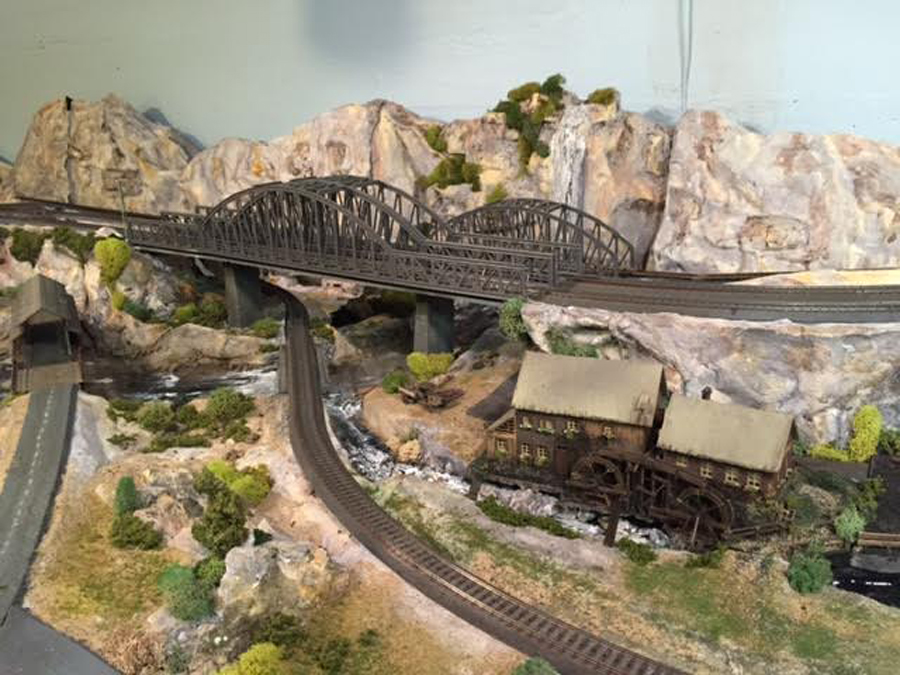
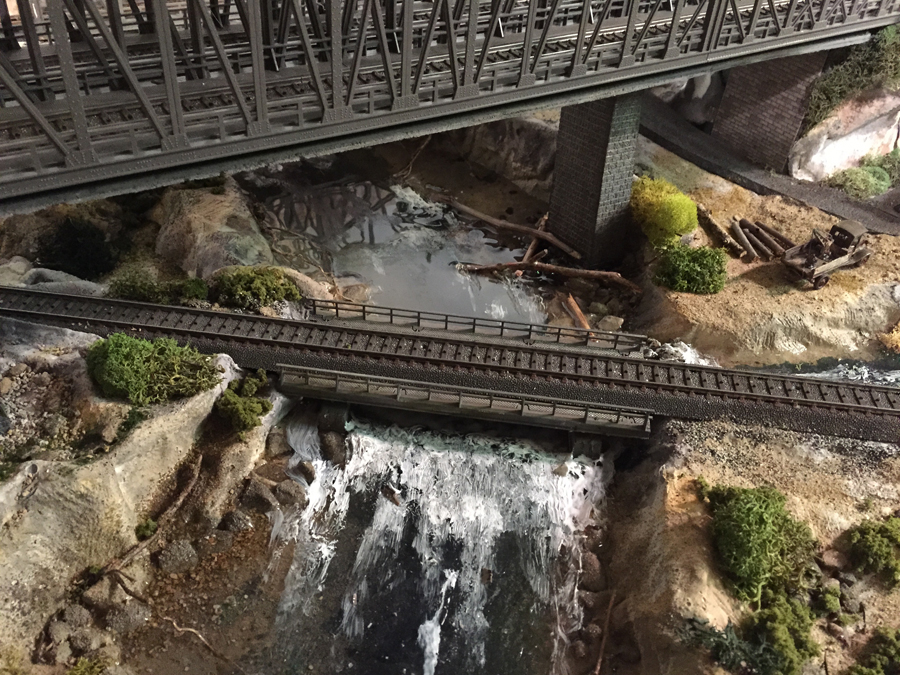
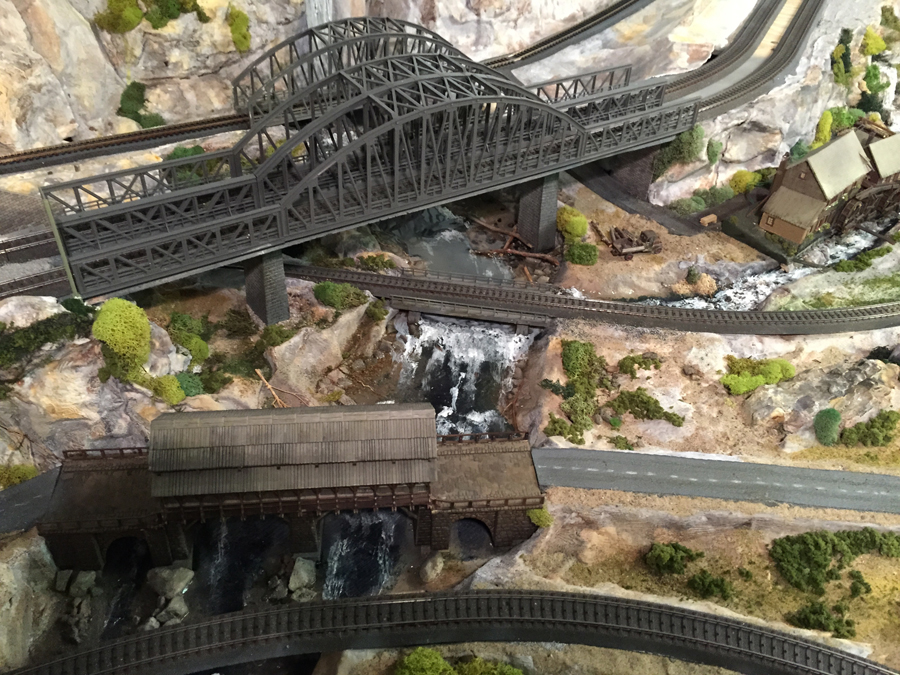
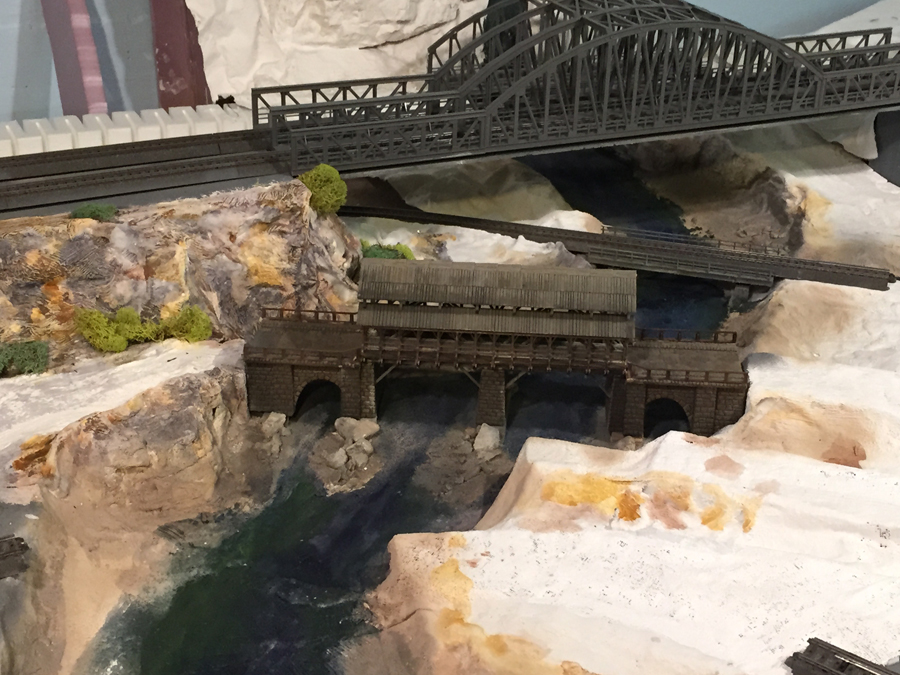
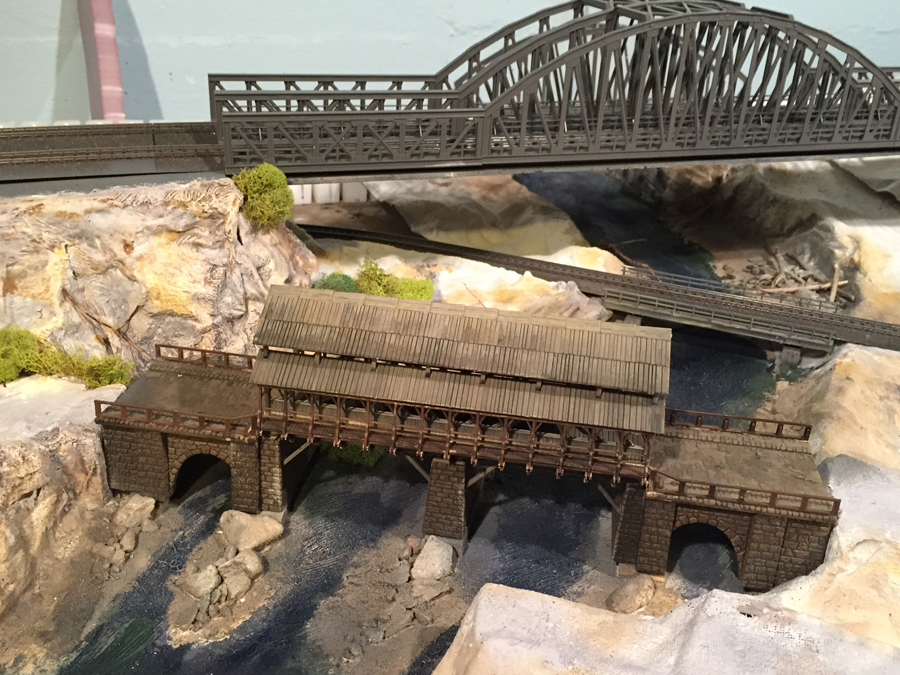
I thought I would finish up the river construction section today as my first post brought us to the painted river bed with some rock debris added but no further.

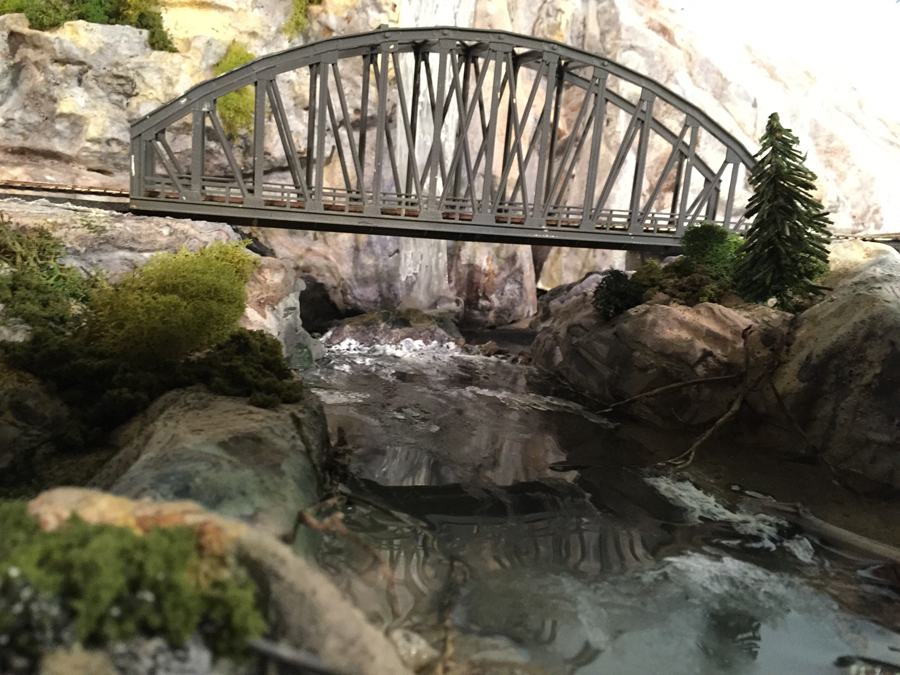
Once the river bed was plastered, I painted it as shown with darker blue for deep water in the center of the water flow, becoming more greenish blue toward the river banks.

I feathered the edges with light fine sand and inserted small pebbles I picked up in the driveway and garden.

For sand I bought a bag of fine children’s playground sand, available at any hardware store – cheap and easy and Ive used it over and over again to create river banks, sandy surface and roadsides.

I sprinkled the sand on river banks and over the approaches to the river. Once everything was in position I sprayed it with undiluted medicinal alcohol available from any pharmacy or grocery store.

This allows scenic cement to flow easily into every nook and cranny and prevents spray on scenic cement from disturbing the surface and blowing the sand away ( I learned this tip from one of the posts on this site).

Once sprayed with alcohol I sprayed the entire river bed and river bank construct with scenic cement – simple Elmers Woodglue or Modgepodge glue diluted 50:50 with tap water. – It sets rock hard in a few hours.

Then I laid a few broken dried twigs from the garden to simulate fallen trees and branches lying in or near the water. Remember these tend to wash up in the corners of river bends.

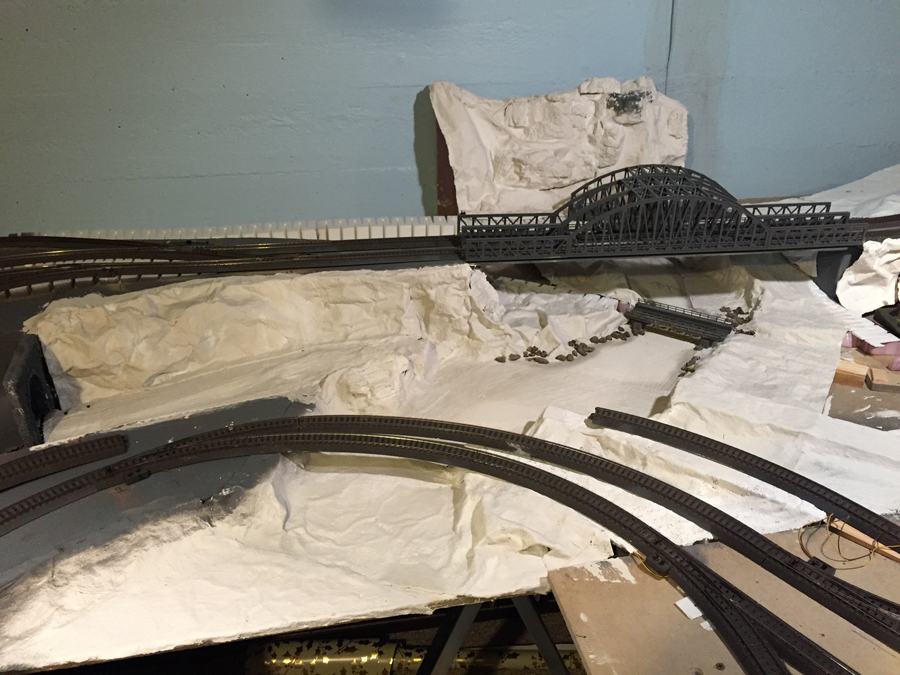
Once all my sand, rocks and timber debris were in place, I poured the river. Herein lies a lesson I learned to my cost! Acrylic water (e.g Woodland Scenic Realistic Water) is self leveling, dries slowly, and can find its way into every tiny orifice imaginable to leak away!

SO first, make sure your river is leveled or, if creating a descending stream, separate each level portion from the next descent by a waterproof dam disguised as a rapid.

If you don’t the liquid water will gently trickle its way down to the lowest part of your river leaving you with a desert landscape up top!

Next, plug any tiny holes in the river bed so as to prevent leakage of your water – its expensive stuff and its very disheartening to see you river leaking onto the floor beneath your layout. I created a plywood bulwark at the end of my river but I didnt have a perfect seal and lost quite a bit from first pour. Lesson learned.

You can do multiple pours to build up depth. I ended up using 5 bottles of the stuff as it contract as it dries (up to 50%) and my river system is nearly 2 meters long. Noch and Faller make similar ready to use liquid water as well. Noch’s 2k Wasser is apparently better for deep water.

Once the water was set, it looks great and you can see through it to your landscaped river bed etc. Problem is you dont see movement. To add rapids and ripples etc, use Woodland Scenics Water Effects.

It comes as a thick white paste in a plastic bottle with nozzle and you just squeeze it onto the smooth water surface and spread it with a toothpick or serrated card.

It dries clear and looks like ripples. If you add a little white acrylic artists paint, it creates white foam-like ripples which dry whitish. They look pretty realistic.

The river banks are painted with the leopard spotting technique shown in the many Woodland Scenics Youtube videos on landscaping and building water features. The videos are excellent. Once painted I developed the river banks with blended and light green turf sprayed with my scenic cement mix, and then stuck on clumps of medium coarse foliage and lichen to simulate bushes.

The pics illustrate the final results. It’s an incredibly gratifying experience and great fun to build.

Happy modeling!

Glyn.”

water pour

close up HO scale river

painted rapids Ho scale


How to make water for model railroad:

How to make water for model railroad

How to make water for model railroad

River bend

River overview

How to make water for model railroad

A big thanks to Glyn for sharing his take on ‘How to make water for model railroad’.

I know the water feature ‘how-tos’ always go down well. Get them right and they look fantastic, get them wrong, and, well…

There’s lots of waterfeature stuff in the Beginner’s Guide if it takes your fancy.

That’s all this time folks. I always enjoy reading your mails, and it’s great to be able to share them with so many like minded folk.

Please do keep ’em coming!

Best

Al

PS Latest ebay cheat sheet is here.

PPS More HO scale train layouts here if that’s your thing.


model train answers

Rock molds model railroad – Glyn’s

Glyn has been kind enough to respond to your questions about his layout, and specifically the rock molds model railroad.

(if you missed it, it’s here).

“Hi Al

Several folks have asked about the techniques I used to landscape my layout.

I thought I’d make a few comments about basic approaches to landscaping and then start with how I developed the river system as it was the lowest point of the layout and I worked upwards from there. It gave me a real sense of excitement with its physical variety and provided a meaningful impetus to move forward with construction.

First, I had used the traditional technique of plaster covered papier mâché as a youngster and found it unbelievably messy – I got the stuff everywhere, often not where I wanted it! When I researched newer techniques several things came up:

1: cardboard strips covered with plaster soaked newspaper of paper towel
2: balls of rolled up newspaper covered with plaster soaked papier mâché
3: insulation foam or styrofoam carved with a hot knife
4: landscape aluminium mesh
5: Woodland Scenics shaper sheet coated with liquid plaster

I tried several of the earlier techniques and found them messy and difficult to work with quickly as time is often a problem for me. When I tried the Woodland Scenics shaper sheet I realized I had hit pay dirt! It is simply fantastic.

All you do is buy rolls of 9″x72″ or 18″x72″ shaper sheet, cut off a piece larger than you think you need, then scrunch it up to whatever shape you desire. Simple as that. I stapled it to plywood supports or insulation foam for rigidity. The you just paint on a liquid plaster slurry and it dries to a rock hard shell in a few hours.

The sheeting is not cheap (US$10 for 9″ wide and US$22 for 18″ wide roll [I used the latter always]) but a little goes a long way and it is worth every cent. It can be lifted off intact or re-shaped as needed. To plaster it you can use expensive Hydrocal at $10 a box, but I found that a $10 20lb bag of joint compound from Home Depot was just as good and 10x less costly.

Once I had the basic shape in place, I would add rocks. These I made from Woodland Scenics silicone rock molds – buy a few different shapes and pour your own rocks as needed using the joint compound plaster. They dry overnight and can be peeled out of the molds easily.

Placing them in different orientations creates fascinating realistic rock formations. The rock molds are anchored by layering a thick paste of joint compound slurry to the back of the rock and then sticking it into place on the plastered shaper sheet. I blend the edges of the rock with plaster slurry as needed.

Anyway back to the river. I created river banks by shaping pieces of 1” thick insulation foam to build the banks of the river course. Then I overlaid shaper sheet over the river bed and banks, scrunching it up to create the desired contours. The sheet is then painted with the plaster slurry and allowed to dry.

Once dry, the river bed is painted appropriately with artists acrylic paint – darker blue-green for the deeper water and greeny blue for the shallower water. Small pieces of real rock chips or gravel are placed to imitate boulders and fine talus can build up finer rocky deposits and sand banks to imitate river bends.

I had a bag of playground sand in the garage and it makes a perfect size to imitate river sand and fine dirt as well. Small broken twigs form the garden act as fallen logs and river debris washed up on the banks of the river.

Prior to pouring liquid acrylic water, the banks and hillsides should be painted using the Woodland Scenics “leopard spotting” painting approach – – 3 water-diluted mixes of acrylic black (produces gray), burnt umber and yellow ochre. More of that in my next post. Below are images of the steps leading to the painted but unfinished river bed.

Glyn”

rock molds model railroad

rock molds model railroad


Rock molds model railroad:

River course

River overview


And Mark has been back in touch too. If you missed his last missive, it’s here.

“Hi, Al. Just responding to some of the questions and thoughts about the Wine Train video.

First of all, a big THANK YOU to everyone for all the flattering responses to the video. I am humbled and encouraged to continue! And another big THANKS to Al, for all of his time and effort in promoting our hobby!

Q&A The flag assembly is made by miniatronics, part #90-048-01 but the BIG question is “what is the best selling product at the general store on Thunder Mountain”? …hairspray!

Q&A The rock faces are commercially available and made of a high grade rubber, augmented by actual rock gleaned from the garden.

Q&A The layout is HO scale and the ALCO engine is made by Rapido

Q&A …and still trying to figure out how to tap into the wine tank car!

Cheers!

Mark”


A huge thanks to Glyn for sharing his rock molds model railroad tips and to Mark too. It’s great to see how they do what they do!

Ebay cheat is more than pulling its weight at the moment, have a look, it’s here.

That’s all this time folks. Please do keep ’em coming.

Best

Al

PS Scratching your head over where to start? Have a look at the Beginners Guide.


HO track layouts – Glyn’s

Glyn’s been in touch, he’s added to the HO track layouts on the blog, and it’s a stunner too:

“Hello Al

Thanks for your reply and here are the first images of my layout. I’m attaching 3 images of the original track plan taken from the Marklin Magazine several years ago. The layout is constructed in a 16’x11′ W design.

I built the base on sawhorses from Home Depot with 2″x4” horizontal supports and bracing in between – very simple and sturdy. This was overlain with Homasote for sound deadening. I cut access windows where needed with a Dremel saw with side cutting drillbit. The modular design allows for subsequent dismantling in sections when I retire and move south of our current location in Illinois.

The layout utilizes 3-rail AC Marklin C track with digital operation from the Marklin Central Station CS-2. All locomotives are digital and the points (turnouts for US readers) are digitally operated which makes wiring almost non-existent apart from a bus wire with feeder wires to the main tracks every 2 metres to boost power to all track blocks. I’m an electrical simpleton so I need all the help I can get. Digital makes wiring so easy that even I could get it right!!

I liked the concept of a mainline station with smaller rural through station and a large marshaling yard. The two stations are connected by extensive curving double mainline tracks running over several bridges crossing a river and there are multiple hidden storage tracks beneath each station. I modified the plan somewhat to add extra track in the marshaling yard and also widened the curve in the rural station area to allow for more surface area for the rural town to be expanded. In addition I ultimately lengthened the end tracks in the main station to accommodate longer train consists. Getting the track levels correct was difficult. I eventually resorted to Woodland Scenics styrofoam inclines which proved invaluable.

I wish I had used them earlier and noticed that “Dangerous Dave” had incorporated their use in his layout revision. They make incline construction so simple. I had to pull all of the base boards apart and re-lay multiple areas of track in order to achieve smooth operation but the final assembly shows the end result with successful test runs over the entire track plan.The attached images of the undeveloped layout in pieces then assembled, show the sequence.

I was given my first small Marklin layout at age 5 and was fascinated by it. I developed a longstanding interest in the German and Swiss railroad systems and began collecting digital locos in the 1990’s after a lengthy break from the hobby. I was also intrigued by some of the legendary US locomotives like the UP BigBoy and the War Bonnet Sante Fe diesel passenger trains, so had a bit of a problem as to which systems to model, having collected both. I planned to build the layout in the basement and did not have enough room to build 2 separate layouts, so opted for a fantasy design running both Swiss-German and US trains on 1 layout, The rivet counters will be horrified but I just want to enjoy running my trains in a beautifully constructed landscape, so a blended system it is!

I can’t remember who said it but one of your readers suggested landscaping the layout in stages so as not to feel overwhelmed with the magnitude of the project. Given the busyness of my daily surgical schedule, night call and academic writing, I had relatively little time available and thought the advice to work on creating small vignettes in stages rather than tackling the entire landscape in 1 mammoth operation a good one. I began with the river and expanded from there. I will send further images of my progress starting with making the mountain backdrop and then the river scene. For now I enclosed the most recent image of the river crossing area and a close up of the coaling station in the marshaling yard to indicate how it has progressed since the humble beginnings!

Again I so appreciate what you are doing for the hobby and hope my simple contributions will be of value to those contemplating building or looking through HO track layouts.

Best wishes

Glyn”

ho track layouts

ho track layouts

ho track layouts


HO track layouts:

Main station

Marshalling yard

Rural station town

Bridges 1

Coaling station

ho track layouts

ho track layouts

ho track layouts

A huge thank you to Glyn for adding to the HO track layouts – great pics and a wonderful narrative too.

And it just goes to show there is some great advice shared on this site. Why be overwhelmed when you can do things bit by bit?

Keep ’em coming.

An If you’re still mulling over making a start, the Beginners Guide is packed with sound advice.

Best

Al

PS More HO scale train layouts here.

PS Latest ebay cheat sheet is here.

PPS More HO scale train layouts here if that’s your thing.


model train answers