Glyn’s been back in touch with a fantastic post on how to make water for model railroad.
“Hello Al
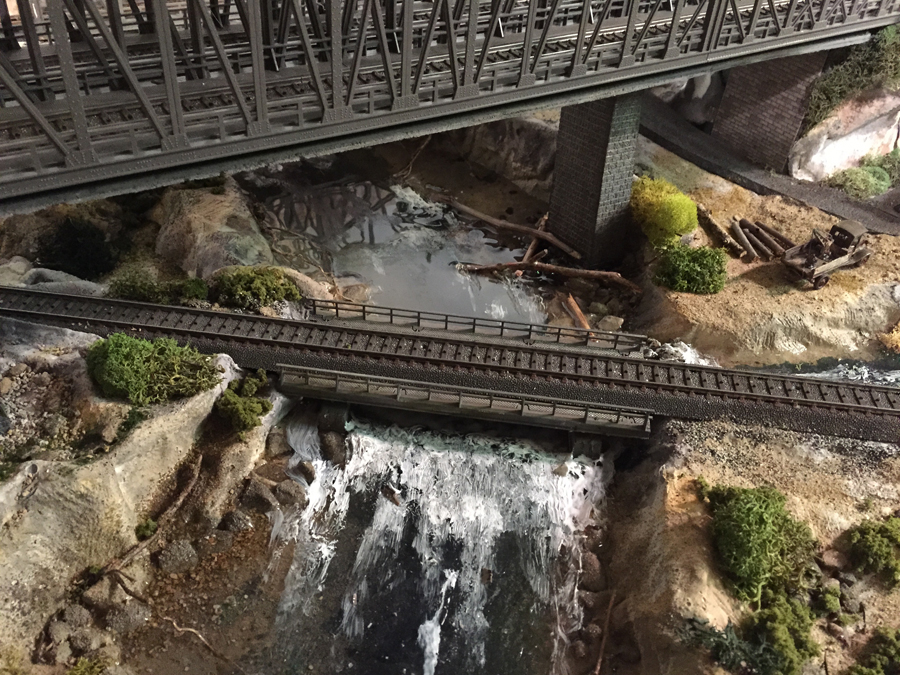
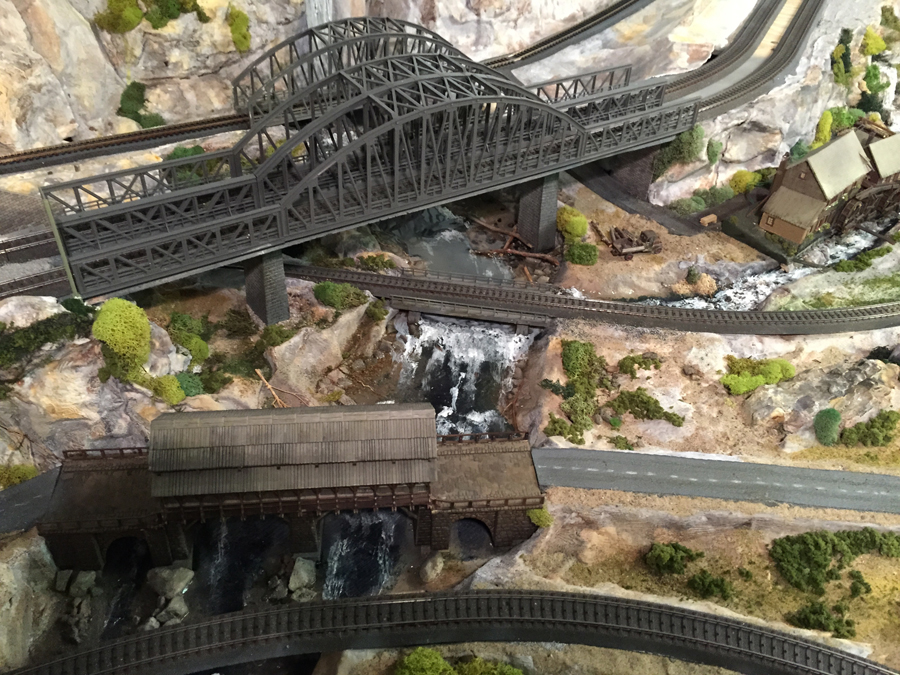
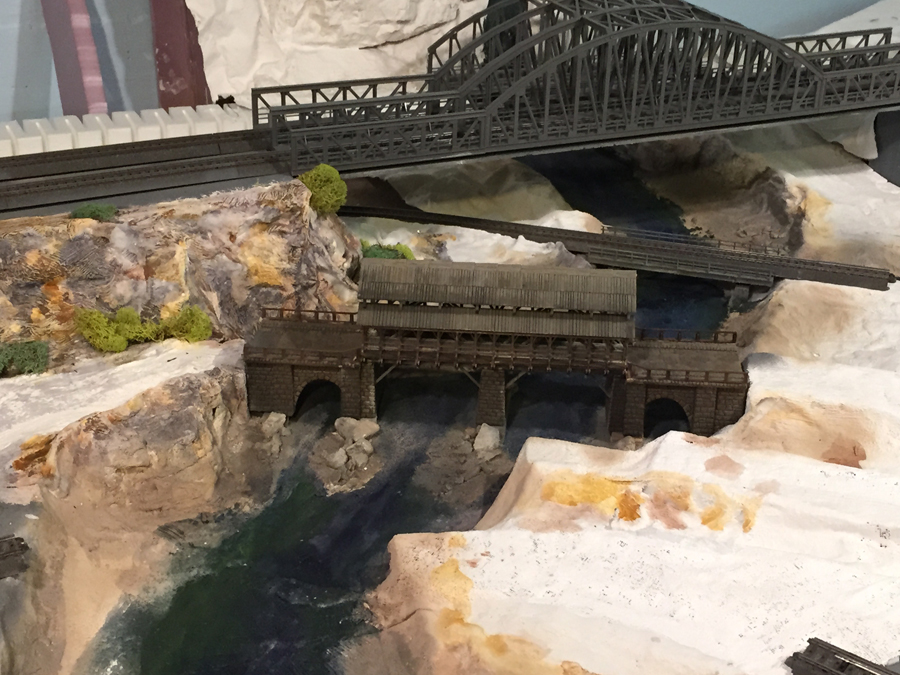
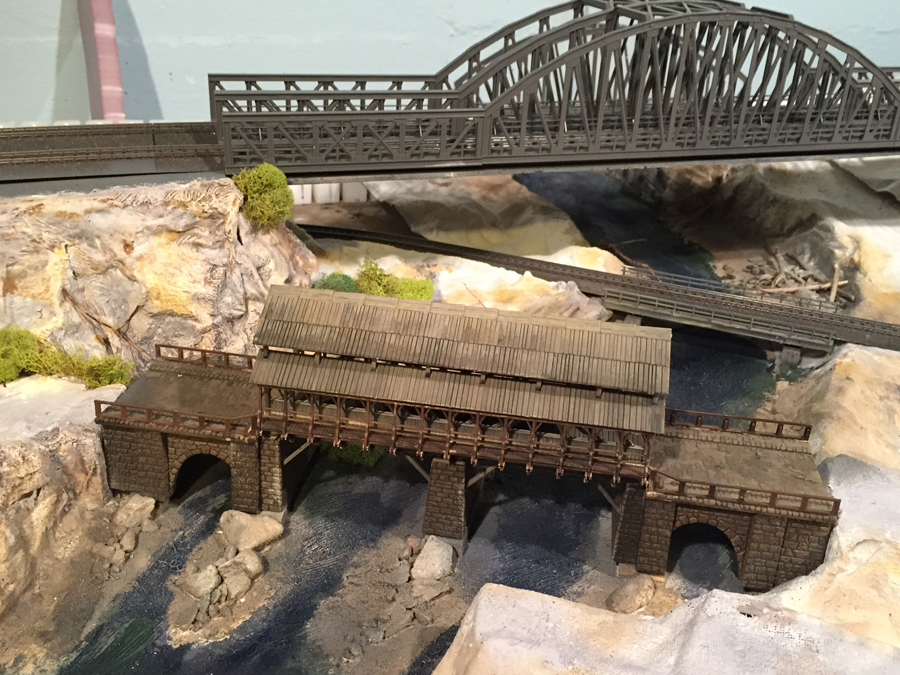
I thought I would finish up the river construction section today as my first post brought us to the painted river bed with some rock debris added but no further.
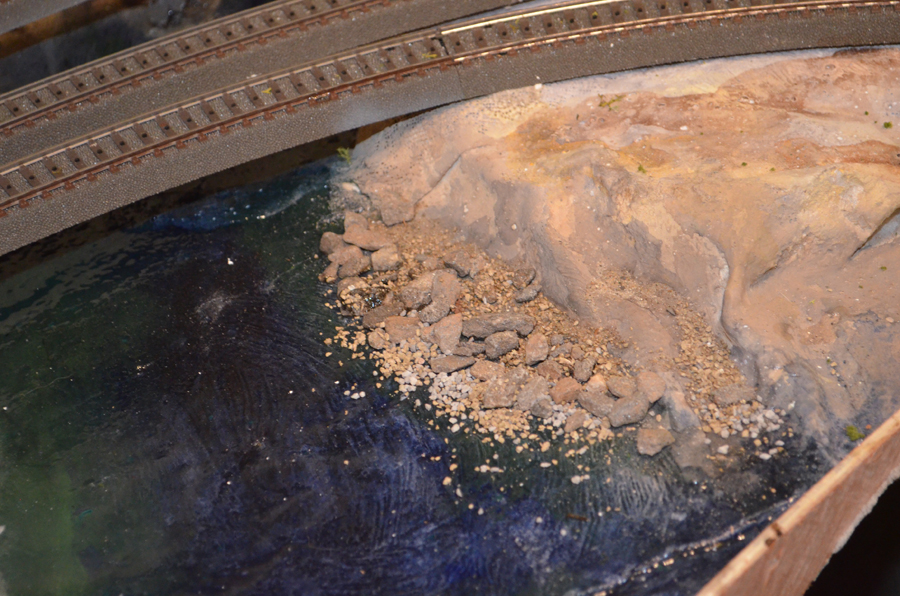
Once the river bed was plastered, I painted it as shown with darker blue for deep water in the center of the water flow, becoming more greenish blue toward the river banks.
I feathered the edges with light fine sand and inserted small pebbles I picked up in the driveway and garden.
For sand I bought a bag of fine children’s playground sand, available at any hardware store – cheap and easy and Ive used it over and over again to create river banks, sandy surface and roadsides.
I sprinkled the sand on river banks and over the approaches to the river. Once everything was in position I sprayed it with undiluted medicinal alcohol available from any pharmacy or grocery store.
This allows scenic cement to flow easily into every nook and cranny and prevents spray on scenic cement from disturbing the surface and blowing the sand away ( I learned this tip from one of the posts on this site).
Once sprayed with alcohol I sprayed the entire river bed and river bank construct with scenic cement – simple Elmers Woodglue or Modgepodge glue diluted 50:50 with tap water. – It sets rock hard in a few hours.
Then I laid a few broken dried twigs from the garden to simulate fallen trees and branches lying in or near the water. Remember these tend to wash up in the corners of river bends.
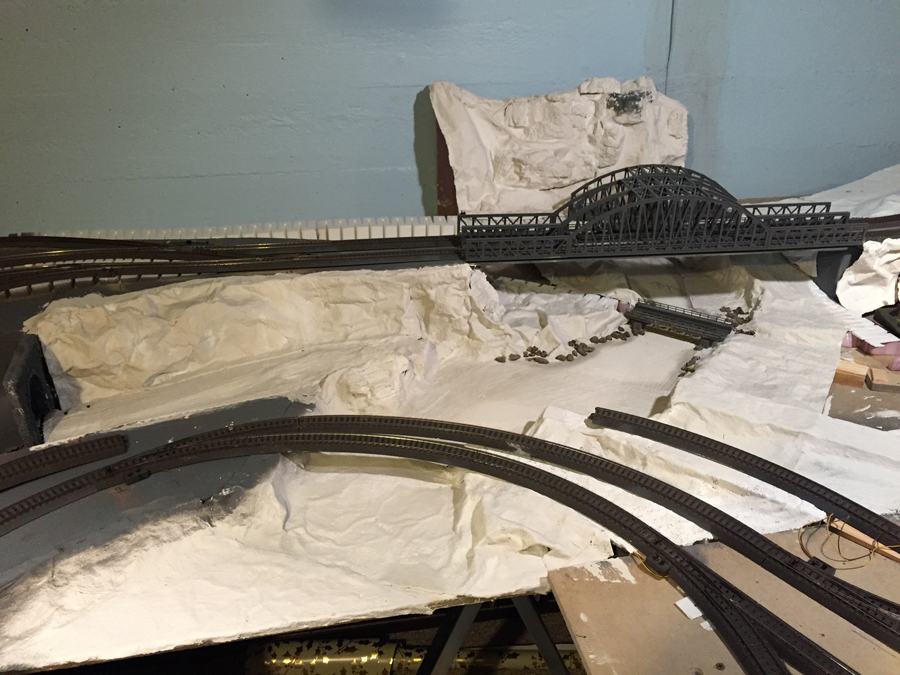
Once all my sand, rocks and timber debris were in place, I poured the river. Herein lies a lesson I learned to my cost! Acrylic water (e.g Woodland Scenic Realistic Water) is self leveling, dries slowly, and can find its way into every tiny orifice imaginable to leak away!
SO first, make sure your river is leveled or, if creating a descending stream, separate each level portion from the next descent by a waterproof dam disguised as a rapid.
If you don’t the liquid water will gently trickle its way down to the lowest part of your river leaving you with a desert landscape up top!
Next, plug any tiny holes in the river bed so as to prevent leakage of your water – its expensive stuff and its very disheartening to see you river leaking onto the floor beneath your layout. I created a plywood bulwark at the end of my river but I didnt have a perfect seal and lost quite a bit from first pour. Lesson learned.
You can do multiple pours to build up depth. I ended up using 5 bottles of the stuff as it contract as it dries (up to 50%) and my river system is nearly 2 meters long. Noch and Faller make similar ready to use liquid water as well. Noch’s 2k Wasser is apparently better for deep water.
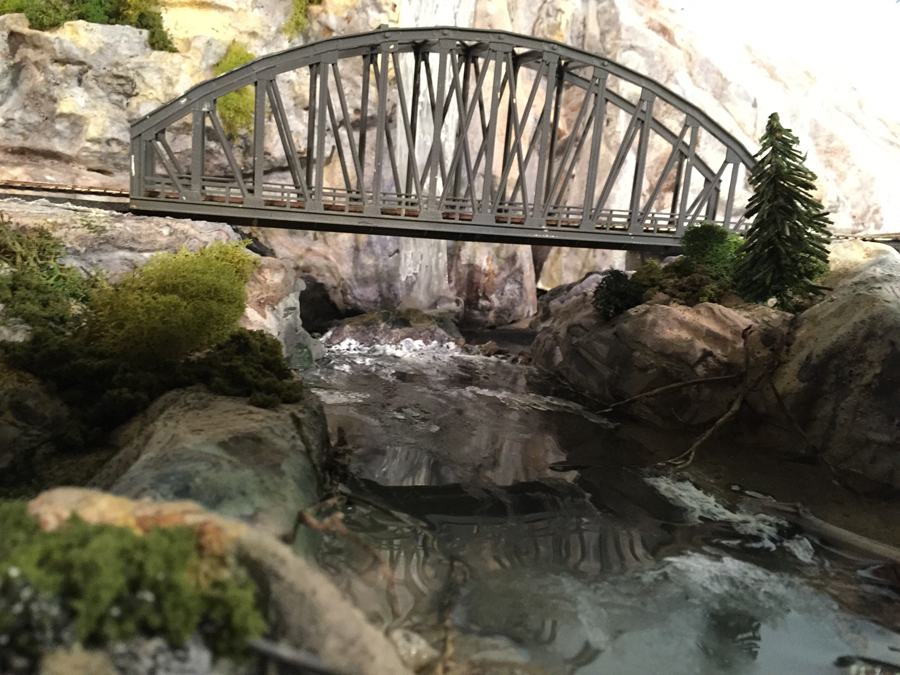
Once the water was set, it looks great and you can see through it to your landscaped river bed etc. Problem is you dont see movement. To add rapids and ripples etc, use Woodland Scenics Water Effects.
It comes as a thick white paste in a plastic bottle with nozzle and you just squeeze it onto the smooth water surface and spread it with a toothpick or serrated card.
It dries clear and looks like ripples. If you add a little white acrylic artists paint, it creates white foam-like ripples which dry whitish. They look pretty realistic.
The river banks are painted with the leopard spotting technique shown in the many Woodland Scenics Youtube videos on landscaping and building water features. The videos are excellent. Once painted I developed the river banks with blended and light green turf sprayed with my scenic cement mix, and then stuck on clumps of medium coarse foliage and lichen to simulate bushes.
The pics illustrate the final results. It’s an incredibly gratifying experience and great fun to build.
Happy modeling!
Glyn.”

How to make water for model railroad:
A big thanks to Glyn for sharing his take on ‘How to make water for model railroad’.
I know the water feature ‘how-tos’ always go down well. Get them right and they look fantastic, get them wrong, and, well…
There’s lots of waterfeature stuff in the Beginner’s Guide.
And right now is a great time to get because for the next few days the silly sale returns!
Get the beginner’s guide and 38 printable buildings for just $9!
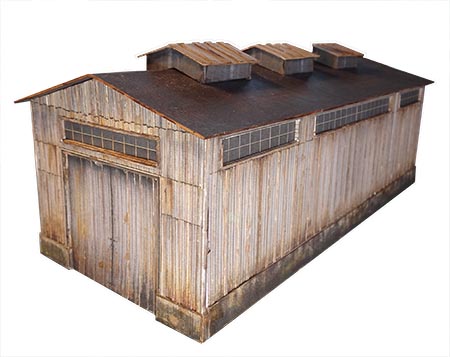
Here’s the latest building that’s included with the Beginner’s Guide, a rusty, weathered engine house:
And if you want a full list of everything else you get, have a look here.
But don’t forget, the silly sale is only for a few days then everything goes back to the usual pricing.
You can grab the Beginner’s Guide and all the buildings for just $9 right here.
Just so we’re all clear, you’re getting a saving of $360. It really is a silly sale.
And I know many of you have bought the Beginner’s Guide many times before.
But adding the new buildings to the guide just makes it really easy for me to get them online, and I’m getting too old for the technical stuff.
So if you want the new buildings for just $9, grab ’em now.
Best
Al

Thanks Glyn – a lot of hard gained experience willingly shared. Al is right about water – when it’s good it adds so much to the layout. And this is very good indeed. You can almost ‘hear’ the rapids! Glyn’s work is a real pleasure to see.
Great job of incorporating all level views of the river,with the running of the track.
Thank you for a allowing me to see what you are doing with your setup.
Glyn What can I say your picture already has done. Dam fine job really well done love the white water you have captured the essence with perfection. Thanks for sharing it with us. I also had water dispersing away and if you find out to late i sets like concrete Regards Brian.
Glyn,
What a beautiful scene on your railroad, “The River.” Not only building it but then taking the time to write down the steps for us to use. How unselfish that is.
Thank you Glyn. Thank you Al for sharing this with us.
I am having some medical issues and can’t start my railroad … but I live in a neighborhood that other people are involved like a club … see it the will help me build my MRR as to my instructions and their input.
Also thanks to everyone who share themselves with us.
best.
Tom
hi al, brilliant water feature and description of how to achieve it cheers to glynn,i have started to make a recovery from viral infection so went up to loft after about 6 months decided to change to dcc so all the previous mails will be re read when i restart the scenery thanks again al
ps i may not have read them all yet but i have saved every one,it’s my railroad encyclopedia
Glyn, Thanks for the pictures and the narrative. Great tips . The river looks great. I especially like rapids also..Thanks for sharing
Mike
Best looking waterfall I’ve seen in quite some time….Looks real….
What can I say but it’s outstanding looking.I am very new at this and looking at your layout let’s me Know I have a lot of work to do on my layout.
Don
Very realistic! Your comments/instructions very appropriate and helpful!!
Thank you for sharing
Very Realistic. Always wondered how you could get it done with water but this is definitely better.
wow what an informative post Glyn
I am filing this away for future use
keep em runnin fellas
StJohn in Long beach calif
Very well done. extremely realistic. Thank you so much for posting.
looks great the hints on leaks is a must especially if you have track underneath. the pics look great .
Thanks for sharing Glyn. I learnt a lot. Cheers Roossco, Adelaide, South Australia.
I just recently returned from a day trip to Bushkill Falls in PA. You have captured the feeling I got when standing next to some of the smaller falls on that river. Now I am seriously thinking on adding at least some “water” feature to my layout! Well done!
Norm in York, PA
Some of the most realistic water I’ve seen yet. Particularly like the water falls and white water parts.
So realistic, I love it. Thank you for sharing. The white water has always been a mystery to me . Now thanks to your post I feel more confident. Thank you.
Carol
Most Excellent Glyn! Thank you for sharing. I have never seen such realistic water effects. You have given me great incentive to get going on my project.
Mike D.
Well done it’s very realistic. Congratulations in advance.
Well done, looking good
Did you make your bridges, if yes where did you purchase the kits?
Thanks, Dave
What more can I say. Thank you Al this is exactly what I needed. My highest complements to Glyn for his superb workmanship quite suitable for a professional museum display. Thanks again: Palmer
The Water effects are outstanding. One of the best!!!
One word, AWESOME! Thanks for sharing. Al, is so right. Do it well , and instant fantastic, do it wrong and, …..well.
Seems to me that paying attention to Glyn’s narrative is in order big time. The bit about watching it leak out caused me to stop for three years. I just let my river be a wash in the desert. Thanks Glyn, maybe I’ll kick the tires and light the fires for another go.
Glyn……thanks for the additional info…….that river is a great piece of work…….I also love that tresses bridge……is that scratch built? If not, where did you get it? Who is the manufacturer?
Excellent tips, and your technique is supported by other modelers posting videos on the internet, especially the “water” from Woodland Scenics. Some folks diluted the alcohol, typically 70 percent isopropyl, about 50-50 with water and call it “wet water.” Whatever works, I guess. Anyhow, nice job!
Water is the hardest part of a layout to try and master. But you managed to to great
The Critic
There is NO ballast on bridges. Use plain track on the beams on the bridges.
Looks pretty Kool. Keep up the good work.
very nice i like it.
Yes too, thought one of the photos was actual. Good to see realistic flowage and not the sky blue so many have meandering through meadows, not forgetting ponds. Imagine this with a light snow fall, mind-boggling. ❄️
Again, Rich
very nice. i like the trellises and bridges.
Fantastic water features and bridges. Glyn’s attention to detail is remarkable. Especially appreciate incorporating the rocks and logs before adding water as it presents a more realistic finish. Thanks for sharing.
Awesome river scene, look’s really great well done Glyn many good tips.
To WillBill. have you never seen or heard of ballasted deck bridges? In my region, there are quite a few of them.This is also directed to those who previously have written in about bridges with ballast. I ran my trains over several of them while I was still running.
Beautiful work Glyn! Very well done indeed! Thank you for sharing both your successes and the occasional failures that make us all smarter the next time.
Nicely done. It so great to see a waterfall that looks natural and does not empty into a small lake having no outlet with a couple of canoes sitting the perfectly calm water!
Quite the waterfall and a very impressive trestle to go with it. A lot of hard work went into it and it shows!
nice