Keith makes a tunnel

“Not much of an idea but it works well.

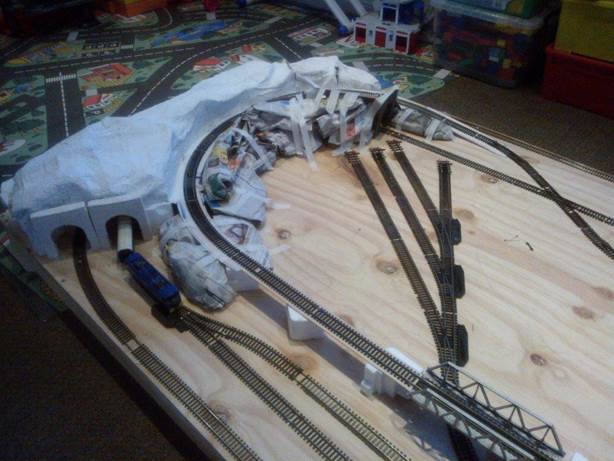
Take 2′ piece of 6″ smoke pipe not seamed and bend it out to what may look like a tunnel.

Cover it with wax paper, and wax paper a huge piece of cardboard underneath it and spray foam seal on it in a thin coat or base as i would describe it.

Give it a day to cure it will keep growing for at least 24 hrs.

It will expand right off the mold but thats ok, apply your next can of foam sealant to get the mountain look over the tunnel.

Again this will expand beyond what you may think, but now only on the out side, so prepare your self.

Make sure you give this 48 hours in house temp because it will continue to expand.

When dry you can take a hole saw bit to trim out the inside of the tunnel then take a huge magic marker, lay it flat on the work table and work it along the base level cutting of at the mark till you get the base level and to height desired.

Brown base paint, green scatter paint looks awesome.

If you want winter look, hold the white spray paint can from above like snow would fall……….its just so easy and so cool.

If you want to do it for HO use 4″ smoke pipe to start.

Keith”

snow fall O scale

tunnel base paint

tunnel base

tunnel HO 1

And Tony’s been kind enough to send in these answers (his post is here).

“Hello Al. This is Tony again.

I sent in the pictures of the toothpick trestle. I see you have several people with wiring questions.

I have experience wiring on multiple club layouts as well as the four layouts in my basement.

The most complex of these is a 5000 square foot layout with over 600 blocks.

It has five large yards with a total of eight dispatcher/yardmaster panels and 16 cab control all performed in standard dc.

The information in this how to will work for any scale dc layout. It is diferent for dcc and for ac layouts.

I use fixed 20v power supply for turnout control and four variable voltage power suplies for train control. I will start very basic and hoefuly this helps someone.


The first thing to know is a block is an elrictical isolation of one section of track from the rest of the layout.

For relism of operation i ussualy break these on both legs of every turnout and occasionaly on long straight runs of track. When you break a block you only need to cut through one rail. I leave one rail completely uncut all the way around the layout.

The other rail I break up for blocks. This changes when I get to ocupancy detection.

Track work is really important. I operate trains with an average length of seventy to eighty cars but on ocasion I go over one hundred.

The longest I have run was one hudred thirty-five with four engines and two pushing helpers.

I lay my turnouts first and work from there out to ensure the track lines up perfecly.

I use flex track and on the loose rail I cut half of the first one out. This alows me to slide the loose rail of the second piece in and ensures that my joints are never right beside each othe. I then go through and solder every other joint on both rails every solder joint gets a wire soldered to it for track power.

I then go through and make my block cuts. I drop black wires on the “inside” rail and red on the “outside”. It is importantthat these are the same all the around the layout.

Next is conecting into power. I run one wire from each power supply including the twenty volt dc supply to a bus bar. The other wire from each variable power supply will go to a single pull double throw toggle. Then from the toggle to the outside rail of the block. The inside rail will tie entirely back to the bus bar all the way around.

The next time I will share wiring the turnouts in and discuss reverse loops!!!!!

I have pictures I will send you to go with this but I still have some editing to do.

Thank you,

Tony”


Big thanks to Tony!

That’s all for today folks.

Please do keep ’em coming.

Don’t forget, the Beginner’s Guide is here if you wan to roll your sleeves up and have a go.

Best

Al

PS Latest ebay cheat sheet is here. Still updated daily.


More from Tye

Brian’s been back in touch. If you missed his last post, it’s here.

“Hi Al,

Here is a reply to some of the questions asked.

Thanks

Hi guys, the material used for the engine house is Northeastern scale scribed siding from the USA.

I always have sheets of it as well as stripwood handy for scratch built projects. 95% of my buildings are of wood design because of the era (1930s) as well as area modelled.

Answer to the question of how I get square corners at the window edges, simple, I mark the outline in pencil and then use a sharp hobby knife with a number 11 blade and work from both sides until it falls out and leaves perfectly square corners.

I have never used “foamcore” as it is too thick and does not help when doing interior detailing.

Brian – Cape Town South Africa”


And Tye has been cracking on with his layout:

IMG_0784

IMG_0785

IMG_0898

IMG_0899

IMG_0900


IMG_0901

IMG_0902

IMG_0903

IMG_0906

IMG_0908

IMG_0909


“Hi Al.

just uploaded this video showing a few problems and some additions… maybe of some use to some of your members.

Regards

Dave”


Please do keep ’em coming.

And don’t forget, the Beginner’s Guide is here if you want to save hours and hours of sweat, toil and utter frustration.

Best

Al

PS Latest ebay cheat sheet is here.

PPS More HO scale train layouts here if that’s your thing.


The latest from Rob

“Great info. Keep them coming!!

Here is my suggestion for Oil storage tanks.

Materials: pvc caps and couplings

I used different sizes (2, 3 and 4 inches) bought from the local building supply stores.

The logos were downloaded from the web and copied into a pdf file so they could be sized to the tank.

I printed the logos onto transparency sheets and used 3m spray adhesive to secure them.

I plan to add ladders and also seal the seam between the cap and coupler to conceal the joint.

Lou”

OIL TANKW


“I have to say that this is the first model railroad for me in over 25 plus years and I’m working on a freelance of 17′ x 9′ on an N scale I have been doing track 1st and then landscape !

Not sure if this is the correct way but I have learning by mistakes !

And I have to laugh at myself for that , I will say all the post from everyone out there are a great help . And I love working on my layout even if I do it twice !

Thanks to all of you out there with your ex pert advice .

Earl”

photo


“Here’s my tip – get started. The journey always begins with a first step, so don’t be afraid. That’s the fun of learning.

James”


“Hi Al,

Thanks for posting my Caravan park videos. It appears it was a mistake to put them in a playlist. Half the viewers never got on to the second video in the playlist. It was the better one of the two. In the future I will send single links.

By the way, I worked out how to cut out a passable 00 Scale umbrella tent from paper. I plan to demonstrate it in Part III.

All the best,

Rob”

IMG_0572

IMG_0578


And if you did miss Rob’s second video, it’s here:


That’s it for today.

Keep ’em coming.

And if today is the day when you decide to join in on the fun, the Beginner’s Guide is here.

Best

Al

PS Latest ebay cheat sheet is here.