Bob’s been back in touch with a great tip on model train table legs.
He show’s how to get your table level.
“In my last post I said I was going to do things right this time around.
So I got out my Bosch Pro Laser Level and identified that my new L-girder framework to take into account the slope in the floor.
The room originally was going to be a screened in patio thus the slope. I tended up full-blown 16’ x 28’ addition to the house. There is a difference of ¾-in in 8’.
So I needed my model train table legs to accommodate this.
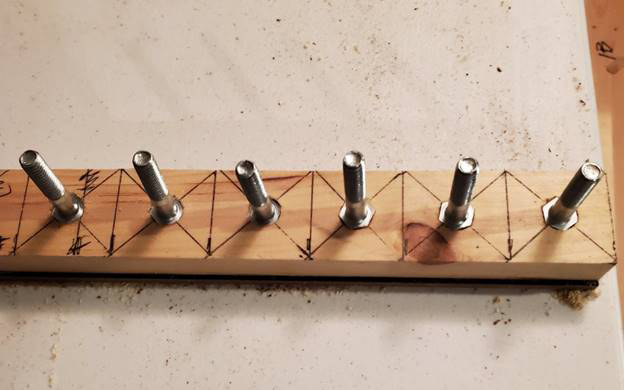
I started with building an 8’ section and a 6’ section of framework. The two sections highlighted in this picture:
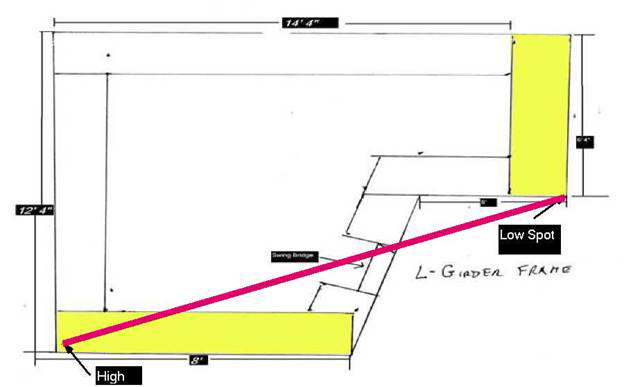
The red line represents where I used the laser. I built four sets of legs, two sets for each section, and setup the laser at the high point.
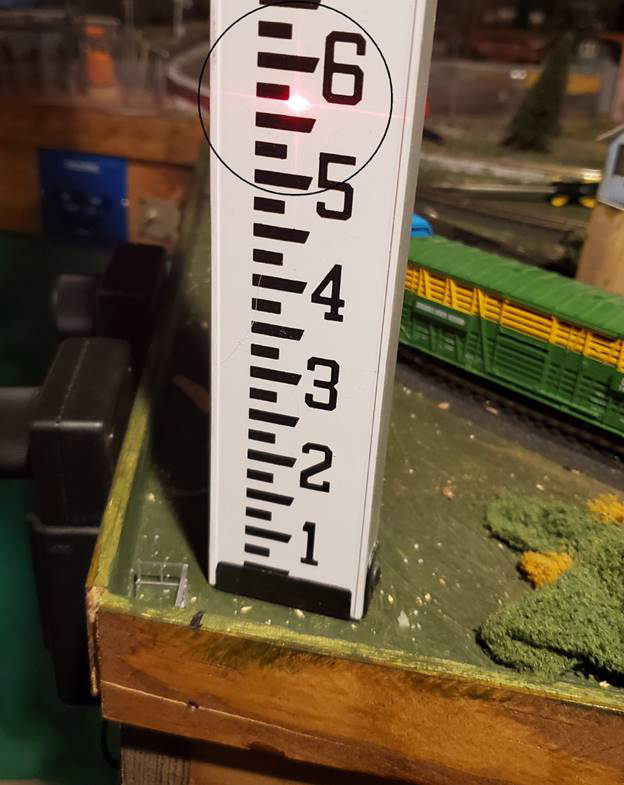
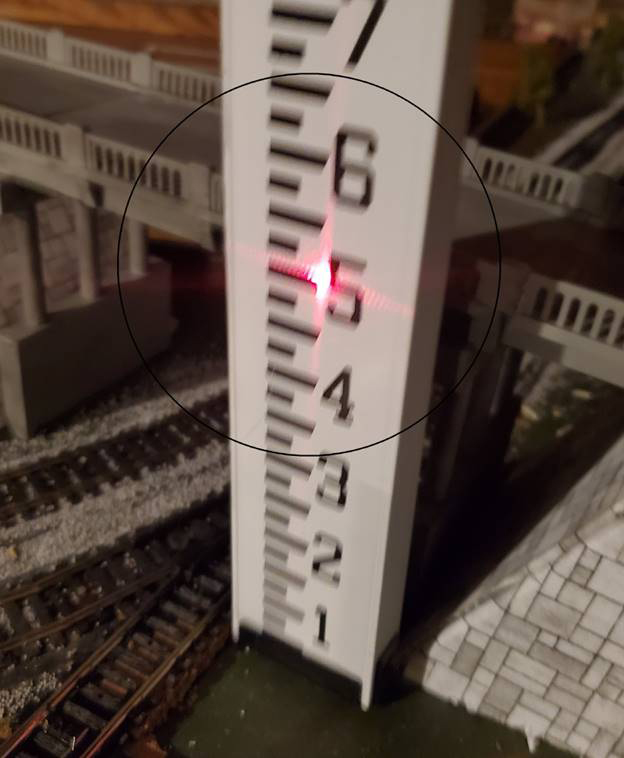
I made the first set of legs so the top of the L-girder at 42” and lined up the lase with the top of that set of legs and then swung it to make that height on the 2x2s for the other legs of that framework and built that set of legs.
In the videos I watched about L-girder framework they recommend adjustable feet for the legs so you can avoid the use of shims as much as possible.
I looked up leveling feet and they are expensive to my way of thinking. One of the videos suggested tee nuts and hex bolts. I bought two 25 packs of tee nuts at $6.98 each and a box of 50 hex bolts for about $14.00. I put them on the legs:
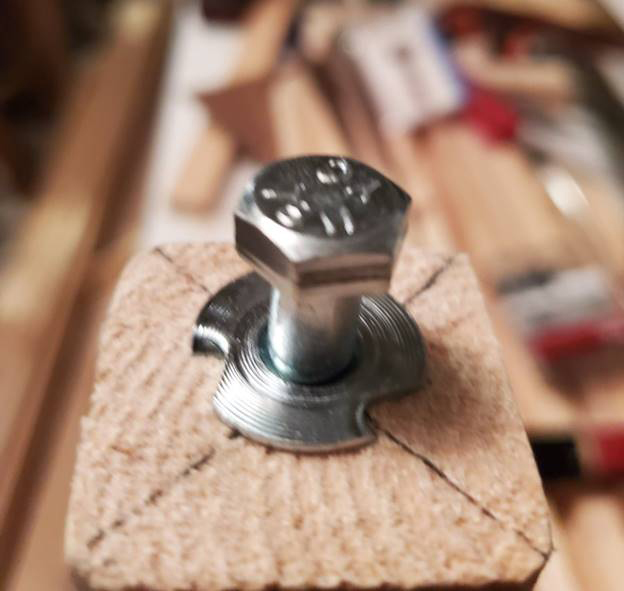
This will allow about 1-in of adjustment once the framework is put together which should be adequate since the initial height of the leg sets has been set with the laser.
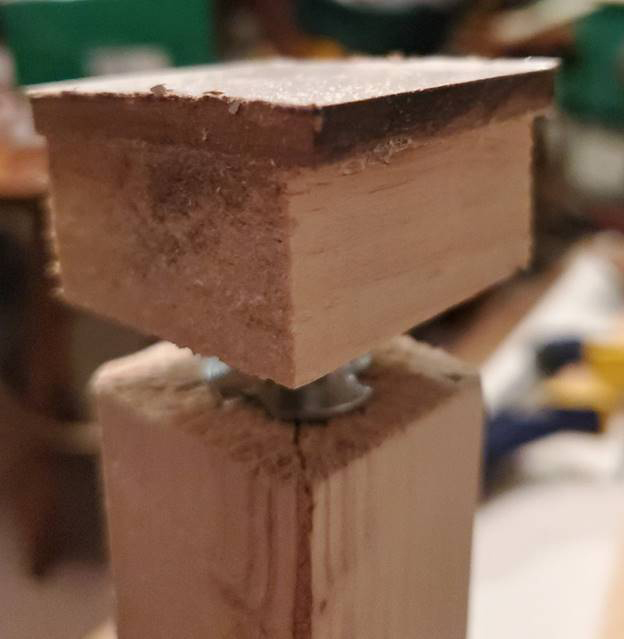
After patting myself for saving by using hex bolts and tree nuts, I looked at the legs and thought: All the weight of the frame is going to be resting on four ½-in wide hex bolts. I studied the situation and decided I need to create wider feet for the legs.
My solution was to take a piece of 1×2-in left from the cross bracing and mark off squares and then use a ½-in forstner bit to drill holes in the center of the squares. The holes were the depth of the hex nut head.
I drove the bolts into the holes with a hammer. The dark strip on the bottom is a strip of whiteboard that I glued with contact cement with the smooth side down to allow the feet to turn easy on the carpet. Next I cut each block to make individual feet.

The finished product adds about 1and 1/2-in to the height of the legs.
As I go along I will submit updates and discoveries.
Bob, Virginia”
A huge thanks to Bob for sharing his tip on Model train table legs.
Some of you may think this is a lot of effort to go to – but as Bob found out, getting your bench / table level is critical.
A table that is not level, uneven or wobbly table will slowly drive you insane and sap all of the enjoyment from you.
I’m with Bob: tables that aren’t level are the work of the devil.
Please do leave a comment below and share your own insights. I’d love to hear them on this.
Now on to Dave:
“Hi Al…
Well my new Loco came this week with sound fitted, the class 67 from Hornby, and what a great runner it is, well pleased with it, so just had to share my video of her.
Also showing from last week the different size of Peco Track can be used together, a small piece of transition track can be used to join the 2 types up on a layout, I have used blue tack just to hold it down so it looks a bit on the wobbly side, but this is just to show as a demonstration.
Regards
Dave”
Latest ebay cheat sheet is here.
That’s all for today folks.
Please do keep ’em coming.
And if today is the day you claim your spare room or basement in the pursuit of having fun with trains, the Beginner’s Guide is here.
Best
Al


Thanks again Dave for a great video and really helpful tips. Im sorry to hear you are having problems with your controller…but I can’t wait until I see your video on it. Im still learning DCC and I would like to see what you have to say about the EcOS.
I had a hornby select which I managed to short circuit out of existence and now have a NCE pro-cab, which Im finding very temperamental (it won’t re-program my locos and keeps giving me a can’t read cv error),
So, on one hand its nice to know that others have similar problems and frustrations with the electrics side.
Very very clever. Thanks for sharing.
Phil
Brilliant idea well executed as being level is critical to smooth running.
Brilliant idea well executed – smooth running require level track.
Bob I love it, think I am going to use this method at hobby shop. Getting ready to do a 12 x 6 table in 6 sections and this will be perfect for that. Thank yo for sharing. Eric the firefighter
Mating code 100 to code 83 I found just connecting them together and filing the 100 down to the 83 rail head back about 2 inches from the joint gives a nice smooth transition from one code to another.
Good idea….alternative would be using the T-nuts with threaded rod….put it in the middle of the leg….could be adjusted without bending down….
Timothy,
That’s a good idea but I can only go up about 8 inches because of the braces from the L-girder to the legs.
Bob
Good work ,Bob. My train room was designed as a garage for a snowmobile, so it comes with running water, a floor drain and a sloped floor. Adjustable feet were the fix for me.
Dave, my 2 mains are code 100, but the yard will be code 83. I bought Walthers transition tracks, about 5 ” long, to ease the change. Nice looking engine.
Mn Dan
I use the “T” nut method also, but with carriage bolts (rounded head). Then I cut 4″ circles out of scrap 3/4″ Melamine that I had. Put a divot in the middle with a large drill bit. These “pucks” sit between the bolt head and the carpet. Easily adjustable also. Al – thx so much for this site.
I like to use elevator bolts with tee nuts. An elevator bolt makes the extra wood block on the bottom unnecessary.
Fantastic solution with the leveling legs…….I wish I had seen this idea before I started building my layout table. Great job.
Gary M
RE: Bob’s level-headed layout. Anybody in the Flat Earth Society?
For Graeme , thanks re the Ecos , I finally got my problem sorted its a new loksound 5 decoder that gave the problem , but sorted now not sure what I did , but something to do with Railcom , to be honest apart from this blip its one of the best controllers I have used , there are a good few videos out there , so save me doing one , but yes would recommend , they are like a computer , just need to get to understand the full potential , you can do so much with them ……
Good idea Bob has used there with his layout table …Dangerous Dave
Hi Al, I had a similar problem as Bob to overcome, my layout starts on my patio and the extends down my garden.
I built my base layout on Dexion steel angle legs and drilled and tapped the base crossbar 10mm for some 4inch long Stainless steel dome head bolts with locking nuts to give me a level playing field.
After the track leaves the patio at about 4ft above ground level (I have arthritis in my knees and have difficulty getting down low) it proceeds down a border on posts with felt covered 6″x1″ timber planks for the track bed, the steepest part of the gradient is about 5degrees, not a problem after I installed Powerbase from DCC Concepts, my Princess Coronation flies up, this main run is 25yds long with a 10ft diameter turning circle to return up what I shall be calling the long drag, quite appropriate really with mainly LMS setup. I will be sending some photo’s once I have all the track laid, this is controlled by the weather.
The adhesive I have found as the best for sticking down the track bed is Evo-stick “Sticks Like S**t”, and it does.
It’s always a pleasure to open your e-mails Al, most days it contains inspiration and always amazement at the quality of the different layouts.
You didn’t say much about the loco Dave, so in case anyone’s wondering, Belmond is a luxury events and hospitality specialist which runs Pullman dining train experiences on the national network. The class 67 locos are by General Motors (for the diesel and power train) but with chassis by I believe CAF of Spain, who have more high speed experience than GM itself. They were designed to do 125mph but are rarely used that fast, having been built mostly to work Royal Mail trains which they did for several years but ultimately the Mail services were cut back when a new logistics system was brought in which allegedly couldn’t understand trains, only trucks and planes! There was an outcry and they have retained rail Mail trains from London to the north and Scotland where they can use their own electric trains, but not revived any of the diesel services sadly. The riding of the 67s was a bit rough, a few drivers were actually thrown from the seat, so they have a lot of damping now but I think this brings a fairly high track access charge due to wear. They have electric train heating power, and are mostly owned now by DBS. Due to the unflattering body design they’re known as Skips. Other jobs they do include the ‘Gerald’, a daily return service from Holyhead to Cardiff for Transport for Wales. An early job, now gone, was the short lived Wrexham and Shropshire company express trains to London via the Chiltern route. They have thus carried several different liveries, the EW&S maroon and flash, DB bright red, Arriva Trains Wales turquoise, a couple in a deep claret for working the Queen’s royal train, and now the Belmont umber and cream. W&S livery was silver and grey by memory.
Rod