Brian’s been back in touch with his HO scale harbor layout:
“Hi Al, here is the final article on the build/kit bash of the repair dock for my Pelican Bay section of my layout – the conclusion of this part of the HO scale Boat Repair Dock building project.
The supplied photo below is of the complete kit built up as a diorama showing in the four buildings included in the box. (unknown builder)

With all the modifications I made to it, has taken tooooo long (just over 3 months) but the end result is worth it in the end.
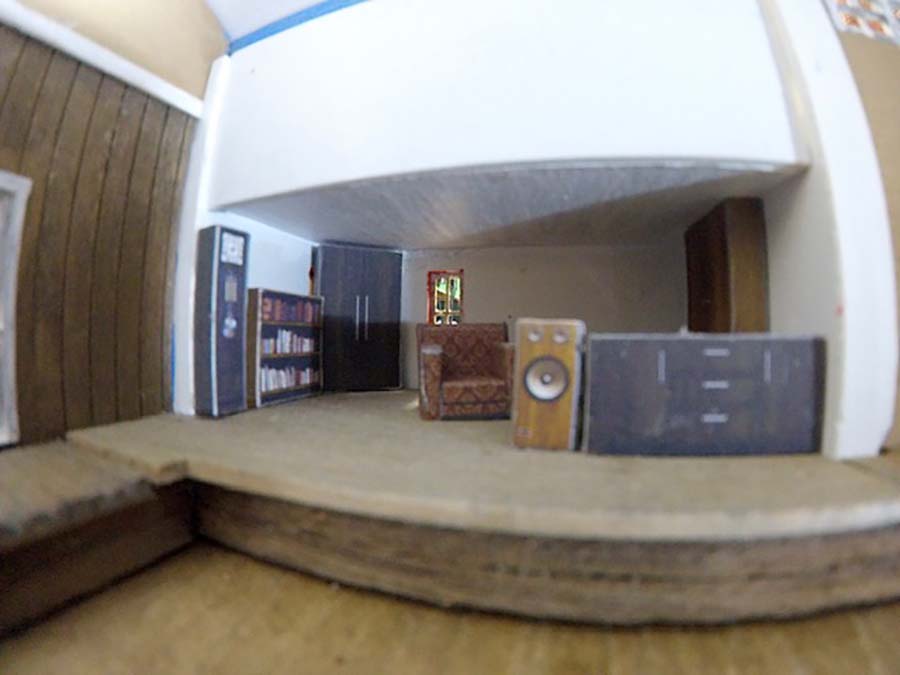
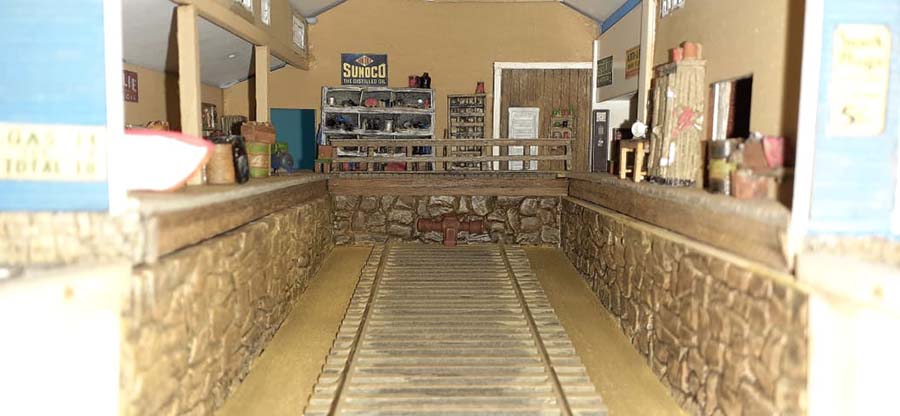
Below is a photo of the proposed interior. On the left back is a doorway leading to the wood storage area. The closed off part in dark wood (with the white door) is a machinery section (not detailed but is where the woodworking machines are supposed to be kept).

The white walls at the right back is the downstairs office in the brick side attached building and the other doorway on the right leads out to the side platform work area.
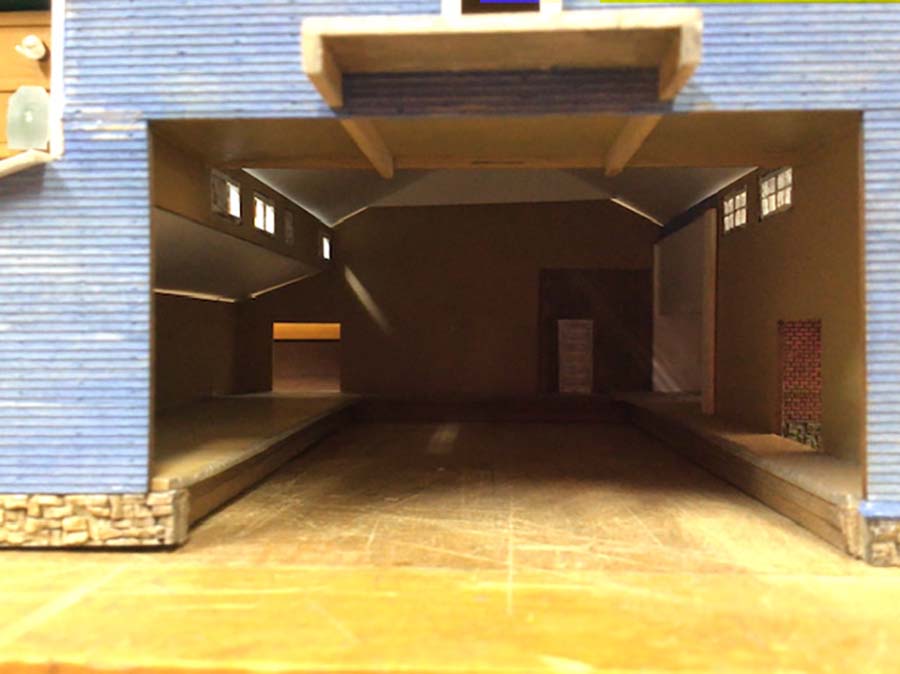
This photo shows the proposed layout of the interior.
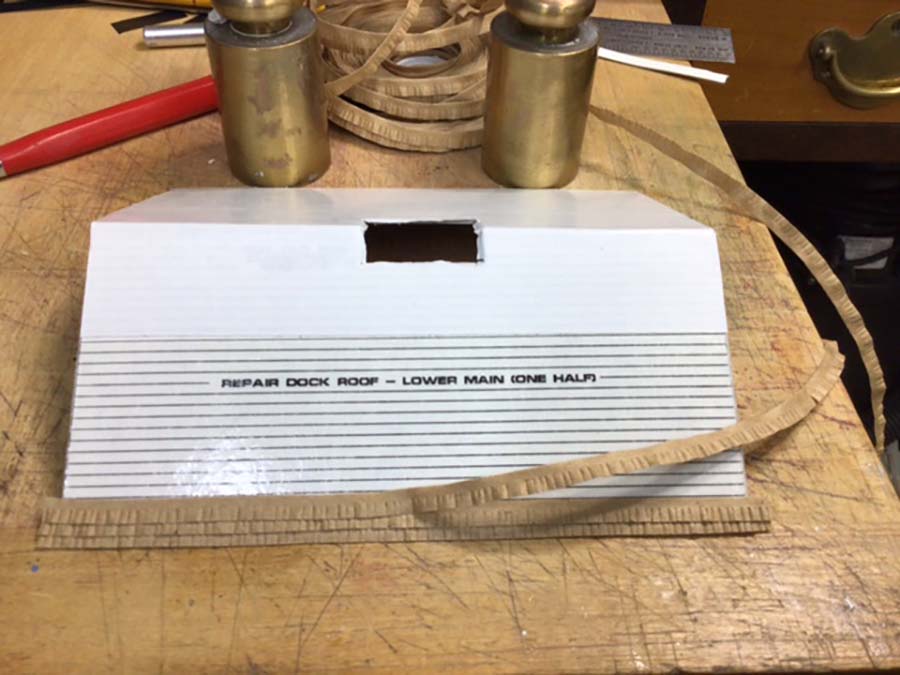
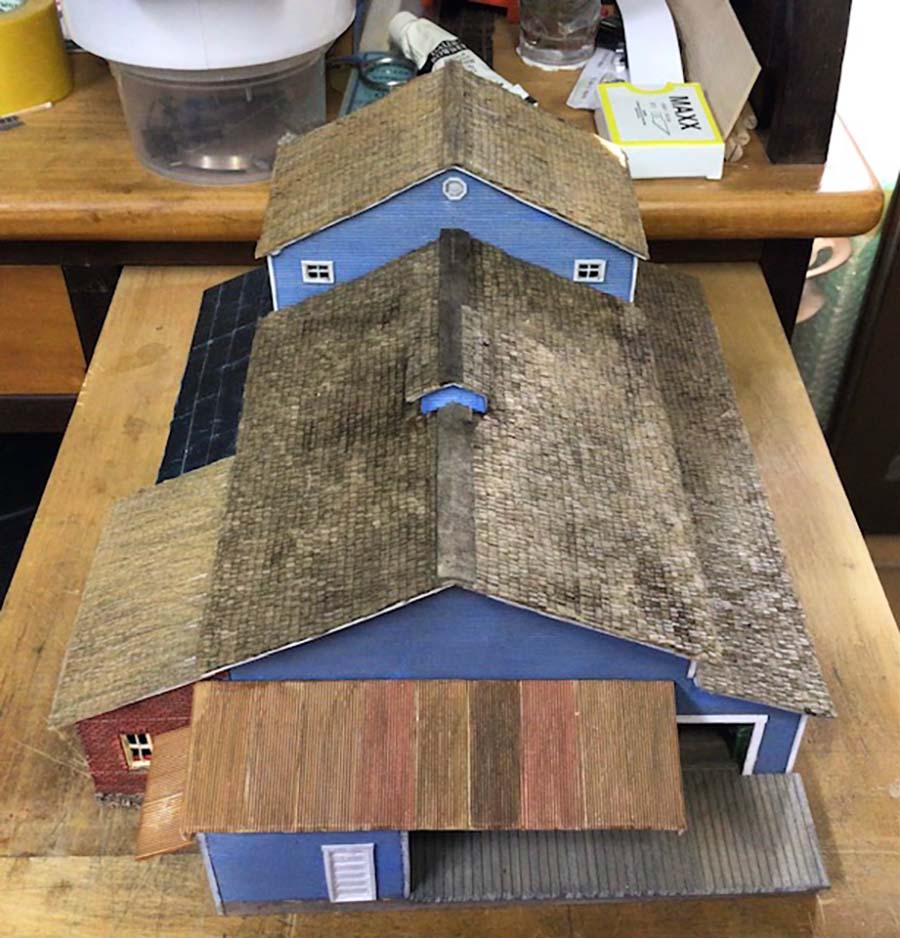
Here the “tarpaper” roof and supports are in place in front of the brick office. The tarpaper on the roof is masking tape painted black and weathered.
This has to be the most tedious part of the hobby – putting shingle strips on the roof.
I use double sided tape on the lined roof to stick the Campbell Scale shingle strips down. So much easier than the glue and stick-it method suggested. The brass weights prevent it moving away while laying the strips.
The office roof completed and busy laying shingles on the side workshop roof. The weights help to stop the roof moving while doing this.

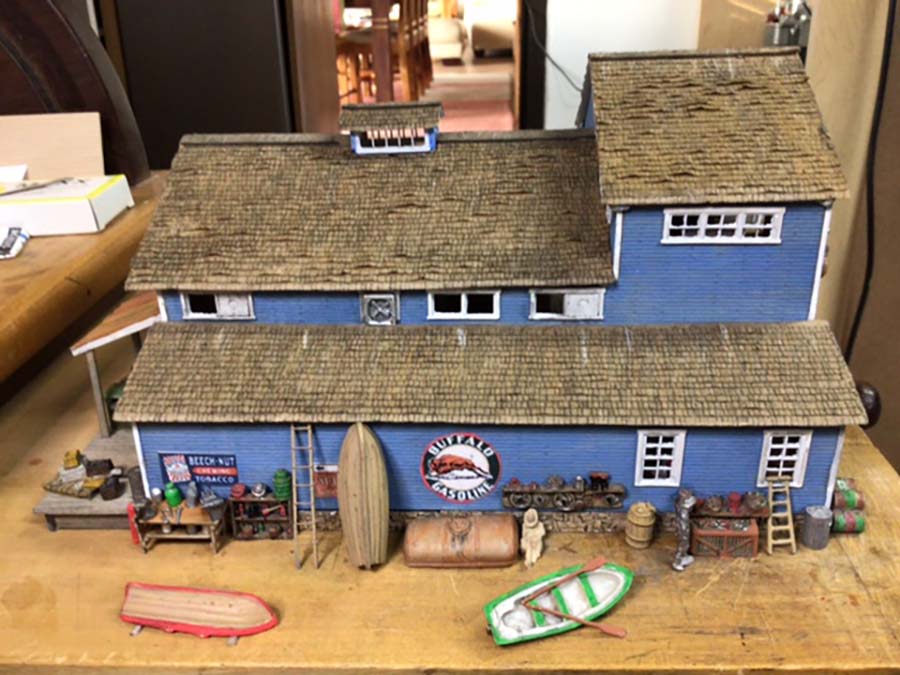
All the shingling is done and I have added the corrugated iron sheets on the back roof of the wood store. They were also added onto the double sided tape. They were painted and weathered before placing on the roof. Final weathering was done using pastel powders. Support posts were added afterwards.
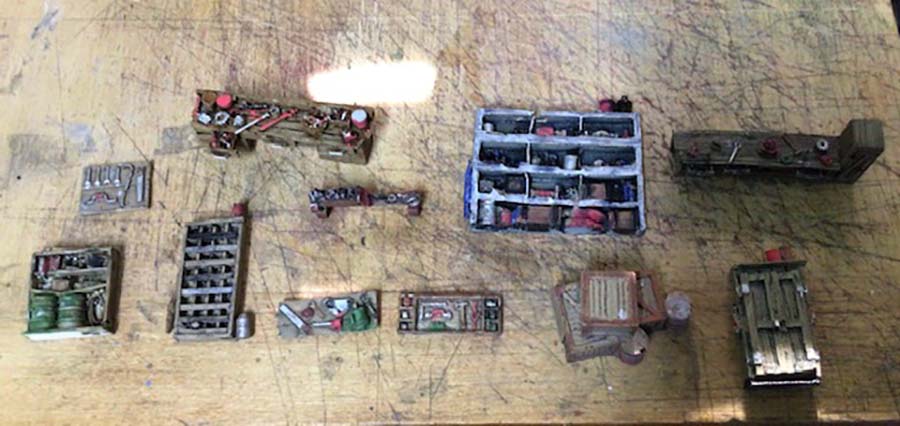
Another time consuming job is painting and weathering all the tools and racks for the interior and exterior walls.
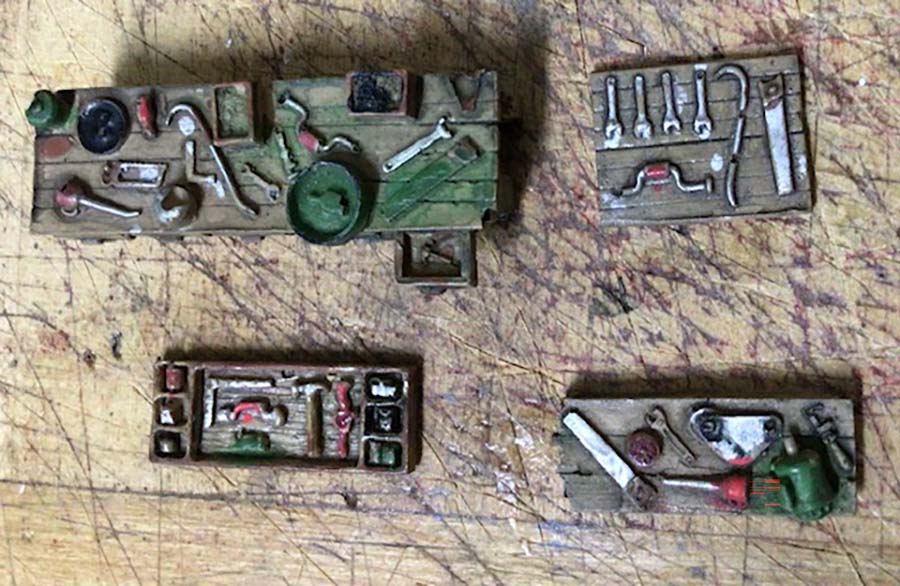
All these castings come from my “bits box” and they get painted as and when needed.
Here the upstairs office has been finished using bits and pieces again from my “bits box”. The door is from the same source (bits box). The one supplied in the kit is a solid metal one and could not open. I needed a door that was open as I could then place figures on the deck outside as well as being able to see the details inside through the door and windows.

The downstairs office was given the same treatment by filling it with the necessary office equipment and figures. (Figures were added later). These photos were taken while the building was still on the work bench.
Below shows all the bits and pieces being placed in strategic positions as well as the installation of the lights. Signs were added around the inside adding to the atmosphere. Some of the castings can be seen on the exterior walls as well as signage.
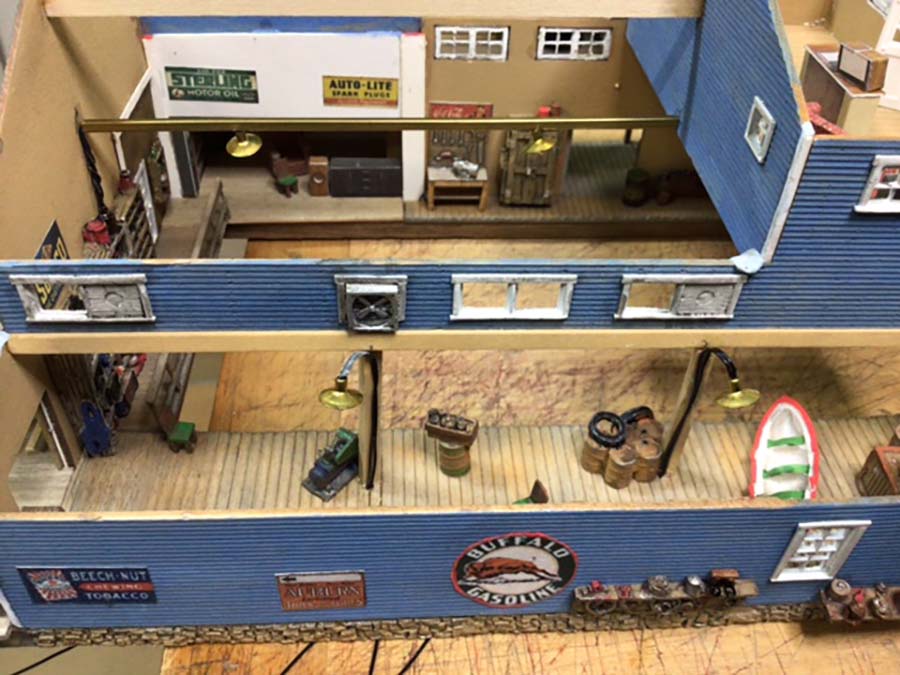
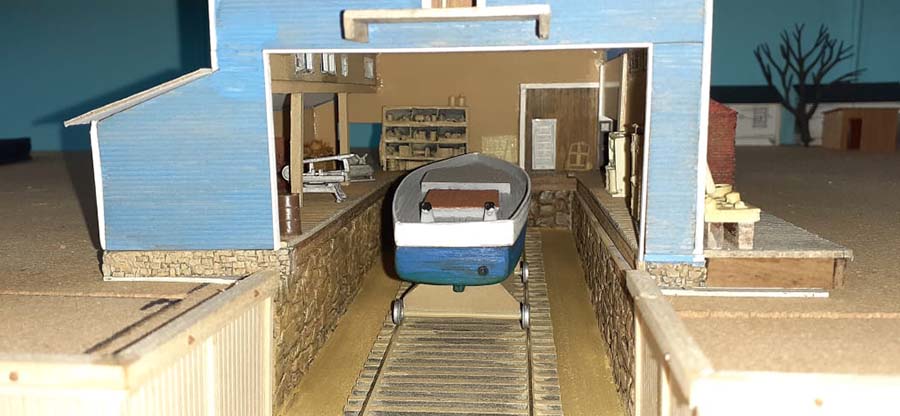
Here is a view looking up the ramp from the waters edge and into the detailed interior. Sand will be added to the ramp as a floor area and will be level with tops of the sleepers.
Another view of the outside work/repair area before placing the final details and adding the sliding door over the doorway into the main building.

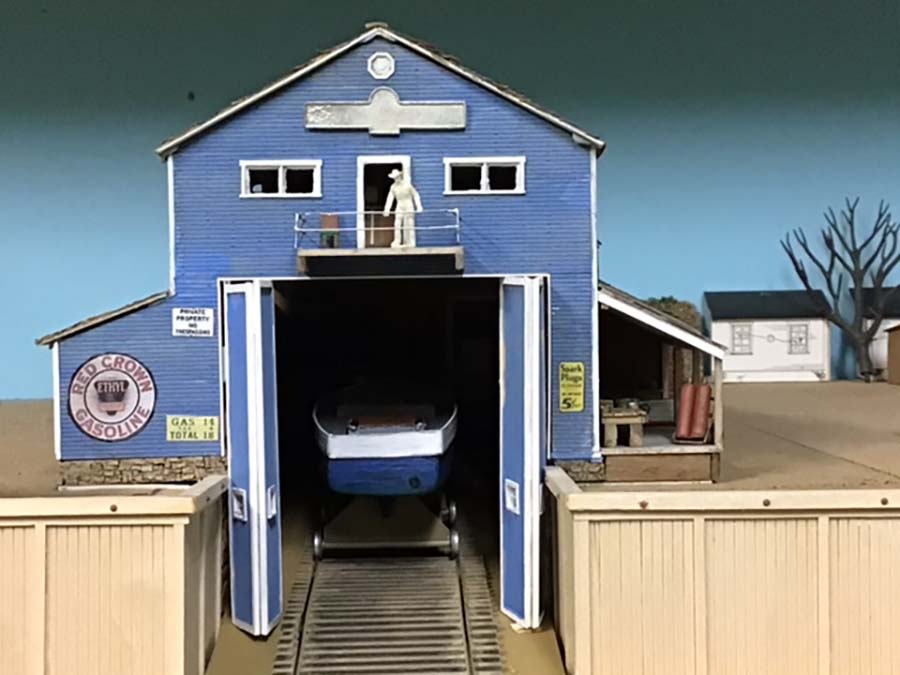
This view shows the front exterior with the deck from the office as well as temporary fitment of the bi-fold doors to get the right height above the rails. And error was made here (to long) and I had to cut three millimetres off the bottom and redo them so that theoretically they could close.
Temporary placement of the details outside while still on the workbench to ensure that it looked right before placing them on the layout. The crooked top roof is just from the camera angle that made it look like that.
Here the sign is now complete, windows have the open parts in position (brass inserts into the white metal window frames). It is obviously tea time as the boss is sitting on the deck outside the office chatting to the manager and a worker is taking a break down below on the right.
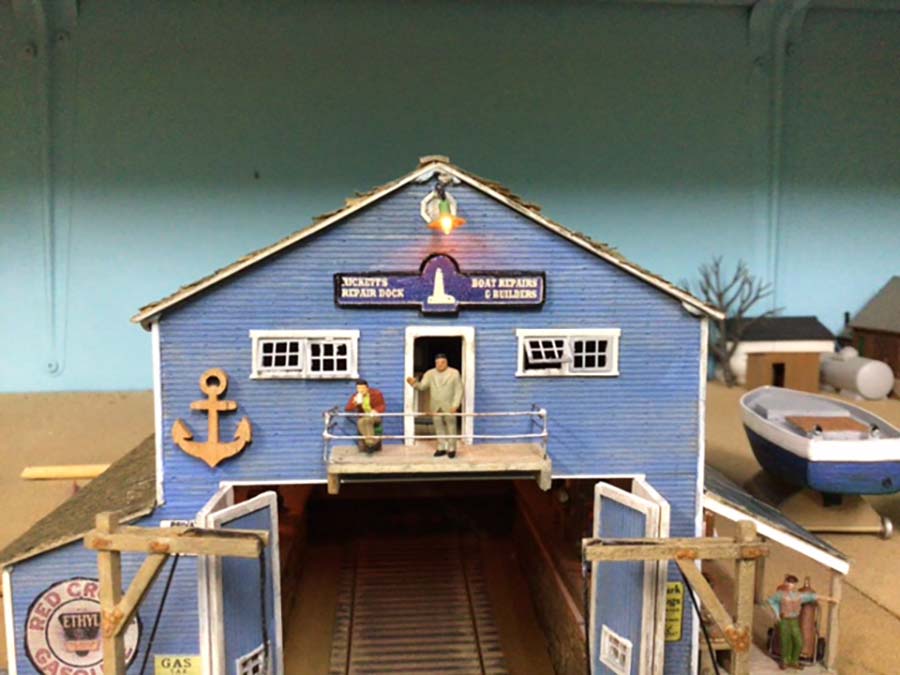
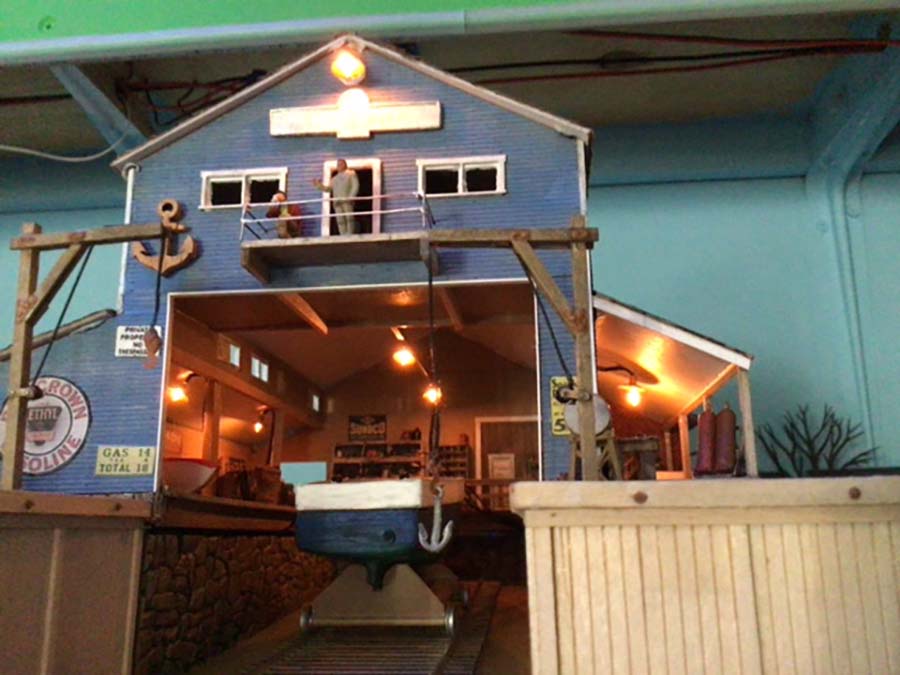
The dockside cranes are in position. Here the interior lights as well as the lit up outside repair area on the right hand side can be seen.
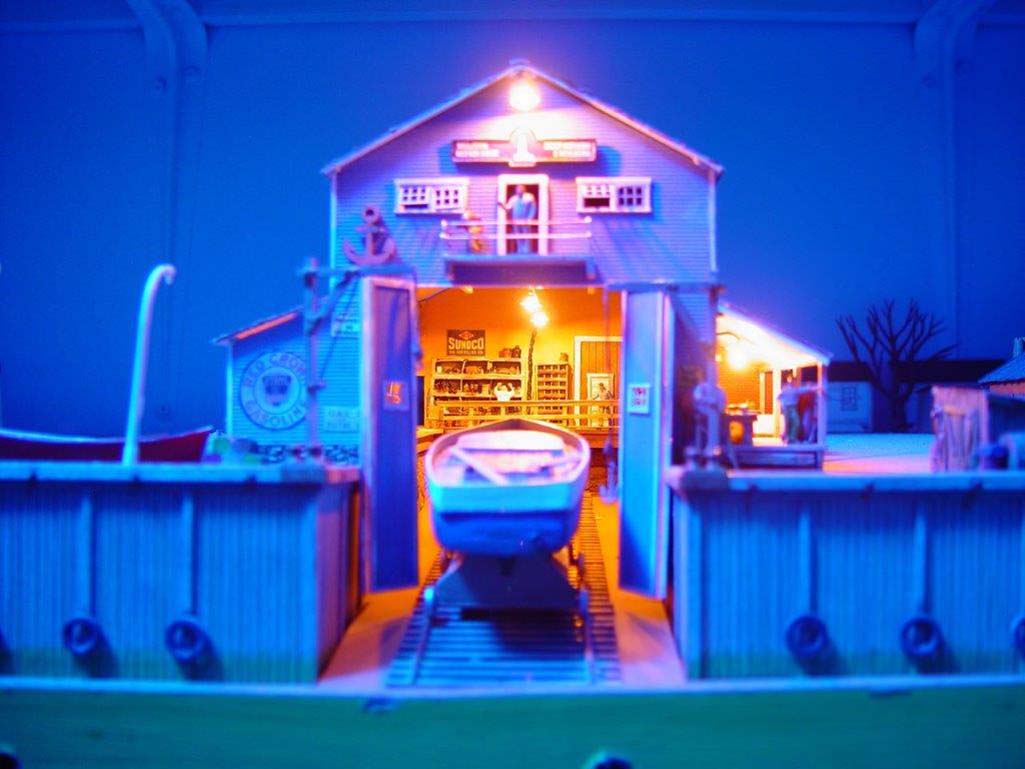
A moonlit photo of the whole setup showing the front wood barrier walls all weathered and the tires added as bumpers on them. The ramp leading from the water up to the interior work area will be covered with a sand floor.
It also shows the well lit area inside giving it a great atmosphere.
A side view of the building also taken on a moonlit night. When I am a bit further with this section, it will have ground cover on it and everything will be bedded in properly.
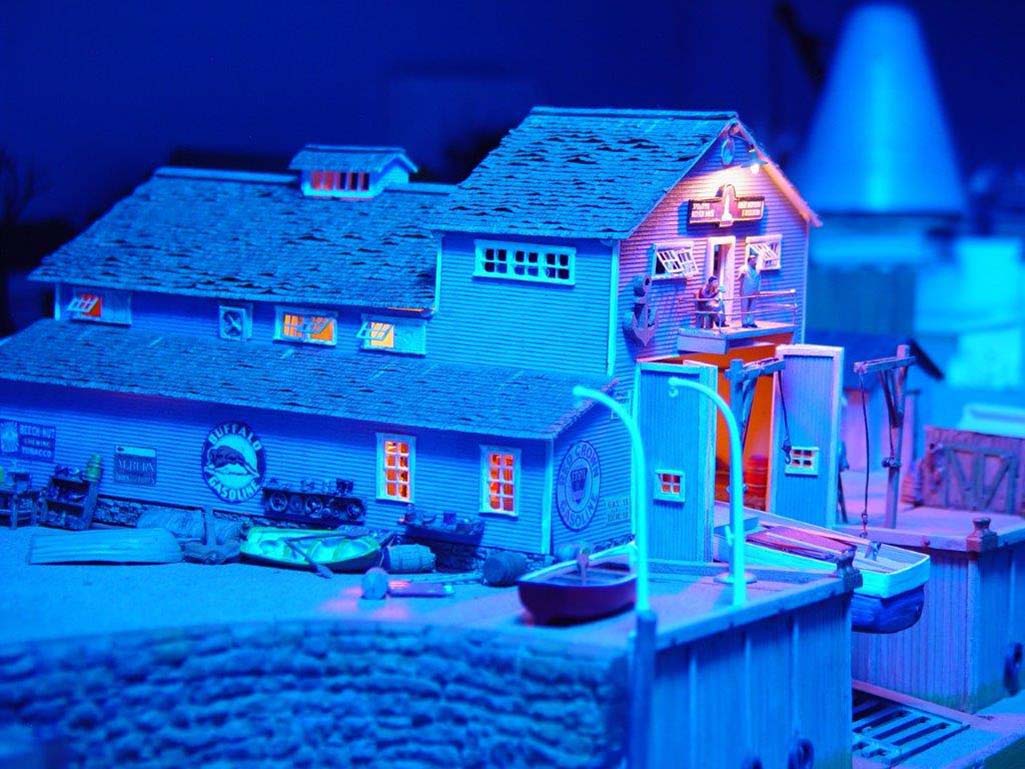
This I where it is situated on the layout as part of Pelican Bay extension.
Once the “green” building from another kit (currently a card stock mock-up of it) is built and placed on the pier, the base for the water will be textured, painted and then Woodland Scenics realistic water will be poured to match the existing water on the left.
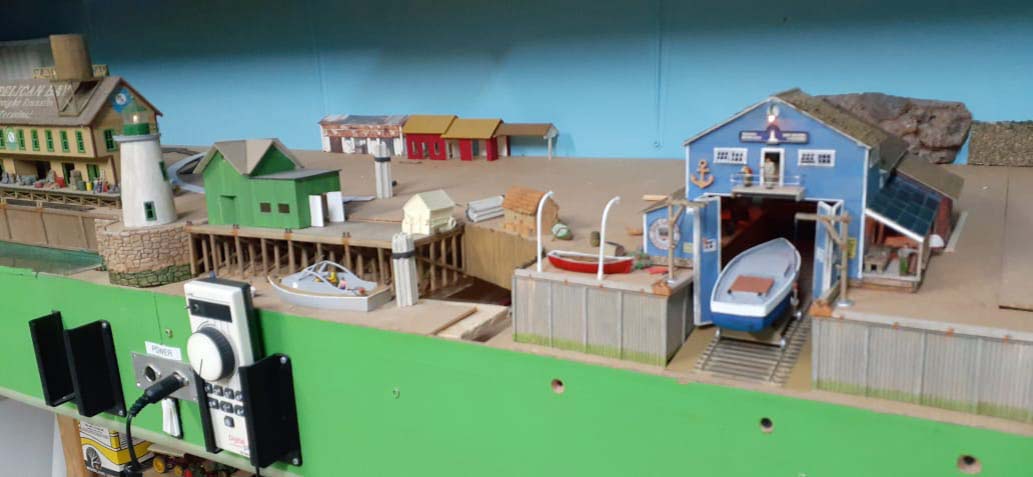
The railroad tracks will be laid to fit the area and supply the various industries along the waterfront here. Currently the tracks are laid to just behind the extreme left hand side building. A piece of track can be seen between the lighthouse and the green building on the pier.
At the back against the wall is a card stock mock-up of a Fine Scale Miniatures freight house that still has to be built as well. (The red one).
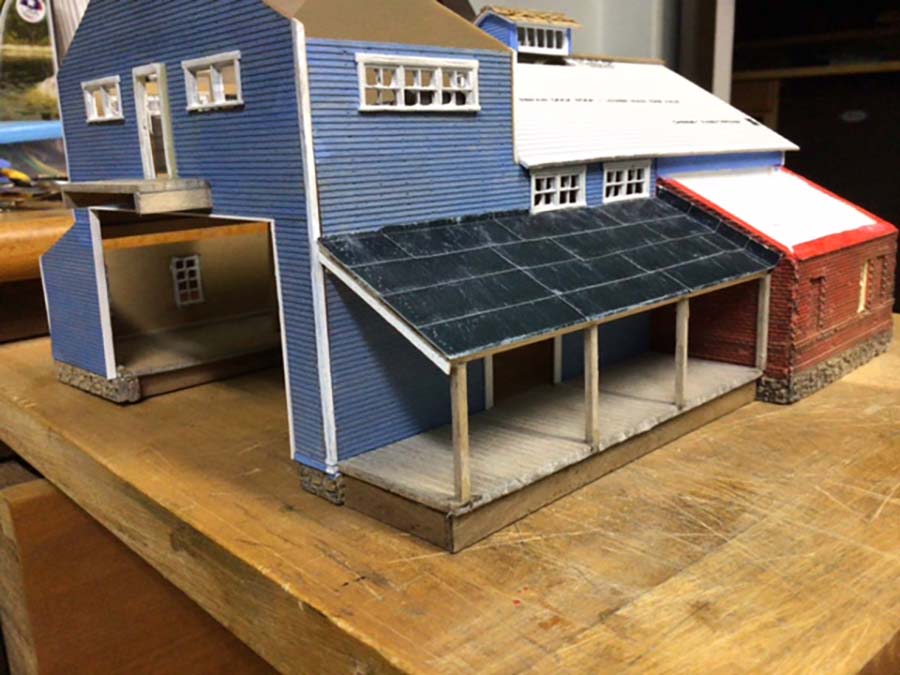
This Repair Dock building (Builders in Scale kit) is one of four supplied in this kit. This building will also be used for repairing and building of small boats for Pelican Bay. The second one (a sail maker, although it may be called something else as I already have on on this level) will follow around to the right of the above. (Future extension)
The third building in the kit is a restaurant and the fourth one is the lighthouse shown on the left.
This construction will be covered in another article later as I did alter it quite substantially into a working lighthouse.
I do have photos of the interior taken with my GoPro cube camera that show off the whole interior of the above building with all the figures and bits and pieces.
If requested, I can send them to Alastair for inclusion in future posts.
Till next time, keep modelling.
Brian – the HOn3 guy in Knysna.”
A huge thanks to Brian for sharing his HO scale harbor scene – if you want to see his last update it’s right here.
That’s all for today folks.
Please do keep ’em coming.
And if today is the day you get started on your layout, the Beginner’s Guide is here.
Best
Al
PS Latest ebay cheat sheet is here.
PPS More HO scale train layouts here if that’s your thing.


What a great diorama. It is excellent.
Very nicely done. Looks real
Super nice detail work!
This diorama looks very real. Very good work. And I know how much time it takes to build something like that.
Brian. Well done. When finally located and the water installed it should look the part. I would only comment on your proposal to cover the ramp with sand fill. The ramp would have been constructed either on concrete or stone slab base or timber sleepers. It would be kept as clean as possible to ensure easy access to both the trolley and its rails and to get to the underside of any boat on the trolly. If you think about it sand would try and level itself out and for it to be all the way up the ramp it would be so thick that it would cover the ramp track / rails. I would suggest that you may find an amount if sand no higher up the ramp than the high tide mark the rest would be the base that the track / rails were constructed on. Again a fine model. Look forward to your lighthouse post
A lot of detailed work there that Brian has done , first class job …Dangerous Dave
My word, though I was looking inside a new addition for a RR room, not a model. Have never seen such detailed, scaled work. TG no 3-D boats or other made here.
Regards, Rich
Absolutely stunning the detail in this. Looks fantastic. Obviously a labor of love. Great work.
great job.
Brian
Awesome
Thanks for the narrative and pictures. Cant wait to see the finished harbor.
Be safe
George from LI,NY
Excellent work and thank you for sharing in such detail.
It looks fantastic Brian. Keep up the good work in South Africa
Great craftsmanship out have a lot more patience than I have Good job
Quite impressive… Nicely done
Awesome look keep the good work.
Stunning!
AWESOME…………………
Brian…..fantastic piece of modeling……..really amazing…….
Brian you have done a marvelous job of your diorama especially the boathouse. So much rich detail it is very hard to pick out one thing I was impressed with. The building itself is a work of art let alone the fine HO details inside. Bravo, well done.
Rob McCrain – Farland Howe
quiero agua, por favor ! un el magnífico .
el crítico
WOW! You detailed the Hell out of everything. This is to me what makes model railroading an interesting hobby despite the total cost to build a layout, you can focus on just one project, one build, one individual kit or thing and just one project becomes a hobby all by itself.
Besides building or crafting things, you seem to put a lot of work into the painting and then weathering. The time you invested is really paying off.
Frank in Orlando
Very nicely done. Love the details. I will likely borrow some of your ideas for some details I’d ‘like to add to my layout. Thank you for sharing. The challenge for me is I work in N scale.
Wonderful work Brian, I admire your patience and skills plus ideas here that I must try out Thanks
Andrew in Oz
Masterful!!!
If I ever grow up, I want to be at least half as good as you are in this kind of scenery work. I love it!
NICE work on the Boat Repair shop! WOW the detail is amazing!!!! Keep up the GREAT work! ~Hemi in the USA
Outstanding. Highly detailed and quite realistic. Thanks for sharing.
Jim AZ
Wow !!!! That is amazing detail inside the bldging and the lights inside and outside when the it turns night time very cool !!!! Thank you for sharing!
Stunning work Brian. This is so realistic and well done!! For all the modelers who have commented, Brian is (as you can see) a man of enormous talent and he loves sharing this talent with us locals in Knysna South Africa. Thank you Brian!
Brian, all of your effort payed off. A+ on your job
WOW!! Don’t think I’ve EVER seen such a great detailing job! Of course the most sincere praise will be the copies that other modelers will do . . . and there WILL be some, you betcha!
That is truly a work of art. I don’t think i would have the patience.
What a fantastic build and the whole water front scene is very realistic. You certainly have a lot of patience to do all that intricate work. However I see no railroad tracks in the area. Won’t the water front produce any product to be shipped by rail? Has to be a fish processing house there somewhere.
By the way, I’ve always wanted to know, what time is “tea time?”