Fred’s been in touch again, this time with some advice on model railroad backdrop painting.
He’s very kindly put the below together in response to all the comments on his last post (which is here).
“Many thanks to all of you for your over-the-top compliments, which were greatly appreciated.
What you see has taken me a full time effort for a year, and it gets lonely in the basement – I appreciate the support.
Iʼll try to answer some of the questions sent me, but first let me explain my background and what excites me about modeling as a pastime.
While I had trains as a boy, as an architect I made a lot of architectural models in the 70ʼs and 80ʼs, and did a number of them professionally to earn extra money in what eventually became a non lucrative vocation that I quit in 1984. (Modeling was my favorite part of architecture.)
Iʼve always loved modeling, though, and as a pilot, I did a lot of RC aircraft modeling, with large scale models of WWII fighters and the like, until I tired at the heartache of seeing a half yearʼs work shattered by a violent crash into a fence or treetop!
So in my retirement I opted for more “permanent” subjects, and my preference is definitely on backgrounds, structures, scenery, etc.
Trains, per se, are less important, and mainly a way to bring the static part of the model to life, rather than the other way round. Iʼm not making a value judgement, itʼs just a personal preference.
Iʼm also finding that the painting of both scenery and structures, rocks, etc. is as fun as it is challenging – architectural modeling is almost always white, which is a bore.
For model railroad backdrop painting, determining a color “palette,” “atmospheric scale,” or the degree to which color changes and fades with distance is interesting to me, and Iʼve enjoyed the chance to explore this in the layout.
There are a number of fascinating articles about the dioramas at the Museum of Natural History in New York, which consumed me as a kid, and inspired me to make my layout as much a full “diorama” as my basement space would permit.
Of course this decision complicated a lot of processes. For instance, I have now learned that I couldnʼt really do the backdrop and the scenery sequentially.
While that might seem more efficient, I was unable to make the judgements about color value, conventional perspective lines, lighting, and decided other things that for visual reasons are best done at once!
So I find myself going back and forth, even with buildings and trees in the way, and I have repainted the majority of the backdrop two or three times already.
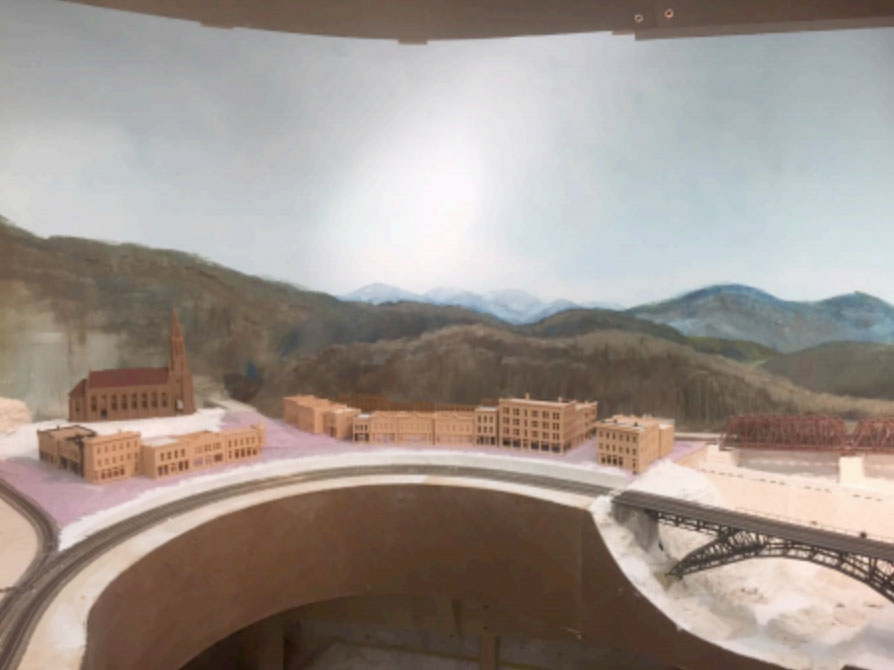
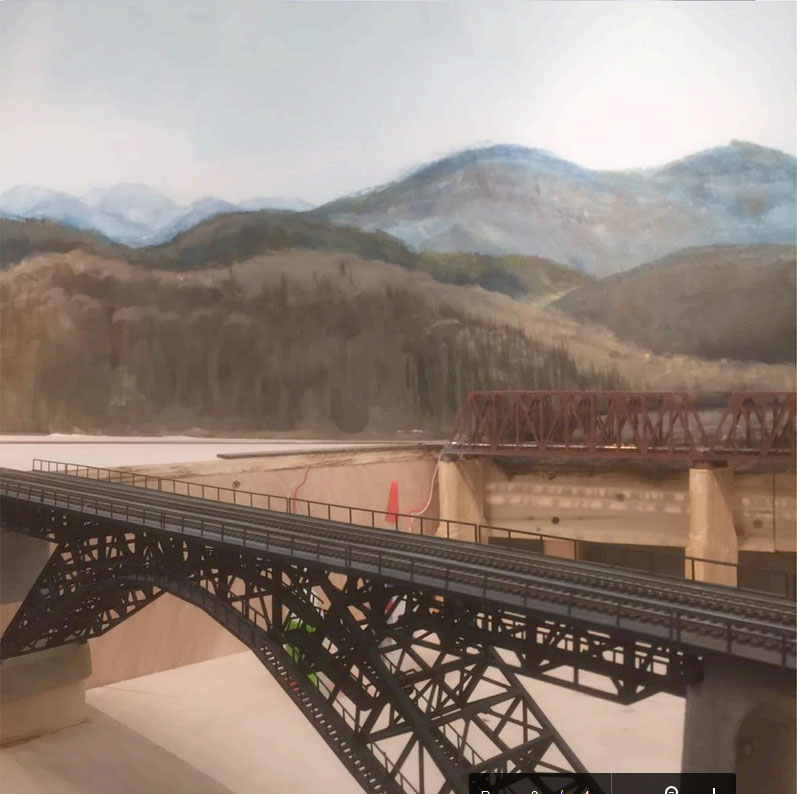
Here are some earlier pictures of my model railroad backdrop painting which I never sent Al, which show the dam and backdrop before Iʼd remembered what my high school art teacher once taught me, and before Iʼd even figured out that early fall was the most interesting season to depict from the color standpoint:
For the fellow that expressed some intimidation that he “wouldnʼt be able to meet the grade,” all I can say is that the fun part of this hobby is that we are first our own critics.
So if you feel you arenʼt doing what you wanted to do, just keep pounding away….youʼll
eventually improve and be very happy with it!
My first efforts at this backdrop are barely polychromatic, flat, and too sketchy to be anything but a big distraction.
Interestingly, when I progressed last November to a phase of psychological abandon from hating my backdrop so much that I wanted to start all over again, I had had the time to stare it and figure out what was wrong:
1) Mountains were too exaggerated in form. (When you enter my basement and view
the backdrop from an angle, the foreshortening effect makes this even worse.)
2) I had chickened out initially from showing any source of light in the painting. This is sort of a no-no in most landscape painting.The most recent version has strong light from the right hand side, which helps define the shape of the topography, bring out some color, etc. By the way, Iʼm starting to experiment with shading and coloring of the shady side of my buildings for added effect. Anybody else tried that?
3) I hadnʼt yet defined my street layout in the village, so I couldnʼt integrate roads and river in the painting.
4) Color palette was out of whack with available ground matte and scenery foams from Scenic Express and everybody else. Now it works, but the choice of foams definitely drove the show, and I think that most of the greens they offer are way to green to look really genuine. I made most of my trees with yellow, olive green, or light green. Iʼll be adding more “aspen yellow,” and subtle orange/red in places. But a little red goes a looong way!
For those who requested videos: Iʼll try. Videography is not my strong suit, and for some reason the video Iʼm taking on my iPhone6 gets out of focus and the color turns reddish and washed out. Anybody have any ideas what Iʼm doing wrong?
Itʼs hard to photo this layout from farther back…my furnace gets in the way. I gave Al a couple additional photos at the other end. Hope that works.
For the question about the dam “penstock,” Iʼve been working on that. The dam was not a kit. I made the face of the dam with built up plywood and foam, then layered with rough stone “tiles” roughly 50ʼ by 25ʼ at N scale which I made with one of my many latex plaster molds.
I ground the edges and thickness of these on a large bench grinder until they roughly coincided with the lines of the stone courses from the mold, then “grouted” in by hand with plaster of paris. All my exposed natural rock and cut stone in the layout is stained with 3 thin acrylic washes (yellow ochre, burnt sienna, black….in that order)
And I had the predictable problems with spots that wouldnʼt stain due to glues, “Sculptamold,” and basically anything beyond plaster. Nothing that a little shrubbery wonʼt hide! Railings are ABS, and dam turrets were “kitbashed” from parts of other DPM kits.
The penstock is going on the face of the dam as a pair of enormous pipes down to the turbine level inside the power house. Iʼve been putting this off while I search for something pre-made that looks like 8 to 10ʼ diameter industrial pipe.
Itʼs tricky at this scale, because without the requisite details like the pipe flanges at the proper thickness, and maybe even the mating bolts, a pair of half inch hoses running down my dam may actually spoil the effect.
Artistic license is necessary. Or maybe I can find a source to do it in brass. Iʼve just discovered etched brass fire escapes for my buildings, and I love them, but maybe it should become the “damn penstock!”
For the fellow who asked about track height, itʼs all on the same level. I dropped the level of my river/ravine to accomodate the dam by building a lower section of the bench work thatʼs about a foot lower than the rest of the benchwork, which is 48” off the floor.
Itʼs fatally incongruous though that I actually wound up with a river thatʼs below sea level! But since Maxwell Falls exists way down at one end of the layout, nobody has yet noticed this but me.
And for the guy who wants to get in his truck to come see the layout…youʼre welcome (and anybody else) any time. Even if youʼre trucking in from Cape Town! Just get in touch first, thatʼs all I ask.
Fred”
A huge thanks to Fred for sharing his take on Model railroad backdrop painting – sound advice.
(Here’s the link to his original post again).
Stunning stuff – and I so love his comment that I think really captures the spirit of this hobby: “…all I can say is that the fun part of this hobby is that we are first our own critics”.
That’s all for today folks.
Please do keep ’em coming.
And if today is the day you start your layout and paint that backdrop, the Beginner’s Guide is here.
Best
Al
PS More HO scale train layouts here if that’s your thing.
Need buildings for your layout? Have a look at the Silly Discount bundle.

very impressive layout , and your comment ” we are first our own critics”. is so very true as long as we are willing to learn from our mistakes and make something better .
Steve , Sarver Pa,
I though he said that there were going to be some later pictures of the back drop?
Fantastic Fred – just beautiful work. Another question about the Dam wall – how did you make the small turrets on the face of the walkway? You’ve inspired me to incorporate a wall with spillway on my HO Marklin layout and I love the unique appearance of those little turrets. Any tips? Thanks
Glyn
While this is impressive to look at, many of us build layouts to enjoy the challenge of running the trains, and the complexity of the design of the track configuration is the goal we are after. Scenery is needed for realism, but it definitely is not the focus or most time, effort, and cost consuming part of the layout. Not sure how many feet of track I have in my 4 x 6 n scale layout, but it’s a bunch, with 8 switches interconnecting 4 lines on the left half that feed into 2 on the right, with the track divided into 5 sections controllable by either of two transformers. The challenge is running multiple trains simultaneously over the myriad routes available.
Fred, beautiful layout, but in your quest for perfection, you miss the point. Nothing is ever ‘perfect’ in a literal sense, and rather than obsessing over, say the backdrop, continue on with your design in the macro sense, and come back to those areas that are not ‘perfect’. I too love realism, and craftsman modeling, but don’t miss out on the joy of just running trains. Layouts are never really finished, and are a labor of love.
Lovely work mate, and as for the reservoir, most of ours in Welsh Water had a draw-off tower with valves at various levels down it, sited some yards out from the water-side dam face, and the pipelines went out down the inside of the tower and through a tunnel in the ground under the dam. This was so you could draw good quality water for treatment, as the reservoir would often stratify, with a layer or two of rather ‘stale’ water with low oxygen or sediment suspended in it. Many of these towers were decoratively finished but the look was usually spoiled a bit by a steel walkway to the valve house from the dam. Still, no unsightly pipes down the ‘dry’ face.
Rod
Turrets were “kit bashed” from DPM models of a corner store with turret over entrance.
As to “missing the point,” let’s just say that perhaps I’m not doing all this (which I explained) for the same reasons some of you are. That’s OK… just a different outlook. I absolutely enjoyed flying RC aircraft. Trains are just less rewarding FOR ME. (But I’m building a fair layout within my diorama, so perhaps that will change!)
I completely understand that trains are a passionate hobby for people, and i think that’s great.
I have a motorcycle pal who has no hobby – doesn’t read, doesn’t make things, doesn’t play a musical instrument. Now that’s “missing the point.”
Beautiful
Excellent post Fred. Very nice layout. Great pictures.
Thanks for sharing.
Pete T. From Fla.
Thanks Fred – I appreciate the advice. As to scenery, nothing is ever perfect but you do a mighty fine job of getting pretty darned close! I love making beautiful scenery too as well as running the trains – I say enjoy yourself doing what ever pleases you with a layout and keep up the great work. We all look forward to seeing more of your posts and thank you again!
Glyn
It’s amazing how grand an N gauge layout can look but I’m afraid with my fingers these days I don’t think I could mange the finer details. Wonderful layout and thanks for the tips. I shall use some on my 00 gauge layout.
As for the piping run down the face of the dam, this was a design feature that was popular in the early 1900s. By the 1940s in western countries not so much so. Of course, many of these installations survived for long periods. Consider plastic soda straws painted rust as a piping material. Flanges can be punched out of light thin stock. Bolts can be simulated with indents with a counterpunch. After the 1940s, large diameter piping was being welded as those techniques were perfected. Flages became a feature in industrial applications such as refineries. However, at N scale, much can be suggested to the imagination.
Fred, short response…I appreciated and enjoyed your narrative.
Everyone has an opportunity to make what they want. I feel that it is a trully fine effort a d accomplishment. I see the senery as the most critical part of my 1944 layout, its all in the details for me trai s while important are secondary to the overall layout. Kindest, Russell
Verry fantastic and impressive layout great dat why mi anchoi dis layout.
HC Treintje Belgium.
Thanks Fred. Great comments on your work. As an Artist your backgrounds look pretty good to me. Be careful in your shadowing, the light come from only one direction.
A great work of art – and perhaps it is ‘finished’ when it matches the view as envisaged in the mind of the creator. I hope one day you will be able to show us your interpretation of light and shadow. Andrew in Oz
Gidday Fred
Generally, if you are filming or photographing under Incandescent Lighting, you
will get a Reddish tinge in your work. To overcome this, a Blue Filter lens will
solve your problems. Fluoros can have the opposite effect, in which case you
go to a Red Filter. Most modern cameras have an automatic or manual
adjustment built in.
Hope this helps
Wayne The Antipodian (kiwi)
Glad to see somebody else is always updating their back drops, mine never seem to be finished.
Good on you John, I can never keep up with buildings. I keep meaning to send in a picture of one of mine but the scene never seems to be finished to my satisfaction.
great back drop.
Your backgrounds are incredible….. great job!!!!
Superb modelling – I love your layout. And I can relate to the dilemma between technical accuracy and visual appearance. I have had to rebuild parts of my layout when, despite being to scale, it just does not look credible
Many thanks for explaining your experiences, most helpful
Andrew in O.
Fred,
Dont worry about a river that is below sea leave. I believe a River (more like a stream these days) flows into the Dead Sea and the dead Sea is BELOW sea level. See, there is a real life example of your work.
You have absolutly beautiful work.
Thank you for sharing it with us mear mortals.
Frank in BC Canada
Great looking background, outstanding bridge
Have you tried metal curtain rod. It would be close to your requirements?
As for painting backdrops I had some experience in this area nearly forty years ago. I was asked to paint the backdrops and scenery panels for a church group who were putting on a music hall production. If you have very bright lights shining on your artwork it will drain the colours considerably. I found this out the hard way. I thought I had completed my first of two backdrops when I put the stage lights on. Regardless of whether you were at the front of the audience or at the rear the colours appeared all washed out. You have to deepen the colour. For example if you are using yellow use one of the darker yellows. This goes for any colour you use.
As regards you using your smart phone to take photos the same could be happening. Up until six months ago I was using a 13 year old flip phone. It suited my needs as I reside in a non mobile/cell phone area. I was on the 3G network and the telcos stopped supporting this network. I have not utilised my smart phone for videoing or taking photos but do know that the light on a smart phone is very bright. My daughter tells me that if you use the flash option when taking photos with you phone you are basically using the phones light. This could be draining the colour out of your paintwork.
I hope this helps.
Fred the paint that we consider to be appropriate and not too bright or dark when painting backdrops etc. do not agree with bright lights. The flash of your iPhone 6, if my daughters generic brand phone is anything to go by, is very bright. This makes any colour look washed out.
If you can turn your flash off and use the lights in your train room only you might find the colours are more like what you expect in your photos.
Nearly forty years ago I painted the back drops and side panels for scenes in a music hall show put on by my local church. When I turned the spotlights on I found the colours were very light, washed out. I found this out very early in the task and adjusted my colours. I chose darker yellows, greens, browns, etc. to ensure under the bright lights the colours were as close to right as I could get them.
It is one of the hassles of photographing painted scenes, or paintings, when using bright flashes or lights. Whenever I photograph my paintings I always try to use natural light or the flourescent lights in my studio area for this very reason.
Fred 2mm is roughly 1 foot in N scale. In Australia we have round boiled lollies (candy) that has a hard plastic handle that is 2 – 3 mms in diameter. They are probably 75 mms in length. If you have anything like this in your neck of the woods these may meet your pipe needs.
Fred, very nice layout. Plastruct make both 1/2-inch (TB-16) and 5/8-inch (TB-20) OD plastic tubes that might be a little easier to work with than the brass tubing since they could be heated and bent if necessary. Depending on how much length you need, various high-lighter and marker pens have plastic tubes of 1/2″ to 5/8″ diameter. Also, 1/2″ PEX tubing used for regular plumbing work is a scale 8-foot outside diameter in N-scale.
You might also look for someone to 3D print the valves, unions or whatever other pipe fittings you might need to complete the pipes to the generator house. Or they could also be scratch built from styrene sheet and tubing.
Your integration of backdrops with foreground scenery (in the earlier photos) is impressive and the dam is truly amazing. I appreciate your sage advice as well on how to choose the correct paint colors.