Keith’s been in touch with his 12×16 HO layout:
“Greeting Al, from the northern part of Wisconsin, USA.
This is my first contact with your blog, but I have read it for a couple of years now, and sure do appreciate your efforts as well as the contributions of all who enjoy this indoor sport. I have lifted many tips from your many readers – so thanks to all.
I, like most others, am retired and decided to re-set up the layout I had packed away for many years. The layout is pretty big – roughly 12’ x 16’ in HO scale. The table is constructed with 2 x 8’s for framing, 2 x 6’s for legs, covered with 3/4” plywood and that covered with 1’ thick Styrofoam for sound deadening.
There is an internal walkway for repair and correcting errant rolling stock. Everything is standard DC, but I sure wish we had the finances to have gone DCC. We have three steam locomotives and 10 diesels of various size and configurations, plus more rolling stock than we really need.
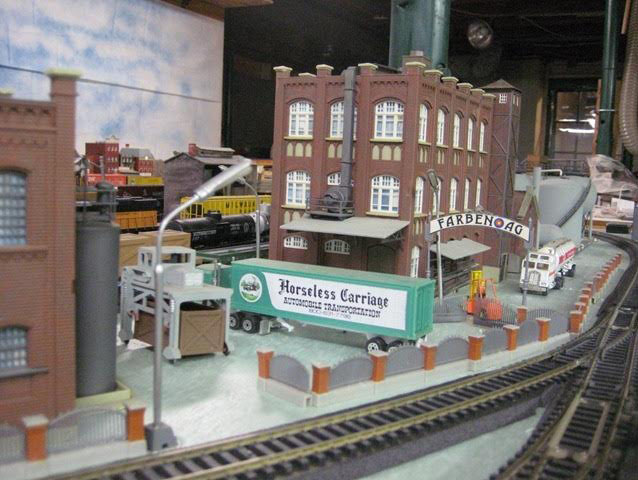
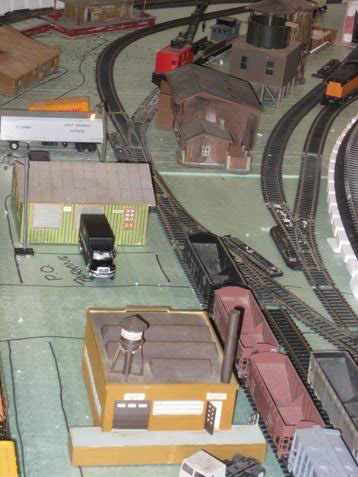
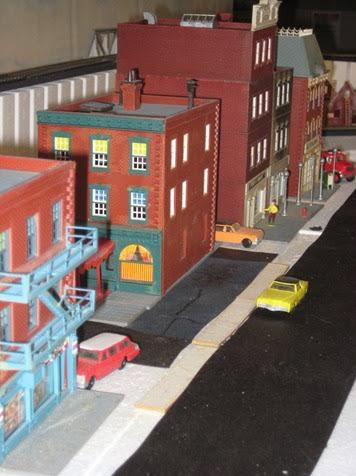
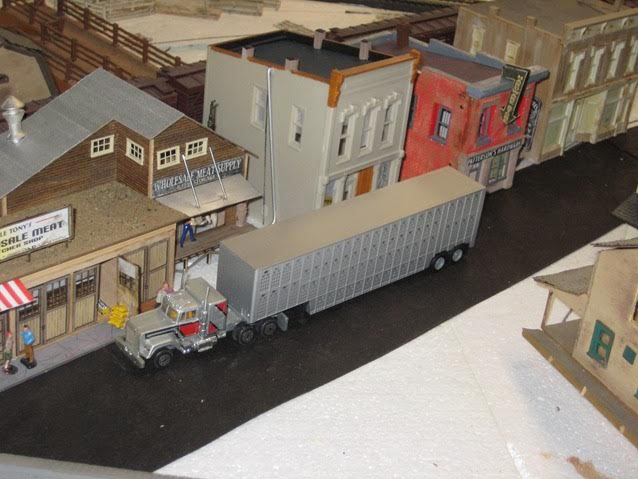
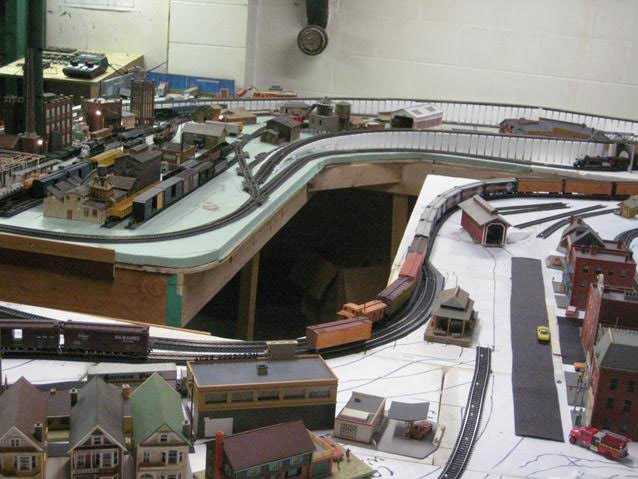
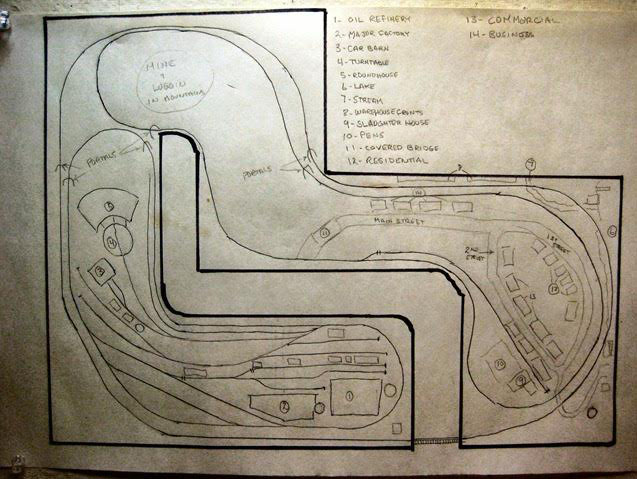
There are four separate loops individually controlled, including a street car run, an industrial switching yard, a commercial and town run, and a mountain run. We have fixed our point in time to be around the early to mid-fifties, and have not modeled this after anything other than our imagination.
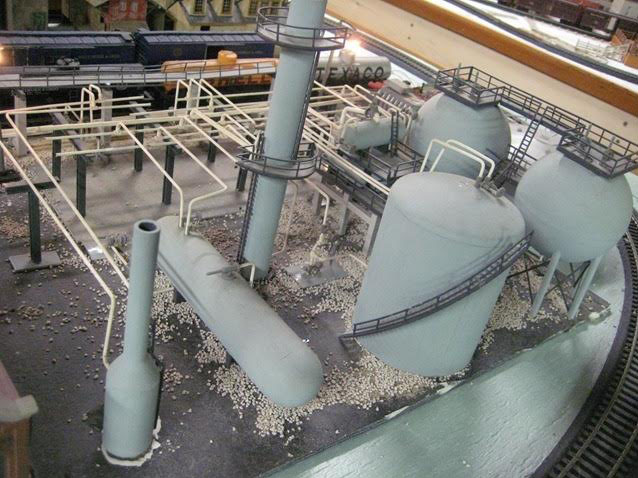
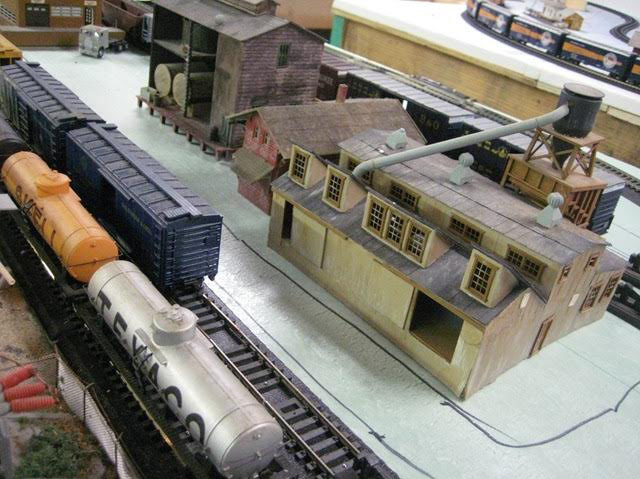
We have a three stall operating round house plus additional service buildings. In the mountains there is an operating mine with an oar crushing operation, serviced with a separate spur. We have a major factory area plus a refinery. We have a small stock yard with it’s siding, including some meat packing operations.
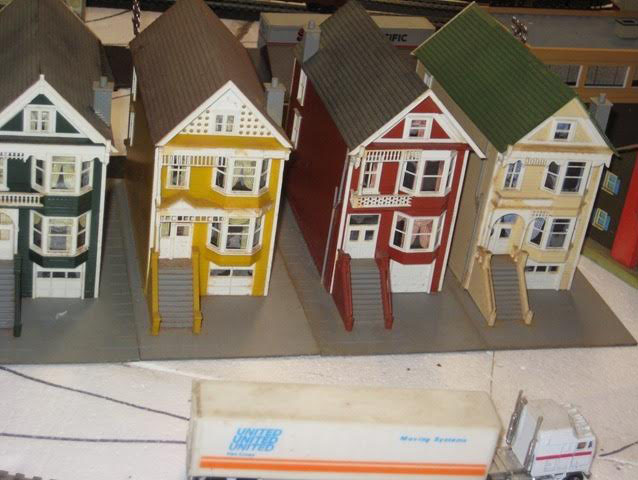
The residential area is small but it connects to our downtown business district. The mountain area has many small “interesting” scenarios for the viewers to discover. We have on order, a 3’ x 12’ printed banner of a mountain scene from a photo, and this is to be most of our backdrop. I am looking forward to getting that into place.
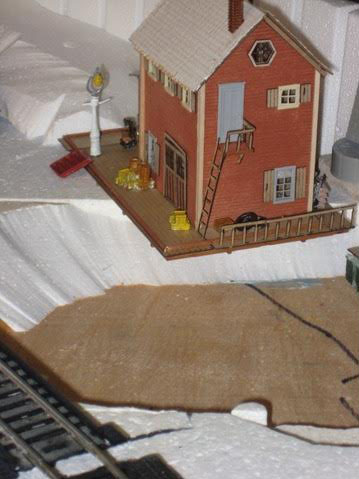
We have done no landscaping as yet (that will come later) and very little of the electrical wiring is finished. The track loops are now functional and a few of the building and yard lights are hooked up. No swithouts are functional at this point so when we “play” we need to manually change the switches.
Some ides that we have incorporated as we progresses thru the layout so far are; using tar paper for blacktop roads. It works great and can be cut to any size, length, and configuration. Very thin pin stripping tape (from an auto parts store) can be used for center lines where needed. I do not have a steady enough hand to paint the lines myself.
I purchased a bag of fish tank gravel and some fake greens from a pet supply store – a lot cheaper than from a hobby supply center.
I also have picked up several fake flowers and interesting branches from Hobby Lobby for future landscaping use. I used a stiff wire brush on some old roof shingles and I collected the gravel in a glass jar. Good for almost everything including ballast.
Keith – My construction partner is named JJ, so thus the name of our project – the JJ & K RR”
And now back on to Fred – after his stunning last post, quite a few of you had questions.
Fred’s put together another post which I’ll publish in the next day or so. In the meantime, he also kindly sent in this:
“Hi Al –
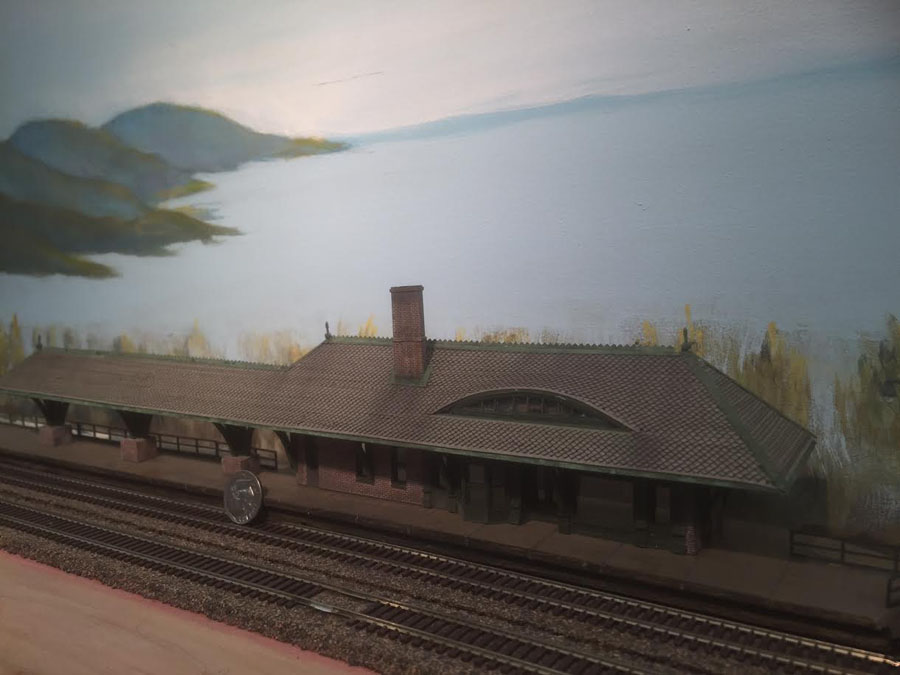
For the ridge detail on my depot, I used a strip of the roof shingles inverted! The weathering was pretty easy: weathering powder in the usual places – dark grey for runoff from the roof, green for the “verdigris” that you saw everywhere back when copper was used pretty exclusively for flashing.
Although I suppose you could say that I’m really “painting” with it.I find that you can brush it onto all surfaces including polyethylene as long as you put something sticky on the surface first.
Some use fixative after they weather, I use it before. And while the surface is still a little tacky I brush on the green – the more the better. Just make sure you don’t inadvertently touch an area you don’t want to receive it, and if you drip any powder on anything else, blow it off before something touches it and it spoils things. I’ve done this with whole roofs, and by wetting the surface with a spray mister you can “powder” it on the damp surface really thick. It gets that lovely copper sulphate look.
In this case I made my flashings on the roof first, (of folded paper, cut very fine) then sprayed on (lightly) a very dark green/brown as a base color. While the paint was still wet, I bathed the paper with green weathering powder on the exposed side. Having already unfolded the flashing, I flipped it over and sprayed (fairly heavily) a 3M spray adhesive on the underside.
After 5 minutes of drying, I stuck the flashing to the roof, with tweezers, being careful to only press the edges so it wouldn’t curl, and then trimmed it in place with a very sharp blade. After all that I touched up with a little more weathering powder and a very pointed brush.
Having modeled years ago for architectural projects, what I find so satisfying today is the breadth of special glues that are available, especially the Cyanoacrylates. Having built furniture with it for years (you can leach the really thin stuff into a dovetail joint after assembly and then sand or plane the surface, I have a lot of the stuff around, in a variety of consistencies.
For modeling I have been mainly using the thick stuff. And because the only drawback to the stuff is its shininess, I’ve learned a technique I’ll call “spotwelding” with crazy glue, and “finish welding” with PVA. Allow me to explain:
On my station I used 3/8″ high ABS railings, which I bought in bulk. They’re too black as they come, so I usually paint them per my description above, only give them a light dusting with green powder, which takes the edge off the color, and gives it some color “scale” which I like. They’re light and fragile, though, and tough to hold in place. Plastic cement is likely to melt them, leave shiny glop on the receiving surface, and PVA is fine, but holding my hand on a model for the half hour that it takes to harden is not my idea of fun.
I should have mentioned my love affair with the other component of successful cyanoacrylate gluing – the “accelerator.” I get mine from Rockler, which is a fine carpentry outlet here. It comes in pressurized aerosol cans and has the advantage that you can give a very light overspray on the receiving surface without staining or damaging anything. because it’s pretty volatile it seems to evaporate quickly and leaves no trace of stickiness or residue.
Then I take the part to be glued (in this case my railing), and with a piece of wire like a paper clip I dab the smallest possible drop on the underside in about three or four places. As long as the accelerator hasn’t come near the piece to be glued, the droplet will remain liquid on it for several minutes. Very carefully I place the rail exactly where I want it. And the instant that railing hits the receiving surface (in this case the station platform) it is firmly stuck, or at least enough to hold it in place.
We’re not through yet! Because PVA offers the modeler some serious advantages, not the least of which is appearance, (the second one being the ability to wet it and undo your work if need be) I want to do the major bonding with it. It also allows you to fill little gaps which if dusted with weathering powder at finish, make joints invisible or more realistic.
So then I take a small bottle lid with some PVA “white glue” (I use Elmers Glue-All because it’s cheap and readily available) and with a small chisel shaped artist brush and a drop of glue at the very tip, start the tedious job of filling in the joint between the railing and the platform. After an overnight dry it looks perfect, with no visible glue.
Fred”
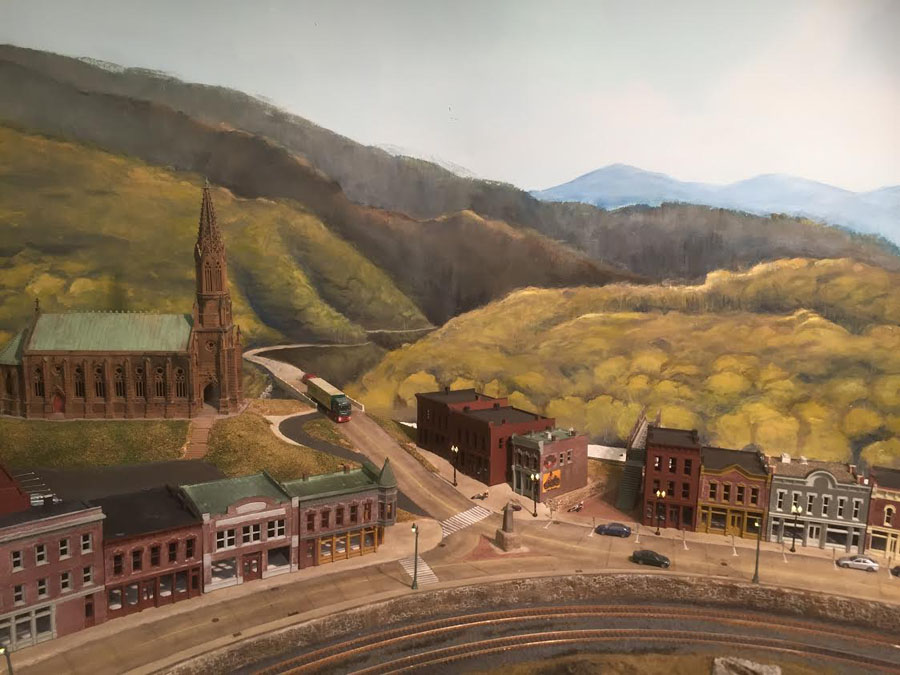
Church Roof has the “Verdigris” treatment:
A huge thank to Fred!
And finally, here’s a question I see time and time again, so I thought it worth posting as I think it’ll help quite a few:
“Hi Al,
I’m just getting back into model railroading (HO Scale) after about 50 years. I have all the board work down and am now getting ready to lay track. I have one main question before proceeding. When I was originally into Model Railroading there wasn’t any DCC wiring only DC and I have no one nearby to ask questions. Do you recommend that I stay with DC or try to figure out on my own the newer DCC method?
Any help would be appreciated.
Thanks,
Curt”
Please do post your answers below – and thanks to everyone who’s contributed.
That’s all this time folks – don’t forget the Beginner’s Guide – it’s the very first step to getting your head this hobby, whether DC or DCC is your thing.
Keep ’em coming.
Best
Al
PS Latest ebay cheat sheet is here
PPS More HO scale train layouts here if that’s your thing.

I would recommend going down the DCC route. Wiring is much simpler, you are driving the trains, and there are lots of modules etc for signals points(switches) etc.
I have quite a large collection of DC locos and I converted each one to DCC when funds allowed, giving me much more control of everything
Hi Al. Great layout Keith. Would like to see it as it progresses. I`m new to model railways only been doing it for about a year. Wish I had started earlier.
It`s addictive :o) Thanks Al for a great blog and thanks to all who contribute.
P.S. My layout is N Gauge and is 5`x 3` owing to space problems :o)
Keep up the good work guys and gals. John
I would definitely recommend going with the DCC! I started my layout using DC and while trying to figure out districts and blocks and reversing loops, I started to read about DCC. Yes, granted, it is slightly more expensive, but the advantage of having less than 1/4 of the wiring and no need for DPDT switches for reversing loops outweighs the cost. I only wish that I had started initially at the beginning with the DCC. I had a fairly good size pile of wire that I ripped out because it was no longer needed! There are a couple of excellent books out there about DCC, and several different manufacturers. Some people like NCE, others Digitrax. I say just go with one that your closest shop is most familiar with. Both of these manufacturers have excellent support techs and chat groups. I have Digitrax at home and the club to which I belong has NCE. Other than the throttle control, I can’t find any difference at all operating any motive power.
This is a nice layout. I have a space that is approximately 25×25 that I’d like to start my layout in. Funds just dont support this yet. I was thinking about doing modulars but need an overall plan and not sure where to begin.
I love these emails that you send. I get so many great ideas!
Thank you!
Curt, If you are starting from ‘scratch’ with new locomotives or do not have many older DC locomotives then I would recommend going DCC. It allows you to have more than one locomotive running simultaneously. The drawbacks – adding chips to ‘old’ locomotive and the cost of adding sound. Having said that once you have chipped locomotives you can use them and add sound later if you so wish. If you are still not sure which way to go or have a large number of DC locomotives then buy any new ones as DCC ready because these can be run DC and if later you decide to go DCC they will only need a ‘plug-in’ chip. Hope that helps.
Hi Curt. I, like you, was doing model railroading in years past. The thought of DCC was intimidating at first, but let me tell you, DCC is VERY easy and you will enjoy Model Railroading much more and with a lot less trouble. Please don’t accept the mindset “I am familiar with DC, so I will go with what I am familiar with”. You will be surprised how east DCC will become what you are familiar with. You can send questions to me as well as post them here on Al’s blog and you will get all the answers you need. Hope this helps. Thanks.
Hi Keith, bit puzzled why you went for completely separate circuits, even with DC it’s not difficult to wire a more connected railroad in block sections switched between a couple of controllers. I would be wanting to see my steamers tackle the mountain line, my streamliners cruise by the factories, my freights swapping cars in the yard… Got to be worth putting in some crossovers where the routes run parallel, hasn’t it?
Rod
On DCC; I am in a similar situation except I left HO 50 years ago using just DC and block wiring for G (or F) outside and used radio control of 3 separate DC loops. I thought my friends would like to ‘operate’ and pick up and drop off cars, make up trains. etc. They didn’t; they wanted to see trains run while they sat on the deck with a beverage and listen to the chugging and whistling. I left all that and moved nearer the grandkids and have begun an ON30 indoor layout with DCC at least for train control. I have picked a layoit plan that will allow continous running and some switching. My wife thinks I’m nuts!
1. Little or no block wiring is needed, although good distribution to all the track is necessary,
2. The availability of relatively inexpensive DCC locos with sound.
3. the adaptation of wireless technology so that a wireless throttle or 2 can be carried by engine drivers Engineers)
I used the ESU system and bought the one I use from PIKO (called Smartcontrol). There is a lot to learn but it works well so far. I am working on a right angle railroad about 12′ x 12′ and 30″ to 4′ (like a wide and long corner shelf). I live rurally no and there is no club nearby. The things I don’t know yet are:
1. Part of me wants to operate switches manually which works well with the walk-around DCC.
2. Part of me wants some centalized switch control on the mainline and in small yards so that one control sets up a route. That can be done with DCC (adds significant cost) or regular electric wiring.
I used Mianne benchwork with 1″ foam (no plywood) as a base. I have started to use the Woodland Scenics ‘sub terrain’ system. I believe the integral foam and plaster cloth scenery will be strong enough. We’ll see!
Great lay out I question true Ho size buildings but like the detsil
DCC is the only way to go … when I converted I had many feet of wire to dispose
of. No more blocks and the corresponding switches ect. I love it
I still require reversing modules ?
Sheldon. Phoenix AZ
Running trains with DCC is as simple wiring-wise as setting a DC layout up to only ever have one loco (trainset mode). No blocks.
Although I run DCC it is only for the trains, the track switching and signals are wired separately. More work but far cheaper.
Keith
Great Layout with nice structures too.
I would think of maybe a better name rather than “(JJ & K RR)”
Try to think of some towns or city in your state and name the RR for that.
It give your layout a more realistic sounding name.
Don J
Very good but can not see all the layout
Very nice,I particularly like that he included a track plan.
There’s a lot of thought that went into this
I especially like the church and town on that gradual curve. Great detail, and wonderfully done. Thanks
I’d recommend DCC too, but beware using an inadequate decoder for older engines. The decoders are rated for a certain maximum current, and the tiny ones that are often the only things you can jam in an older steam loco are only rated for half to one amp. If the loco has an old fashioned motor it might draw a couple of amps or so and then your Expensive little decoder is toast. There’s a lot to be said for buying new DCC-ready locomotives rather than struggling with that cheap kit you built in 1973. I speak as one who has been there and done that…
GOOD STUFF!! should be a kick to operate.. keep us posted!! thanks.. Brad
Curt, I’ve been using plain DC for 40 years but still think if I was starting today I’d go for DCC, I may even give it a go on our next club project.
Rod
just a lot of great advise, I had big HO layout now switching to N scale I have been going back and forth about still using DC for my new layout but I think you all have made DCC sound easier than I thought it would be that I’m going to go with DCC.
thank you.
scenry printouts. what thickness card do you attach these to? and what kind of adhesive do you use? what can i use for windows for these so i can put lights in them?
Keith, Great job man… and I truly appreciate you providing your track plan, I wish everyone that sends in an article drew one up… it really helps the reader visualize the what the poster is talking about.
Very, Very NICE…… Thanks for sharing…
Entirely intimidated by dc I changed a layout to dcc and am using dcc on new extensions. It really is easy. Hardwiring very old split chassis locos not worth the hassle. I use ROCO Z21 and Dcc Concepts accessory decoders for points. Very easy to use. Lots of wiring still but much less than dc and is easier to fault find on.
Very nice detail and scenery!
Great looking layout! I wish I had the space for an HO scale layout. I decided to go with a 3.5′ x 7′, N-scale layout. Since I have been out of the model railroading world for about 50 years, I decided to go with DCC over DC. (my last HO scale railroad ran on 2 d-cell batteries) I am still early in the planning stages and clearing the space for the table, but hope to have things up and running by the end of the summer.
Lots of great ideas on this blog
Keith, great layout. Where did the refinery (or parts ) come from. I am modeling in O scale and want to use a refinery or tank farm in my layout, not having having any luck in sourcing parts. Any suggestions?
After many years of my DC equipment in storage due to many kids, I finally was able to start my hobby again. I chose the DCC route since it gave me many more advantages over regular DC. I feel that DCC adds more realism to the hobby because of the sound as well as being able to run multiple trains at the same time. I am almost 63 and am thoroughly enjoying what DCC has to offer. My grandkids love it too.
Sheridan, WY USA
Very interesting layout Keith, it’s an attention getter!
AL…. this is a great blog……lot of info on DCC and also on weathering……..one of your best…….keep the info coming.
Keith……..Great detail on your structures…..it is going to look great as you progress.
Curt and all….. Great info on DCC……
Having operated both analogue and DCC layouts, I have to say that I personally find DCC to have been massively overrated (unless you’re running sound!). DCC wiring doesn’t have to be complicated (except in loco yards) and the use of auxiliary switches on point motors can reduce the amount of manual switching needed.
2x8s and 2x6s for table construction ???????
Way way over kill ! Well at least you got yourself a
Bomb shelter and tornado shelter if all else fails
I’m building an O scale 28’ x21’ layout and I’m using 1×4 spaced 30” apart in 7/16 plywood and that’s plenty strong !!!
Please opt for a DCC system. If I had to make comparisons, I could ask … in this day and age, would you rather use a typewriter, or a computer/word processor/printer? Would you prefer a rotary dial telephone, or a cell phone? Would you purchase a tube television, or a flat screen?
And once you make the correct choice and select a DCC command station, I would recommend purchasing new locomotives with pre-installed sound-equipped decoders, especially in N scale. You can retrofit decoders to old locos, and indeed, that is a fulfilling segment of the hobby for many folks, but it involves another order of knowledge and complexity that is best “grown into” down the road.
Keith, I am so impressed with the quality and variety of the structures. I wish I could build structures like that. The track plan is a very good one too with plenty of access and running room.
Fred’s station building is so wonderful. Stunning was a great word for it, Al.
Keith’s 12×16 HO layout
I spent most of my 50 working years in various chemical related complexes. To look realistic, I recommend that you totally do away with the scattered gravel at the base of your process equipment. Also repaint the black area that looks like asphalt as well as all of the foundations supporting the tanks to look like concrete. Finally construct a small, solid looking, concrete wall (dike or bund-for British readers) about the scale height of a “Jersey Barrier” about 10-20 scale feet away from the various pieces of tall equipment (the tanks and towers). The barrier should be the same height all the way around the complex, but can be only a few scale feet away from the shorter equipment. For worker entry into the diked-in area, provide several steel styles consisting of a grated platform including railings above the dike wall, and access stairs including 2 railings on both the outside and inside of the dike. From what I see of you modeling skills from the collection of photos you sent, I have no doubt you have the necessary skills to add these realistic features to a really great layout.
Keith, Nice layout photos. I really like some of your structures. I agree with another post that it seems like connecting some of the big loops would give you more operating possibilities.
Fred, Thanks for the detailed explanation of your weathering and building techniques. They obviously work well as evidenced by your photos. I especially like the curved street with the church. Very nice work and it blends so well with your backdrop!
Curt, Unless you have a huge quantity of old DC engines, DCC is definitely the way to go. I have a lot of old DC locos too, but after trying just two new DCC locos I decided DCC is definitely easier and more fun. Wiring is so much simpler since the track is merely a signal carrier. I have both NCE and MRC DCC systems and find that I prefer the MRC because it’s easier to understand. You do still have to deal with polarity issues of reversing loops, but there are circuit boards from most DCC manufacturers to automatically handle the reversing loop polarity.
Keith, I like your layout. The closeups are fine, but I’m a forest-not-the-trees person, so I really appreciate your drawing of your overall layout. I also like that you have BOTH a yard section with lots of tracks, plus a section that represents the majority of railroads. Great concept, and I’m anxious to follow your progress.
Look awesome. I hope mine turns out that good.
To Keith, great start on your layout. Looks really good and you have great detail on your structures.
To Curt, since you’re starting from scratch for train control you should consider ALL of your options, DC, DCC, dead-rail, RailPro, Bluetooth. I’m still planning my layout but will be starting to build framing in the room this winter. Many years ago I was looking at all my options for control and I chose to go with RailPro. It is super intuitive to use and the best part for me was I could take my trains to any of my friends layouts that are running power on their lines and I can run my trains on their layout because I just need the power from the rail. The RailPro is radio control for the signal to the locomotive so you just need the power from the rails or a battery if you want to go dead rail with it. This has allowed me to run my trains for the past couple years while planning for my layout. A couple others in my club who are doing their layouts and hadn’t settled on control yet have also gone with RailPro. Best part too is if you have kids that might use it they will pick it up right away. Best part is there is no programming required. To make a consist of multiple locomotives just link them all on the controller and away you go. No speed matching or any of that required like in DCC and no programming. I highly recommend it.
Very nicely done layout. Well done refinery and other industries. As you go it’ll really fill in with details. I would definitely look into dcc, it seems to make everything easier, once you get the hang of it. Keep up the good work. I can’t wait to see updates
Well curt I suppose after all those comments you’re having g a blast converting to DCC… lol. Great layout , looks massive. Keep plugging away at it and please do share your progress .
My reply is for DC vs DCC. All things being set from the start, DCC would be my choice. I recommend looking into RING ENGINEERING as they have a totally different approach, using radio to control locomotives ans devices. They also have superior sound, and a system of nearly automatic MU (multiple unit) operations where the lead locomotive sets the speed for up to 6 locomotives following.
Hey Keith, definitely go with DCC and please connect up your loops so you will have plenty of options for running your trains in the future. Seems like you could also incorporate reversing tracks too which are very easy to operate with DCC. When you get around to the fascia treatment please consider blending it to the scenery with appropriate paint color or even better…retaining walls, sloped terrain, or possibly rock face edges. Cheers!
Keith: Great!
Fred: Beautiful
Curt: DCC
Having such a beautiful intricate layout why not allow the OUTSIDE LOOP to intergrate with the rest of the layout. Just needs a double switch track section. If I’m wrong someone please correct me. I think it would complete the entire aspect. 😉