Got this in from Glyn. He’s shared an excellent post on making mountains for model trains:
“Hello Al – I’ve re-started some work on the layout once more, adding the first of a series of mountains to the right hand side of the double mainline.
It’s been an awkward reach but I’m managing to get it done piecemeal.
I should have done this at the beginning of construction but as you may recall I decided to add an entire double mainline loop to the back end of the layout just a couple of months ago, necessitating the additional landscaping as an after thought.
Hindsight is 20:20! I hope it will be helpful to some of your viewers.
I’ve been swamped with work but have started working on the layout once more after finishing the Bietschtal bridge project I sent in earlier.
Since the bridge installation I added railings around the bridge approaches shown below.
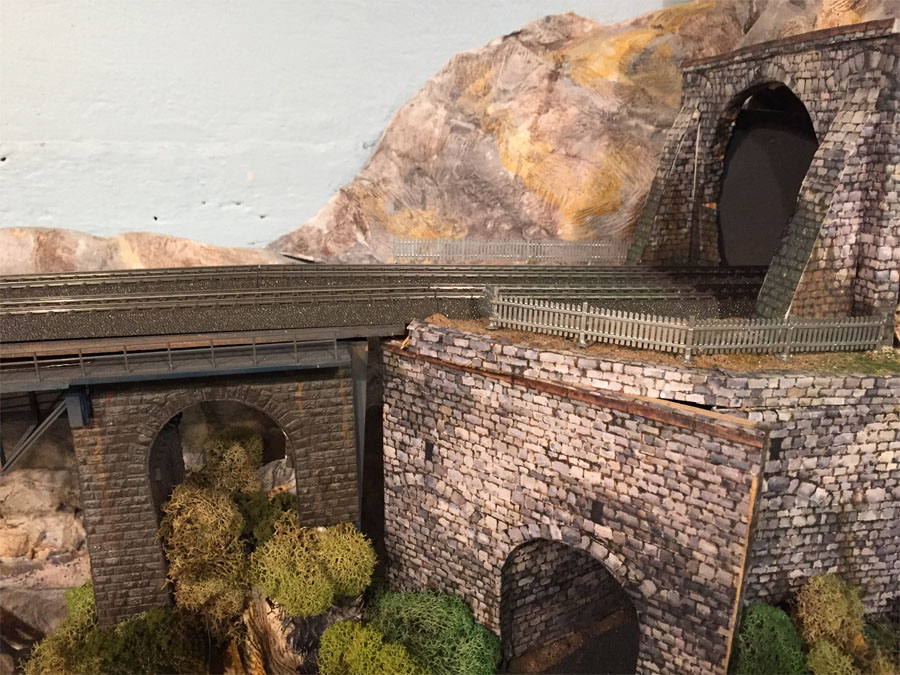
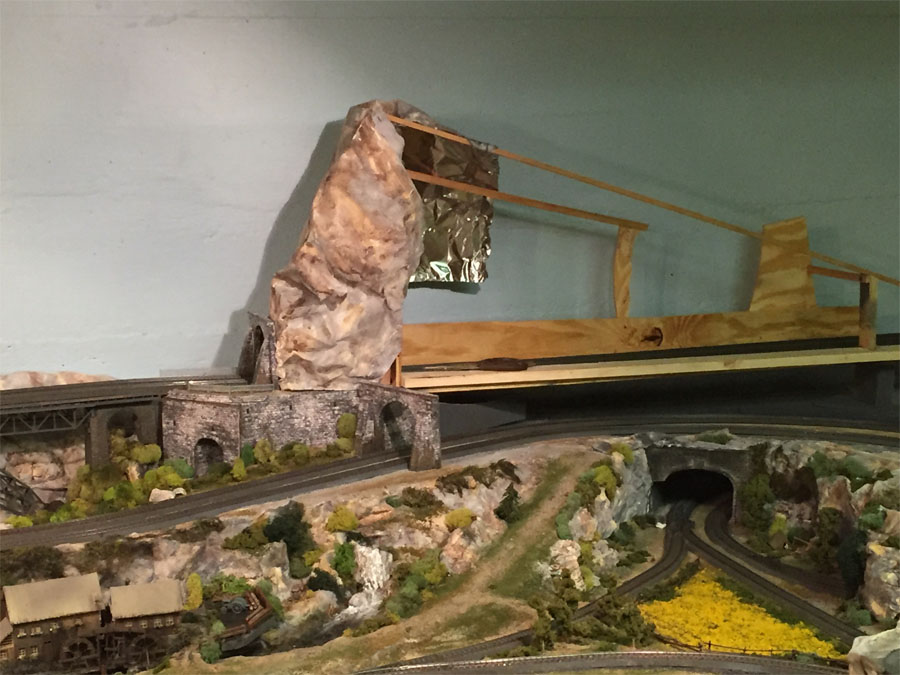
With the tunnel portals made I started on framing up the mountain to the right of the bridge.
I wanted a fairly high peak tapering gently down toward low hills which would be the backdrop of a smaller town on the right limb of the layouts E-shape.
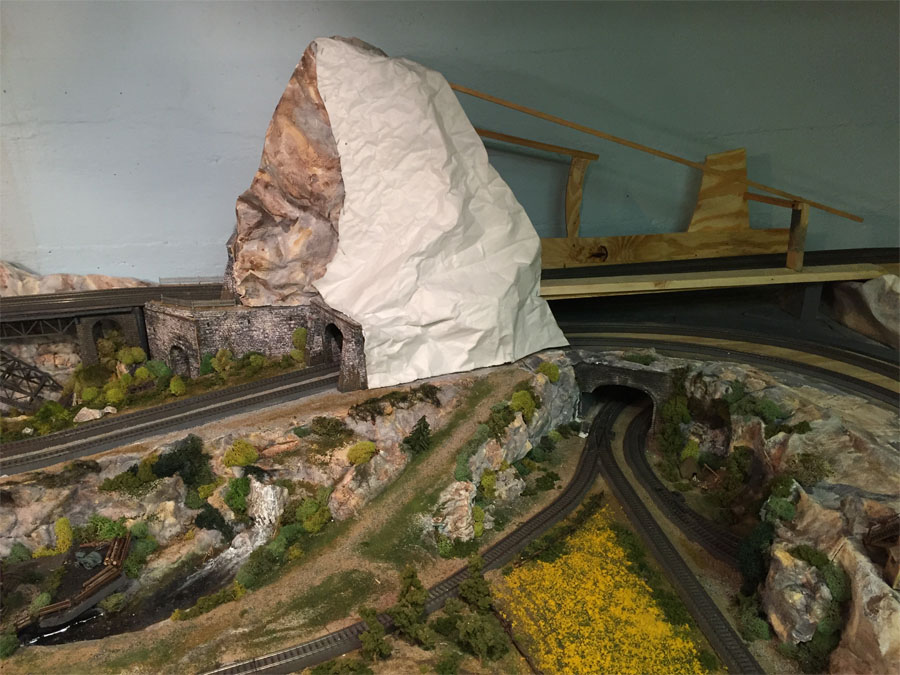
I made a rough wooden frame out of wood off-cuts – not much to look at but it was sturdy enough to support the use of Woodland Scenics shaper sheet.

With the face of the mountain stapled on to the frame I began covering the entire structure, making allowance for the tunnel portals.
The idea was to construct a mountain that could be easily lifted off the layout in case of derailment or for track maintenance problems etc

Next came the plastering shown above and once that had dried I started to paint the shell using the Woodland Scenics leopard spotting approach with burnt umber, yellow ochre and Paynes Gray/black acrylic washes.
The initial result with this technique (shown below) is always a little garish but as it dries, the colours fade and become quite realistic.

Making mountains for model trains:
Next I started adding areas of light grass flocking and small bushes using lichen.
I also made an attempt at constructing a tall pine tree using Luke Towan’s technique using BBQ skewers with coconut fiber rings to create the framework for the flocking. He has a superb YouTube video describing the technique and achieves amazing results at a fraction of the cost of buying ready made trees.

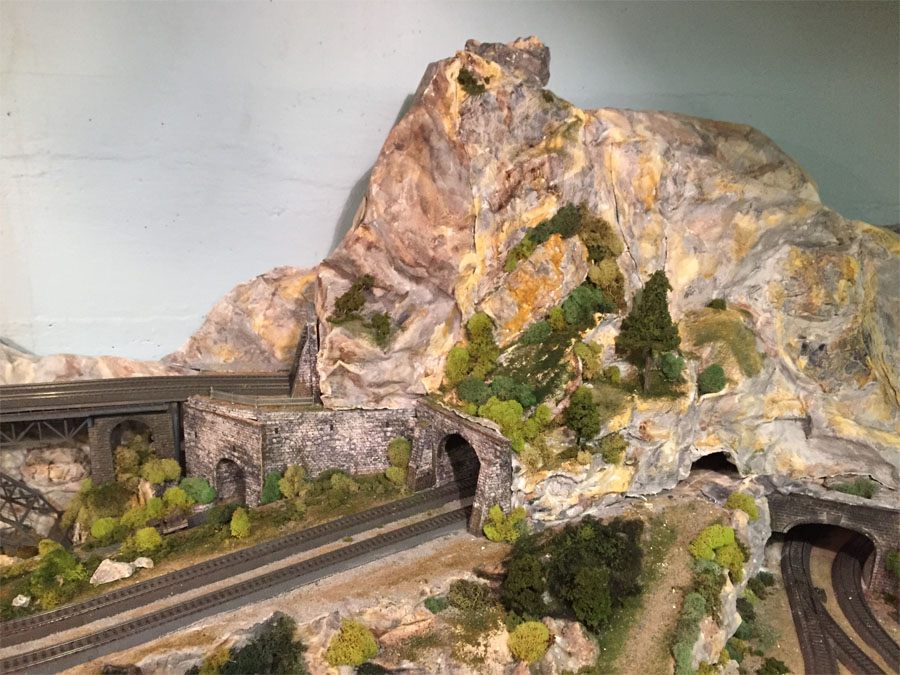

The effect was fairly pleasing so I began to add electrostatic grass to the softer shoulders of the mountain and then added more trees, both deciduous and conifers.
I also added anther smaller summit to the main mountain as I didn’t like the angular profile of the original construct.
I had added some vines along the edges of the precipice but found that too dark and unrealistic so off it came. This is before I removed the vines.

With some of the vines removed I added more trees and electrostatic grass.
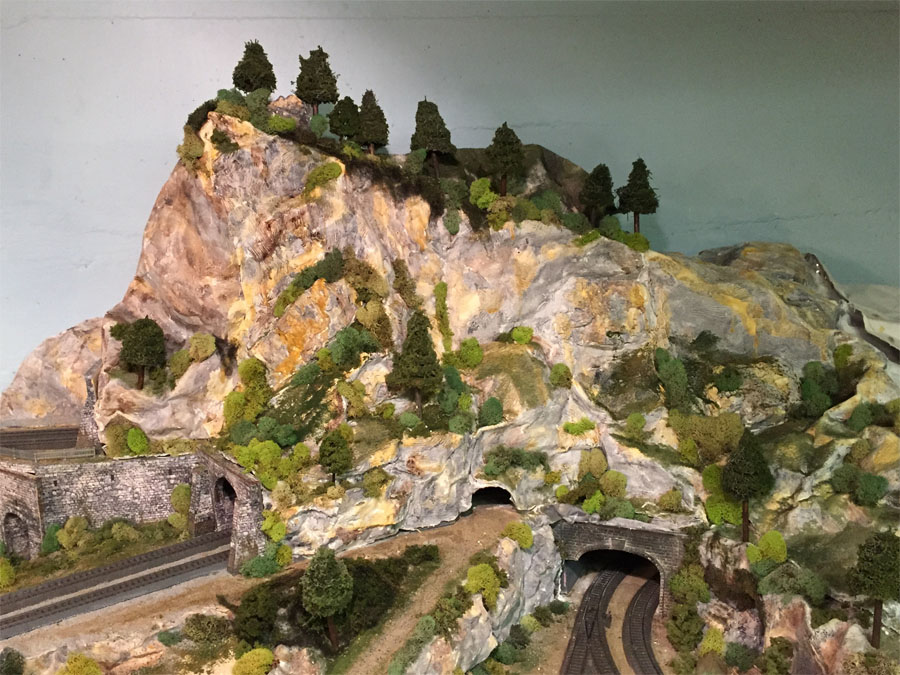
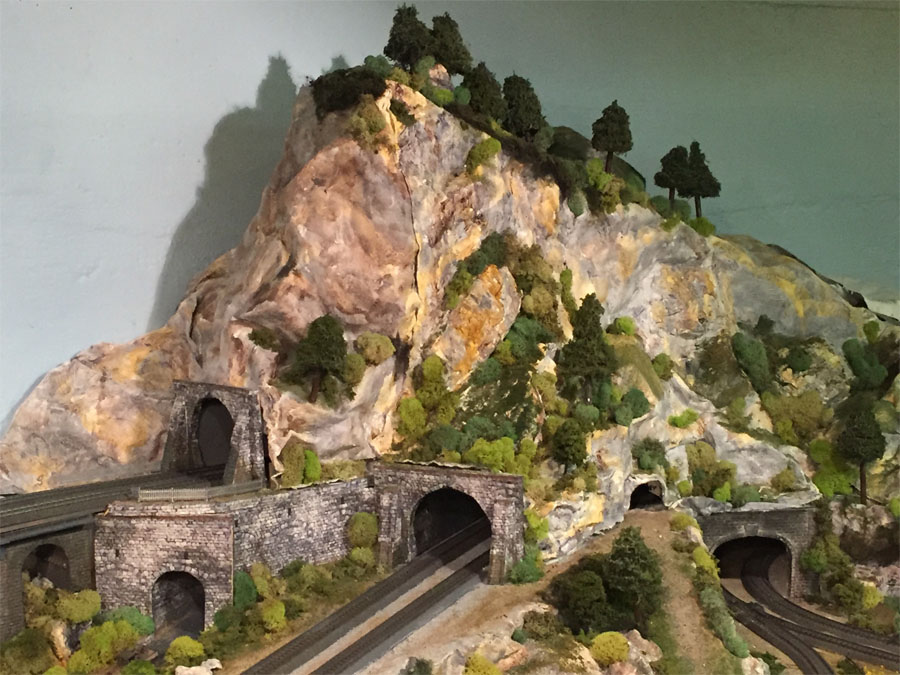
The final result is fairly pleasing at this stage but I plan to add more trees and bushes to the main mountain as well as to the smaller outcrop to the left of the tunnel portal.
I will also have to camouflage the junctures between the portals and the mountainsides and add a tunnel portal for the logging road at its base.
Then it’s on to building more mountains to the left of the Bietschtal bridge! And so it goes on!! I’ll send some video once I have it edited.
Thanks again,
Glyn”
Well what can I say? I stunning ‘how to’ on making mountains for model trains. I think they look amazing.
(It reminds me of Jim’s post: DIY model train mountains.)
Latest ebay cheat sheet is here.
And if Glyn has left you feeling inspired – the Beginner’s Guide is here.
That’s all this time folks. Hope you enjoyed this one as much as me.
Keep ’em coming.
Best
Al
PS More HO scale train layouts here if that’s your thing.
Need buildings for your layout? Have a look at the Silly Discount bundle.

Thank you, Glyn. Your pictures and descriptions provide inspiration and economy for those of us who aspire to develop more impressive and realistic layouts.
Karl
Excellent balance between railroad an scenery, beautiful job :-):-):-)
Wonderful scenery and great technique. I love the fact that you indicate model railroading is a WIP and a layout will never be completed; it is pure enjoyment!
Cheers! NJ Mark
Glyn–Great job of building a realistic mountain!
Very nice. Not sure how I would accomplish it but a few puffy clouds in the background would soften the scene. I’m always thinking about how to incorporate a mountain.
Looks fantastic, great job!
One of the best how to demonstration I have seen. I was so taken with it I spent several hours watching all the others he has made. Great ideas made easy.
Great. Thanks for sharing.
Thanks for the encouraging comments – I’m glad this post has been helpful. Regarding the clouds and backdrop, I will be adding one – distant mountains with a lake in the foreground feeding my waterfall scene behind the Bietschtal bridge. I should have placed the backdrop first before building the bench work etc. I had originally planned a temporary layout, knowing we would ultimately relocate, but it grew (as they always do!) into something larger and more permanent. I know that the backdrop will add an enormous amount of realism which is currently lacking so I look forward to posting some pics of it once I have mounted it on backing boards.
Glyn that looks amazing great work it inspires me to have a go. Thank you very much, Johanna
That is one very convincing mountain Glyn.
Thanks Glyn for your tips and photos. Cheers Rossco Adelaide, South Australia
That is an amazing mountain. The how to was so good I have had a go myself not as good as yours but passable. Thankyou.
I find only one source for electrostatic grass applicator – a company in Germany. Is this the case? Do you know of any other sources?
Great presentation of a very economical project.
It really looks nice. Thanks for the photos!
looking good
Could you show pictures of the mountain removed for maintenance, etc.? Beautiful job, thank you
I wish we could get away from Woodland Scenics and their ridiculously high prices. There are many good tips that have appeared here that don’ cost an arm and a leg. The things that can be done cheaply allow for more kids without the disposable income to get into the hobby. Don’t hand out free advertising when discribing your models.
Great work Glyn, love the mountains, but also the bridge work is great too!
have fun and happy modeling. Cary in KY
This layout is beautiful. I’m 62 and I am really doing things really out of place. I had money and no time now, I have time and no money……lol. I can only hope my layout will look 1/2 as good as all the layouts I’ve seen on here. Al keep doing what you’re doing on here. I have gotten so much information on here it’s great. My hat off to ALL the modelers who share here kudos to everyone.
Love your bridges . Where did you purchase ? I want the big one
Great job and so realistic.
The Critic
To Gene Fricks,
There are many sources for static grass applicators in the U.S. Almost any train dealer will carry Woodland Scenics’ static grass applicator. However, if you look up Larry the DCC Guy on YouTube, he’s got a great video of how to make your own static grass applicator for about $5 using a battery-powered bug zapper and a metal sifter / strainer. It seems to work just as well, if not better, than the pricey commercial static grass applicators.
To Glyn,
Very nice start to finish photos of your mountain addition. Exceptionally well done! Do you have easy access to the tunnels in case of a derailment?
Looks great, the bridges are awesome a job well done!
Wow…I wish I had the patience and the skills to do THAT quality of work – it’s amazing!
Nice work! I learn something from virtually every post!
Pretty Kool. I hope mine turns out that good.
Wonderful job.
Great work and thanks for documenting the process of getting it done.
Beautiful! Thank you for sharing how you accomplished it.
You have made a very good job there
What a great job on the landscape. To everyone a Merry Christmas and Happy New Year
Ingenius and beautifully made very ,very realistic . Thank you for the pictures .
Thank you for this, very inspirational and detailed.
Nice job Glyn, looks great the scenery looks good.
very nice scenery. i like it.
How do you reach inside the tunnel in case of a derailment?
Nice. Landscaping can be frustrating but trial and error and several great techniques posted here can help make it successful. Always a work in progress. Thanks for sharing.
Jim AZ
Hi Glyn,
I am always amazed by what so many of you guys and gals accomplish in the scenery and the overall layout realism. The mountain looks great, and I see so many tracks and tunnels in there. That leads to one question from my viewing of the pictures; is there a way to get to the trains in the mountain if there is any issues as they transit the tunnels? I may be just not seeing your solution to that. Keep up the good work, I am, like I say impressed by what others manage to create in our hobby.
Thank you for the kind words- yes the tunnel and base of the mountain were accessible from the far right hand side.
Nice rock work – I’ve tried many different types and combinations to create my rocks formations but Shaper Sheet has to be my favorite. It’s a dream surface to wash, paint and or shape.
Brilliant –
thanks for sharing your process to achieve this good looking mountain. You have inspired me with your work, to put a large mountain in my own layout.
I have been given some great ideas from your inspiration.
Thaks Glyn
What you’ve done looks very beautiful. It has been a great source of inspiration.
Looks like there’s gold in them ther’ hills! Nice work!
Mamacita, with 5 tunnels there must be a party going on inside that mountain somewhere!!! Nice touch!
Nice job. Looking real good.