Glyn has been in touch again with his Faller bridge HO scale – and it left me speechless. It’s not hard to see why.
I hope you enjoy this as much as I did. All images are clickable by the way.
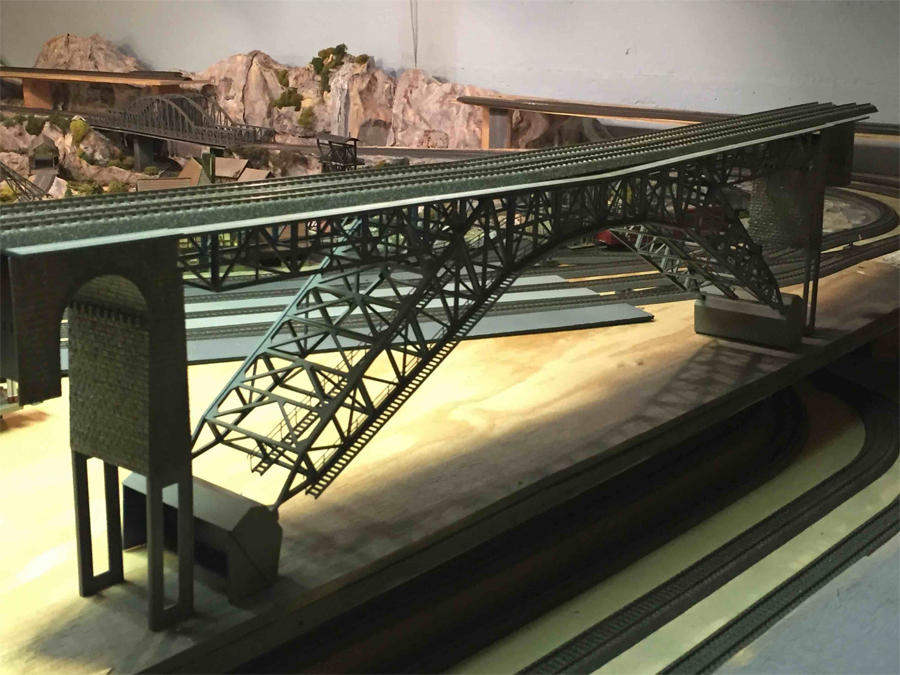
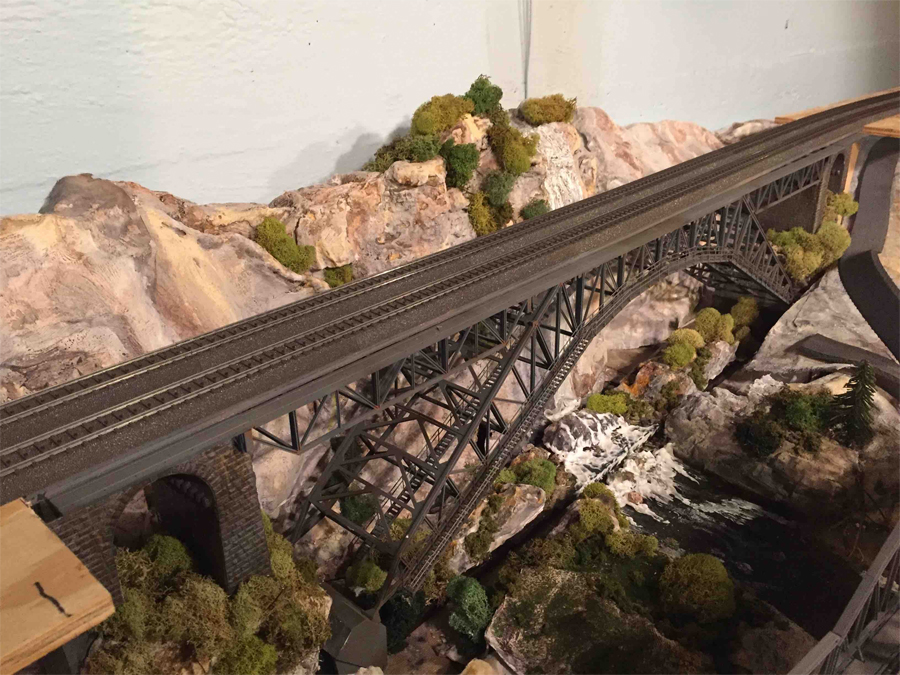
“Hi Al – I’ve been traveling a lot lately but was awaiting the arrival of my Faller bridge HO of the Bietschtal bridge to complete the double main line addition to the back of my layout.
The tracks crossed my river-waterfall feature at a higher level and I needed the 43″ span of this bridge to make the project work.
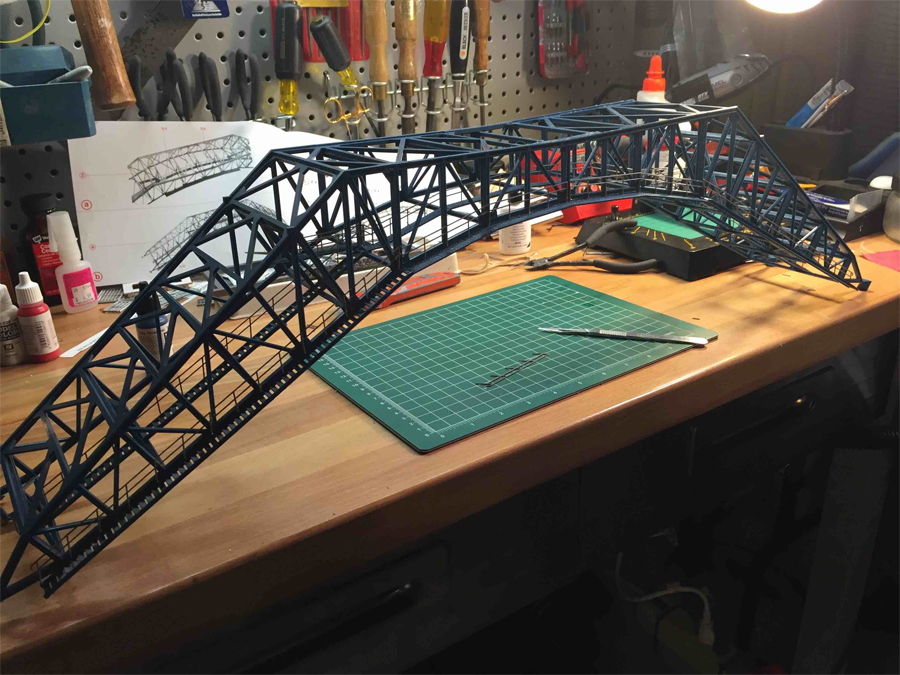
It finally arrived and I spent most of last weekend building this highly detailed kit 43″ long and 15” high.
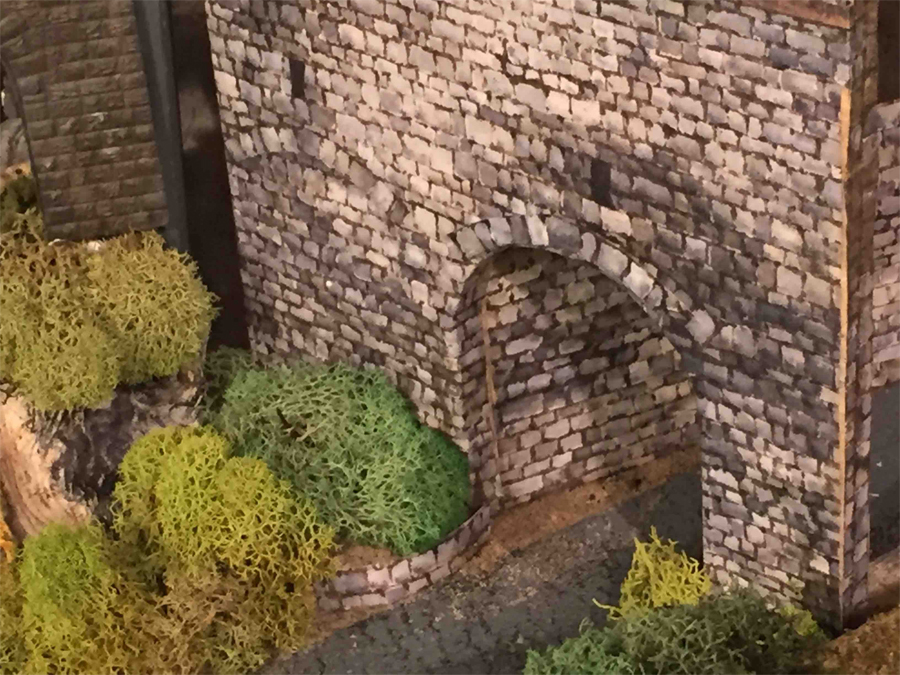
I also needed to re-route my logging road through a side tunnel alongside the ravine so, inspired by John’s amazing use of your stone wall printout, embarked on a scratch built tunnel portal replete with curved stone abutment at the entrance to add some character.
That printout is amazing and probably the best piece of modeling landscape material I’ve ever purchased – truly incredible what you can do with it and a little imagination!
So here goes with the project step by step.
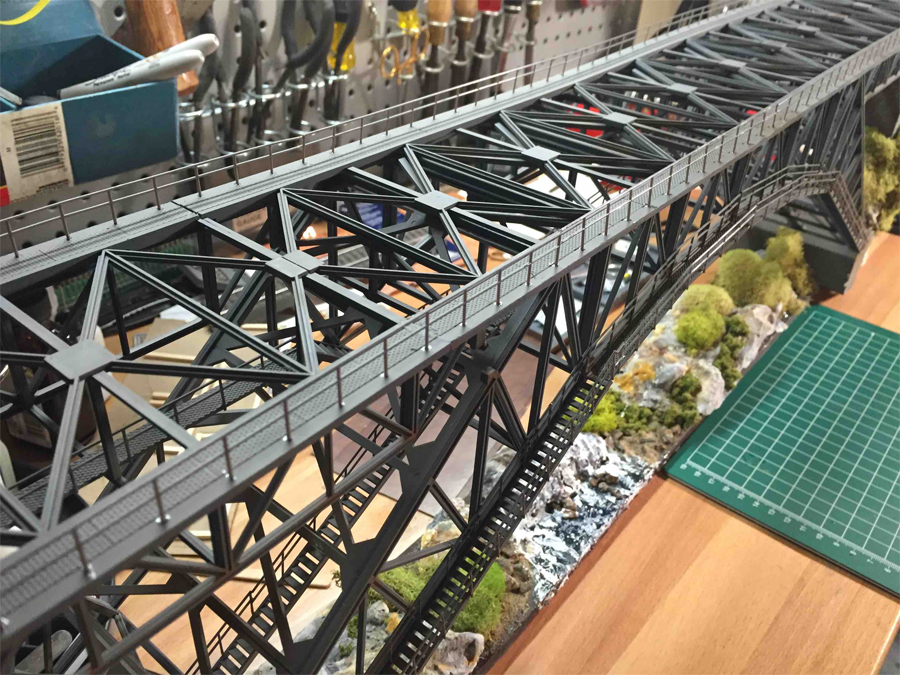
The support spans were built first – incredibly tedious as the catwalks have to be constructed within the bridge spans after everything has been assembled, the handrails being the worst part.
The Faller bridge HO stone arch supports added – these were a strange beige colour and not very realistic so I sprayed them and the bridge with gray acrylic primer then weathered the stone. The centre of the bridge sagged a little without appropriate tensioning of the support stanchions so I built a wooden frame to stabilize everything. Being 43” long this bends easily when lifted!
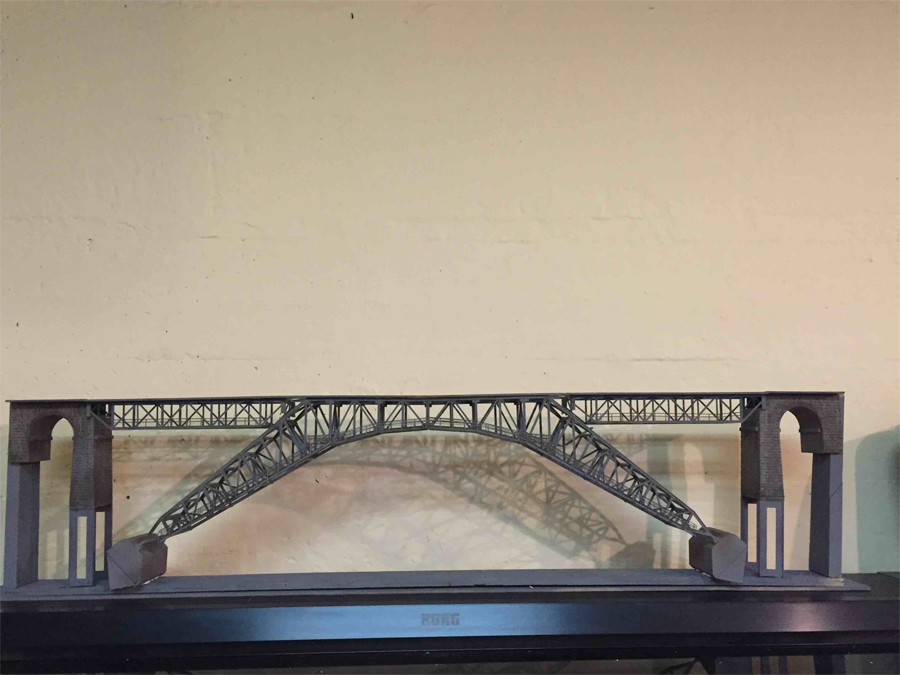
The bridge’s stone portal were re-inforced with vertical pine struts painted gray.
The support spans with their concrete bases were reinforced with transverse pine blockes glued to the horizontal wooden base at a point where they would provide vertical tension on the main bridge deck to prevent sagging as in real life. That worked pretty well and leveled the deck nicely.
Then it was time for a trial fit into the river’s ravine. I added some styrofoam between the stone portal arches as a prelude to wrapping with Woodland Scenics shaper sheet for landscaping.
Then it was time to lower the bridge construct into the ravine for a trial fit.
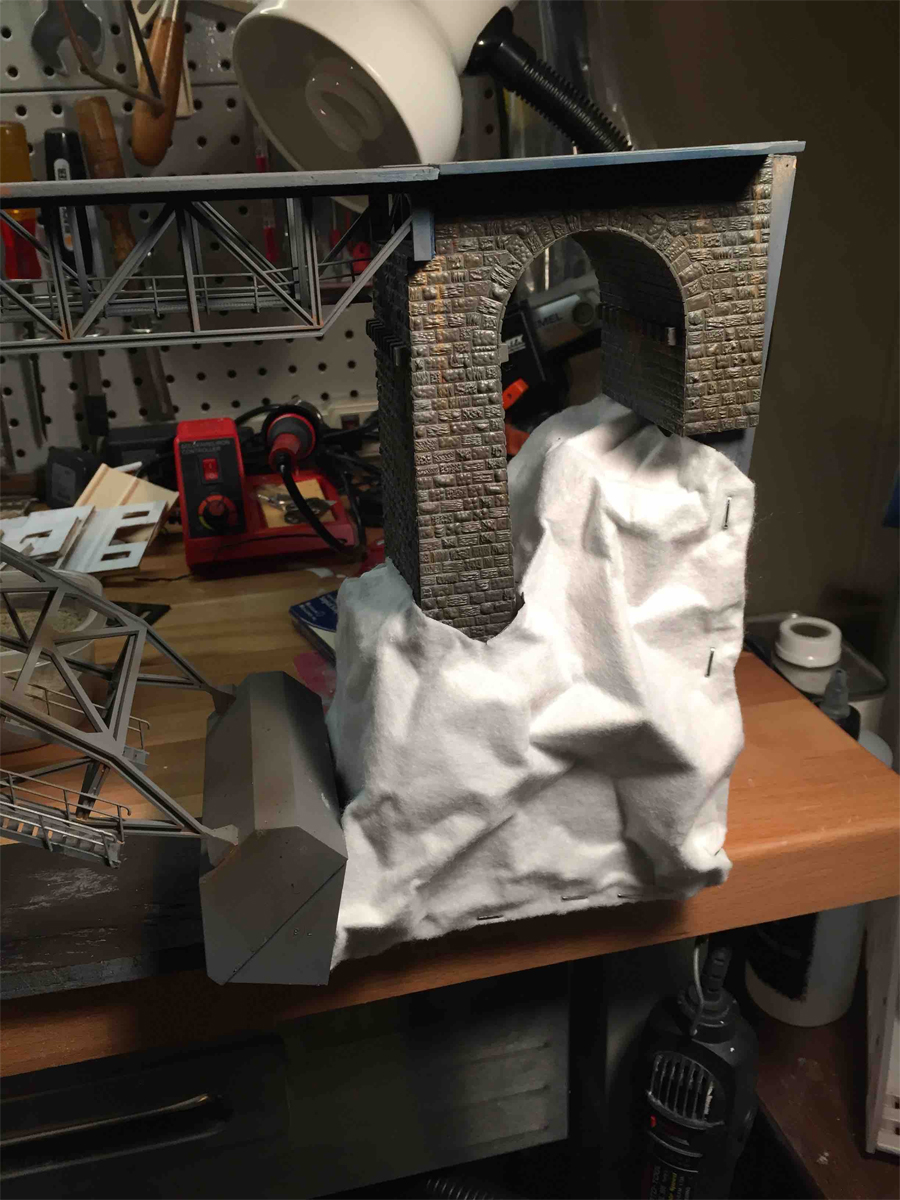
Back out we came and I started the landscaping by wrapping the vertical supports and styrofoam with Woodland scenics shaper sheet. This stuff is amazing – so easy to use, no mess and it can be moulded and bent into shape and re-worked until you are happy.Then I stapled it firmly to the wooden frame inpreparation for plastering and painting using the leopard spotting technique described by Woodland scenics.
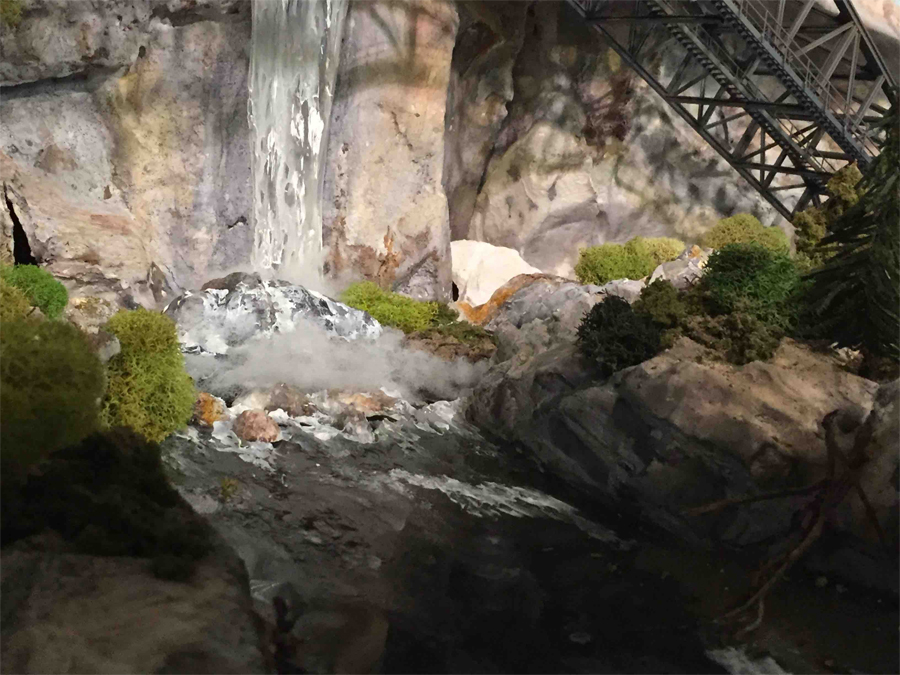
I’d marked where the river flowed underneath the Faller bridge HO and started laying down river boulders and sandbanks. Then I leopard spotted the plastered shaper sheet with yellow ochre, burnt umber and Payne’s grey acrylic wash, let it dry and added clumps of colored lichen for bushes and undergrowth using a glue gun.
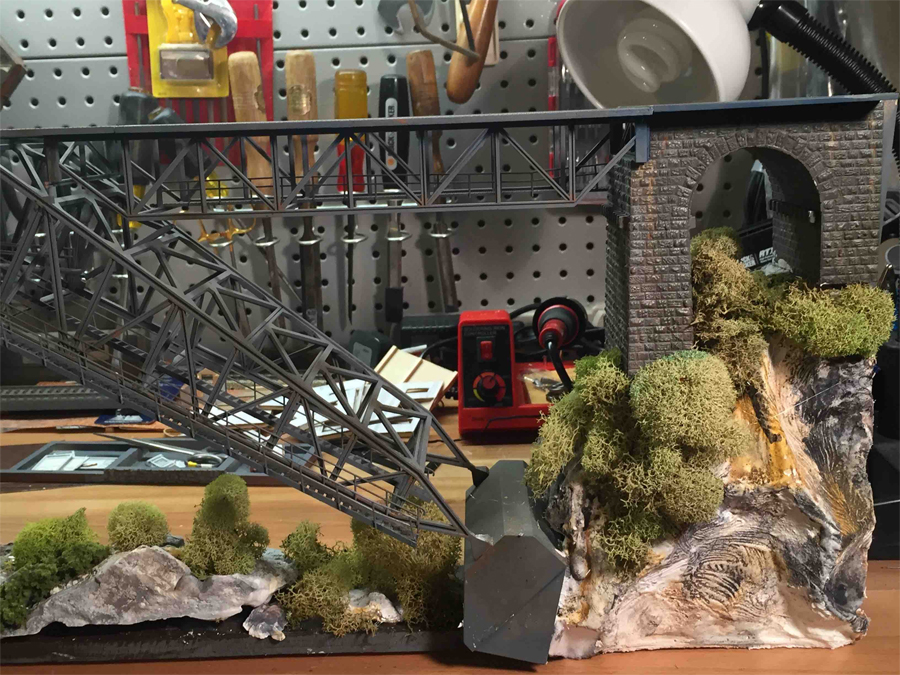
Close-up of the weathered base evolving.
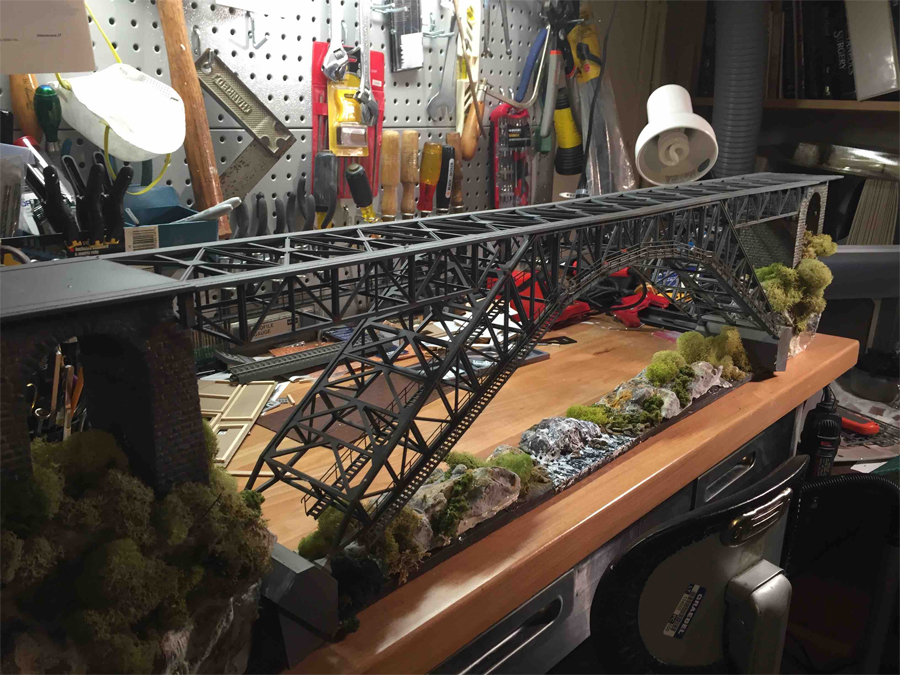
The entire Faller bridge HO on the workbench. Plaster moulded rocks were added and painted, slowly building up the scene and rapids were painted in with acrylic water texture paste and white acrylic paint.Next came another trial fit. This was the empty gap between the track ends:
I needed to make sure the added landscaping did not impede my ability to seat the bridge within the fixed endpoints of the ravine –thankfully it fitted in perfectly.
So now I had the basic bridge construct landscpaed, I needed to add the decking and handrails along the main pedestrian catwalks, out it came again for the handrails to be added.
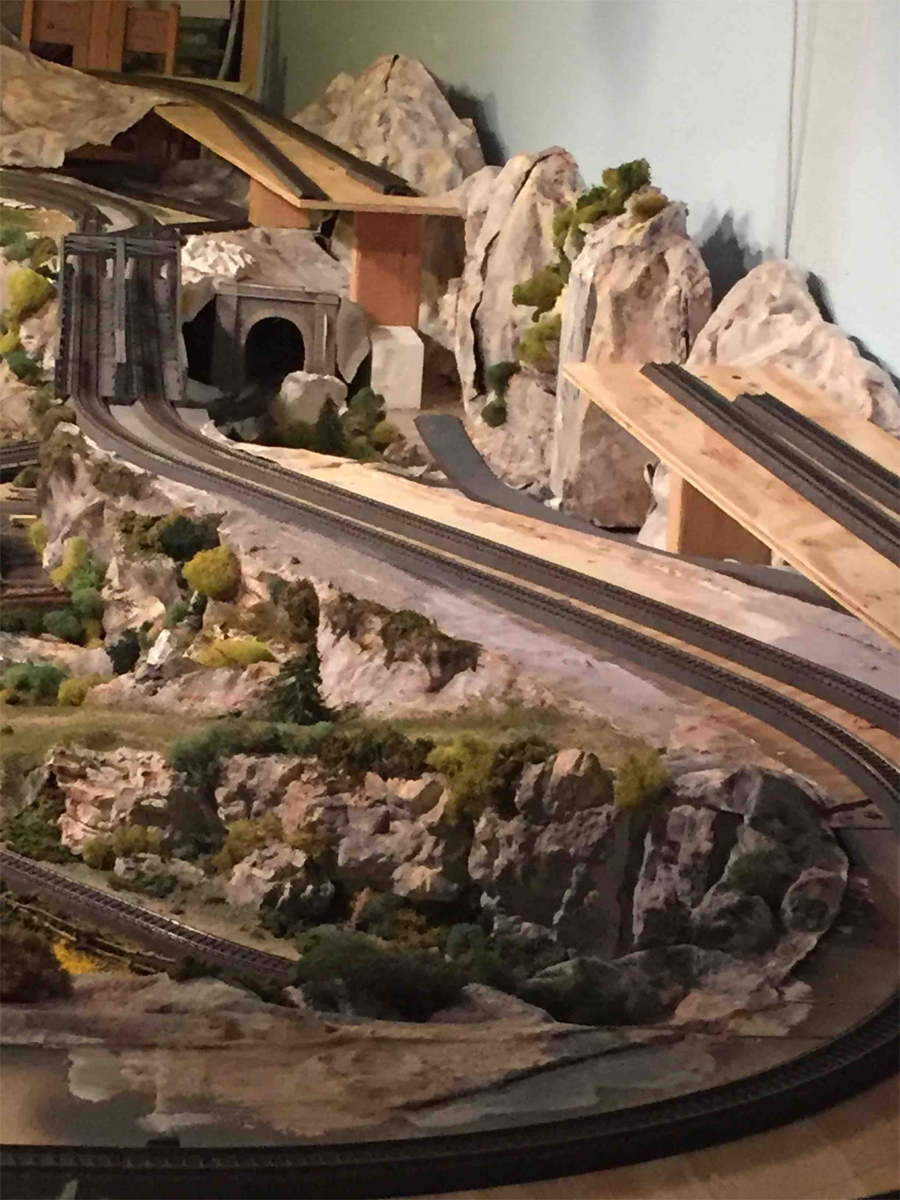
Next, I lifted the old logging company road and changed its direction to run alingside the newly fashioned ravine edge, together with a quick re-do of the landscaping – playground sand, various woodland scenics turf colours, undergrowth and bushes.
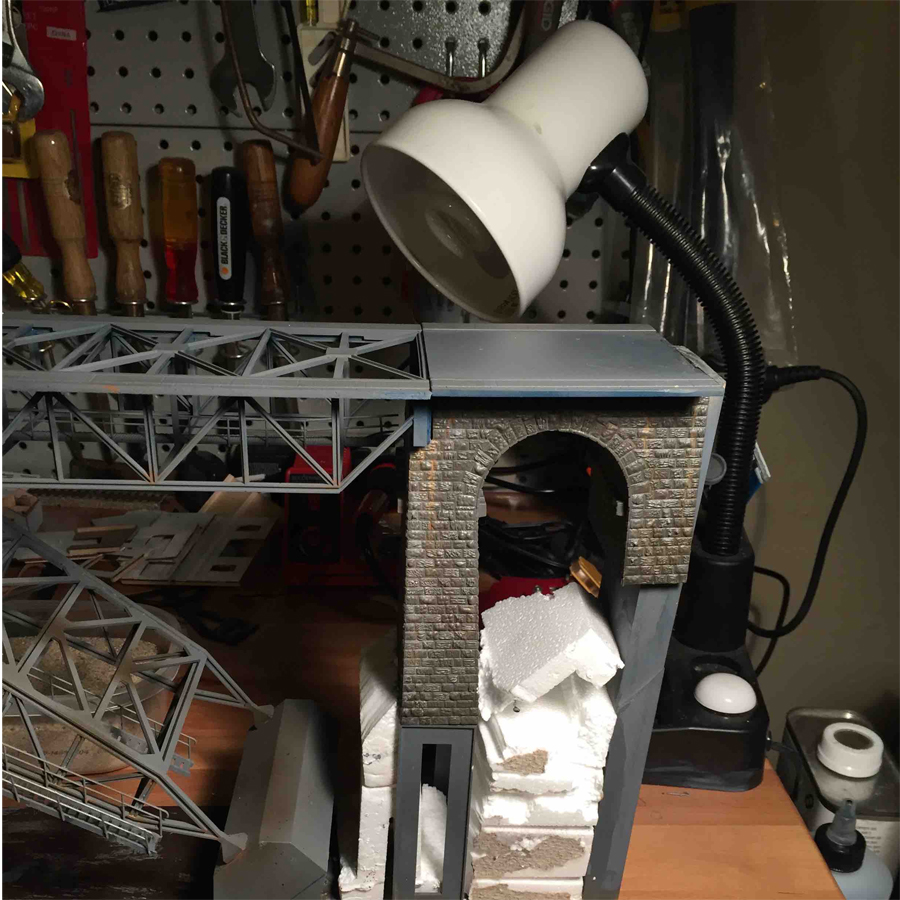
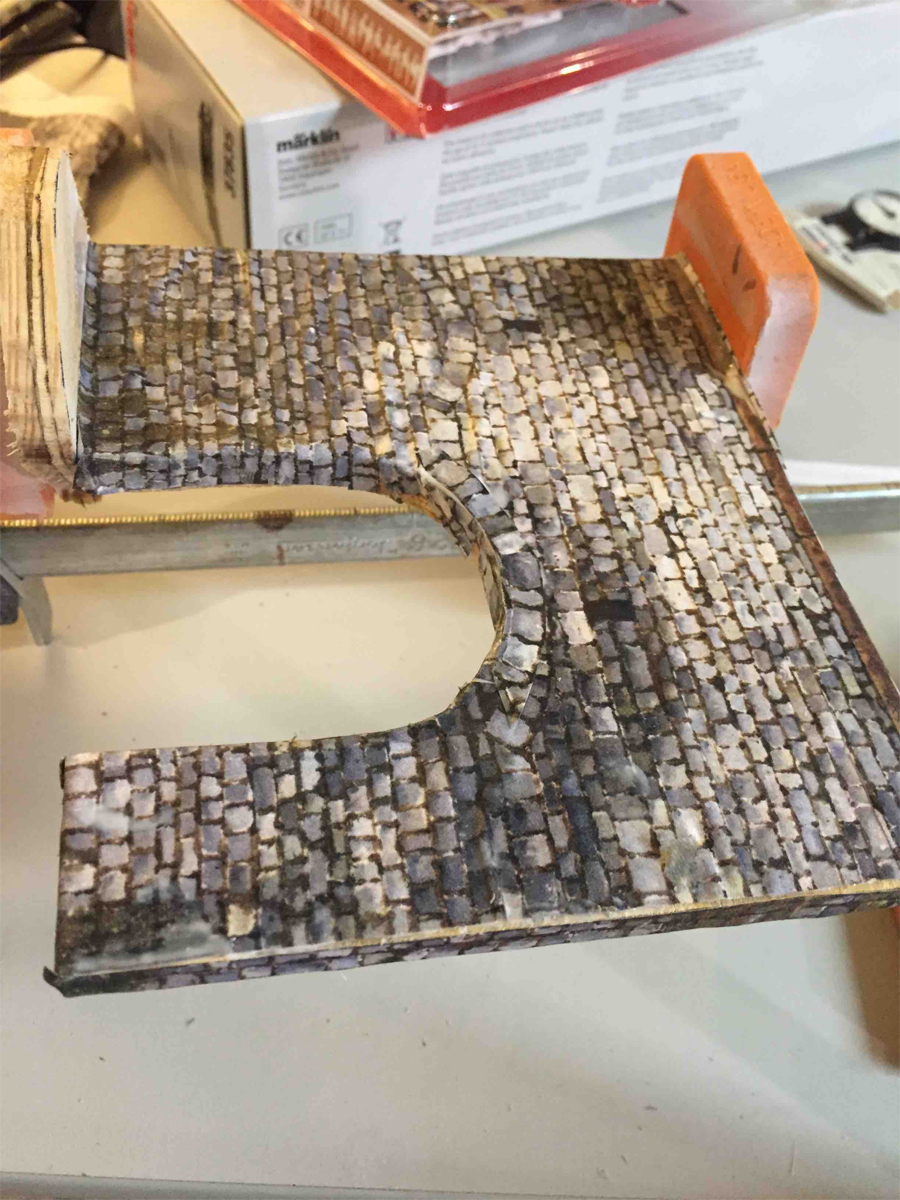
That all worked out well but I needed a scratch-built tunnel portal where the logging road passes through the mountains to my next town, which has yet to materialize on the right hand side of the layout! So I measured and cut out a tunnel portal from a plywood off-cut, coated it with PVA glue.

Then I pasted on the stone wall printout from your website, cut to size and adapted as John described using bits and pieced glued together to make it look confluent,
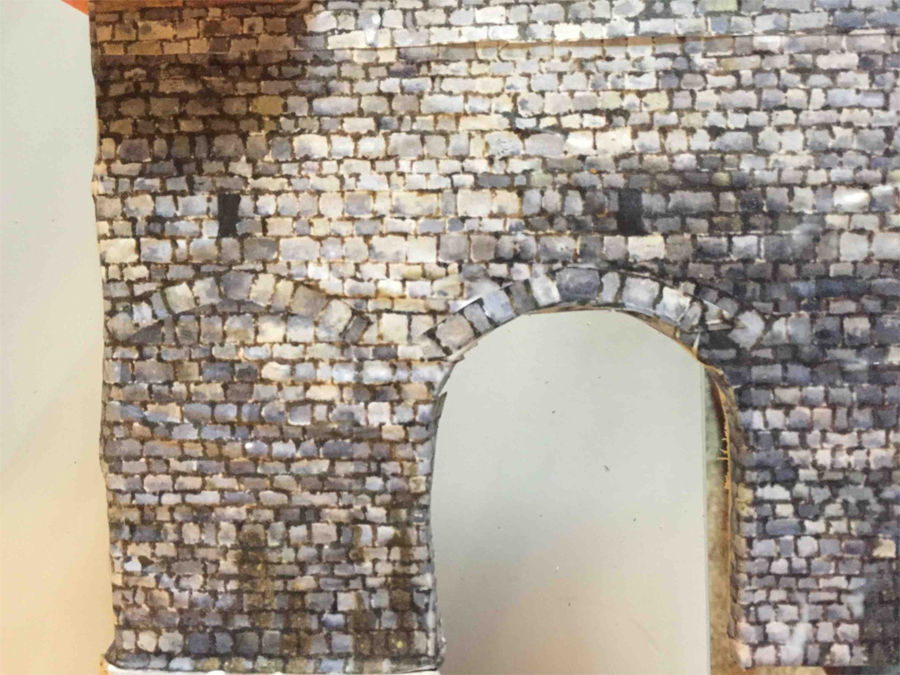
I bent the excess over the edges of the insides of the tunnel entrance to give the 3-D appearance that John describes.
I needed a little extra support on one side so, for added interest , I added a curved support base as a bulwark and pasted a strip of wallpaper to give the appearance of a curved abutment.
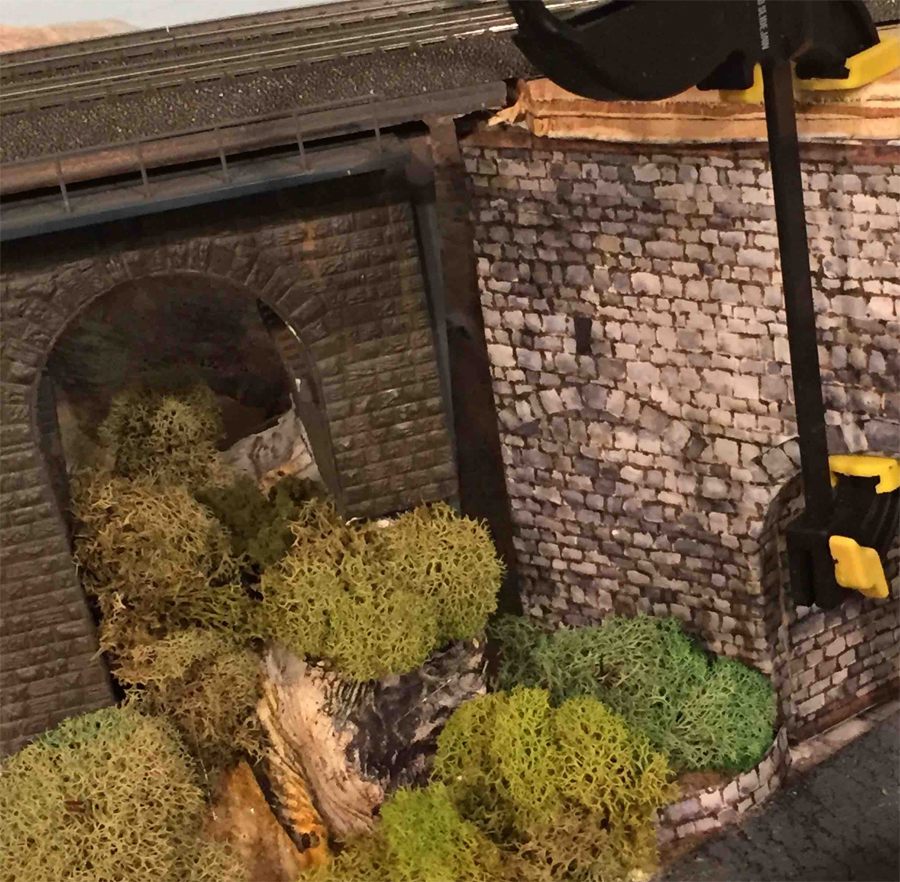
Then I sprinkled on some sand and glued bushes and foliage before gluing it in place and clamping it on. I used another piece of waste plywood covered in paper printout to achieve the interior tunnel wall appearance. So here is a close up of the tunnel entrance.
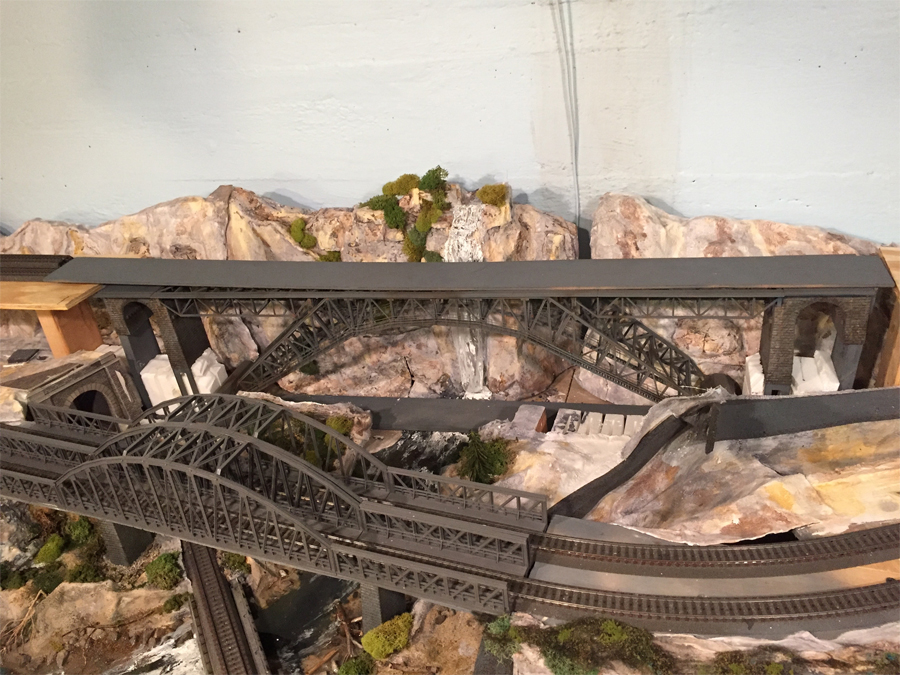
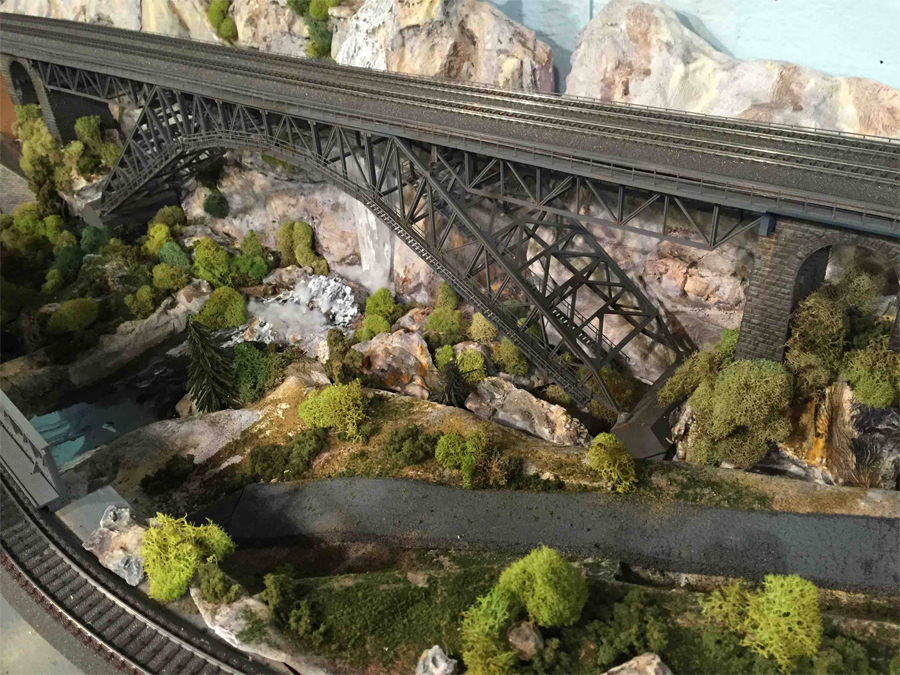
And here is the final Faller bridge HO inset showing the overall effect with all the bridges spanning my waterfall /river feature.
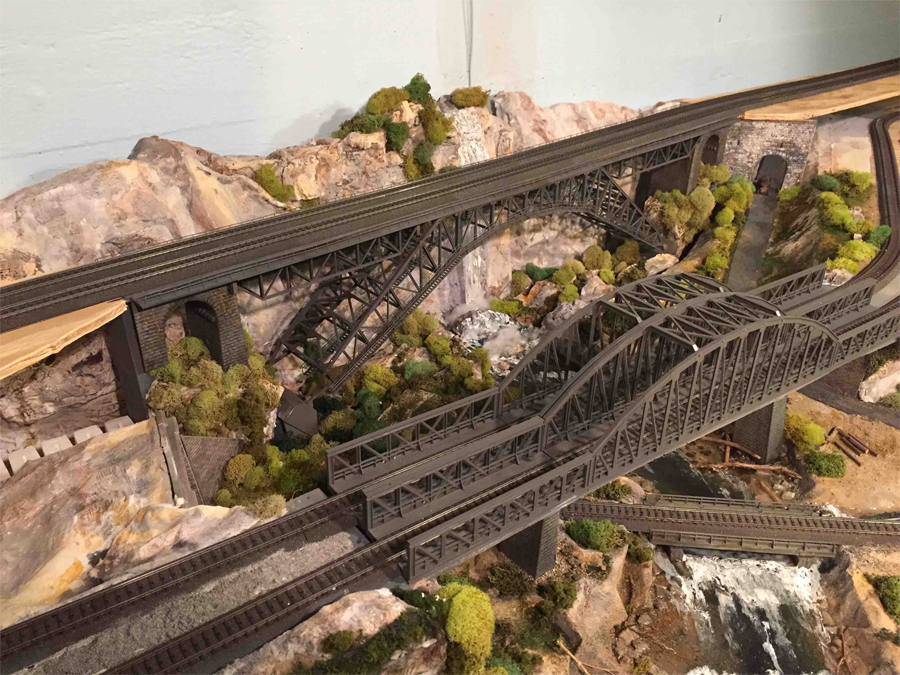
Quite a deamnding piece opf medling but well worth the effort and it was tremendous fun getting it all done. Now I have to start building the mountains over the double mainline tracks and set up my backdrop (which should have been done first!).
Well, what can I say? An absolutely stunning ‘how to’ from Glyn, on his stunning layout.
But it gets better, this is just part 1 of Glyn’s narrative – so there’s more to follow next time.
A HUGE thanks to Glyn for taking the time and effort to share his Faller bridge HO. I can’t thank him enough.
I absolutely love what he’s done with the printable buildings.
And if it’s inspired you, the Beginner’s Guide is here.
That’s all this time folks. Please do keep ’em coming.
Best
Al
PS Latest ebay cheat sheet is here.


Truly amazing! Cheers! NJ Mark
Hi Glyn,
Congratulations!
This is not a model bridge, or a model of a bridge, it is a work of art. Admirable! Your patience and skills have duly been rewarded. What a daunting task to undertake.
Thank you,
Raymond
Super work and lots of patience to complete such a task.
Stunning doesnt cover it. Absolute Beauty. Great craftsmanship.
Amazing bridgework! You must have an enormous amount of patience and creativity.
Outstanding bridge work!! Are all the parts home made?
Amazing. Thanks for sharing!
These are the types of “how to’s” that I enjoy to get my creative juices flowing. I am so impressed with both the ability and creativity of Glyn! I hope to see the completed product at some point as well. I am appreciative of the post, Al.
Dear Al: I enjoy each one of your sessions. I particularly enjoyed Glyns description of how he made a river. To my sorrow when I tried to save it my computer hid it so well I can’t find it. Please show it again. Thank you: Palmer Schatell
truly stunning piece of work. Hats of to Glyn a marvel of model engineering thanks this is really inspirational. Regards
Steve (UK)
This man Glyn knows how to make bridges and tunnels. stunning. ,thanks for the mails you send me all the time, greetings from Delft, Holland
I keep looking at your work here and thinking how long it would take me to create something like that. Your work is as Raymond said in his comment, “a work of art”. Congratulations for having such talent and thanks a million for sharing it with others. TX Gerell
One weekend you say??? Your work is as Raymond commented, “a work of art”. Congratulations for having such talent and thanks a million for sharing it with others. The bridge work is incredible work and inspires me. Al, keep up your sessions They are valuable
Thanks, Gerell in Texas
Well done for sure !
I would like to see all posts include the gauge. N, HO ect.
Sheldon in Arizona
FANTASTIC BIT OF WORK!!!!!!!
Amazing project, thank you for sharing!
Danny Marso, D&WRR
Simply put, I dont have the vocabulary to describe what I see in these photos. Yes, stunning comes to mind as does phenomenal. But this seem to pale compared to this work of art.
Pete-Silicon Valley Calif.
I would like to see detailed plans and material specs for that bridge (both of them actually) given to a qualified bridge engineer for him/her to carry out the associated calculations, because I would put money on the fact that those calcs would show that the model bridges are absolutely capable of carrying their scale loads with the expected safety margins, whether you did it by eye or by calculation matters not.
I call it instinctive engineering.
Apart from that they are exquisite examples of the inordinate skills of a superb modelling artisan.
Hi Glyn,
Fantastic work!
I hope mine turns out half as good as yours.
Keep up the great work.
Keith
Thank you all for the kind comments – it was great fun to build, just tedious with all the fine handrails etc. Someone asked about the gauge – this is all HO, Marklin C-track, digital CS-2 controller. Happy modeling to all! Glyn
Excellent work Glyn. One thing that would make the scenery better would be to cover your lichen bushes with the appropriate colour of fine turf, coarse turf or underbrush (use watered down white glue and a cheap hair spray to make it stick). The results are much more realistic and would be the ultimate touch for such a fine piece of work.
Outstanding work,truly beautiful.
Great work. It looks hook.
what a wonderful display of craftsmanship, the presentation of the how to just gets you back to the shed and start something .well done.
That is an outstanding work of art, not just a bridge but a truly amazing work of art. Beautifully done. Love it.
Thanks for the tip about touching up the lichen bushes – I’ll give it a try – anything to make it more realistic!:) Glyn
I’m working on an outdoor G scale garden railroad, was not planning on any elaborate bridges but you have inspired me! Time to rethink my plan and do some more digging. Thanks for the post! Cary, Crestwood KY
I love that bridge.
Paul from Ozzie
Well I tried the tip on sprinkling coarse turf etc on the lichen and spraying with hairspray – it worked superbly – only problem is my train room and workshop smells like a hairdressing salon! Thanks again for the great idea. Glyn
Very nice, great work
Beautiful craftsmanship!
One of the best bridge constructions I’ve seen. Great work.
WOW!!! Absolutely beautiful.
I am a beginner in this hobby, and I hope I can come half way near in the next
25 years.
now THAS some terrific modeling work…
this guy knows how to do it right!!
keep em runnin fellas
stjohn in long beach calif
Wow I love this bridge It shows the skill of a master modeller and what kind of results you can achieve with lots of patience congrats on the job
Hi AL thanx for sending Glyns how to par 1 I am using mine as a duck under and was worried that the main deck would sag and am now going to use a steel hidden within the top deck so Grandkids and mates if they touch it accidentally It will not shatter and I will have to tension the two concrete supports some how maybe with ply pads screwed from under baseboard when is done I will send you the results bit poorly a the moment but its my new to be cellar 00 guage that keeps this 68 year old going kind regards and keep up the good work you and your lad
Where did you get the bridge?
All I can say is wow, and well done you, please show pictures or video of trains running across the bridges,
Agree with all, is the bridge of all bridges, only one question. The walkways of the arch, drop off with no steps or embankment that I can see? Seems railroad owned property would have complete steps or ladders integral with arched part of structure?
Have no idea how picture of my Boss Mustang got to your site lol- Rich.
Glyn
Your work ranks up their with John Allans work and layout. Keep up the good work
and I would like to see more of your layout.
Excellent, nothing short of excellent in all aspects……..
Great work..
Sort of speechless,you modelers are a phenomenal group of imagination,thanks for the ride!!
Truly magnificent. How would a mirror look at the back of your tunnel? Not sure of the viewing angle, but I have seen that done with an interesting effect.
Again, superlative work.
MnDan
WOW.. just WOW!!!!! NICE work!
Great job love the patience it took to construct that beautiful bridge and the layout in general.
The Critic
This is fantastic piece of work. How can I get a drawing of this bridge, for I have a perfect application for it.
Wonderful Modelling Glynn, well done!
Brian, Wokingham, UK
That is one gorgeous kit. i almost got it. Opted for the other ones you have on your layout as it was just to high for my needs. Had to get extra pylon pieces to get them down into the water. Probably could have raised the embankments up to accomodate it. Yours all look marvelous.
WOW! As close to perfection as can be had on this side of the grass. Workmanship & narrative are excellent. Jobs well done.
Inspiring work
That is unreal! Great Job! Nice looking layout also.
It’s just Beautifull, from Colombia South America, I wish I could do something like that, but, there is nothing like that around here.
My kid IS a civil engineer ill forward this post to him will be interesting what he comes up with very nice build !
Looks fantastic. I hope mine comes out that good.
If I hadn’t seen it, I wouldn’t believe it! Congratulations!
Wonderful work!
WOW!
your work is amazing to see. this hobby is so much fun but to see how good other people are with their layouts is amazing. hope to see more of your layout soon.
Woooooheeee and woweee, how nice can it get?
Just super!!
If Glyn built a real bridge I would have no problem traveling over it, by foot, car or train. Glyn knows how to build bridges.
That bridge looks good.
I’m not quite speechless, one word left. WOW!
I also have Faller’s bridge kit. Your narrative will help me from making many mistakes when I build it. My span will bridge a window to allow light.
A+. = Best bridge ever posted.
The Faller kit, and your work with it, produced an excellent addition to your railroad. I smiled all through your description as memories of assembling this bridge in N scale came flooding back. It’s been several years and my trains still traverse it safely.
This is at the point where modelers like ME say to hell with the handrails, the workers are on their own. LOL (actually I’m very jealous!)
Magnificent Work! The sheer volume of compliments is testimony to your
masterful artistry and technical ability….
Love it, great job.
There’s only one thing I can say, awesome bridge !!!!
Wow! What a spectacular layout.