Dan’s been back in touch. He talks us through his HO scale trestle template and how it all come together. Stunning stuff:
“For this segment of the layout, I wanted a long trestle. Who doesn’t want one? But not just any old one.
Most trestles have bents marching from short to long and then long to short as needed. I wanted the trestle to look as if the scenery was there first.
Remember we pick and choose the local, time, and place for our scenery. Some compromises need to be made to satisfy the look we might want.
As I began to design the scene, I realized that it would have to be on a curve. This gave me the name of the canyon. The trestle was the arc of a rainbow. As you will see later, the canyon rocks have different subtle colors in the various layers of sedimentary rocks.
I have a copy of All-Nation Line Bridges and Trestles from the 1950’s or so. This was when everyone built bridges of wood even though they might be plate girder bridges. I had previously built, from a Campbelle kit, a short trestle, and a short, curved trestle perhaps 10 years before this project.
You will see the short curved trestle in the next installment. This gave me the confidence to jump into the project.
I made copies from the book of the various segments: bents, stringer placement, and tie placement. I made jigs for the bents and went to work. I knew how long the trestle was to be and then calculated how many bents of the different sizes to make. The bents are 16 feet center to center.
I pre stained all the scale lumber a lighter color than creosote. This was to be a focal point on the layout, and I did not want to have a dark space for them to look at. I used super glue for the assembly.
I learned that the wood soaked up the glue like a sponge. I had to put a dab of glue on the ends to be joined and let it set up. Appling glue again for the final setup. I then went back and drilled very small holes at all the joints and put scale bolt heads in the holes. Yep, a lot of bolts. It looks good though.
The trestle is right in front of the visitors, so the work was worth it.
Once the bents were done, assembly began. I built it upside down. Once two bents were in place, I connected them to make a tower. I took me two weeks of evenings to assemble. Unfortunately, I did not take photos while I assembled the trestle. I was too occupied with the construction.
The canyon rocks were assembled the same way as my other rocks.
The space where Rainbow Canyon will go. Also, you can see part of the trestle which at this point is finished and will be making the scenery fit the trestle as we go. The glue bottle is where the track for the trestle will be exiting a tunnel. The large area near the red and white spray bottle will be an access hole for oopses.

The canyon to be. The green piece of cardboard is a shield to block light from another tunnel to be. The tunnel will take the mainline to the lower level seen as the lowest track in the photo. The middle track leads to the tunnel and the upper track leads to the trestle to com.

Fitting the trestle to the scenery. The trestle at this time is removable so I can paint the rocks.

A little farther along.

HO scale trestle template – it now fits the scenery.

Another view.

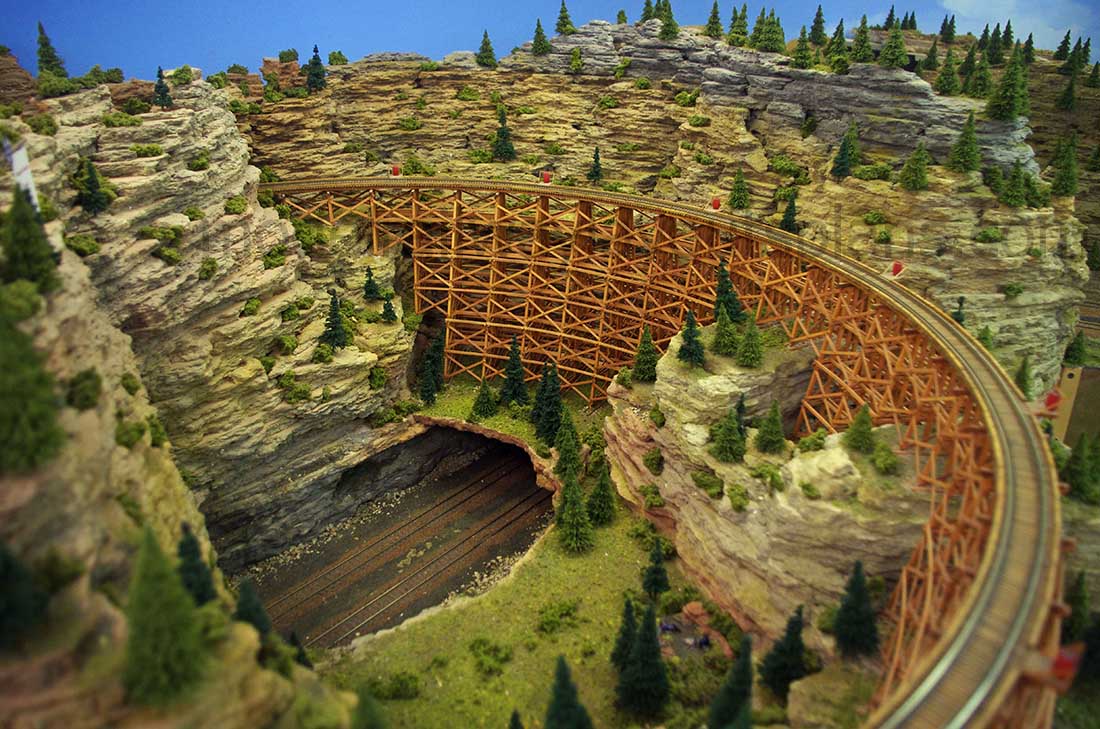
The finished trestle. I hand laid the track on all of my bridges including trestles.

Later the trees will be added. You can see the subtle coloration in the different layers of rock.
The track on the trestle actually cross in the tunnel. A little compromise to make it work. The track, going counter clock wise, enters the tunnel and goes to Burnt Lake. The next post I will be doing.

Now for the ugly side of the HO scale trestle template. I make a base and then stack the ceiling tile.

Another view of a base and more stacking.

I mentioned in another photo that there was a pop up hole to come. Here it is. The rock surround the hole and the rocks are finished on BOTH sides. This way if you are tall enough to see over the mountain. it looks finished.

Look to the upper right of the photo and you can see the opening to the pop up hole. The rest of the view is Burnt lake at the top and the track is the spiral up and down to the lower level. I did not make a helix. The grade is 3.5% that matches Santa Fe’s Raton Pass grade.

The tourist train to Burnt Lake makes the obligatory stop to photograph the canyon and the sign.

The info about the trestle.

The RDC brings employees to Burnt Lake…explained in the next installment.

A closeup of the Grant Line bolts. Every joint has a bolt on the HO scale trestle template.

Details around each bent leg. Beside ground foam, the fine gravel/sand is ground up kitty litter.

It appears a hobo camp has been established.

I know there are those who think this is not likely to happen. However, there is a very good reason for this. As i was working on this scene I had several visitors to the layout. They kept looking for trains to appear here. So instead of covering it up, I put a scene there in that space. You have to look for it so it is OK. Visitors always look to see what is in the bottom of Rainbow canyon.

The other side of the canyon.
Thanks for looking.
Thanks, Al for letting me pontificate some more.
Dan”
Well, I think it should be me thanking Dan for sharing his HO scale trestle template. Amazing narrative and amazing pics.
Trestle bridges come up quite often on the blog. These posts spring to mind:
HO scale curved trestle bridge.
HO scale wooden trestle bridge.
Jim’s N scale is just as impressive:
A huge big thanks to Dan for putting this together.
If you want to see more of Dan’s stuff, his last post is here:
One last thing – pleased do email me if you’d like to share your layout. It doesn’t have to be a knock out stunner to be enjoyed on the blog. Everyone, and every layout is welcome.
That’s all for today folks.
Please do keep ’em coming.
And if today is the day you roll up your sleeves, start laying track, and join in the fun, the Beginner’s Guide is here.
Best
Al
PS Latest ebay cheat sheet is here.
PPS More HO scale train layouts here if that’s your thing.


incredible detail & craftsmanship on the bridge, very impressive.
Fantabulous,super job I’m impressed.
The Critic
Amazing work, well planned and executed. The bolt detail was labor intensive but the effect was well worth it. Thank you for sharing. How about a video train tour to see a train run over the trestle.
Built with a lot of patience and skill
It’s truly a work of art you done. It beautiful
I’m sure it took sometime to complete it.
No words….I am still trying to understand what I just observed. That is beyond belief. The labor of love involved is beyond just awe inspiring. Thank you for sharing that. Would love to see it first hand, wow all I can think is wow!!
This trestle is a labor of love. It is remarkable in its gracefulness. I expect many peaceful hours of model building went into it. They were worth it. It is a magnificent masterpiece of modeling. Well done. Rob McCrain
Stunning! I like the idea of the trains being visible at the bottom of the canyon.
Outstanding work and execution. Takes me back to John Allen’s rail road. Congratulations on a successful project.
Dan, that is some amazing trestle you built! I want to build a trestle like that. I want mine to be double track. I may have to build the beats and I stall them as I go. My track is already laid. Where did you get the scale lumber from. Can you tell me what exactly you used ? I also use ceiling tile like you. I don’t have as much yet but I’m working on it.Would love to see your layout. I live in Southen California.
Dan
What wood did you use. The devil is in the details and the bolts just made it so real. Your skills and artistic eye make you at the top of the modeler class and I am thrilled to see your talents at work.
Guys like you and Bill from Va made layouts from a 3D perspective that just blows us mortals away. This is a special skill and I thank you for sharing with us so can see how it’s done. Just amazing.
Big Al
Another OMG morning with my Java. 👍😁
That is one of the nicest Trestles I have seen. Absolutely beautiful
I’d be committed after finishing that gorgeous trestle. I’d like to take that beauty thats in the upper advertisement with me if I could . .
The lumber was from a supplier who advertised in MR years ago. But, Walther’s carries the wood.
The bents are 12X12, the girts are 6X10, the cross pieces are 3X10, all scale sizes.
The stringers (the long pieces that hold the bridge ties) were made up if 3 6X10s glued together. (I believe they make stringers as a milled product.) For a curved trestle it is much easier to make your own by gluing the 6X10 together. There are two stringer sets. One per side. The lumber pieces all came in 3 foot lengths.
For a double track trestle just make the bents wider and put stringers (2) per track to support the ties.
My bents are 6 wide. I would assume the double track would have the bents 12 wide. Have fun.
I will work on some video later.
…in a word: MAGNIFICENT!
This IS the finest trestle trestle bridge I have ever seen!
I admire these so much, real artistry. Something I’ll never try but glad someone does!
Chuck, I live south of Indianapolis Indiana.
I am also into 1/8th scale trains. I am president of the Indiana Live Steamers. My locomotive is a GP 15 and weighs 700 pounds.
You are a true artist. 👍
“….” Words fail me.
Andrew in Oz
Just one word of caution, depending on the “vintage” of those ceiling tiles, they may have contained (or still contain) a substantial amount of asbestos. I just urge some caution when cutting and handling them. I’d truly hate to see the beauty of the work impaired by possible health effects due to a well-known lung irritant, and hope that your ceiling tiles didn’t contain asbestos.
Bill, they were all asbestos free. From a school.
Some use a respirator while doing the tile.
I’ll bet that took a month of Sundays Fan-tastic!
i have always loved the trestle work. it a lot of work, but worth it.
Another example of why I’m glad someone invented the word “Wow”
Wow that is exquisite! Your hard work and attention to detail payed off
WOW!!!!! just WOW!!!!! Awesome pictures of how you arrived at doing things. Awesome trestle work and how you made your road crossings. Just WOW !!!!! , that’s all I can say, well done !!!!!
That bridge took a LOT of work. GREAT job. It really looks nice.
Yup. Use of ceiling tile at its best. Great look so realistic. That trestle bridge must have taken a long time to build. Looks amazing.
Jim AZ
Magnificent!
Fantastic trestle and tutorial on how you built it Dan. Your scenery looks great, and I really appreciate the under the layout photos showing construction. I can’t imagine how many hours it took to place all those bolt heads. Wow! Thanks for sharing.