Rob’s been in touch with how to make ponds and lakes for a model railroad layout.
(You can see more of Rob in the Hall of fame.)
“Hi Alistair,
A friend of mine after seeing my lake that I call hanging lake said I should make a video of how to make a lake so people will feel confident and try to make an interesting pond, lake or river.
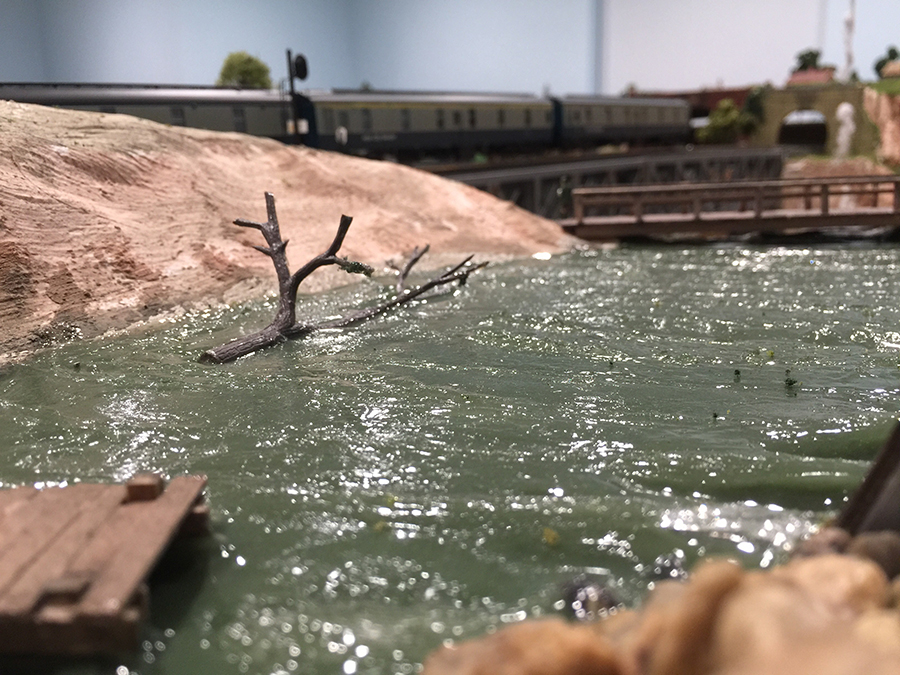
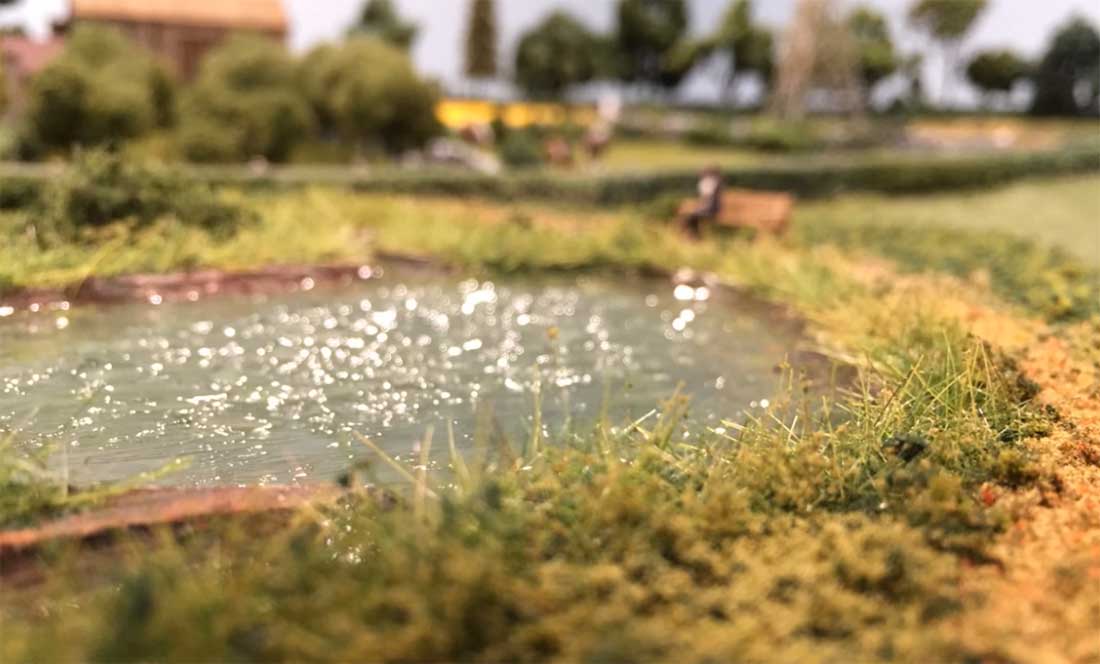
It is quite easy to get good results. Here are two pictures of both my lake and my waterfall.

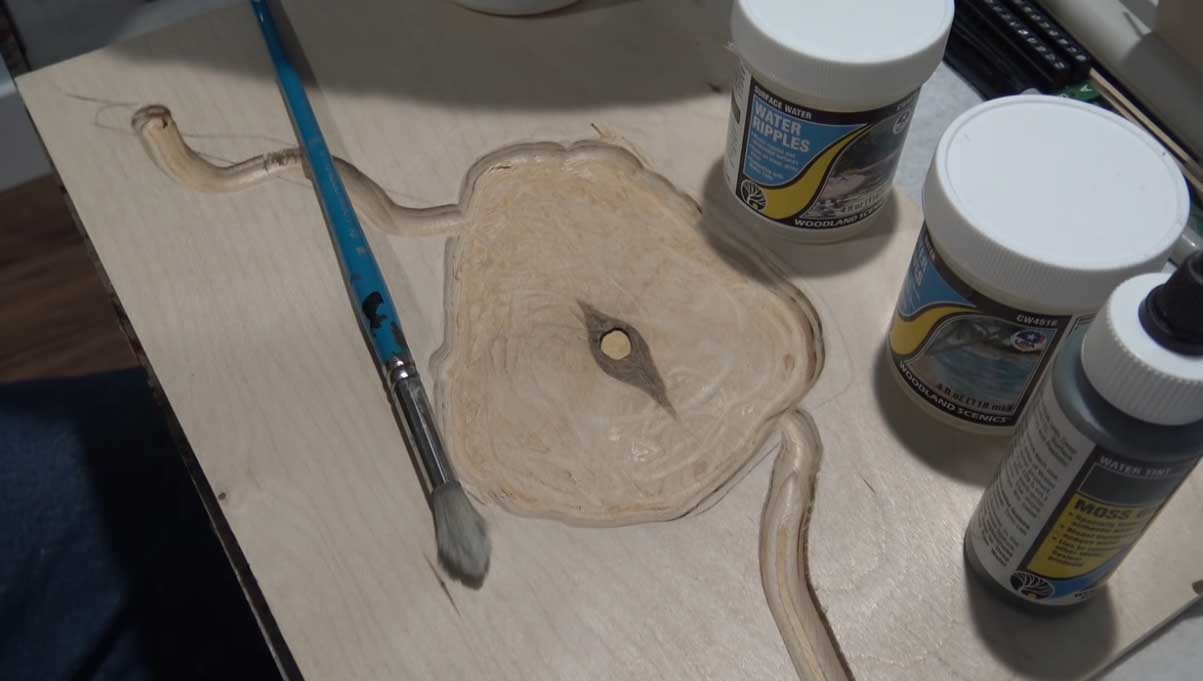
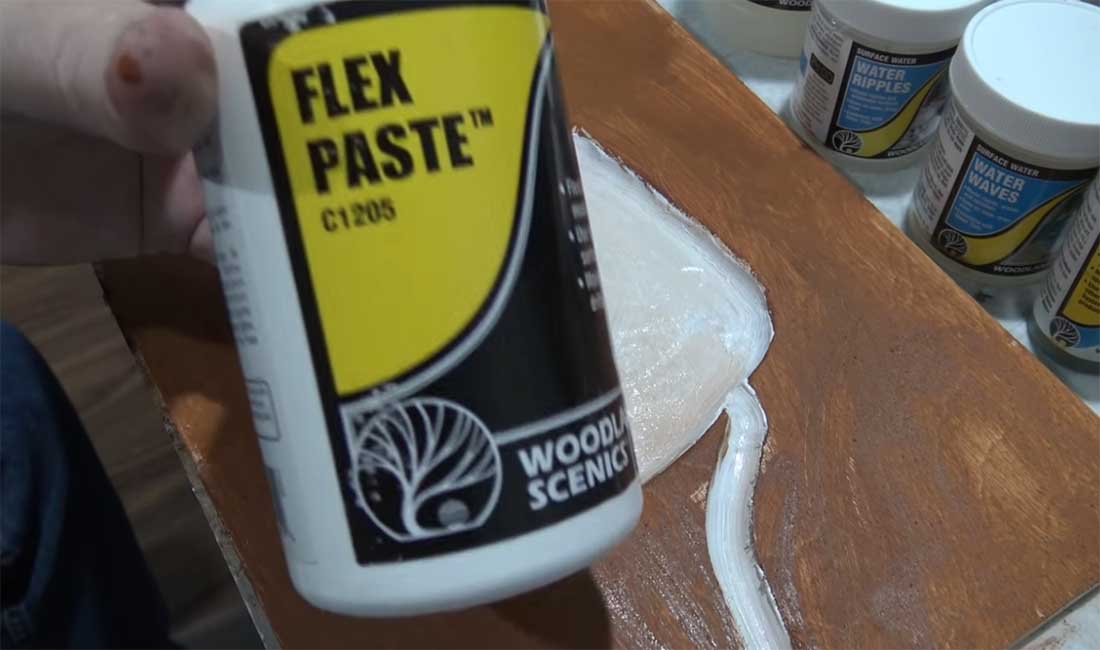
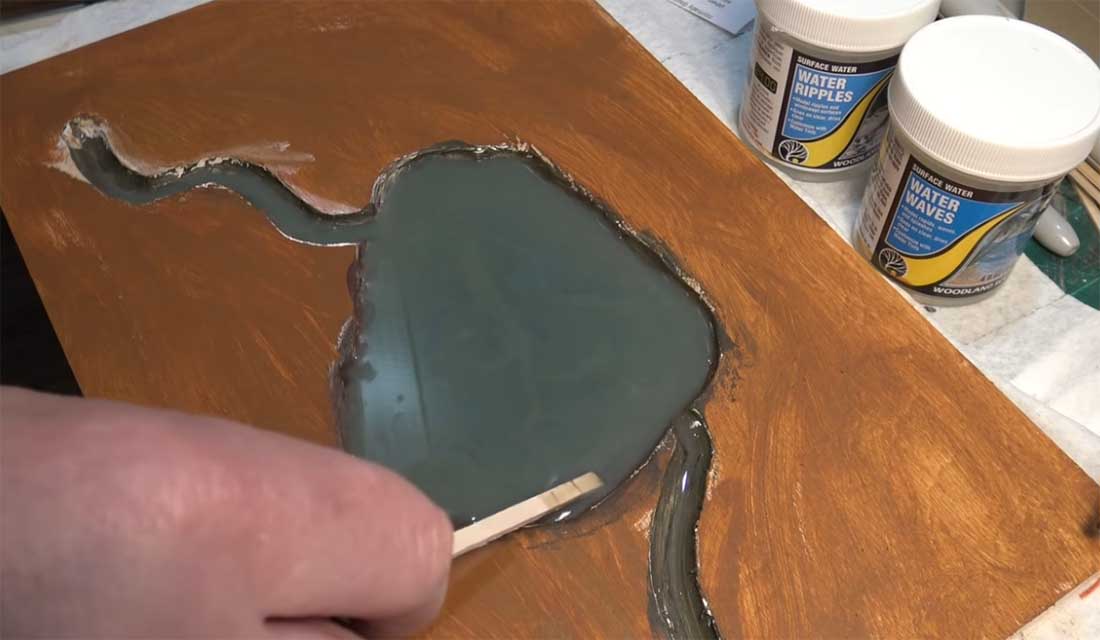
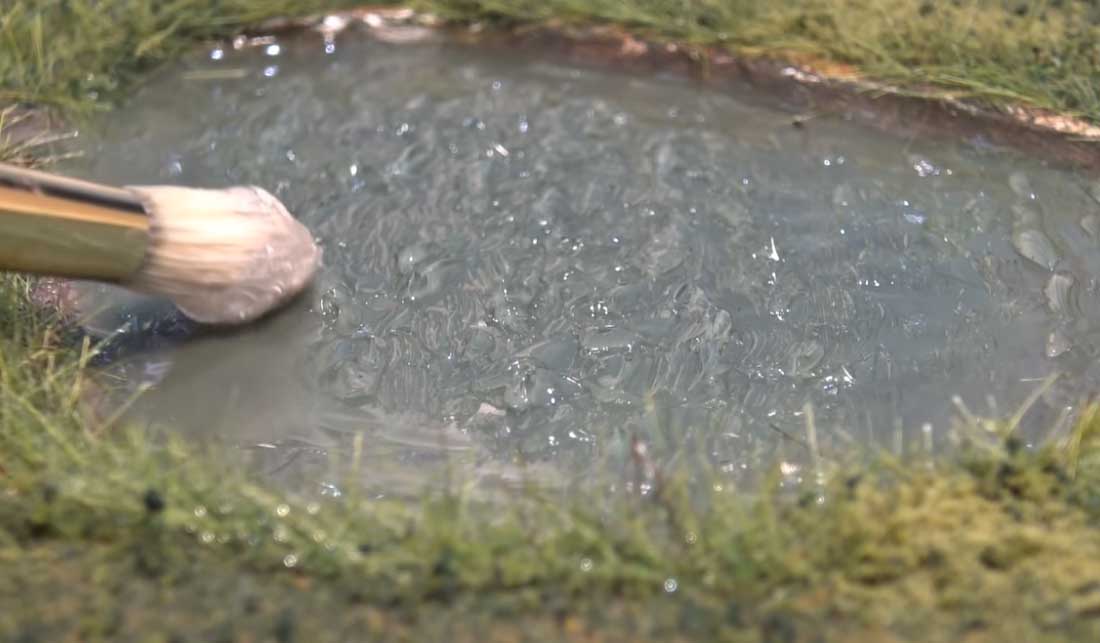
In the video I take you step by step through the process. My project was done over a two day period working just an hour in total.
Water features are easy and fun to do. Anyone who is worried about how to make ponds and lakes for a model railroad layout should watch this video.
Thank you so much for all you do.
Rob – Farland Howe”
Rob’s also done another fabulous water how to:
It reminded me of one of Dan’s post too:
And now on to Joe. You all know how fond I am of posts that show the biggest hurdle – making a start!
“I when I was in high school, (Los Angeles, CA USA) back in the 1950s, I built an “L” shaped Lionel “O” gauge layout that was 10’ long on one leg and 12’ on the other on which I could run 2 trains simultaneously. Those trains and days are long gone!
In the late 60s, I built a “folded doggone” “N” scale layout that was 5′ X 2 ½’. “N” scale was relatively new and it was a lot of work to keep everything running and I soon lost interest.
In the late 80s I began collecting HO equipment. I had determined to model the 1940s to 50s steam era. By then, we were living in San Diego, CA.
A friend gave me his “Chessie System” 4-6-2 Mantua loco and tender and I bought about 2 dozen freight cars (Athearn & Roundhouse) and a set of 3 Roundhouse 50’ “Harriman” coaches. All in kit form.
Before building them, I sprayed the chassis and undercarriages with a light, ‘splotchy’ coat of light-rust colored primer. I grouped them by size & style on a large scrap of cardboard and did them all at once.
Next, I decided to do a slight bit of weathering because I didn’t like the idea of running a plastic train. I simply took a small piece of 400 grit ‘wet and dry’ sandpaper (I used it dry) and lightly stroked down over the lettering, etc. leaving the ‘dust’ on the model. Then I sprayed lightly with dull coat to “fix” the weathering.
Since I had no place to actually build the layout at the time, I worked on the cars, loco and some buildings at my leisure.
Since I was not modeling the C&O, I stripped the paint from the Pacific loco and tender and repainted them flat loco black.
In 2001, we moved to a house in Missouri that had a huge room that I could dedicate to a layout so I began a track plan. It is 12’ x 8’ and built as four modules. I designed it that way so it could be moved. Finally, retiring in 2009, I began to build the layout.
We moved in 2017 to Battlefield, MO and I was glad I had constructed a “modular” layout. Currently it is sitting in my huge 25’ x 25’ heated, air conditioned well insulated shop building. ½ the shop is for the layout and relaxing and the other ½ is my wood/cabinet/woodworking shop. I have completed the backdrop and some of the background scenery. I will be starting the landscaping within the month.
I’ve run out of time right now but will continue next week. You’ll probably want to wait until you have another 3 or 4 sets of pictures before you publish them.
Here are some pics from early construction:
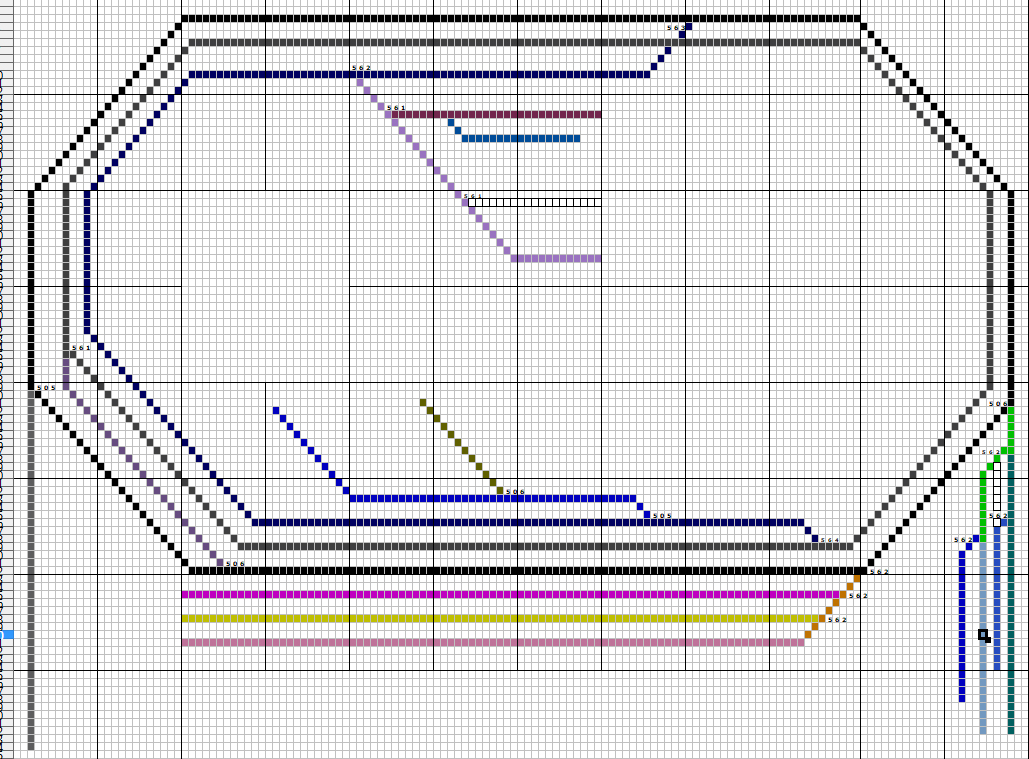
This is roughly the track plan.
Framework completed, all four modules bolted together.
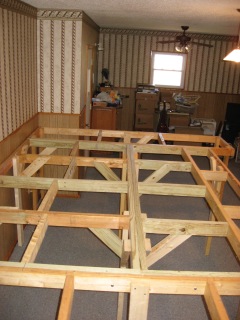
There is a 2’ x 8’ module on each end, a 4’ x 8’ “sandwiched” between them at the back (Left) and a 3’ x 8’ “sandwiched” in front (right).
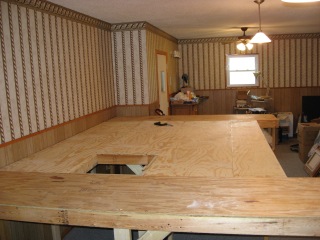
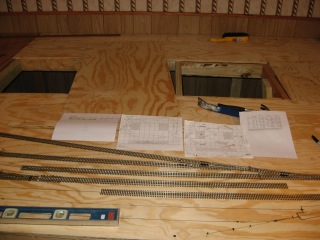
½” plywood applied

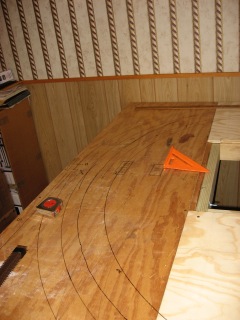
“Roughing-out” the track plan.
“East end” curves marked. The largest radius is 34”, the smallest is 30”.
Joe”
A huge thanks to Rob and Joe.
It really did brighten my day because for some reason of late, the trolls have been out in force.
When I started this blog, all those years ago, they used to get me. But now I just merrily delete them and read the nice mails, which does the trick:
“I almost forgot about your site as I got out of the hobby for several years.I started up again and maybe because of age or just being away from modeling so long I forgot a lot of what you do helping others in this great hobby. But I just went up to my grage attic and found printouts from your site I save in a folder from many years ago and you still great in saving time and money for all your fellow modelers. Thank you again. Allen”
“Hi…… great site and great emails……. Gary”
“Al;
Just wanted to drop you a line to tell you how much I enjoy and have learned from your newsletter and blog. I purchased the “Beginner’s Guide” a while back and have read it through numerous times. It has helped me in planning for my own beginning layout which will be taking shape soon. I have a three-year-old grandson who is currently into the Thomas trains in a big way, so I have a dedicated shed at my home that will serve as the home to my layout and give the grandson plenty of room to spread out his wooden train tracks (he loves to rearrange the layouts into new and novel configurations) and “help” me run the HO layout until he gets a little older. I have gradually accumulated enough track and rolling stock to build and operate a double-loop 4X8 layout. My emphasis is on the late 1940s to early 1950s when the final transition from steam to diesel was being made. I grew up on a farm which adjoined the main rail line from Atlanta, Georgia to Knoxville, Tennessee, and was originally built in the 1850s. As a child I watched the freights and passenger trains of the Southern Railway on this line, so it is the Southern that will be principally represented on my layout.
Thanks, and best wishes from the USA!
Jim, Cleveland, Tennessee, USA”
“Al: I really love your website. All of the tips and tricks are really good info for us model railroad fans. Mike, Michigan USA”
“Al, your blog is the daily feature that I enjoy and I look forward receiving your email. I’ve been in Model railroading since I was 10 years old when I received my first model train set, a Marx metal 027 scale. I’m greatful for your efforts bringing us what most of us enjoy. Thank you! Frank, near Mickey Mouse, Orlando”
You get the idea – the nice mails / comments really do drown out the trolls.
I’m telling you this for no other reason than to say thank you. A huge thank you.
If you read my mails and enjoy the site, thank you.
And an even bigger thank you to anyone who has supported the site by investing in the Beginner’s Guide or any of the print out scenery (frankly, without them, there wouldn’t be a site).
So, thank you, thank you, thank you – you know who you are.
That’s all for today folks. Hope you enjoyed Rob’s “How to make ponds and lakes for a model railroad layout” as much as I did. Stunning stuff.
I wonder how many of you will make a pond for your model railroad now?
Best
Al
PS More HO scale train layouts here if that’s your thing.
Need buildings for your layout? Have a look at the Silly Discount bundle.

Excellent job Rob…..I maybe one day will add water to my layout
Regards Fred
Nice techniques. I might now give this a try. Thank you very much.
Ant.
Rob is another of your regulars, like Dave, who I really enjoy. Always something worth watching at Farland Howe. Some useful product information this time and a well produced ‘tutorial’. Thank you Rob, for taking the time.
Thank you Al for continuing your good work. Sorry to hear you are occasionally pestered by sad people hiding anonymously behind their computers – thank you for filtering them out!
Dustyk UK
Excellent work Rob as usual, did notice you have the same problems as I with Realistic water…bubbles, a real pain, my cure is EZ water sets quick and so long as you soak the area with scenic glue first and let it dry it doesn’t bubble as much as the liquid and they can be pricked out with a needle if any occur before fully set or blown out with a heat gun, You can use the other aids like waves and ripples on it too.
Al, ignore the trash, block them out and keep up the excellent blog site you created, real modellers love it.
Quite an instructive video. I plan on doing a D-Day diorama and I can see using some of this to add water effects like waves to what I already had planned to use. I will definitely make use of the flex paste to seal the board
I have been using the same technique. I use latex paint to make the bottom water tight. I use Water Effects for ripples and water falls. The biggest problem is it does not come out of the bottle. I have used centrifugal force to get it off the bottom of the bottle to squeeze it out. Storing the bottle upside down is not very effective. I’ve thought of warming it in hot water, but am worried it will setup. I also used Deep Water for a large river with drops of tint. It is very true that a little tint goes a long way. Any suggestions to get Water Effects out of the bottle?
Rob – Never saw such “real” looking water! Fantastic job!!!
Great tutorial on making a pond. Really enjoyed watching it
Bob you can make a dark green using red. I’m an artist and colors on the other side of the color wheel will make cleaner colors instead of using black.
I just wanted to say how much I enjoy getting your emails. I have done some HO and Z scale layouts many years ago, and probably won’t have the space or time to get into it again, but I enjoy reminiscing via the text, photos and (most of all) videos that you send. For me, my daily grind of working on the computer at my home office desk gets, well, pretty boring at times. When your emails arrive, I always mark them as “unread” and save them for another time. When I’ve finally had it up to my eyeballs with computer screens, printers and piled up work tasks, I push back in my office chair, click on my “In” box, tap your email, and in the next instant I’m transported to another time, a kinder and gentler time, as trains roll through hillsides, over trestles, around lakes, through tunnels and past busy city stations. I’m riding in a steam locomotive or taking in the passing scenery from a Pullman car…all in an enchanted land of makebelieve. I know I can’t be the only reader that gets that experience – and I feel grateful for the time and effort you put in. So “thanks” from a big kid who never outgrew his boyhood dreams!
I think I have just the place for a waterfall. Keep em coming, AL.
Loos like when you pour the water, you could add vegetation cover, something for the bass to hide in. Would like more info on the waterfall. Very enjoyable and doable!
Thank you Rob. Now I know how to make ripples!!!!!
Pete in Silicon Valley
Thanks Rob, an excellent how to! You make it look EASY! CRAIG
Thank you a great help
cheers
what an inspiration s is to a learner, I will be trying this out and add it to any layout I start to work on, thankyou.
Ian
Absolutely STUNNING work!!!! -I’m not sure on the rest who read this but this will GREATLY help what I have planned for my own layout which I’m building and getting things to begin! Keep up the GREAT work! -Hemi
Hi Rob!
I would like to make a small waterfall and a rapidly flowing river on my mountaneous layout. So, please make a ‘hot-to’ on your waterfall technique. I admire your presenting skills!
SorenES
Perfect timing. I’m getting ready to put down some water scenes. I’ve never did a water scene before so this was great. Thanks ! Jim from NJ..
that was a stunning how to Rob. it really puts thoughts into peoples future layouts. thanks for sharing.
Thanks for the video on how to make water. I already have the bridges over the river and the riverbed. Glad I read about the sealing of the plywood, I never would have thought of that.
Rob
Your videos and thoughtful instructions are invaluable. Mucho gracias.
If you have a ditch or puddle that you want to display as wet get a shiny varnish and paint it where you want the wet area. Surprisingly it comes out shiny wet, brown tint, and I like the results. Easy breezy.
Big Al
Why someone would be negative about your blog is so baffling. I have found you to be creative, properly sensitive, hard working and very reasonable. I use this site as mental therapy-I need it, want it, and it’s the first thing I open every morning. Your fan club needs you. Be well & safe
Like others have said, it eludes me how anyone could possibly find anything derogatory to say about a web site devoted to model railroading. Especially when it’s a site that gives equal opportunity to all scales, all skills, all nations and all interests.
We, who so look forward to our daily interlude of train-filled levity from our trusty and reliable Al, appreciate that we are just as likely to see a toy-like oval of classic three-rail O scale memories, as we are an expansive, expensive diorama of super-detailed N or HO scaled operations-focused realism. We revel in the chance to see fellow hobbyists filling their spare time with something harmless and satisfying that also brings joy to others, especially the littlest ones in our lives.
I’m astonished that there are individuals who not only take exception to that, but actually go out of their way to share their miserableness with Al. I’m sorry that you are occasionally confronted with such vitriol my friend, and it’s nice to hear that you can just shrug it off. Thanks for keeping those dark clouds away from the rest of us, and I’m sure you have the satisfaction of knowing that the vast majority of us are forever grateful for all that you do.
Al, you bring such pleasure to email “in boxes” across the world! Do not let the doubters get you down. The world is a better place because of what you do, and I for one, would be very unhappy without my Dangerous Dave videos to review. Good thoughts to all the positive model railroaders out there that make this community such a gem!!!
Rob Schweitzer
St. Goar & Murren Scenic Railway
Ann Arbor, Michigan USA
Hi Rob, we never knew about the Water ripple or Waves stuff till now thankyou. This I have to see If I can get here in QLD for we have a lake area & a water fall so to speak on our layout, but not finished as yet now this has given me the how to finish it with the canoes & swimmers ect I want to put in it & to finish the water fall off to I hope, there is a first time for everything for we have been doing things we know or have an idea on how to do them but thanks to Alistair & this great site he has with all these great people My son & I have been learning as we go & it has given us more wants then we can poke a stick at & we don’t have the room for it all but love what we have done & what we have & every time we run it we have smiles from ear to ear just about & that all comes from all the members who like you Ron have helped us in one way or another over the years of building our layout with all the info you all have given Alistair to put up on his site to help people like Jason & I to learn & do what we love to do & start doing it for a change. Thank you to all & a special thankyou to you Alistair for joining us in with your great group of people & for the help you too gave us to get started too 🙂 Heather & Jason.
Rob great looking water scene, and joe nice start on that layout. More water and photos of that layout when completed.
Very good tutorial from Rob.Should have it about 6 months ago then I could have a great pond and a good looking lake.Now will have to demolish my pond & lake to build this better.
Very, very, very, very, very, very… realistic.
Yes, thank you Rob. I am creating a 1920’s central Oregon logging scene with river flowing to a log pond. Very helpful. More importantly, as I write this 27 people have commented and expressed appreciation for this blog and Al’s contribution to this wonderful hobby. There are ‘trolls’ in all aspects of our lives but there are infinitely more of us who are very appreciative and thankful for what you have done and are doing, Al.
Thanks for the video.
Always love your work !!
Best waterfall I have ever seen outside of the real world!!!
very nice job. sometimes this stuff doesnt come out just right, but you did a good job.
Thank you for the step by step video on how to on making a harbor scene Rob, looks great !!!!
I’m sorry, I also want to thank you for showing how to make a pond, it also looks great !!!
One of the best tutorial ‘s I’ve seen so far. Your site is awesome. Having been mostly an armchair modeler for a while, I’m getting ready to jump in with both feet. Th e posts you share with everyone is a great motivator. Thanks for all you do.
Awesome job on your scenery. The best I’ve seen.
Dear Al,
I just wanted to chime in and express my gratitude for your blog also. This is the first thing I do every morning after I get my coffee brewing. I haven’t been a model railroader for many decades now and what with my gypsy lifestyle I probably never will again, but here I get to vicariously live the good life of the train enthusiast. Thank you many times over for taking me back to a kinder and gentler time when life was simpler and not so fraught with angst and stress. Your site has brought me a great deal of peace and joy over the years and I pray that you outlast me in this life so I will never have to go without it!
Very useful video, thank you
GREAT rock work too!
Rob, excellent tutorial on your lake project. I have followed your water projects for quite a while. Please keep us informed.
Brian – The HOn3 guy from Knysna RSA.
Awesome work from Rob on the pond and a great video, really helpful!! Thanks!
Cheers
Al, I don’t understand about the trolls. You do a fantastic job! You bring the amazing work done by many people showing how they are having great fun in their lives to many others. Layouts range all the way from track on a plain table to layouts that can only be described as works of art which, depending on the angle of the picture, might be mistaken for reality instead of an imaginary construct.
Thank you for your patience and for those who can’t just enjoy the magnificent work of others, whether simple or complex.
Thank you for your work.
Respectfully,
Frank Fleury
A fine tutorial on how to make a pond and I will add it to the archive when I make my pond on my layout.