Bob’s been in touch – he’s slowly building up an incline curve on his HO scale.
“Hi Alastair;
It’s been awhile, but I am spending more time working on my layout.
Incorporating the wife’s Dept 56 North Pole Series Collection of 46 buildings with my simple HO railroad oval with some turnouts and a round house!
Here are some photo updates:
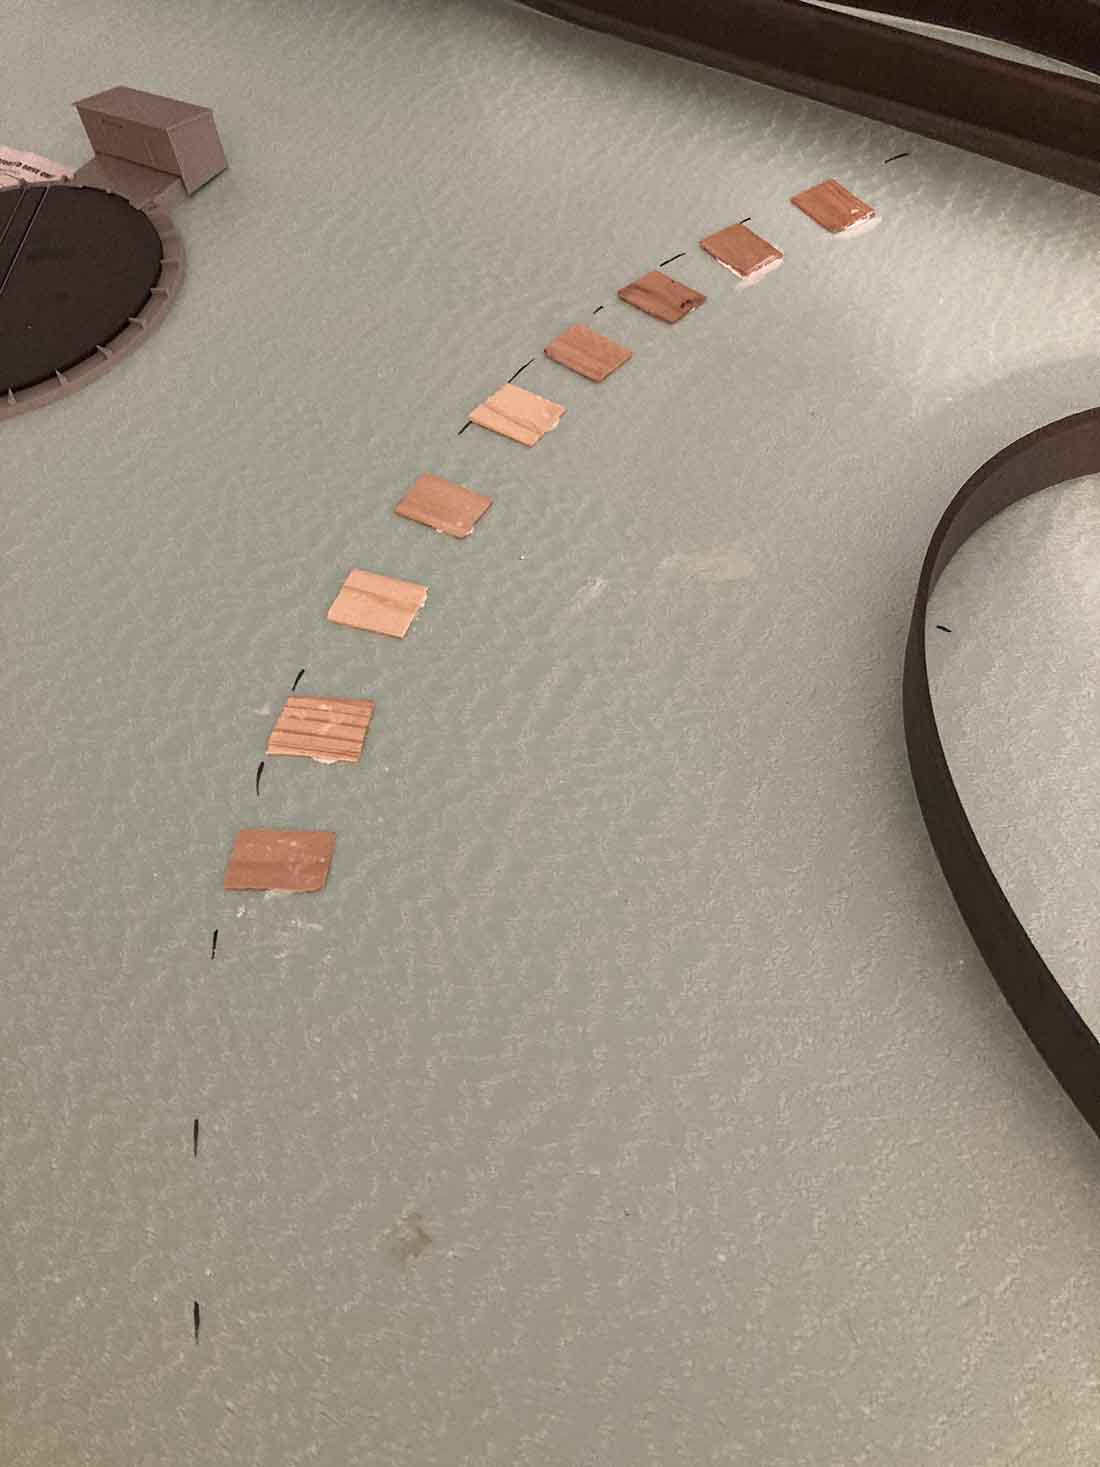
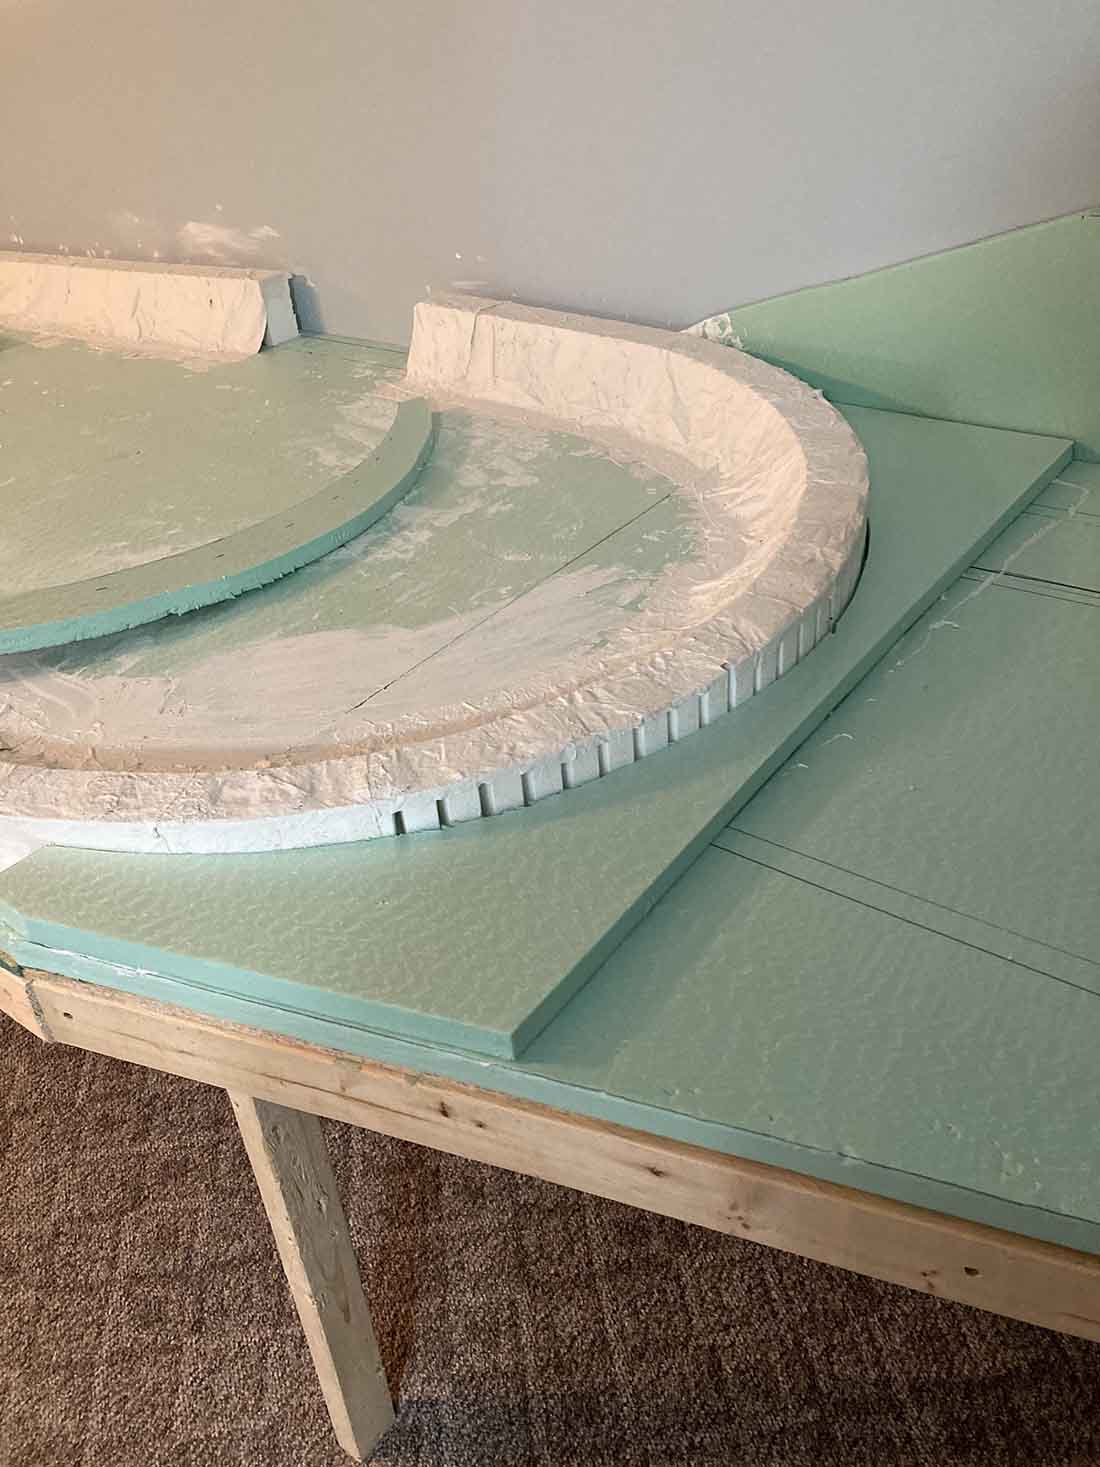
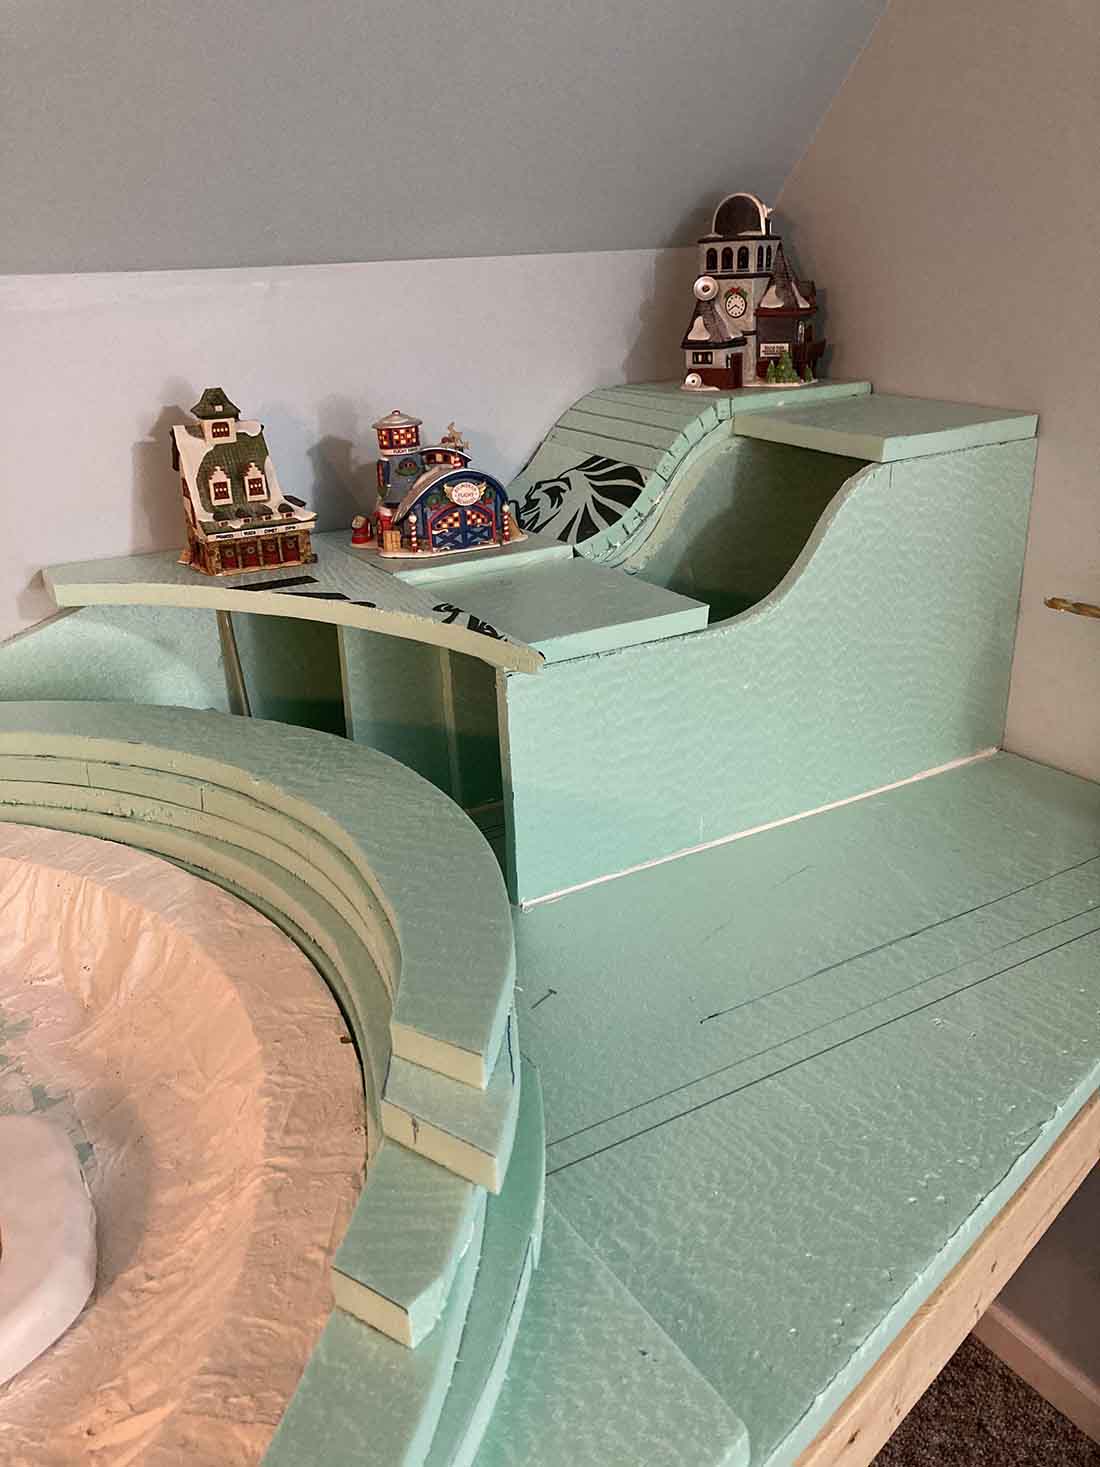
And the last photo shows how I am going to get will get wired below the board for lighting off the buildings!
Thanks
Walt”
Looks like Walt is doing a thorough job of building up his incline curve.
It reminds me of Bruce’s post on inclines.
It’s a thorny issue – get it wrong and your inclines be a constant source of irritation.
Now on to Wayne.
If you missed his last post it’s here.
He sent this in since:
“Dear Mr. Alastair Lee I have read some of your input, and that of other model train nuts. I am one also and have been for over 65 years.
I have always wanted to have a larger layout than a 4’X8’. I waited for a long time to make my dream become a reality.
My wife passed away about a year and half ago. Her canning room was next to our bedroom. I decided to turn that room into my train layout room.
The room size is 8’ x 14’ which is large enough for what I wanted. At 77 years old I thought I better do something while I still can.
I started this about 10 mo. ago. I don’t sleep much at night, which has helped me get as far along as I have. I have photographed almost every night’s progress.
I spent a lot of nights with paper and ruler trying to layout something that would work.
I finely purchased the HO scale computer software called Any Rail. It is great if you read the instructions’ first. I didn’t, it would have been quicker if I had, it works great once you know what to do.
If you could take a look at my layout and tell me what you think.
Most of the main lines have a 30-inch radius. This was so when I get one of my dreams (big boy) it can handle the curves with no problems.
I am calling my layout Canyon Springs RR. It’s a transition from late 1940 to mid-1960. Even though I read model railroad magazine, you tube videos, and articles like yours, this has been a learning curve, and still is.
I was looking for the tracks to cross over each other at the height needed for clearance. To get close to the grade to achieve the 4 cross overs. This left me with a lot less track footage but left me areas large enough for decent size industries, and a fare size yard.
I will try and keep you supplied with photos. If any you want to post, great. The rest can be put in the circular file.
In some of my photos you can see Rix Products HO 628-0103 Early 150′ Highway Overpass Kit.
I like things to have a start and a stop to them. To cut the cost a little and fit in my area I cut the bridge in half length ways. I think I used 4 kits so I would have enough side railing for both sides.
To get the curve down, and also bend around I used a heat gun. If you don’t get in a hurry you can form the plastic about any way you want. It’s a one lane bridge for ho, and two lane for n gauge.
I will tell you some of the other things that have been kit bashed, or made to fit what was needed. Enough for now need to get back on the layout.
Wayne”
I have really enjoyed following Wayne’s layout journey – I really like the questions that different posts inspire too:
After reading some of Wayne’s posts, Frank got in touch with these:
“I notice that many layouts are on foam board’s.
I have several questions regarding this method. I am now using plywood with “Track-Bed” and nailing down my N Scale track and breaking many ties in the process. So here are my questions:
1. Why do you use it and how is it cut.
2. When I go to Home Depot, what do I ask for.
3. Do I still use “Track Bed” or cork on top of the foam. ( it has to be movable )
4. How do I nail down the track
5. I have DCC. Will it affect the engine sounds.
Thanks for the answers and any othersuggestions you guys have.
Frank (73) in Arizona”
Please do leave a comment below if you can help Frank.
That’s all for this time folks.
Please do keep ’em coming.
And if creating your own model railroad is an itch you just have to scratch, the the Beginner’s Guide is here.
Best
Al
PS More HO scale train layouts here if that’s your thing.
Need buildings for your layout? Have a look at the Silly Discount bundle.

Wayne, N scale-“er” responding…I posted a while back on my “Union Pacific Central Division Hub at Marysville, KS” layout. Lately I have been kind of bogged down scratch building a 390 scale foot icing dock (shrunk from the actual PFE dock that stood here that was over 1,000 feet long). I got kind of tired of glueing five tiny “insulators” on top of each post frame to string electric wires and led lights through. I use electric motor armature winding wire for fence wire and overhead electric lines, it can be pulled straight beforehand and is thinner and stronger than thread. Anyway, I need to make myself get out the tweezers, steady my shakey hands and glue the rest of those on so I can get it painted and move on to something else!
I hope you get your Big Boy! I have one, and designed my layout with wide, easy curves and gentle, hand laid turnouts so those engines and even long, non-articulated ones will run through smoothly. Thanks for the boost!
Look pretty kool.!!!!! Would like to see more. I sure hope mine turns out that good.
Hello Wayne. I liked the name for yer railroad. I also am building my first layout,Sir. I am setting my railroad in Mayberry,Missouri. About the late forties,into the middle fifties are; when steam still ruled the short lines. My BIG thing has been wiring so far. I am a novice at it. I read someone`s site where they used 14 gauge wiring, and that is what I started out with. I have had to RE change it to 22 gauge. RE wiring today. Frustrated, but still moving along and learning. I have lain my bouard, styrofoam, and roadbed plus the track is all hooked up. Second time I am wiring tho. Like you, I have a big switch yard, a town, and a few industries. I wanted the railroad to be supportive ,what with the town and industries. I took a coaling tower and converted it to a Feedmill. Right how, small scale boxes serve as buildings for now. I have learned a lot watching tghe many model train video`s. I wish you luck Sir with yer layout. I hope to be posting pictures and something worth reading REAL soon.
Pls answer these questions. Alot of beginning modeler want to know!
Like that idea of armature wire for poles and actually electrify for transmissions, all low voltage of coarse. And using sledge hammer to nail down N track? Thought everybody there used needle nose pliers and pushed spikes in… plywood forget it. Usually a dab of Elmer’s wood or white glue works fine. Water will dissolve those spots for uplift, don’t try glueing entire bottom of piece though. Superglue won’t work well at all for anything like that.
And white paper glue still works great for window glazing. Stretch across openings with toothpick, like making soap bubbles. It dries transparent, use also to stick everything else down too with spray bottle. Dried coffee grounds still one of the best options for dark earth. 🍮 Lastly for canvas, toilet paper- light spray of paper glue, let dry and mist spray of OD or any color. Cuts well then also. 🧻✂️
These layouts with bolder size cat litter all over roads, grass, everywhere’s just doesn’t cut it lmao. 🐈
Hello Frank. As to your questions about foam board, let me chime in. I used 1” foam board like so many other modelers do. It is called “sheet insulation” and can be found in abundance at Lowe’s or Home Depot here in the states. The primary reason people use it is because of its sound insulation properties. It does not affect the sound of the diesel prime movers at all, in fact, I’d say the opposite is true. By removing a great deal of sound transference from the locomotives and rolling stock down through the table (without foam board) it allows you to hear much more of the sounds that have been engineered into the newer DCC locomotives, like “cab chatter, compressors and other miscellaneous sounds. I still use track bed to raise the track above the surface. Plus it allows additional sound deadening qualities. There’s a place on my layout where I had to cut the foam down to the bare wood under a trestle to have clearance, and there is a noticeable difference in sound when the train goes under the bridge. I can only imagine how loud that might be running trains at midnight without the foam board. Plus lastly, it makes it super easy to install trees and fences and whatnot on foam over trying to drill holes in a wood table. I hope this helps Frank.
In reply to Frank,
1.Why do you use it and how is it cut. I used it for a variety of reasons. It makes a great base for attaching scenic material such as trees, which you can simply stick into the foamboard by making a small hole, or by attaching a pin to the tree and then sticking it on the foam. You can carve into the foam to make ditches, ponds, etc. or add layers of foam and carve them to make hills, etc. It also acts as a sound deadener, sometimes if laying track over a solid surface such as plywood, you can get a drumming or echo affect which drowns out your engine sounds. Using foam eliminates most of that. The foam can be cut with any sharp utility knife, or there are a variety of electric cutters out there, basically running a hot wire through the foam to cut or shape it. I just use a Stanley or similar utility knife.
2.When I go to Home Depot, what do I ask for. Most big box stores call it Rigid Foamboard insulation. Owens Corning is a popular brand at Home Depot. Go to the lumber section, all the stores in my area keep it in the last aisle where the roofing and other insulation products are.
3.Do I still use “Track Bed” or cork on top of the foam. ( it has to be movable ) Not sure what you mean by “has to be moveable” I used cork track bed and attached it to the foamboard using DAP Alex. This is a latex chalk, and the track bed can be peeled off with a spatula or putty knife if you need to make changes later. If you are careful, you can reuse it. Any similar chalk will do the trick. I used Midwest cork track bed except in areas where I wanted to drop the track level, then just bought a roll of cork and cut it to shape needed.
4.How do I nail down the track. I used pins to hold the track to the cork board, you can find them from a number of manufacturers, I used Peco simply because I was using Peco track. You could also use the chalk, but I like the flexibility of using pins, allows for quick tweaks if needed for track alignment, etc.
5.I have DCC. Will it affect the engine sounds. I think you will find your train sounds will be much clearer when running over foam board.
Hope this helps.
I also use extruded Styrene insulation. I usually start with 2 inch thick as a base and raise it in layers as needed. I am modeling in HO scale and use flex track primarily.
I use straight pins to attach Woodland Scenics roadbed to the layout base. The roadbed is first slit down the middle and laid on each side of straight pins laid on the intended center line of the track. I then drill 0.025 holes down the center of the track and use straight pins to attach the track to the roadbed. On my current layout I am glueing the track bed down with Alene’s Tacky glue and expect to glue the track down after I test the various sections electrically and with trains. When I disassembled my last layout I recovered most of the roadbed as well as the track for reuse which should address ‘what do you mean I have to MOVE the track’ questions
I made a jig for drilling the holes in the track ties the keeps the holes centered for accurate alignment with the roadbed centerline. The spacing depends on how much curve is in the track. Straights may have holes 6 inches or more apart and curves may be as fine as 1 inch depending on how much force is needed to keep the curve. As I use easements I also make templates to ensure the track centerlines are in the ‘right’ place.
Ray Martin
mine was good but yours is a little bit better.
I nail down my N scale track. I drill a 1 mm hole through the ties and then push a 12 mm brad into the hole. The 12 mm brads are a reasonably tight fit and are easy to prise up if you need to move track.
Frank, I have in train since 1952 , S gauge first and switch to HO 1954. I use cork roadbed on foam and glue it down then glue my track down with weights. Worked in trains when I retired for 17 years. I wire all my track sections to the bus line no matter what size, including switches. Never relied on rail joiners to conduct current. Used 22ga stranded wire for drops and 12 gauge stranded for bust lines…. I’m DCC …
Tom
For both my HO layout and modules as well as my N-Trak modules, I use Woodland Scenics foam roadbed materials in both rolls and strips. For glue I use Woodland’s foam adhesive to hold down both the roadbed and track. I just ripped up my 4×8 HO layout (cork roadbed on white foam on top of plywood) and am glueing down the foam roadbed directly on the plywood as has been done on previous HO and N-scale modules with great success. The HO layout fills a walk-in closet (we don’t have basements here in Florida!) — picture story to follow when finished remodeling.
Frank
My base is MDF and I have used foam track bed. I also used Peco flex track which has holes through the ties/sleepers at frequent intervals.
I pin down my track to the base through the track bed. I drill a 1 mm hole through the ties/sleepers where there isn’t any, the flex track has holes in the ties/sleepers, and then use a 15-16mm (about 0.6 of an inch) small pin type nail used for delicate woodworking. I push these into the drill holes with a fine tipped nail punch. They grip well and easily come out if you need to realign track.
Walt, Good on you for taking your time and planning. Nothing wrong with that. IU can relate to the age thing. I am 77 and have slowed down a bit from my 60s. The most important thing is to enjoy the process.
Wayne, I recommend that you glue your track down. I use Woodland Scenics Foam Tack, and I use it very sparingly. A very thin coat of this product will allow you to take up your track later if needed without damage and yet hold it firmly.
Rob
I would like to see more of Bob’s Dept 56 North Pole layout — I have a similar layout in mind and want to see how the HO scale fits in with the Dept 56 houses.
— Carl Flowers, Hot Springs Village, Arkansas
In response to Frank’s query on rigid foam. Looks like a great start sir! I had some initial issues using 1&1/2″ foam for flat yard areas and then trying to transition grades up or down from the foam onto homosote spline that I’ve used for main lines and longer curves section all on top of an open 1 by 4 lumber frame.
My advice would be to make sure your transitions from the flat to any incline are very, very gradual. The foam with lightly glued cork transmits almost no extra sound, homosote topped with cork roadbed is silent. My biggest issue with the foam was the under mounting of Tortise switch machines. The 1&1/2″depth was a bit too much to get a nice solid throw against each rail side so I ended up removing 1″ of foam from the underside to make a cavity, mounting the switch machine on 2″x2″ 3/8″ plywood and adhering the plywood piece up into the cavity. A lot of picky under table work but the result is OK.
Enjoy , you’re off to a great start, and don’t forget “My Railroad; My Rules!!”
Looking good , off to a fine start indeed . Please post your progress , quite eager to see it develop . Thanks for posting your work .