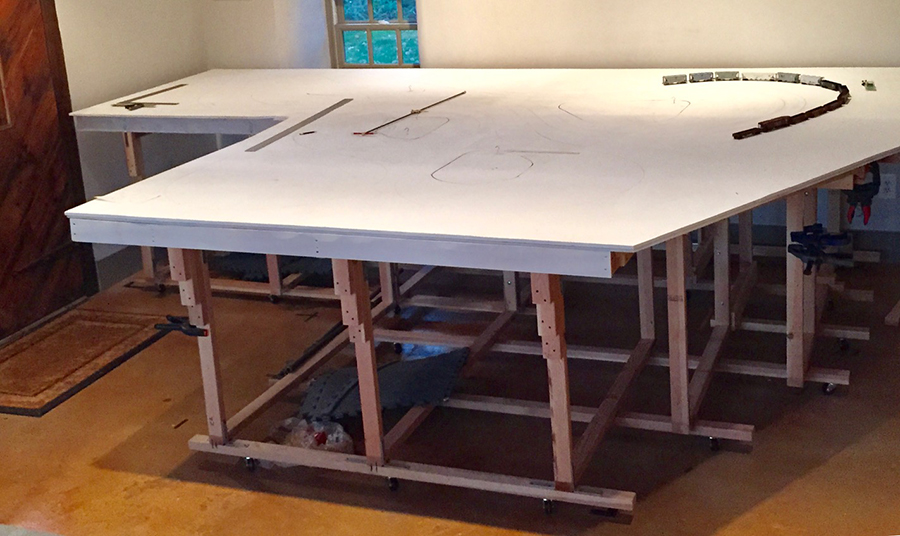
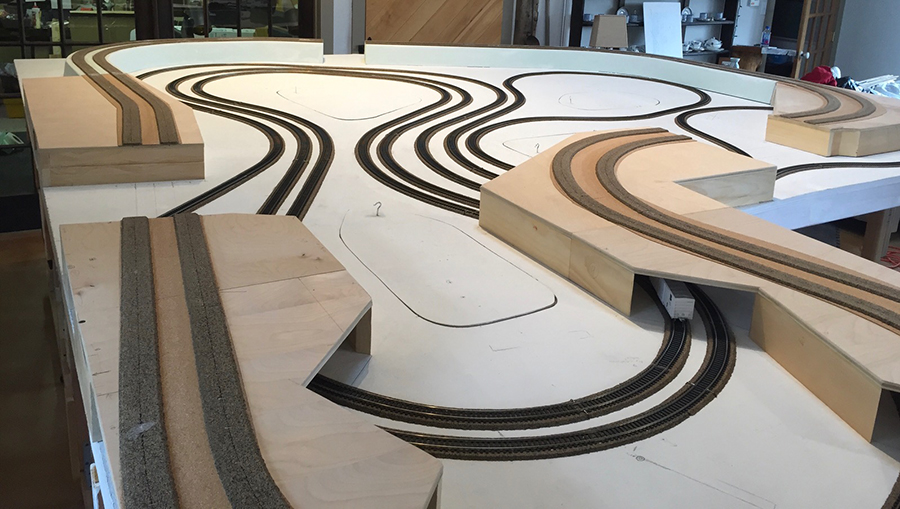
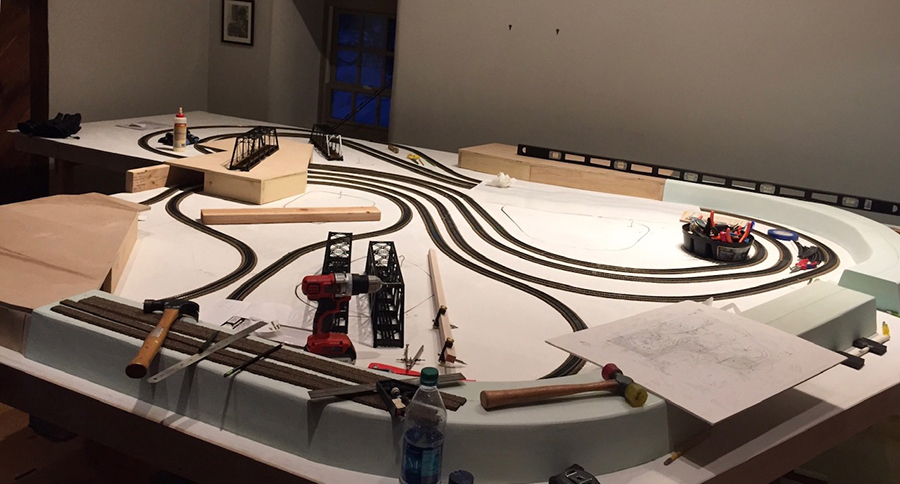
John’s HO scale layout is really taking shape:
“Hi Al, (From a longtime follower and great admirer)!
My love for trains started about 60 years ago and some of the trains on my layout today are some of my originals as well as my wife’s.
That HO train hobby stopped when I got my drivers’ license and was rekindled when our first daughter was about five years old. That lasted for about another 10 or 12 years when my wife packed everything up and neatly put them in the attic.
When the third generation was coming for Christmas about five years ago my oldest daughter called and said “Dad why don’t you put up the trains for the kids!” Luckily the trains were still in good shape and I had about six weekends to build a 4 x 8 layout. When the kids showed up for Christmas, it became immediately obvious that it was all worthwhile.
After the holidays I realized it was time to build a much larger layout. And I will admit it was not only for the kids!
My HO layout is called the Wismer Valley Line. The following objectives informed my plans:
1) Replicate to the extent possible, very long American freight trains, pulled by multiple locomotives, up long grades.
2) Focus on the specific shape of the plan and get as many trains as possible running concurrently.
3) Incorporate the vintage trains into the plans. FYI – The major Railroads on the layout are from areas of the country where my three daughters have lived as adults.
Maybe as important as anything, make my own rules. e.g. It’s OK to have the Pennsylvania RR running alongside the Union Pacific, at least in my barn!
The first thing I did was get your beginners guide!! This is a tremendous resource even if you have previously built train layouts.
Secondly, was to find someone local willing to give me ad hoc advice. This advice began with the key suggestion to avoid grades (especially curved ones) if I wanted to pull long freight trains and avoid derailments. I opted for a bi-level layout. Overall size is approximately 17 feet long and 11 feet wide at the widest point. The shape was dictated by the interior of the space including doors on either end.
The longest freight train, on the upper level outside track is pulling about 60 cars, using four locomotives (NO dummies!) in tandem (over 30 feet in total length). The rolling stock are from the late 1950s the early 1980s and the past five years (which included additional vintage railcar purchases on EBay).
I rebuilt about 100 of the vintage cars installing (Kadee) couplers and well machined wheels, along with new trucks when necessary. The wheels are critically important for long trains in order to minimize drag.
In planning the layout, as can be seen from the plans, I spent a lot of time working on the maximum radius that could be attained by each track. I am surprised to see that more of your readers have not mentioned this issue as longer locos simply can’t make it around tighter curves. Maybe it was just the unconventional layout combined with this many trains that created the issue. My original plans turned out to be invaluable as I used them constantly to measure and adjust the radius of each curve.
The deck is, bottom to top, plywood, Homesote, cork and then the tracks. All seams taped and spackled. Total weight exceeds 600 pounds.
My biggest engineering challenge was the concrete floor in the old outbuilding on our farm. It is neither flat nor level! The solution was to overbuild and use 24 heavy-duty casters so the entire layout can be pulled out from the wall to allow for total access. There are also 4 cutout/lift-out windows (which eventually will be disguised by scenery), where I go underneath and come up out of the hole, enabling me to reach every square inch of the layout.
I spent significant time making sure everything was as level as possible, despite the uneven concrete floor. When working on it, it is pulled out from the wall about 3 feet. When running it, it’s back in the corner. With all those casters, once I get them going in the same direction, it’s not too bad to move; and they have the added benefit of finding their own version of level.
The deck is 43 inches off the ground. If I did it over again it would be a couple inches higher to allow for easier access.
I’ve included a few photos of the plan, and build out as well as a video of the six trains moving at the same time, and a short video of how I test the track.
Original plans and beginning construction:
Construction continues:
Up and running:
Trains running:
Final notes: With all of the wiring required for the six separate train lines I wanted to make sure that the tracks were really laid down properly, before I commenced with the wiring. As you can see from the short video, I push one railcar and see if it makes it all the way around the track (approx. 40’) with no problems. I also listen carefully. Sound will tell you if there is something loose or out of alignment. Better to discover this, BEFORE you do the wiring!
Al, thanks again for this wonderful service you provide for all of us. So much of what you show is the perfect combination of sheer genius crossed with amazing creativity. Inspiring!
Jonathan
P.S. Now it’s time for the ballast, hills, sage brush, and maybe a few sidings, if I can fit them in etc. Perhaps I did this a bit out of order, but I really just love rebuilding old running stock and operating the trains!! You might ask, why not DCC? Well it is quite simple, all of my locos are DC and I don’t particularly care for new technology. Much of what I make these days is with hand tools (not electric). I have rushed for most of my life and find that making things by hand slows me down just enough to think about what I am doing…… before I do it! If that sounds like a rationalization, sobeit.”
A huge thanks to Jonathan – what a joy to see all that rolling stock running.
Lastly, I know some of you had duff links to yesterday’s mail. Sorry about that. Here it is again if you missed it:
Model train wiring tips (Sunday’s)
And the day before too:
Alan’s 6×4 N scale (Saturday’s).
That’s all for today folks.
Please do keep ’em coming.
And if today is the day you get started on your layout, the Beginner’s Guide is here.
Best
Al
PS Latest ebay cheat sheet is here.


This is what I like to see. Bigger railroads with wider curves. Needs to be bigger to accommodate large steam engines.
Wow Johnathan, that test car sure rolls freely around your layout. Keep sending photos as you progress. Nice to see all your trains running as well.
Brian the HOn3 guy.
This is quite ingenious, each set of rails is completely independent of others- no switching. I’d imagine all the loops may be same circumference with inner ones looped more to fit in. Never would of thought of this strategy, probably too much action, will keep one very busy or just walk away lol……
Glad to see you still around.
Regards, Rich
John, This awesome I love the track plan! What type of foam is that in pic 4? I am just getting ready to start my layout build and you have given me some great ideas!
Thanks.
Bill
Holly sma-molly alright Now that’s a bobby dazzler.Now with the addition of a town,factory’s camping resort and WATER,must have water. Great work and have fun!
I love the way you made the tunnels, not such steep inclines so it looks very natural. Great job!
William, thank you for your note and your question. I believe generically it is referred to as high density foam. I’m sure someone out there can be more specific, but It is used in industry for building prototypes. It comes in 4 x 8 sheets in different thicknesses. (I glued up 2 pieces 2” each to get the 4” total height.) You can carve it mill it glue it,etc. It’s also used for exterior applications, like signs. It is not inexpensive. It’s very heavy and when you work with it you should wear a respirator etc. I cut this on a bandsaw with the help of a friend. It would’ve been virtually impossible to do myself. Not sure I would use it again. Balsa wood would be much lighter and easier to work with. Best, Jonathan
EXCELLENT. This is one of the BEST layouts I have ever seen. Love that you can run several long trains at a time. Can’t wait to see more when the scenery is applied. Great Job.
This is impressive!!
Fun video watching scads of trains running. Planning something similar. several closed loops to let them all run. My benchwork comes in next week…Got buildings marathon going now so I have stuff to decorate it with.
Alastair, you are right: hypnotic! Well done on trackwork and wiring.
Great stuff Jonathan! You sure put a lot of planning into this layout & it really paid off handsomely. Truly a really active layout that keeps the viewers attention with so many curves and running stock. You said that on one set of tracks, you were running 4 locos, not dummies, over 30 feet of track & all with just DC power. Knowing that, with each powered loco on the same track causes the locos to run slow, how did you get extra power to each track that you were running multiple locos on? Please keep us updated on the scenery as it is applied. Jim from CB.
First of all, thanks to everyone for all your nice comments. I know this layout is unconventional, to say the least, but I’ve had such a great time restoring much of the rolling stock, that I want to see them moving! Now to Jim’s question from (CB?) about running 4 DC locos on the same track. What did I do to avoid power problems? I strictly stuck to the 6 feet rule. My knowledge of electricity is not strong, but gone are the days when we had one little piece of track around the tree with two wires coming back to the transformer. That worked because we only had six or 8 foot of track and you certainly only had one engine and it was pulling just a few cars. With these long tracks, at a minimum you must wire them every 6 feet! Before I did any wiring I would measure out specifically where those connectors were going to be located and make sure that there were bridges or any other infrastructure in the way. That often lead to wiring some sections every 5 feet. I have never experienced loss of power and I can run extremely slowly.
You also have to be careful of your locomotives. One person suggested to me that you put them on track without coupling them and if they run a different speed which they usually do, put the fastest train upfront with the second fastest behind it etc. If you bought a couple or three locos at the same time and they were manufactured at the same time, they should be quite similar. My Understanding is this has to do with the motor windings. If they run at a significantly different speed, I don’t run them in tandem. Please note, this is not an area where I have expertise. Jonathan
one of the best lay outs I’ve seen. Great job on the bench work. I hope you show more of your work.
Jonathan, running so many cars, I know you mentioned quality trucks, wheel and couplings; do you match weights of cars, follow NMRA weight recommendation, or any other ideas?
Bob, really good question! The short answer is no. Because I am not scientific about it. However if people are interested, look under NMRA weight recommendations, And there is good info on the subject. I agree with the info but I don’t actually use the scale to weigh the cars. But all of my rolling stock has weight and keeping it low is really important. However I’ve avoided to the two major problems. 1) I don’t have grades, rather I have 2 levels on my layout 2) While I have vintage cars and new cars running on the layout, I avoid any very long (modern) rolling stock and I do not put modern box cars (60 feet plus) next to vintage box cars (38 feet) because they look ridiculous! I may photograph some of the vintage ones and send them to Al to show the differences of construction. The old stuff has a great deal of appeal to me.
I am dumbfounded. What a brilliant and hypnotic video to watch. It never crossed my mind not to have any turnouts. Thanks so much are sharing!
Jonathan,
Excellent writeup, impressive track plan, mesmerizing video. Kudos on a job well done – so far 🙂 I’ll keep an eye out for the finished product, but truth be told, I’d be happy with what you have! Enjoy.
Interesting layout with plenty of running and with no point motors (turnouts) allowing multiple trains to run simultaneously.
fantastic!
Jonathan, I looked carefully at your track plan with the many notes written, but cannot spot or determine what the actual dimensions of your base structure is. I have a similar shape, but using Kato Unitrack which limits me in curve radius. My track plan might work, although I have grades, if I could enlarge your specific dimensions. Thanks.
Jonathan
You are fortunate to have that awesome space, unlevel as it is. I am jealous-LOL.
To watch all those trains run at the same time is SO awesome. Much thanks for the time & effort to bring us to your man cave. Great input on some tech issues- love it.
John…… WOW!!!! great to see those trains running. Send pictures as you progress with your scenery.
You’ve got a great plan… one that will keep you busy for a while!
well done
Great tips, nice job. Nobody put my old trains away and now they are lost.
Trying to figure what gauge I want my new layout to be. Leaning towards N, but Z looks interesting.
Great setup. Like you, I am only using DC and have 2 tracks running separately on a 4X8 platform for now. You noted that because of the length of track, you have connections about every 6′. My question is, are they all connected to the same power supply or is each one connected to its own power supply? I’ve noticed a lag in power on the far end of one loop and was wondering if I ran another connection to the same power supply or do I need another power box?
I have the identical question as Sam (above), namely, are all of Jonathan’s power connections made to the same power source OR are they connected to multiple ones???
Nice layout! I also have vintage stock, which I’m in the process of starting my layout. I would also like to replace all of the horn hook couplers with kadee couplers, which ones did you end up using. I’m unsure which ones would work better, so many choices. Thank you