Lawrence has been in touch again with his model railroad helix – his last post is here.
“Al
I was asked about the helix I have. It is a double track double helix six rows tall.
Initial design of a model railroad helix can be frustrating. Building is also costly as half inch plywood is best to use. And it takes a LOT of track.
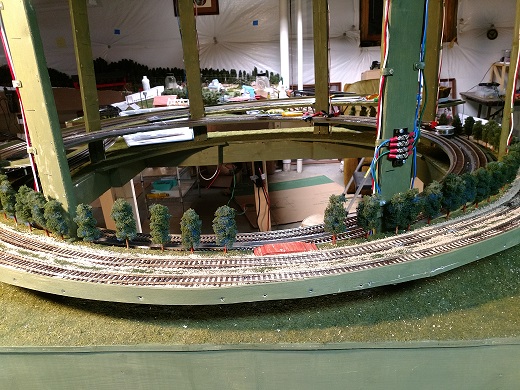
Seeing I was using diesel and steam I decided the inner track on the inner ring would be 23-inch radius. That made the outer track on the inner ring to be 25-inch radius.
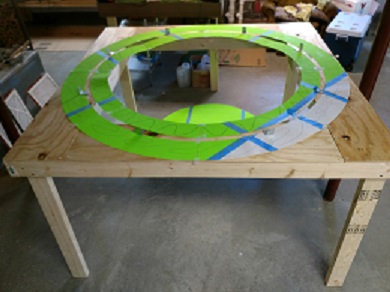
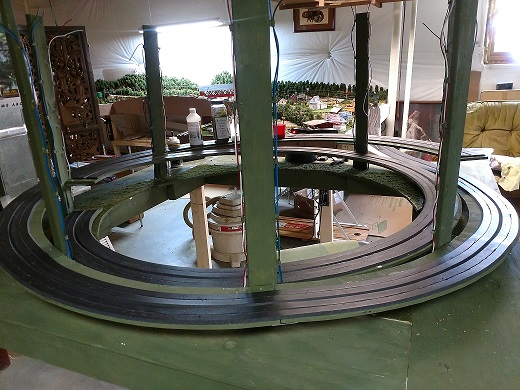
The center poles are one by three inches. I wanted an inch for scenery on the outer ring so the inner track on the outer ring became 29-inch radius. Making the outer ring outer track a 31-inch radius. Or the total width of the helix is 62 inches in diameter. Which is displayed by the second and third pictures.
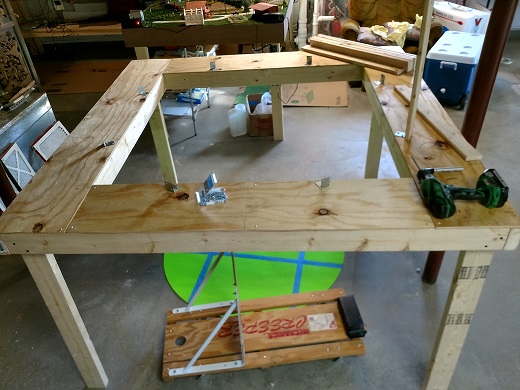
Using card stock, I drew out the base needed for the two rings configuring what the track was to be mounted on.
Cutting each card stock ring in eight equal pieces gave me the pattern to cut the plywood.
Using the pattern gave the angle at the ends and was used to get the maximum amount out of each sheet of plywood.
The uprights were installed between where the rings were to be mounted to keep the mounting as hidden as possible. The plywood ring pieces are held in place by aluminum bars cut and bent and placed on the upright at the appropriate place for the respective circular ring and height row.
The inner and outer rings do not match in height as the outer ring first level passes over the inner ring as the inner ring enters the helix. The inner ring plywood was four inches wide with the outer ring being 5 inches wide.
Decided the inner and outer ring was enter the helix at ground level. So built the first level outer ring first. That determined the right place for the inner ring to enter the helix under the outer ring.
Before going any further, I constructed the two bridges to connect the Model railroad helix to the rest of the layout. And as I built each vertical row, ballasting, power and scenery was added.
This had to be done row by row as when the next row was put in place it only gave 3-4 inches between vertical rows. I believe the helix is part of the train layout so should also have proper ballasting and scenery.
The terminal blocks were located at each level too distribute track power and lighting power at that level. Added two trees in front of each upright at each level to hide the upright. Strip LED lighting was placed on the underside of the next upper level.
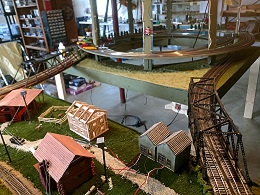
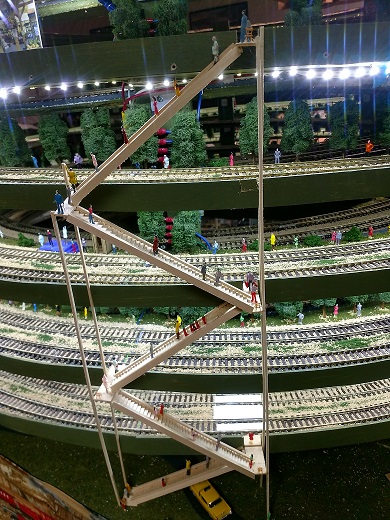
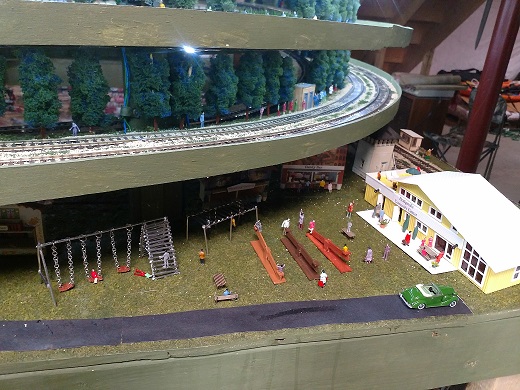
Then a picture showing the outside of the completed Model railroad helix with people enjoying the scenery and wandering in the park. A special stairway was constructed so five of the levels could be easily reached by walking.
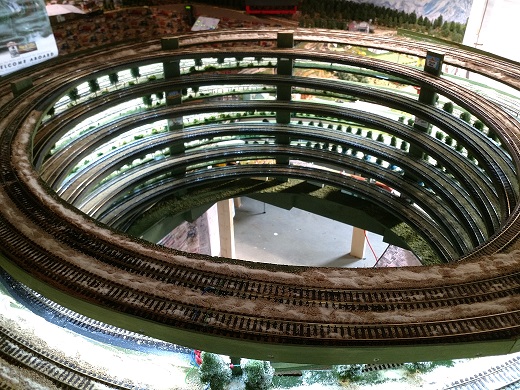
A picture is now shown of the inside of the helix, the inner track and the large enough area that is used to access the inner track. Yes, it is hands and knees to get into the middle.
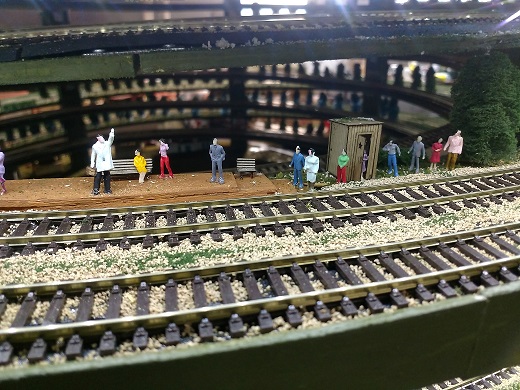
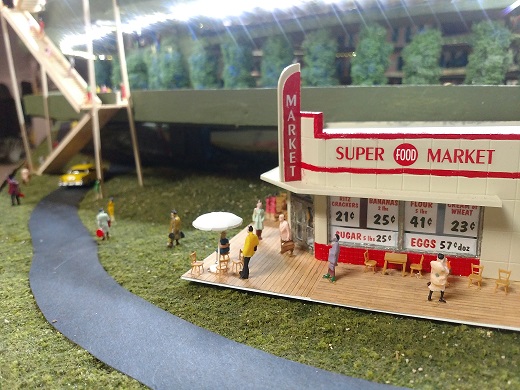
The last three pictures display people waiting at one of the train stops waiting for the train. One of the outside corners of the Model railroad helix base has a super market for any hungry passer buys. One of the other corners has a community center and playground to relax and for the kids. Notice the rest rooms available on the first vertical row.
Not displayed here, I had to take all the facing from all of the rows off as the balsa wood eventually curved in at the top coming in contact with the train. I am presently in the process of putting it all back on but lowered so the top of the facing is level with the top of the track. The added advantage is the facing now hides direct viewing of the LEDs.
Lawrence”

A huge thanks to Lawrence for sharing his model railroad helix – what an undertaking! And it looks great too.
Lastly, on to Dave:
“Hi Al, well after having a good holiday in the sun, I get back to my Model Railway with a bit of an update, and a running session… well got to give the Loco`s a run around after being sat there for a couple of weeks…
Regards
Dave”
That’s all for today folks.
Please do keep ’em coming.
And if today is the day you get started on your layout, the Beginner’s Guide is here.
Best
Al
PS Latest ebay cheat sheet is here.
PPS More HO scale train layouts here if that’s your thing.


Superb and thanks
To Laurence: Looking at your steps for pedestrians to climb from level to level. They’re going to have to be pretty athletic to make that trip and extremely cautious as well as there are no safety hand rails to prevent unplanned flights of fancy should one lose your footing. Ha Ha
Great post as usual.
The helix is fascinating.
Dave is great too.
John from California
Hi
Showing the helix is a brave step and a difficult thing to display. They are usually hidden well behind the backboard. So well done a great effort I’m not sure if you could do better when you want to display it and also gain easy access.
As for Dave what can you say his enthusiasm comes through every time. Keep them coming Dave..
Colin Scotland
Thank you Dave for the sounds of a railroad! Loved it.
Robert B
I don’t know that half inch ply is really necessary – although I suppose a double track helix will potentially have more weight on it (two trains at once). I used to operate a layout with a concealed helix and the track bed on that was much less than half an inch thick! Remember that the thicker the trackbed, the more height needs to be gained on each circuit so either the gradient needs to be steeper or the curves wider (meaning more space needed).
Lawrence, what a great build! Thanks for taking time to show us the step by step process, looks very cool. Cary in KY
Dave…
Layout is looking great. Question: Where did you get those great backgrounds. Really nice and look perfect with your scenery. They would enhance any layout.
Thanks
Jim
I love Dave’s railroad. He do’s a great job.
It you go to the horseshoe curve in Pennsylvania the pedestrians ride up to see the trains on a special finicula which has two cars that ride on a single track with a special passing loop on the middle. Just a suggestion for safety reasons
Lawrence… Great display of your helix. I actually really like the idea of landscaping on the helix, as well as people shown. What an undertaking of enormous size, and yet I believe you nailed it. Yes, we can all find a few things, after the fact, that we might do different. However, I don’t know a modeler that doesn’t say that when they think they are done building a layout without a helix. You did a great job, and Thank you so much for sharing it with all of us. You gave me many ideas. Keep modeling Lawrence. You obviously have a talent.
Great work!! Obviously a very good carpenter. Keep it up!
Fantastic layout! Really enjoyed Tony’s !
Finally a Helix for Show (too) and not just for function! — Very creative and excellently executed Job!
PS: Like the emergency stair ‘case’ like the old fire escapes on tall city buildings!
…forgot to say:
This Helix is a layout already just by itself!
So, if you do not have much space, just buld one… and add a few more rounds.. and it is all you need for playing… (yea, some switch overs can help to make a busy train schedule going… after all it is a quad *Trasse* (Trassierung).
These are the things that keep me reading Al’s blog. That visible, landscaped helix is awesome and Dave is a master hobbyist.
Hi Lawrence — My hat i’s off to you sir! Constructing from scratch a helix on any model railroad is, without a doubt, the most demanding of engineering skills. It’s not for the faint-of-heart. And you chose to build not one, but 2 concentric double track helices. Fantastic job!!
Bit worried about your goods yard Dave, the railway was never happy with people craning loads or manoeuvring vehicles so close to an open main running line, may I suggest at least one of those barriers made of old rail along the cess beside the track to catch any road vehicle reversing toward the track?
Rod
I am in the midst of a redesign that will involve two helices in a bedroom sized HO layout. This was inspirational. I was going to cover all of the helix with scenery but seeing how the possibility of having some of the trackage open for viewing might make my layout much more interesting.
Thanks re my layout (Daves model Railway) the backscenes are available from most large suppliers , they are made by Gaugemaster …
Hi Dave – been following you on the process of changes on your layout. Looks like the changes and upgrades have finally been accomplished. Kudos to you!
(Though of course, future changes are always in the offing…as layouts always seem never to be completely done. We always seem to be able to add one thing or another.) Have to say that your end result has proved the process was worthwhile. Great Job! And I especially like the new backdrops that more readily blend with the new terrain changes. Gives the layout more of an infinite vista, of which I am particularly fond of on layouts as it adds realism. — Arnie – Staten Island, NY.
For some who have not finished their helix there is a better way to build one. I am talking about a spiral helix made by using a 1/2″ dowel at the center and attaching a string to a router with a small cutting bit. As you cut the plywood the string winds around the dowel and moves the cutting in about one track width, which means you cut one spiral from one square piece of plywood. When done, you have an interior plywood for additional use and all levels of the spiral are visible. The 1/2″ dowel will provide a 1.5″ track width. The router cut bit should be small, say 1/8″. Any way a different idea.
Lawrence, your helix is totally mind-blowing, quite an engineering and modelling feat, really impressed. Thought you could add a cable car running from a small station at the top down to somewhere on your main layout.
David love your layout, never tired of watching your updates. I think you are going to have to do a rebuild though, to keep you busy during the extended lockdown. 😂😂
Would love to see a video on Lawrence’s layout.