Mike’s been in touch with his N gauge code 80 track layout:
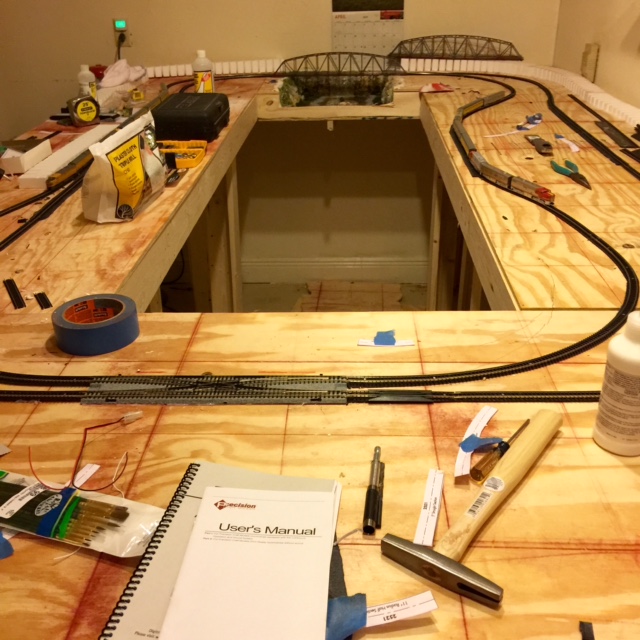
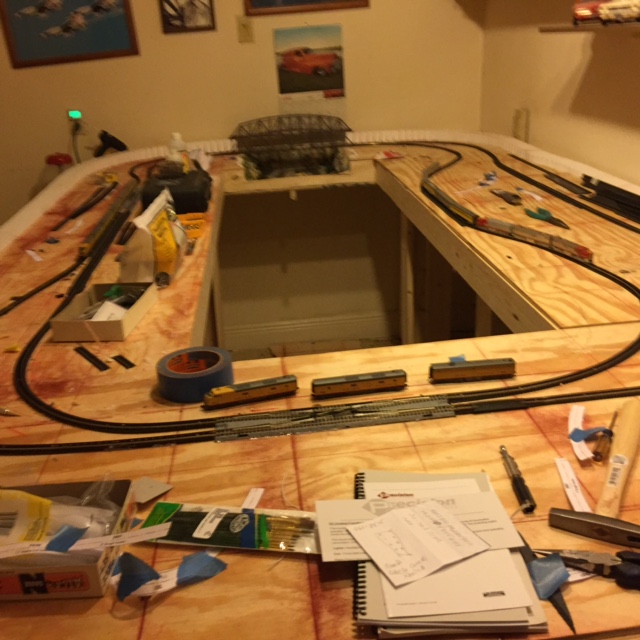
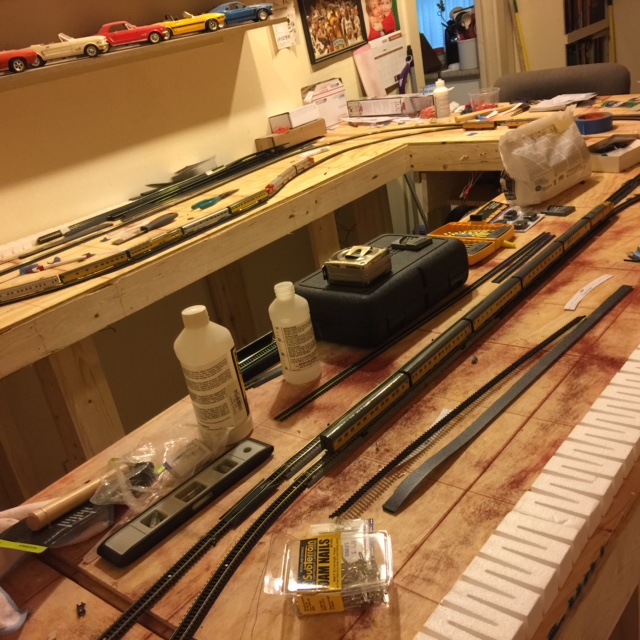
“Mikes place is anywhere you want it to be. I am using a 6ft by 10ft table top board. I am starting my last set. I am now 70 and this is it. I haven’t done any scenery yet just layed the track. I use code N gauge code 80 track and have double slip switches from Kato industries.
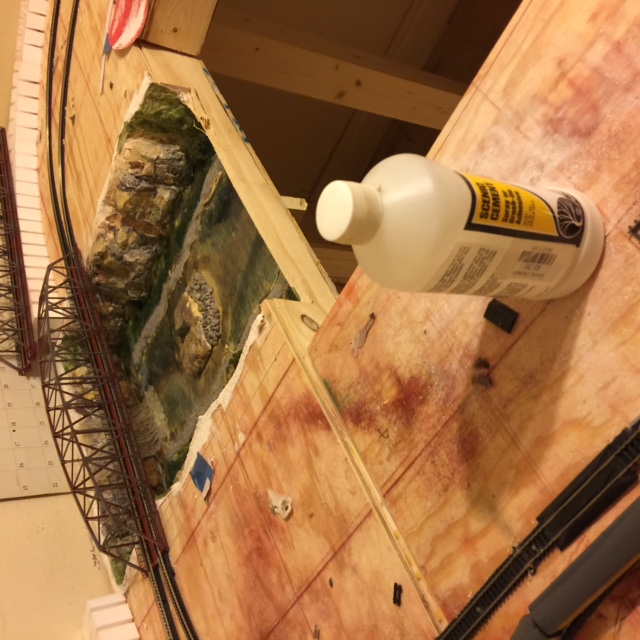
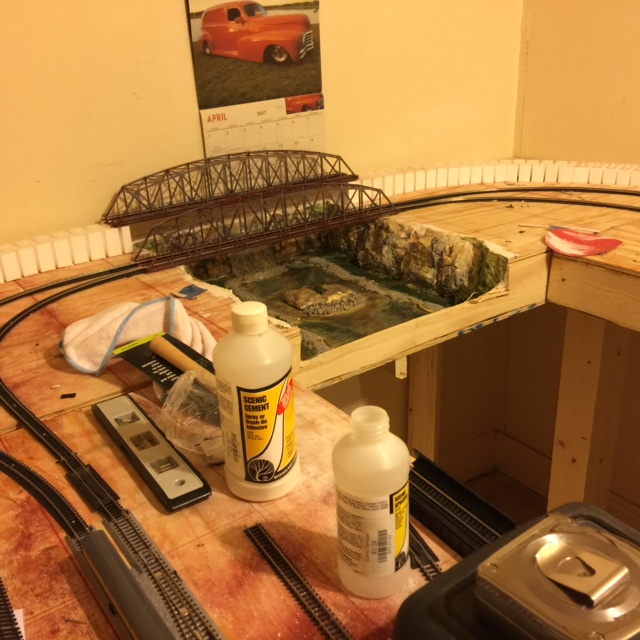
I have found that they will go well with the code 80 rails with a little riser on the code 80 side of the rail. I am also using Tomy Tec 22inch bridges. You can see the river and some of the rocks in the river area.
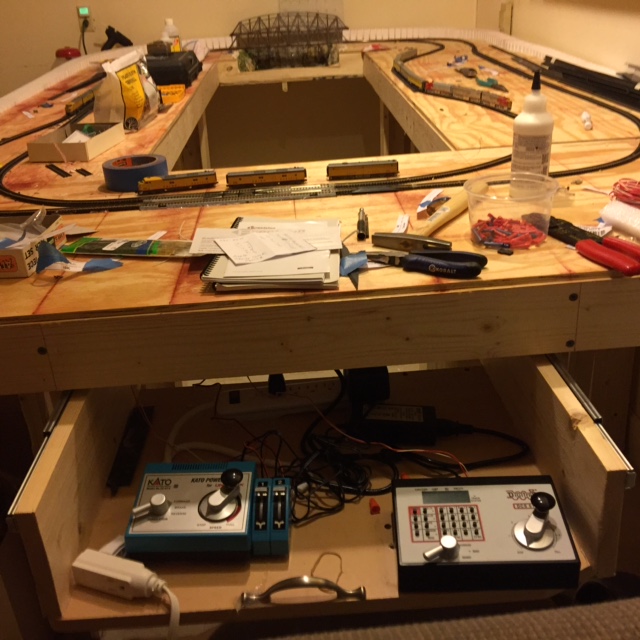
As you can see it is a “major” work in progress will all of the parts still laying around.
This is only two tracks running with two more starting with the inclines. (the long white things in backround).The bridges are a tommy tec units and are 22 inches long. Real long for N gage. I wanted a large area for the river and falls. I hope you can see the falls in the background.
The tomy tec bridges are made only in Japan. All of the info on the box is only in japanese, and since I only read and speak US English I have no Idea what kind of info might be available.
The picture shows the end of the bridges and to use them with atlas code 80 rail you have to cut them off.
I also had to trim off the base of both ends because they are so tall and cant put that many shims under the track.
The track on the bridge works well with N gauge code 80 track.
You can find this item on the walthers web site under bridges, N gauge.
It comes in two colors, red and blue. I have painted the bridges a lite steel color and let the red show through in parts to make it look like its is rusted.
Hope you enjoy this start of Mikes Place N gage rail road.
As I said I am not even close to start the scenery yet. I am not a Pro at this but I do the best I can. Hope you find this interesting.
thx
Mike”

“Hi Alistair
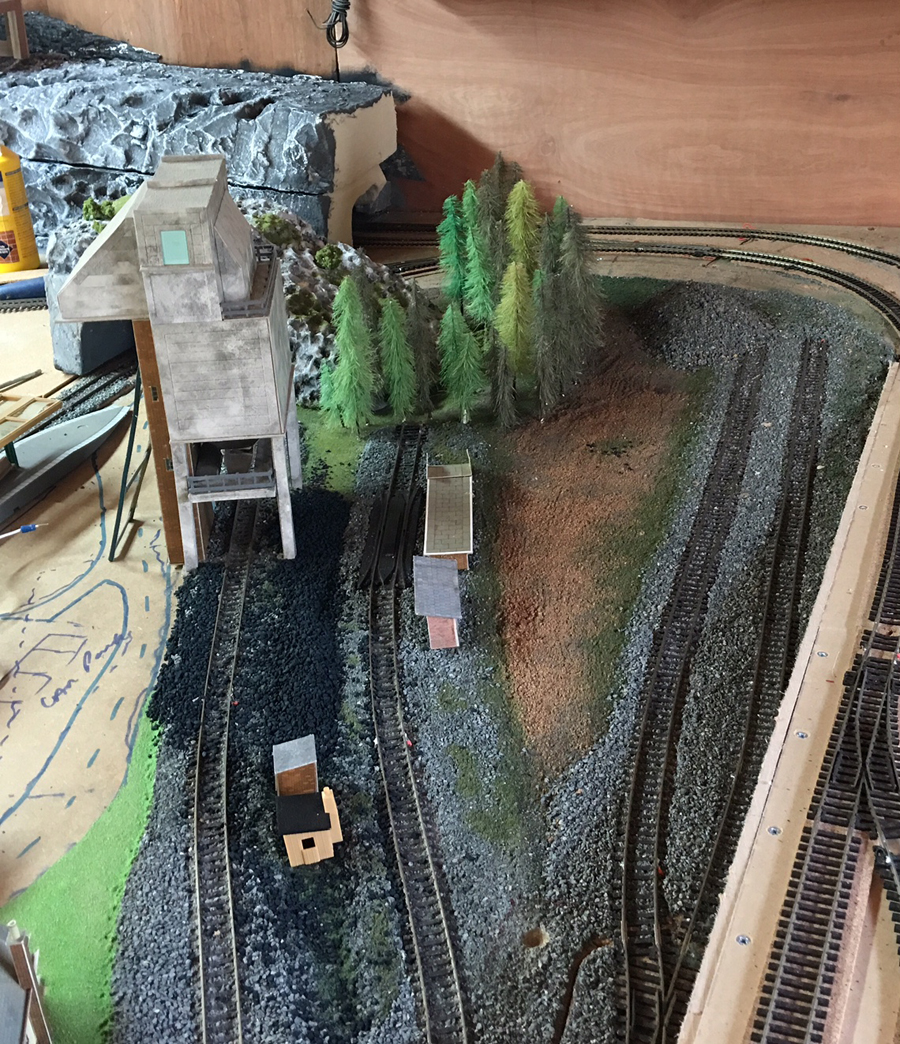
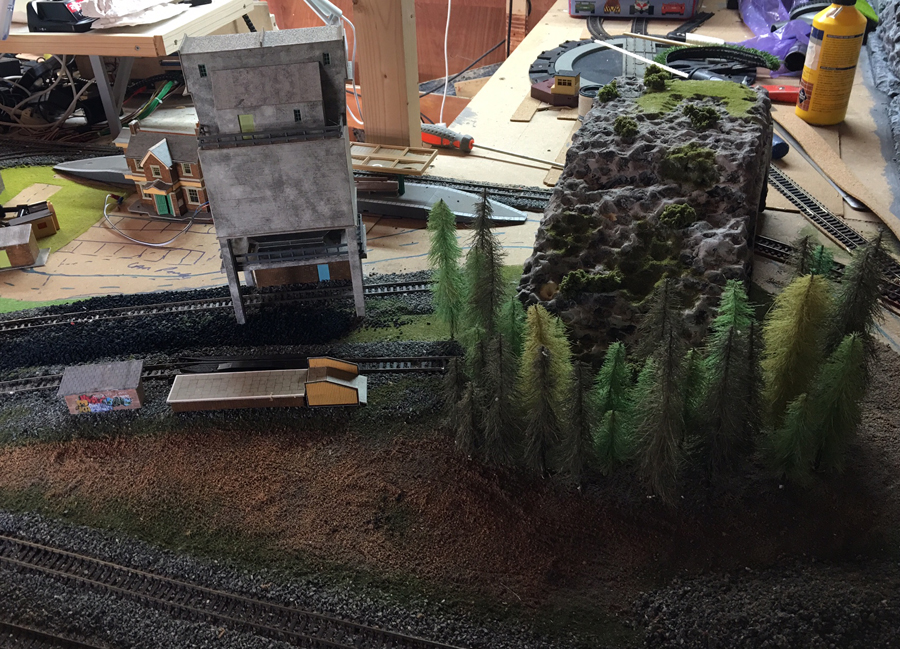
Well I’ve started to do my scenery this is part of the work yard and coal yard more to follow as I complete it, I’ve used sand and Earth to make the track which will go around toward the station.
The pine trees are twisted wire and hemp from hemp rope and then shaped and painted cost per tree 0.10p, the layout is not of any specific place or site it my own design.
Thank you
Andrew”
Do you know what I love about these two layouts? It shows in spades two really important points, that the Hall of Fame members are always saying:
Firstly – just start. It’s that simple – but so many shy away from taking the very first step.
And secondly, don’t worry about what your layout looks like when it’s being built. A God awful mess is absolutely fine – that’s pretty much how they all take shape…
A big thanks to Andrew and Mike for sharing. If they’ve got you chomping at the bit to start, don’t forget the Beginner’s Guide is here.
That’s all this time folks. Please do keep ’em coming.
Best
Al
PS More HO scale train layouts here if that’s your thing.
Need buildings for your layout? Have a look at the Silly Discount bundle.

can’t wait to see the finished layout
love the twin bridges and the river below it
Steve
Mike, i love the slide out drawer for the throttle/controllers! Looks like a great project!
Layout looks great, give us a feed back later with a video
Well done Mike and Andrew! Love the look of the bridges Mike. Just the very thing I’ve been looking for for our new n-scale layout. Why not track down someone in your area who speaks Japanese and get a translation? Both of you just keep on, keep on doing your thing.
Carl, Port Hope, Ontario, Canada
the coaling tower looks great, any tips as i am about to make one from scatch
Very good start,please keep us up to date,would like to see the finished product.
Hi Mike,
I am 70 too but trouble seeing is leading me to the larger scales as even HO is getting hard to work with. At our age we can finally see the need for drama and you certainly have mastered it with you bridges high over your gorge, Looks great to me.
How big of layout of Train
Love seeing “works in progress” and “labors of love”.Keep going and keep posting. ……..thank you.
Lookin great Mike…and solid too…Nice Andrew….
Would very much like to see the Finished Product of this Layout!!! By any change, could you Draw up Plans for a Yankees Stadium layout with Subway Trains with Buildings located around the Structure??? Any Great ideas would be helpful in this Matter!!! Thank You Very!!😃😃🇺🇸🇺🇸 John F. Yanchurak P.S. I have both Gauges ( O & HO Gauges )
For Mike. If you have a smart phone, Google as a Translate App that can use your phone/camera. Here is what I found: “Last year, Google bought a translation app called World Lens, which it recently integrated into its Google Translate app. Thanks to World Lens’ technology, Google Translate can now translate signs through your smartphone’s camera.” If you can get that, you can see what’s on your bridge package!! Your trestle bridges look great by the way.
Andrew. Twisted hemp rope for pine trees? Genius. They look fantastic.
I am very impressed! As I’m only 72 and my very first layout is in its plywood stage, Mike’s place is inspirational. He has started! All of us – it only works if you start! Don’t be afraid to make mistakes. That’s the learning part, I was told.
It’s also the FUN part, to my surprise. I wish I’d started sooner, as I’m having so much fun now.
Excuse me, I’ve got a railroad to build. – Graeme, on a small island in Canada.
excellent post Alistair
Mike, nice start and the river looks great. I have one suggestion. If you are planing to have a background on the walls in the far corner I would install it before proceeding much further so that you can blend your scenery into it. If you are not planing any, I would at least tint the walls a light blue for a foot or eighteen inches above the layout . Cant wait to see your progress in the future. Tim
keep up the good work
Hi Mike and Andrew,
Of all the photo graphs that I see the ones that impress me the most are the “work in progress”. Well done and thank you.
Dave in Eden, NC.
Hi Mike, What a great start! I am 66 and have been collecting N stuff for 20 years, but never had a place long enough to set something up until now. Yeah! Can now put all those buildings and trees onto something. One suggestion: If you have not permanently attached your track down, I would lay at least a 1″ layer [or 2″] of the pink or blue foam on your plywood [use a foam safe glue]. It will make your sceneicking SO much easier. Easy to install trees, ditches, roads, small hills, etc.. Also, paint the foam or plywood with a tan or pale green latex flat paint right away. You will be surprised how much better the layout will look with just that one detail. I am at that stage now. Your bridges look fantastic, as does your river gorge. Great job! Take the box with you to a local Japanese restaurant or food supply store, they may be able to translate for you or direct you to someone who can. Keep up the good work, and save your eyes, use one of those lighted magnifiers. Lee
Hi Andrew, Great start on your scenery. Very realistic. Love the trees. How many of those can you make while watching the telly? I am going to need a lot of trees for my Ohio layout. Keep on having fun! Lee
Mikes layout has a good start. What I noticed was, everyone likes roadbed/cork ect. N scale rail is over 1+ scale ft, high + the road bed. If you model a town with trolley track in the streets, it gets complicated fast. Elevation’s got to be hidden. Now I covered all of the deck with homesote. I can push track nails without earthquakes. (they don’t come up either). Just had to mention this as Mike’s progress is about like my lay out. Just room for thought!
Hello Al..and congratulations to all you folks on your efforts. Those of you in your 70’s, I have you all beat as I am approaching 86.Have recently started back into model railroading, back in the 50’s when my 4 boys entered this world, I began to accumulate a large inventory of HO trains, but they lost interest. Now I have all that equipment plus my neighbor’s HO stock which sits in my garage on a 5x14ft layout. As a retired engineer, I love to design train layouts. I have both N and HO (7 engines running on approx 180 ft of track) 1000 hours so far into the project. I’m finishing up the scenery and thinking of expanding the layout to 8x16ft. (I’ve changed it twice and made 30 or more drawings. I need to find someone to help me put everything on a video. You’re right about the mess scenario, the 2 mountains were a chore. More later, running out of room. Ed
Hello again. Ed here, I’m adding to my comments earlier about increasing my layout as I want to incorporate a “live” water fall into one of my mountains. My wife has a plaque on the wall that has a miniature bowl and a vase and a tiny pump that creates a cascading water fall. I plan to cut a hole in the table cement a plastic bowl next to the mountain and run a tube inside, up and out the top behind some rocks. On paper it looks good, The effect should be unique, providing the pump is strong enough to lift the water up 14 inches. If not, I don’t feel the effort is worth the time to look for a proper size pump. Working on wiring up 8 switches, With my arthritis, getting on and off the creeper working under the table will be a “pain”. One big mistake was making the table too low (24 inches). That was so my grand kids could see the trains. Later on, I’ll raise everything up to 30 inches. (Glutton for punishment) adding 6 inches to 8 legs. I forgot to mention that part of the 1950’s inventory included a remote control coal loader and log dump.All added to the wiring efforts. Will keep you posted on the progress……Ed
great photos of both layouts cant wait to see more.
Hi Mike:
I am 84 and belong to a local model railroad club. Many times I have to crawl under the layout to a hole to retail a train. An believe me it is a pain to crawl under on hands and knees to th hole
I see you have your layout with a large open area in the middle. Ii would suggest before you go to far along to make ana access way into the center area so if a train derails along the inner tracks you do not have to crawl under th layout to get to it.
good luck.
For Ed on use of real water. I’ve never tried it but I remember an old article in Model Railroader which advised against it because of the moisture problems.
Not sure if that is really a problem or not but thought I’d pass it along.
Terry/USA
i’ve read, some of the reviewers have made a comment that real water doesn’t look realistic on a layout . Now that looks counter intuitive, but perhaps you should look into that before you go to the trouble of making your own water waterfalls, rivers etc.
GENE
Mike…….Looks like a great start…….love the bridges and waterfall scene. Keep the pictures coming as you progress. Don’t know how you work with N gauge. Bless your patience.
Andrew…… Nice work….. that is a great scene with the trees and ground cover.
Mike your a man after my own heart. Like me no Styrofoam on the plywood. To me the train running sounds more realistic then on foam. We’re both old school. Foam board sucks, Grassing and greenery is easier to lay down .Roadways simpler to lay Drilling for wires , lights easier. You da man, man.
The Critic
I did the same thing as Mike when starting my layout. First thing was complete the river. Figured it would be soooo much easier to get all that detailing done without working around anything else. Then laid out track and worked the bridges in. LOL then the hard part… wiring gluing down track and ballasting. I am in the fun stage now adding buildings and scenery
Mike
You have no idea how helpful you were when you started with 80 ga N scale with Kato dbl switches with a little rise on the 80 code side. This is vital info!! Some of us will not figure out why we have constant derailments and so many narratives leave out the most important details that make a layout successful. It is great when the greats share that info. Yes the story is important and our eyes can see the talent and scenery but we have to know the “Guts” that make it run smoothly. And we like to know how you made this and that.
So I and others thank you so much.
George from LI, NY
Mike. You may think your not hood at scenery but the river basin and cliffs look to be of a high standard. If you do the rest to the same standard it should be a very exciting and well executed layout. Also like the sweeping curves that you have already laid.
Mike, That looks like a great start on your layout. N scale was too small for my ageing eyes and hands, but I’ve got three different HO layouts to about the same level of completion as yours. I know some people have suggested 2-inch foam as a better base and sub-roadbed than plywood. I used the 2-inch pink foam as my base and used 2-inch beading pins (available in the Walmart crafts department) to hold the track and roadbed in place. The pins are very thin with a smaller head than track nails and fit through the small holes in the sectional track ties. For track with no hole, I use a tiny drill bit in my Dremel tool to drill holes wherever needed. This method allows me to quickly change the track plan if something isn’t working out the way I planned. I painted my foam with leftover tan exterior latex paint from my house. A little black or brown marker pen does a pretty good job of hiding the tiny pin heads.
I will be attempting to start my layout in the very near future. I will be working with the “N” scale. I intend to make all my parts from scratch including bridges, tunnels, buildings, etc. Is there anything such as a guide or “Jig” to help me maintain my scale proportions?
Pretty neat.!!!! I hope mine comes out that good
Hi Alistair. A big “Thanks” to you and all of the contributors and commenters on this site. Every morning, I look forward to opening my email and reading the copy and seeing the pictures and videos from the railroad modeling world. To answer a request/question from Jim Kennedy regarding maintaining scale while scratch-building model structures. If you go on the internet and type in “printablerulers.net” it will take you to a website that has a large selection of FREE, printable, scale rulers. Go to the left side of the page and select hobbiest rulers. That will take you to another page that will allow you to select the scale ruler of your choice..after you download the ruler, you just print it out at 100%. There is even an “inch” ruler along the other edge which allows you to actually check your newly printed ruler (and printer) for accuracy. After making sure that your printer printed it properly, you can laminate it on both sides with some clear plastic or even clear scotch tape, trim it, and start creating properly sized structures in your chosen scale. Hope that helps.
Best regards,
Mike Basher, North Carolina, USA
Very similar to my 6×12 duck under N Scale Layout. May both you and your layout live long and prosper!
Hi Mike, I have only one comment to make. You need a way to gain access to the center of your layout. It can be a lift out section or a bridge. I am 88 now and crawling under a layout is a no way Jose.The design of my 10×12 HO layout has lift outs and bridges so I can gain access anywhere. I am trying to find out how to post pictures so you can see my work. All my trackwork is done (Marklin) and I am working on buildings and scenery, the latter being the most difficult of all. If anyone can tell me how to incorporate pictures from my I-phone to my computer, I would be most grateful.
@mikebasher great info! Thanks!
Nice job Still working on my layout hope to finish it someday i am 77 so who knows
Like the idea of the slide out drawer to hold your power pack and wires. Could you tell us more about the construction of it?
nice bridge work, seems to be a really good layout. keep going.
Mike, are you using an underlay under the tracks? This would reduce the amount of build up either side of the “Kato double slips” and possibly the bridges to. Looks good.
Does anyone have a favorite dirty concrete spray paint? I would like to paint a large modern loading dock I’ve built from white styrene. I will lightly “weather” it in certain areas to show the most commonly used areas. Thanks!
looks good
Wow!!! Nice layout it’s really coming along greatly can’t wait to see more pics of your progress. Thank you for sharing pics!!! Chris, Mi
Mike and Andrew great looking layouts! Mike your stream looks sharp wish we had a closer look, great job guys.
I have no suggestions or recommendations. I have only one comment – Completely OUTSTANDING layout!!!!!
Railways attract extra trains every time you pass a model shop. You’re sure to need at least a small yard!
Dear Mike,
I am Alain, a Belgian man, 67 years old, retired and live together with my Thai wife (64 y.o.) in a house that we rent. We will move to our own new house where I will have a big mancave, especially for my trains and a computer driving range to exercise my other hobby, golf.
The mancave will be 8 x 6 m great, place enough to put my N-scale lay-out, now I have only a sleeproom of 5 x 4 m where I could put my digital (DCC) trains, I have 32 locomotives and about 200 wagons and coaches. 90% of the rolling stock is Belgian, the other 10% is from The Netherlands, French and German manufacture. There is only 1 special train, the InterCity train between London King’s Cross and Edinburgh Waverley Station that I use very often in the years 1976 – 1977, when I visit my older brother how was working at Edinburgh to perfect his English language, afterwards he went to Paris to perfect his French language.
Very great (big) train Lay-out you have, very nice but why you don’t have garages for your locomotives and wagons and coaches ?
I am busy to make my layout, first on paper, afterwards I will do on a wood subsurface, for the moment I don’t have enough place to make my definitive layout, it will be a E form on 3 platforms with the highest platform will be what the people will see. In the middle I will make a terminal station where I want to put 8 platforms with each a length of 1,5 meters and 2 platforms of 2,5 meters, why so long because some trains like the Orient Express count 16 coaches with lightning. Between each platform I will put 3 rails to change some the locomotives if necessary.
Once I have my paper layout, I will put here on, once we live in our new house, I will put here also with and without framing like roads, airport or harbour, trees, ….)
Kind regards,
A very nice start to a fine layout and I like to see more progress as it goes along.