Here’s a simple tip from Hall of Fame member, Brian:
“Hi Al
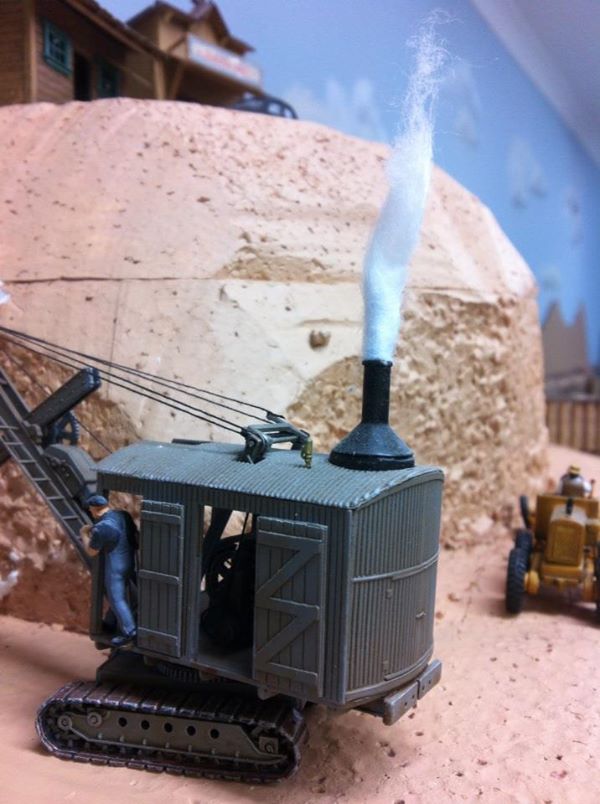
An easy way to make smoke for steam powered machinery.
I used a cotton bud. Hold the stem in one hand and with a pair of tweezers in the other, gently pulling at the cotton wool end to form a tail.
Next cut the stem to the length required and insert it in the smoke stack of your machine.
All that’s need now is to fire up my airbrush with some black paint and apply to look a bit dirty.
This can be done in any scale. In the photo is an HO scale Erie B-2 steam powered shovel (a Jordan Highway miniatures kit) busy removing earth from a collapsed tunnel.
Thought that I would send this video to you of an arc welding module that I use in quite a few industrial buildings on my layout including my two stall engine house that you posted.
This one is in a small repair shop (woodland scenics) where the guy is welding a part on the floor next to the workbench.
I model in HO scale – narrow gauge – HOn3 as I get quite a few requests as to what scale is it.
All the best
Brian”
And, here’s more from another Hall of fame, member – Dangerous Dave:
That’s all for today, folks. Please do keep ’em coming – I enjoy them as much as you!
Don’t forget the Beginner’s Guide if you’re still sitting on the fence about whether to get started or not.
Best
Al
PS Latest ebay cheat sheet is here. Lots of engines around at the mo, have a look.


Andrew’s trestles are first rate. Reminds me of my buddy Milton. He built a large layout. Three garage full of G scale. Sold it all, but last year, as we attended a model train show in Orange Park, FL, low and behold, several of Milton’s hand made, steel and wood trestles were selling for 4 times their original price.
Kudos to Andrew. I am not signalling him out, as all have fascinated me with ideas, tips and of course, professional craftsmanship.
John
Dave,
Every time you show your railway, I find myself with much more
Work on my own railway. I most definitely want to find out how you integrated the station announcement! That is fabulous and something I really want add. If you will, please publish the method you used to achieve the station announcement. For example, did you record that at a train station or is the recording something one can buy? Can the announcements be customized? I model the Jersey Central Railroad aka CNJ. I model the 1950’s and early 1960’s, when the now defunct railroad still had lots of passenger traffic and many towns. Therefore, I would like to have an announcement using the names of towns the CNJ served.
Your layout is brilliant and I always “tune in” to your videos! Many thanks!!
Dave, i to saw the article in Model Rail and i thought it looked to corse yours seems to be the same, what if you used just sand??? or fine grit??? like you said its your railway!!!
Just a point, the inclines, seem to start about half way down the layout, about 15 feet, with a rise of about 9 inches, would that be correct?
Mark
Dave, I find that your layout is so well established and the attention to detail is superb. You stated your layout is approximately 30 ft long by 8 foot wide. Very nicely laid out and size is very spacious to continually keep adding more detail. I do like your idea of using aquarium stone for the outside walls of the cottages. I believe your dilemma with using it in a natural stone or painting it white is quite perplexing. I do believe aquarium stone comes in darker shades of natural browns. This may help with determining what color. There are also shades of stones that come in small grits called river rock. A more natural color palette of earthen colors. Your concept ideas are great please keep them coming. I look forward to each and everyone of your updates. Regards, Ray A.
Hi Andrew,
Well done! The houses look great! Can’t wait to see more. Everything seems to be coming along nicely. Keep up the good work. Lee
This is really useful Dave, the lights in the buildings, streets and station is a project upgrade for the future and will require some re work. Thanks for the inspiration as always. Might leave the pebble dash until another time and yes I call it pebble dash too!¬. Regards Steve
Hi Ray , to answer your question my gadient is 13 ft long and reaches up 4.5″ high the diesels and large steam loco`s have no problem , but a small steam Loco would only pull about 4 coaches up there , I think a 15ft long incline would have been better …Steve glad you also call it pebble dash , I am now trying out a building with large course ballast , that will look even more like pebble dash , waiting for it to dry , like I said though its all to be tried for ….As for the Station Announcements , I cheated they are on the decoder in the blue Pullman already installed by Howes , they supply and fit models with sound decoders , but a lot do record station announcements and then play on a miniature recorder , or even say on your phone ….hope this answers some of the questions …Dangerous dave
Hi Dave Yes agree with all of the above, the lights are one thing I would like to add at a later stage partly because of cost and time when building, so I see this as your layout as a staged development with things being added as time goes by. The incline and decline was interesting and shows that a gradual change in height is vital and ably demonstrated! Thanks for the regular inspirational videos it would be nice to see a western or warship on your layout one day though – only teasing. thanks again Steve
what is your opinion mixing o gauge with ho gauge on a lay out ?
Your layout looks fabulous! I lke the cottage too. Hard to say which side. is better they look great! The station announcement is an awesome touch. I always enjoy looking at your videos they give me such inspiration!!!
Best wishes. Todd
Response to Dave Zito: Go for it!! I’m doing that very thing Dave. I built a second deck 6” above the O gauge layout, around the perimeter of my 12’ X14’’ layout that’s dedicated to HO, giving HO it’s own individual space, but integrated as part of my overall layout. The O gauge passes under the second deck at places, giving an interesting contrast of the two gauges. I’m still in the building stage. I have 4 O gauge lines on the lower deck, and two HO operational lines on the upper deck, and planning a third. That way I can enjoy the unique features of both gauges. Enjoy it. It’s your layout.
What system does Dave use to run his trains?
Dave I really love your lay outs & enjoy watching them every time you run them & I agree with Jon Fourre about the station announcement they are great & I too would love to know more about them please, but there is one thing I really have to ask for I have tried to find out from companies around me but no one can answer so could you tell & or show us how you get the lights to flash like the blue one on the van or the bond fire ect ect I love that look its so real looking Jason wants to do it on our set if we can, can’t wait for a reply on these thanks mate, Heather & Jason.
Hey Guys, be careful adding multiples of LEDs onto a transformer. You could cause a FIRE! The transformer should identify its current rating (usually in milliamps, ie mA). LEDs look good with about 10mA – 20mA, so you can work out how many to place in parallel. I will put something together and send to Al for further explanation.
That welder must be tacking some thing together with those short beads or he’s got dirty metal that is hard to strike a arc on
To: Heather Logan.
You can buy ‘flashing’ LED’s. Just connect power as per normal LED, and they flash at about 1 sec on, 1 sec off.
To: Heather Logan, and all.
For station announcements, I used a chip “ISD1820” ($AUS 3.74 on ebay). You can record up to 10 seconds, and replay as many time as you like, at any time you like. I use a micro controller to detect a stopped train. But switches or simpler components would be possible.
To: Heather Logan, and all..AGAIN.
I forgot to say that the ISD 1820 needs a small amplifier. Check ebay for LM386 or PAM 8402. Around $2-3 AU.
When I think of the layout being 30 feet long and seeing the detail of the house in this segment I can’t help but be impressed. Such detail and four feet to a side etc. I am working in N Gauge but I am inspired. What a beautiful layout. i REALLY ENJOYED THIS POST. .lit IMSPIRED TO GET GOING. Thanks for posting. I really wish I could meet you in person.