And next we hear from Hall of Fame member, Rob:
“Hi Al,
The area my old layout was in was an unfinished area of my basement.
The lighting was jury rigged and probably dangerous, it was alway uncomfortable there too cold in the winter and summer. Well bottom line, it had to go.
In order for the construction of the new room to occur, I had to tear down my layout Farland Howe. It was sad, but I was also looking forward to building an all new layout without all the problems a beginner can create on his first layout.
I wanted to eliminate for the start the poorly laid track, the added onto supporting train tables, the inability to reach certain areas so I was excited to build it new after, of course, once I got over the shock of tearing down 4 years work.
I started off using a computer program called Anyrail. There are several good computer track planning programs out there I chose anyrail due to a recommendation of a friend. It did have some drawbacks but it worked fine for what I was doing.
After exploring 3 completely different concepts for a track plan and studying all your online material and buying a couple books, I arrived at my swirl design as I call it. I experimented with many iterations of the basic plan while I was waiting for construction to be completed, but I think the plan I have started building will be a good one for shooting video and a fun one to run as well.
I chose a three main track layout. I considered four tracks, but in the end settled on three because I thought 4 mainline tracks would take up too much space and 3 would give me some flexibility.
Here is the final plan:
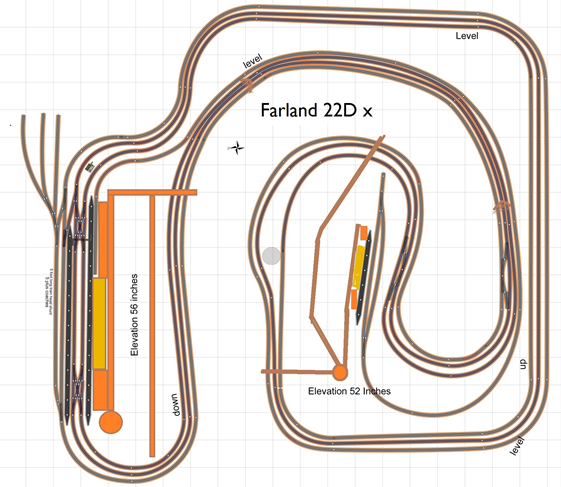
There are three basic heights to it. The town scene around the large main station will be set at the same elevation as platform height. The trains will then run slightly below that height. The smaller station will have a small village surrounding it and will be at a lower elevation. The main lines will have to decline down to that lower elevation and go under scenery to get there.
Any way, I have started building it and I am on part 4 so far. Here is a link to the latest installment of building Farland Two.
Rob”
A huge thanks to Rob – I do love his videos – very watchable and very helpful too.
Rob, as a Hall of Fame member, also helped out with the Beginner’s Guide.
Course, I’m biased, but the Guide is a great first step if you’re getting tired of keeping your armchair warm and want to get going on your layout.
It’s all about making a start!
That’s all this time folks.
Please do keep ’em coming.
Best
Al


Long job ahead with many changes coming good luck on your new layout.
Nice Start , you have your work cut out for you , will be looking forward to seeing updates as work progresses
curious as to how you’ll fill in the gaps of the inclines ? the foam putty they sell doesn’t go very far , on the layout I’ve done tried making my own foam putty by shredding insulation board and mixing with white glue and borax , worked out ok , I’m open to suggestions for filling in the gaps on future layouts .
Steve , Sarver Pa.
Thanks for the track plan, sure helps to “see” your layout… wish every one did this!
I’m very envious of the space you have there Rob (20ft x 18ft?) but I am surprised you have allowed yourself to get forced into a minimum radius of around 24″ (610mm) particularly by the main station. It is fine for a branch line but I think you would benefit from increasing it for the main running lines. Did you consider using curved turnouts to ease the bends? I was advised to do just that and now have a much more realistic and somewhat flexible plan for when I move to a new location. Good luck, looking forward to seeing more.
That’s great guy ! hope to see more as you go through the build .
Be well and stay safe Sir !
George
That is a pleasing use of non-model related material to make your hedges, Phil. I should like to try that myself.
Regards, Tom (USA)
I too am using the inclines. They make work much easier. One thing I’ve done differently is put down plaster cloth over it before laying roadbed. This I did because the inclines have large open gaps. I wish I knew about the Hornby rail joiners and plastic joiners. In the US I got the clear plastic ones and they are very hard to use. Who makes the viaduct?
Looking very good Rob and it’s nice to see British models being built across the pond.
One thing that always amuses me, and I’m not decrying Woodland Scenic products for one minute, I use them myself in the main, but…their t pins are twice the price of what a drapers shop sell them for, and there are twice the numberin a pack! WS foam tack glue….normal PVA glue does exactly the same thing for a quarter of the price. Still, if you have money to burn…
I was brought up and still do model on a shoestring, and it’s much more fun finding things cheaply and adapting them.
Hi,
You can also invert the plant liners and spray them with earthy colours and they seriously help with Hillsides or mountain tops as they have that soft texture which adds realism
yeeeodww Rob….great job!!
Rob knows how to design and build HO gauge….
and I have MANY of Rob’s utube videos in my file for referral etc…
but can I make a suggestion that on utube posts Rob call the new layout
Farland Howe2 or something to keep our file continuance straight
look fwd to seeing the new layout take shape Rob!!!
keep em runnin fellas
stjohn in long beach calif
Can’t wait to see the next video Rob. Thanks for sharing.
Dan from Ohio
great way to make hedges. long road ahead for the new layout great to see a track plan and a train running.
Great job sofare, I would say that some time in August i will be starting on mine.I would have to see out of all my drawings that I might have . I might have to start with a new drawing. Until then, I will keep on reading and watchen.
Stephen from Tampa, next time I will be Stephen from St.Pertersburg.