Cal’s been in touch again with his HO layout 4×8.
He’s been kind enough to answer some of the questions that were posted on his 4×8 HO train layouts:
“It’s DC. I’m not ready to take that step yet.
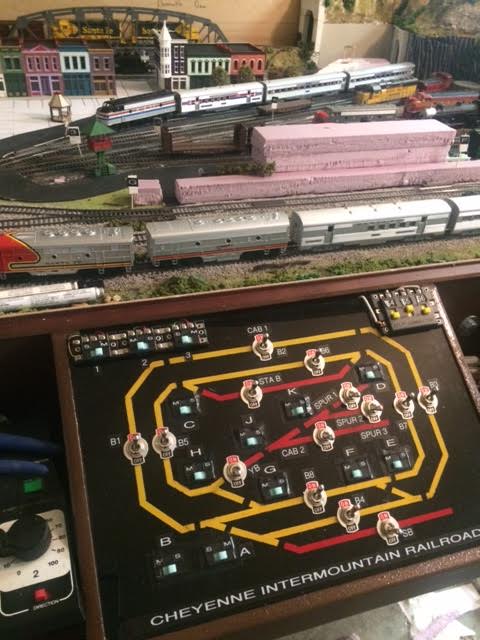
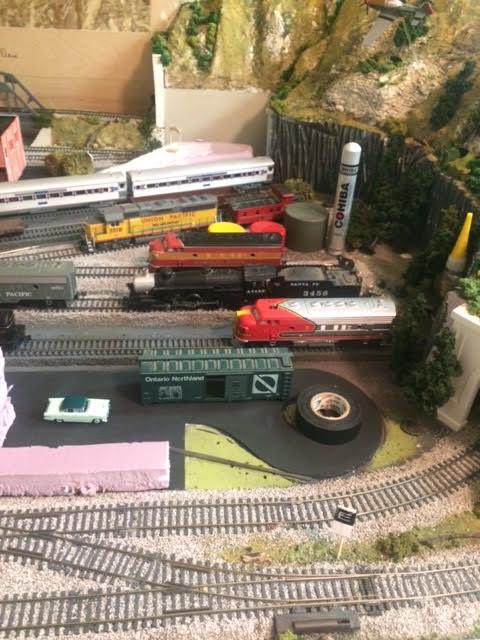
But I designed the track so I can run 2 trains at the same time and I can run a locomotive in the yard all at once. I have a controller with 2 cabs.
As far as the switchboard goes, I made it up as I went along. First I got a piece of plexiglass that o thought would be big enough for the track schematic. Then I built a box with a slant on it for ease of access to the switches. I then printed out a track schematic that I drew on my computer and I taped it to my plexiglass in mirror image.
Then I put pin stripe tape down using my template as my guide. Carefully cutting the tape etc to achieve my blocks in my track. Then I spray painted the back side (the taped side) and peeled away the tape as needed for color change. I.e. Red, Yellow and black.
Then flip it over to the correct side and the panel is all nice and shiney and terrific. Then I carefully drilled holes for the switches I bought from Model Train Stuff on line.
Be careful drilling the holes. You need to drill them very very slow or the panel will crack and become useless. It took me 4 times to finally get it right. I went through 3 switchboard plexiglass by either breaking them or used the wrong paint. After trial and error I finally got it right. The fourth time was the charm.
I wired the track in blocks. I used one negative feed for the entire layout. Then I used a positive feed from the transformer to the switch then to the track. (Block). That way I have better power for the entire layout and I can switch on and off sections of track when I see an imminent collision getting ready to happen. I wired the turnout switches the same way and I just used the atlas switches that come with the turnouts.
I wired them per the instructions and before that was the hard part. I used a Dremil tool to cut out the squares needed for the switch boxes. I slightly made them a hair smaller than the boxes so they would pressure fit into the plexiglas. Then I glued them from the back side with CA glue to insure them not popping out.
I used black tape to trim around the switch boxes to keep it looking a bit better than leaving the raggedy edges of the plexiglass on view. It’s not the best solution but it’s the First control panel I ever made. I’m not savvy enough to build one with red and green LED’s yet but maybe someday I will and replace the one I have now with it. But that’s on the back burner. No hurry. At all.
In the next few days, I’m going to do another walk through video and really get into detail with my commentary. I’m new at this video thing and i wasn’t sure how people would receive my video. But I am getting a lot of positive feedback, so I’ve decided to do another update.
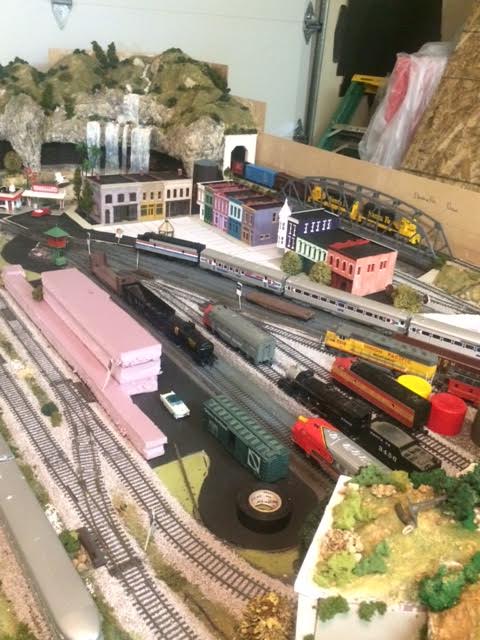
Alastair has really helped me with his blogs, videos, pictures, and what not. I really enjoy reading his emails every day because I have received lots of valuable information that has helped me build this layout. This layout is about my life. All the things that are dear to me, places I’ve been, favorite shows, movies etc. I will have my family and friends all throughout the Layout.
Get this. My mom is 82 and she likes the layout so much, she reserved a spot in my BOOT HILL CEMETERY to put a vial of her ashes in a plot she picked out when she leaves this earth. Lol.
I’ve never dreamed of burying someone on my layout. Lol. Let alone my own mother. But I think it’s a cool idea.
Building this railroad has been a long wait. I’m 61 and have been yearning to build one for decades. I had to wait too the kids grew up and moved out before I had the time and the space to build one. Finally the day arrived. In mid November of last year, I got the urge. I watched tons of YouTube videos and learned a heck of a lot.
Anyway. I hope I’ve answered your question.
Take care and happy railroading.
Thanks so much
Cal”
HO layout 4×8:

There are so many HO layout 4×8 on the blog, but Cal’s is really one that stands out, judging by all the comments.
Now on to Steven:
“Hi Alastair
I have followed your blog for many years and I have a question for you and your bloggers
I have a layout that I keep changing (growing) my issue is I see so many great layout plans. How many times do people change their layout it takes me years to build one?
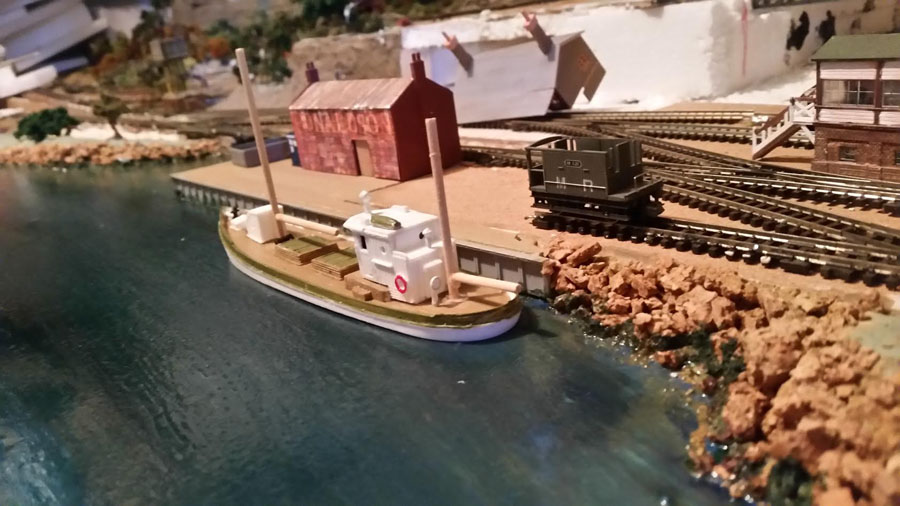
I have attached my latest loco (n scale) and sea port for interest. Loco is a 8200 found on east pulling coal that pass my way sometimes 3 in a row.
Port is made from paint and varish for water, crush cork for rocks, Boat is 3d printed, building is a mix of card and plastic leftovers.
Steven
Sydney Aus”

Now on to Joe:
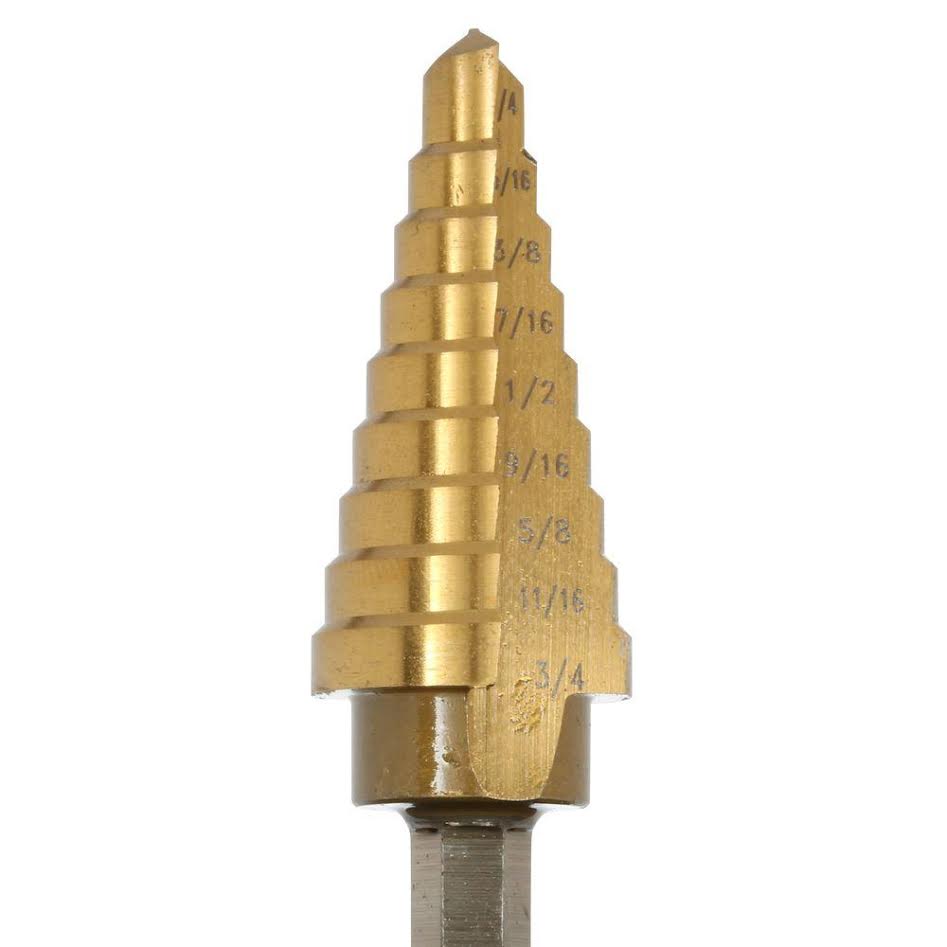
“I have heard many people say they have problems drilling plexiglas, or similar material, because it cracks so easily.
You may want to pass it around that the best way to drill plexiglas is with a step drill. See below.
You start by drilling a small (1/8”) hole, then finish with the step drill. The beauty of the step drill is that it does not have teeth to chip the plexiglas. Rather, there is a smooth transition from one diameter to the next. You then stop drilling when you reach the diameter you want.
Joe”
“Greetings, Al. Your site is better and better every week, Great that the new folks are getting into or back into this hobby. They have great ideas and limitless imagination. And the effort is truly remarkable.
Thought I’d send some more pics of the town.
Best regards,
Jim from AZ”
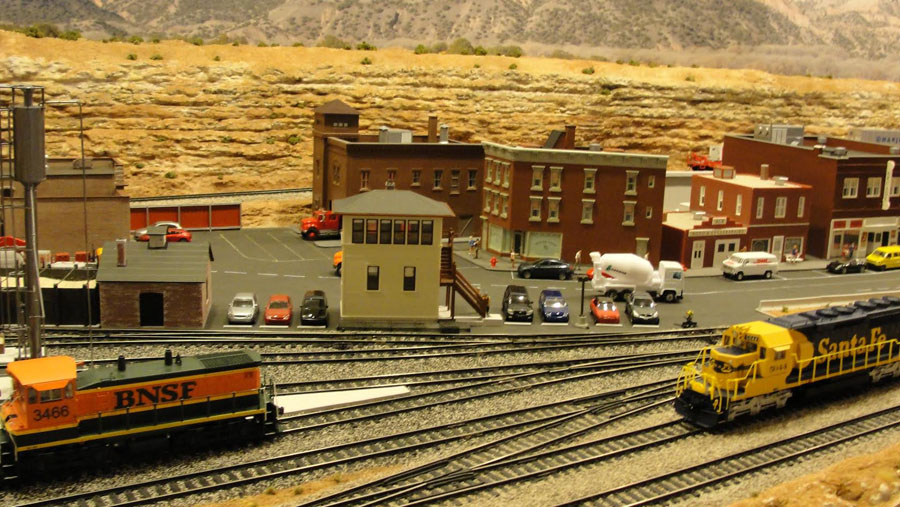
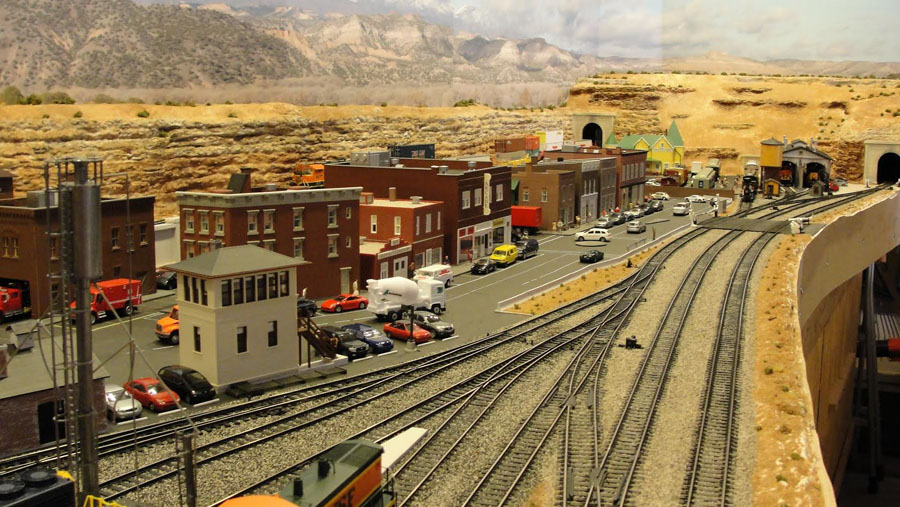
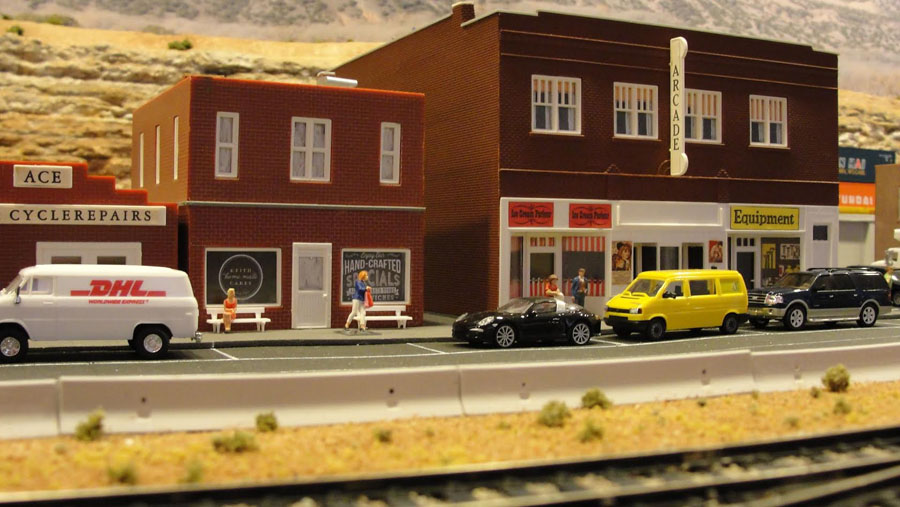
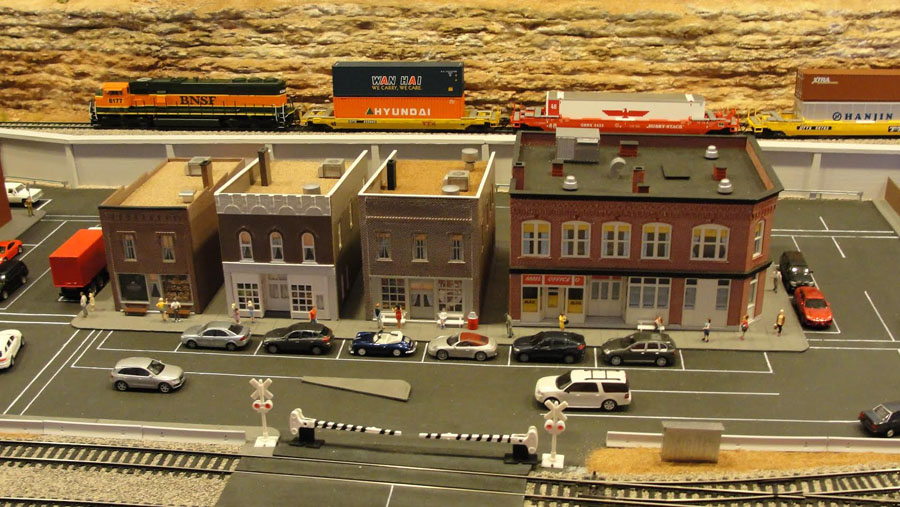
A huge thanks to Cal for sharing his HO layout 4×8. It’s another example that proves bagging some space of your own and just starting, is the only way your layout will ever happen…
That’s all this time folks.
If you’ve enjoyed this one as much as me, please help keep the doors open and support the blog.
You can:
1. Buy the track plans PDF and Beginner’s Guide here.
2. Or you can dive straight into membership here. Stay as long or as little as you like.
(You can cancel directly with the payment provider at any time, or just mail me and I’ll do it for you. There’s no fuss or questions.)
I would dearly love to keep things going, and I promise to let you all know how things pan out.
Best
Al
PS More HO scale train layouts here if that’s your thing.
Need buildings for your layout? Have a look at the Silly Discount bundle.

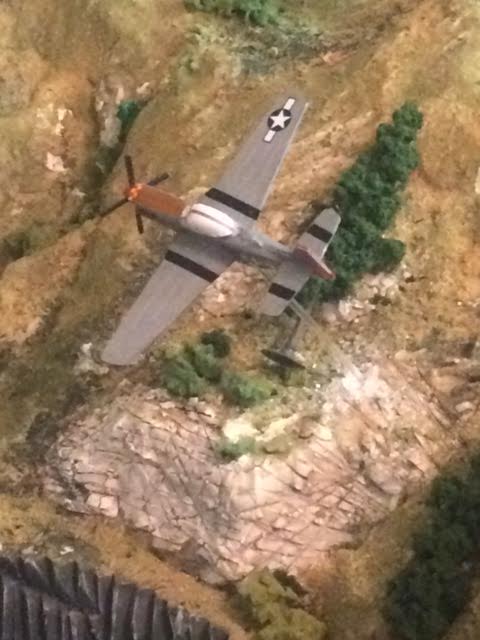
Love the Mustang P51?
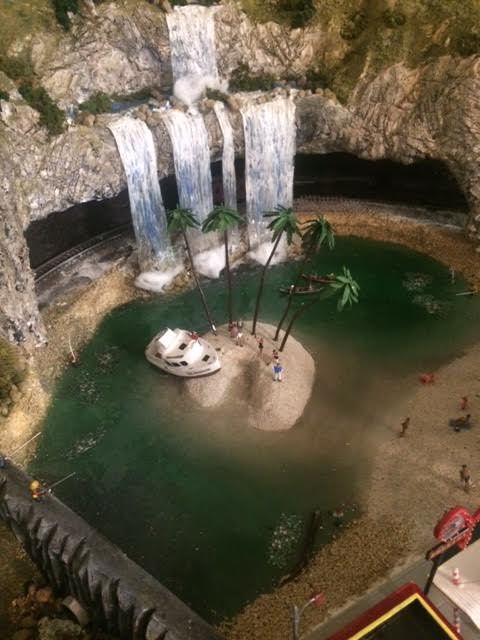
I love the “Gilligan’s Island” tribute. Points of interest scattered about the layout make it even more fun. Cheers! NJ Mark
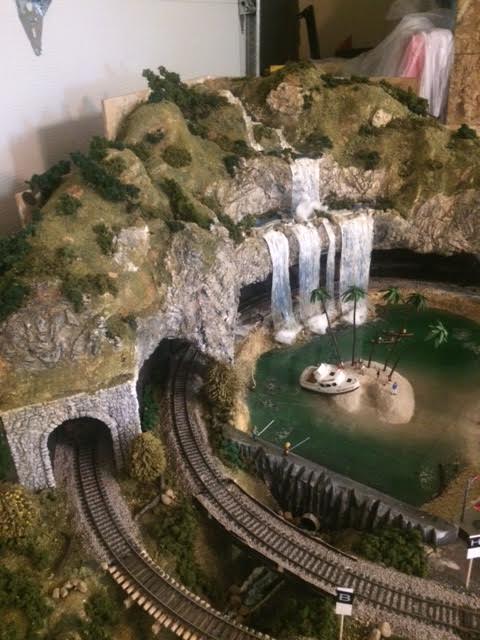
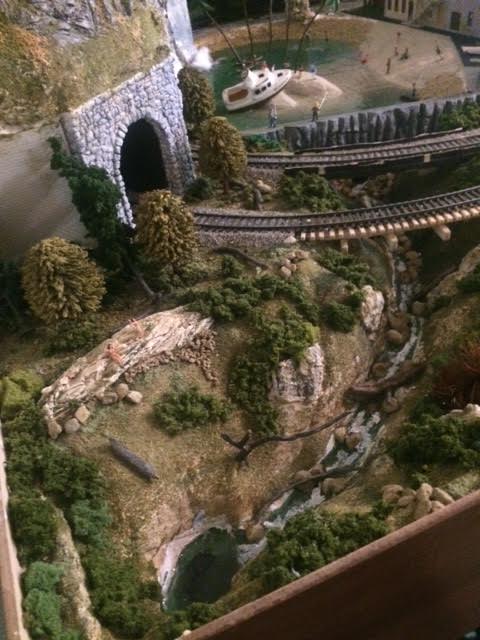
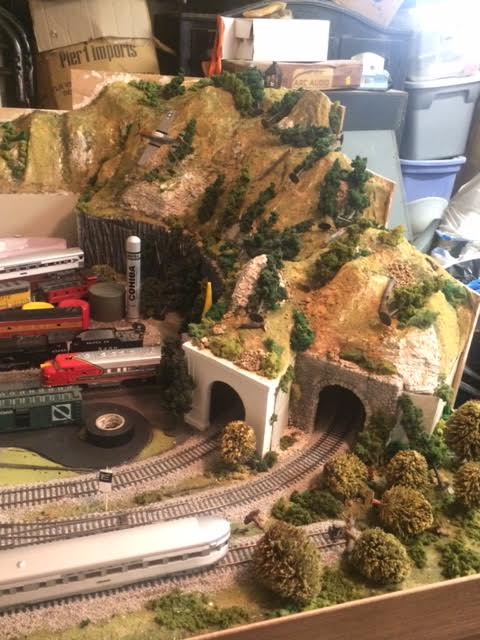
Like this layout, it’s manageable and well done. Scenery is great, waterfalls look real and the open tunnel idea is a nice trade off; watch the train underground. Not too sure about GIlligan’s Island. The rest of the layout is prototype and to me looks out of place. Well done, but would think with maybe a circus or amusement park scenario.
Nothing wrong with running segment DC. Actually more work and involvement required there. Railroad sound can be conjured with any number of sound enhancements on the market today, quite realistic.
Plenty of action at hand also if desired. Don’t mind myself at all the surface switch servos, hope they’re wired so as not to be powered continously. Could overheat I suppose. Control panel is very impressive and fits perfect. Can see much fun to be had there and having some room space left also.
Lovely idea with your Mum, nice to have such family involvement with your hobby, my wife Sue planted all the pine trees in the little forest on my American N layout in the 80s, and the present layout includes our favourite hotel, bar, and mini golf course. A model railway shouldn’t be just something you do on your own in the basement.
Rod
Super layout . If you require to drill plexiglass or any similar material it does help if you lay it onto wood before drilling very slowly
Love the waterfall cove and the river below. The rocky outcrop on the other end looks very realistic. DC is great, I’m sticking to mine. I see people having so much grief with DCC on FB with their track and engines, I won’t touch it. I prefer the old ways of properly wiring each section as I go along, as you start to fit street and house lights and they work as you want then it’s a triumph. Besides when didn’t you hear of computers going wrong? Stick to tried and trusted methods then if it goes wrong there is only yourself to blame. 🙂
Eric (Leeds) UK
Years ago (60 +) I made some model airplanes. One trick to make plane propellers look life like was to cut a circle in a thin piece of plastic and place it on a piece of sandpaper, push down and rotate it a little. Leaves fine scratches and appears as if the prop is turning. Put in place of the prop.
Nice job Cal Steve R UK
Well done Cal. I had HO growing up (I’m in O now). Wired and ran the same way. I especially like the Chohiba tube in the tank farm 🙂
Bob in NY
EXCELLENT!!! The beach and surrounding mountain areas are the best ever! The added touch of the plane says a lot about the designer – all good!!!
WOW Cal, I see your a good craftsman. Lot of detail and finely done. The switch panel is beautifuly done and a lot of attention paid to the detail. I would not be surprised if you start what I call tweeking the layout pretty soon. A little extension here, maybe a bigger yard there. What ever you decide I canot wait to see more of your work.
Very well done. especially the waterfall.
Hi Cal, I love what you do and I too have a 4×8 N scale layout and learned every by myself. A little tip for drilling plexiglass . Take the drill and touch it to the side of the grinding wheel to get a small square edge. It will stop biting into the plexiglass. Have good support undernice.
Good luck Werner
Absolutely love the train running behind the waterfalls. Quite clever and very unique. The thing I like the most is that you are making this your own, what’s near and dear to your heart. Model train displays should be like “Chicken Soup For The Soul”! Keep up the great work.
Linda from Pennsylvania
What have you done for de rails in the mountains behind the tunnels? I’m hoping to build similiar mountains soon and would like to know what to do in case of crashes in the mountains.
Thanks
Jim
Wonderful looking landscape. Especially the waterfalls. Great work.
Jim AZ
Cal excellent job an your layout , love every pice of the layout
nice layout Cal
you do the waterfalls and rock detail verry good
keep em runnin fellas
stjohn in Long Beach Calif
Hi Cal,
Jump in the deep end. Go DCC for your loco’s.
Stay analog with the rest until you feel confident.
DCC does not mean go PC.
Once you taste rolling loco’s DCC you’ll ask yourself why you waited that long.
Good luck,
Jan
Well done!
One of the best things about this site involves the variation in theme and skills presented by the different contributors to it.
There are several things that Cal contributes here that make this contribution really stand out… First is the interplay between realism and imagination. The next is that while not all scenes are complete, one can see how they are developing (the station and town are good examples).
As to “Gilligan’s Island” — the “homage” here is a lot more prototypical than one might imagine… All the scene needs is a film crew — Universal Studio’s back lot! Yep: Most of the scenes for Gilligan’s Island were shot on a pond in the hills above Studio City in the San Fernando Valley area of Los Angeles in California… Including the “wrecked” SS Minnow…
John Reynolds
California USA
Enjoy all of the posts. Lots of great ideas and have borrowed a few.
Nice tribute to Gilligan’s Island. Bob Denver (Gilligan) was our lunch recess supervisor back in Pacific Palisades in the late fifties. We kids weren’t exactly sure why he left in mid-year (something about TV), but six months later he appeared as “Maynard G. Krebbs” in “The Many Lives of Dobie Gillis”, and a couple of years later Gilligan’s Island hit the TV screen. I’ll have to incorporate a “Gilligan’s Island” tribute on my HO layout now!
MS
I am impresses! I too like the P51 and that adds som ideas to add. This is a keeper.
II am a wood toy maker KA Santa Claus, I use Plexiglas a lot in my Doll Houses as well as in my real Reproduction 1901 Oldsmobile I drive. The secret of drilling Plexiglas is using masking tape on both sides and marking the spot you want to drill. I even make toy’s and Music Boxes with Plexiglas. For water scenes I use the old 1950’s and 60’s style of Decoupage to design ponds ad streams. I am not a Model rail Roader but do have a few Boxed up trains I bought from my Brother before he died. But at 77 years, I doubt I personally will not do anything with them. I have three Grandsons and if they ever get their brains in their heads I want them to enjoy them. It’s sad when Grandfather’s want to do for their Grand Children but your own children won’t do anything.
Plexiglas drill bits are actually sharpened backwards so they generate heat and “melt” their way through the material. Yes to the comment about laying the plex on a board and the masking tape. A dull drill bit can work if you go slowly and back off pressure just as it is breaking through.
BH
Really enjoyed the pictures of Cal’s layout – and this is the first time I have seen a layout with an Amtrak passenger train exactly like the one I have on my HO layout! My passenger train measures 6 feet in length and includes 3 engines. (an A & B that are motorized, and another dummy A unit) Always enjoy all of the posts Al. Please keep up the good work! David / Indiana USA
Wasn’t sure at first, but Giligan’s Island soon became a great theme for a layout. Thank uou for sharing your ideas, Cal.
Regards, Tom (USA)
I just made a ho circut board after seeing yours I think I will tear mine up and start over. I mounted the same switches you used but on wood board. Mine looks so bad. I complement you on your patience and skill. Layout looks great to. Tom in Payson AZ
Great work love it all.
I like the 4 x 8 , nicely done. Gillgan’s Island a laugh and the P – 51 also nicely done. Can’t wait to get mine HO & O gouge up and running. I hope when I do, it has the style that Call has on his 4 x 8 .
nice work!! You can run trains and keep busy in the yard.. thanks for sharing!!
really nice. love the water fall.
being retired and bills being what they are, sad to say i can not afford another bill especially if it does not support my scale which is O and G gauges these blogs are all about ho & n rarely any other scales !
I have loved trains since my dad bought me a Marx passenger set in 1950 and have had a 4 x 8 HO set up for the grandkids for several years. I have learned to handle the electronics and wiring (I was a Navy pilot, so I have a knack for electronics). But one thing I absolutely do NOT understand: Why are we forced to deal with such absolutely primitive and sometime fiercely complicated electronics (depending upon how complicated and detailed your rail lines become), when incredibly sophisticated miniaturized batteries are begging to be utilized by someone with a bit of an innovative mind. No manufacturer has taken the initiative to produce plug and play replacements for the vast array of electric engines on the market. I guess that’s just too complicated. But imagine how marvelous it would be to run our engines on tracks exactly like the REAL engines run. We’d be totally independent of all that complicated wiring. BTW, the utter simplicity of battery powered engines would ease the fear that potential new enthusiasts have for venturing into this wonderful hobby….the fear of the arcane mysteries of frogs and switches. This could lead to an incredible rebirth in our beloved but kinda dying hobby. I honestly think this is an idea whose time has come. Like we say in the Navy: “Lead, follow or get the hell out of the way!” Whatcha think?
sweet