Peter’s been in touch with his fold away model train layout:
“Hi Al,
It is a great pleasure to reply to you: one ‘young” old man to another. (Going into my 70th year!)
I thoroughly enjoy all of your mail and find it most useful and educational.
I returned to model railways about six years ago when grandchildren started to arrive – eight at the present.
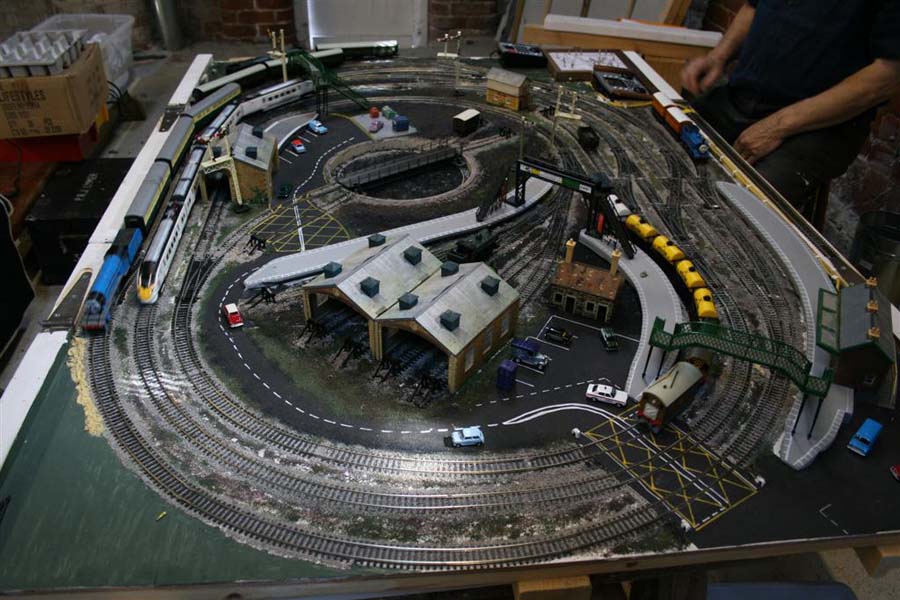
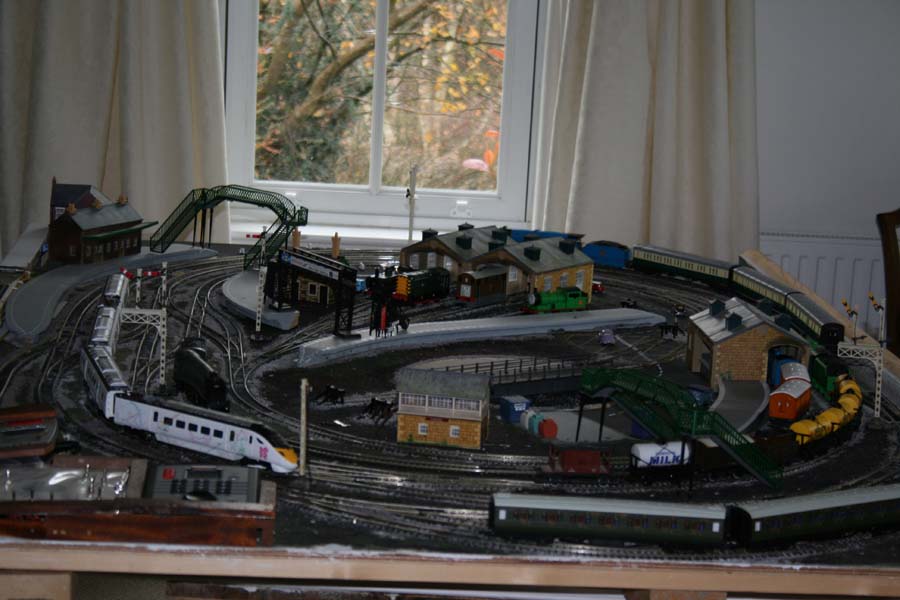
The theme was/is ‘Thomas’ designed on a folding track board for table-top use, but also easy storage.
I did enjoy the wiring. A few photos attached for interest.
Now that I have moved house, my next plan is to build a table 10’6″ x 4′. (Or 12’6″ if I am allowed!!)
Table top planks in three sections will be removable with folding-down aprons to reveal the train track etc.
You’re right: now I have a large ‘hall’ space so the set does not have to be continually moved – just covered for “table uses”.
Building of the table should start shortly.
Enough of me. Thank you again for all your support. I am most grateful.
Kind regards,
Peter”
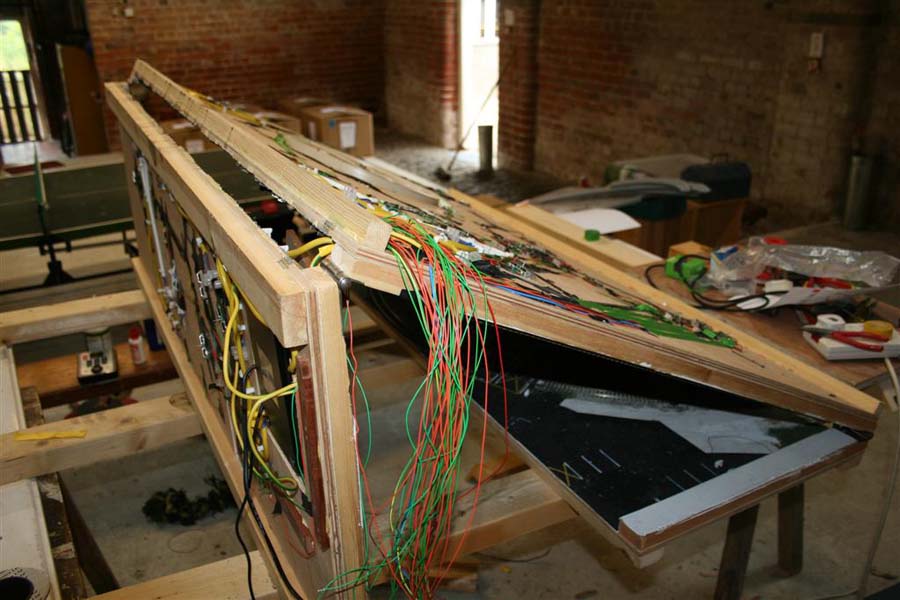

Loved Peter’s wiring. I imagine there was a fair bit of head scratching going on there. A big thanks for sharing his fold away model train layout.
It reminded me of this: portable model train tables.
And if you looked at it and wondered what was going on, take the plunge with this and get up to speed.
Don’t forget the ebay cheat sheet – some cracking stuff about at this time of year.
That’s all for today folks.
Please do keep ’em coming.
And if today is the day you get started on your layout, the Beginner’s Guide is here.
Best
Al
PS Latest ebay cheat sheet is here.
PPS More HO scale train layouts here if that’s your thing.


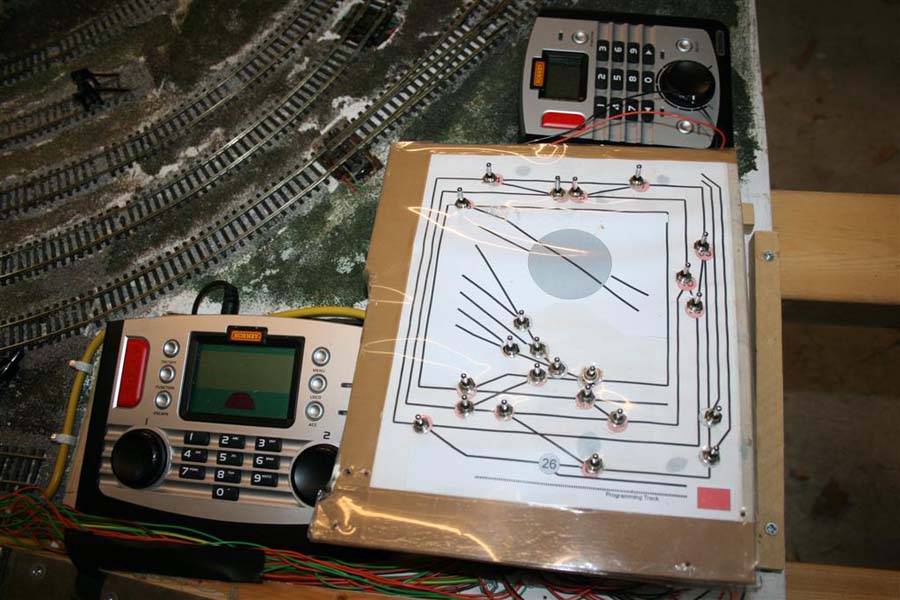
Your wiring looks extremely complicated. Have you not thought about the use of copper self adhesive strip that you can run under the baseboard. It is easy then to solder drop wires from the track and avoid the masses of wires and connector strips. The appearance may even resemble your control panel.
Hi Al,
Thank you very much for sharing this attempt of mine; I shall look forward to peoples’ ideas for my next venture.
I have used the Hornby Track-Master Planning CD which I have thoroughly enjoyed but have now changed the idea for the track board. It is to be suspended from the ceiling with pulleys to raise and lower it. It could be 10′ x 7′; we shall see! As yet I haven’t worked out the system for the pulleys so any ideas would be most welcome.
Again, many thanks,
Kind regards,
Peter
Very creative……A lot of depth, allows for a lot of train movement and switching……Scenery is very lively and well coordinated……excellent workmanship!!!!!
Peter your layout is awesome. Looking forward to seeing your next layout. Brent
Peter, the layout looks good, can’t wait to see your new track plan. As for the wiring under the control board, as it only relates to the points switches, it looks just like I would have done it with the ability to service individual points switches without having to tear everything else up. Good job!
Great layout Peter, i would like to see a track plan and some more closer pice of the scenery etc. Also Look forward to seeing your next layout. Is this oo gauge.
David
I very much like the wires. I am a tactile guy and enjoy such things as stripping and screwing down terminals. You have done it quite neatly. I started out with every intention of keeping mine neat, but instead mine looks like a birds nest I am afraid. Great layou.
OMG, I got dizzy looking at the wiring! Love the layout, great detail. I’m sure you have a “road map” of where your wiring goes. How did you keep it all straight in your mind?
I think you like wiring almost as much as I do. Terminal strips are essential if you ever have to diagnose a wiring problem. Pro job.
Interesting and creative layout
lotsa busy stuff going on
and the wiring is brilliant
keep em runnin fellas
“young” “young” Peter, 1.
“Young” Young” – – as I as about 3 weeks into my 90th.
2. My Great Grand daughter in now about 1 1/2 years and likes to dance to Thomas the Train theme song on the TV..
3. You mentioned a “fold up layout” you had designed and built. Please provide all info you can as I need to make something similar
4. Thank you for all of your help in this regard.
5. Al, You are doing a great and very useful task THANK YOU for your time and effort..
Best regards to all of those for their inspiration and tips.
I neglected to sign my comment Sorry.
Roger Oehmke
Pulley system? Sounds like a fun challenge. Based on my experience, larger pulleys work more easily than smaller ones. Keep the pulleys lubricated (but don’t let them drip). One challenge is to lift all 4 corners at the same time so that one person can raise it. Good luck, and keep us informed.
great layout a lot of wiring you must have a wiring plan. like the idea of fold away.
Peter re: pulleys I built an outside enclosure for our cats with an inverted roman shade using a tarp and pipe on either side. I used three small pulleys per side with stranded nylon lines tied to the pipe. I then ran them through an eye bolt at one end down to a bracket. If you took a line from the four corners and maybe one in the middle of each long side thru pulleys and ran all six lines together through an eye bolt off set to one side and had the lines either braided or tied together where they meet when the table is lowered to operating height then you can keep it level at all times. Best of luck, Tim
Great job Peter. I like your wiring. I would like to see a better view of the under side wiring. This one looks to be 4 x 8, is that correct?
Al: Thanks for the great job you do with this Blog.
Jim
Great idea and nice job. I am sure your grand kids love it. A number of years back my brother made a platform for his son, Scotty, when he was about 6 or 7, he was really into trains then. My brother made his platform just 1-1/2 inches off the floor, a single loop with one manual siding. He painted it green with gray roads; my nephew also had a Matchbox carpet town to play with his cars, my brother matched the carpet roads with the platform roads. My brother also made a simple crane in one corner with an S hook so Scotty could crane loads on and off of the train. This was in a carpeted spare room on the 2nd floor, aka train room (other toys too, it was his playroom). Putting it so close to the floor allowed Scotty to lay on the floor and watch the train, birds eye view. It was also easy for him to make up different car configurations. For several Christmases after that he got buildings, engines (& trolley) and train cars from his uncle (me) and grand mom/pop.
When a teen I had a 9′ x 5′ layout that lifted to the ceiling in my bedroom. The key to easy lifting was that we used a fairly inexpensive winch bolted to the wall that pulled all four corners in unison via simple pulleys..
Nice job wiring Peter! Well organized too. As a general tip for all, use small size wiring (22 or 24AWG) with minimal insulation since we all work with very low voltages and low currents in the range of a few tenth of an amp. This is more economical too since the heavy wire is far more expensive, unless you have some laying around. Using these plastic connection strips is very economical too and you can easily fit several wires into one terminal if needed. – Peter (Electrical Engineer)
I would love to see more details & pictures of his Roundhouse design & equipment.
There are many good Roundhouses out there but very few Great ones. I want to see how great this one is. It looks awesome.
Please send in your Roundhouse & turntable pictures. Of all the things you could add to a layout, a roundhouse is the most challenging.
Very clever..
You are a mere 10 years older than I.
When you are young at heart, you are young no matter what age the body is.
Peter, I enjoyed the photos and story of your train layout very much. The wiring is super but looks a bit scary. Neat idea to make double folds instead of a single fold down the middle of the table. When my two sons were young, I built a slot-car table for them on a 4×8 foot table with a single hinge in the middle so it would fold to 4×4 feet for storage. It worked OK but they would have enjoyed it more if I had left the folding legs off and just set the table on the floor where they could play with it more easily.
Putting your next layout on a pulley system is also an idea I’ve played with at times. I would recommend that it lower onto some kind of table or support legs for stability so the whole layout doesn’t behave like a hammock. Also, by expanding it to 10 x 7 feet it will be much harder to reach anything in the middle of the layout — 4 to 5 feet width is about the limit most of us can reach easily. I recently expanded my 5 x 9 foot HO scale test layout to 5.5′ x 12′ so I could have broader curves and I can just barely reach the center of the 5.5′ area.
Your many grandkids are very lucky to have such a great grandad to entertain them with his train layout.
I had a extended hollow core N scale layout that I could manually by hand. Next one will be too heavy and me a few years older. So I’m going to employ the use of a winch to do grunt lifting. If I could figure how to post picture, I could show rope diagram to four corners
Nice layout. I wish i the room to build it that big.
Regarding pulleys. I raise a tilt table. Lifted side is 100 lbs BUT 1/3 way up the forcesdouble as i push against the hinged half and lift. I found 1 inch pulleys and half inch rope actually increased force needed to lift table because rope binds on self going thru pulley. Half inch rope needs a 2 inch pully to operate smoothly. For me, it took 5 small pulleys to reduce lift force from. 100 to 67 lbs. It should have been only 20 lbs! Pulleys, ropes and eye hooks are rated for max weight capacity. They are designed to fail at 150 percent. My eye hook straighted out like wet spaghetti. Luckily the table fell only 6 inches and did not hurt anything. It was then i got an mech. engineer to help me figure out what was going on. Lots of emailing and expermenting then testing the measured lifting force for over a week to figure it all out. I never would have guessed results and the engineer had to calculate the ideal results and determine why the measured results were so different. Boiled down to pulley size and rope size.. at the time i could still lift table by self. 2 years later, not sure anymore. My tabletop is 5 x 10 and built far heavier than needed.. however the table only sags 1/4 inch in middle and arches 1/2 inch up whem lidted. Because i am O guage, this has not been a problem. With a better designed under deck and far lighter materials i could use 1/4 inch plywood for decking. I have got 5 foot 2×8 on sihort sides and 2x4s on front and back. The deck is supported by 1x5s lattice under deck. It all pivots on a 2 inch clothesline pipe about 3 feet off floor. It does tilt nicely up.and out of way. I designed it so i can have a building up to 13 inches tall and not hit back wall. When down I have 1 foot on both corner walls of room to walk around table.
Peter, I found a lift for a boat whos design will work for your table. First, use ball bearing pulleys. Small ones are available from sailing supply houses. In sailing language, they are called blocks. Mount four of them to the ceiling above the corners of your table. My unit used a screw-like an eye bolt with the eye twisted open so that the pulley could be attached. Four ropes (lines in sailboat language) through the four pulleys are long enough to be joined together. A fifth line is knotted to the four and it comes off to the side to a fifth pulley and then down. You pull on this line which pulls the knotted bundle which will lift the table.
In my system, the last pulley has a line lock on it, so when I pull the boat up, it automatically locks on the line(rope) on holds the boat in position. If there is a need for mechanical advantage, add a couple of pulleys on the fifth line to provide it. Line (rope) lengths will vary to accommodate the geometry of your table and ceiling. I installed mine on the garage rafters. I place the boat under the pulleys, connect the four drop lines, pull on the single lift line and the boat rises smoothly and evenly to the ceiling.
The system was marked by a spinoff company and uses Harken blocks, a sailing supply manufacturer in Wisconsin, USA.
i have a friend that has about the same amount of wiring on his set. with all the trains he runs at one time he put in another electric box. thats still a nice set up.