Rob’s been in touch with his O scale tunnel project:
“Hi Al,
I fired up the inkjet printer again recently for another project.
I’m modeling O gauge with 027 track and curves, due to my space limitations. In my last update I had redone the front right corner of my layout.
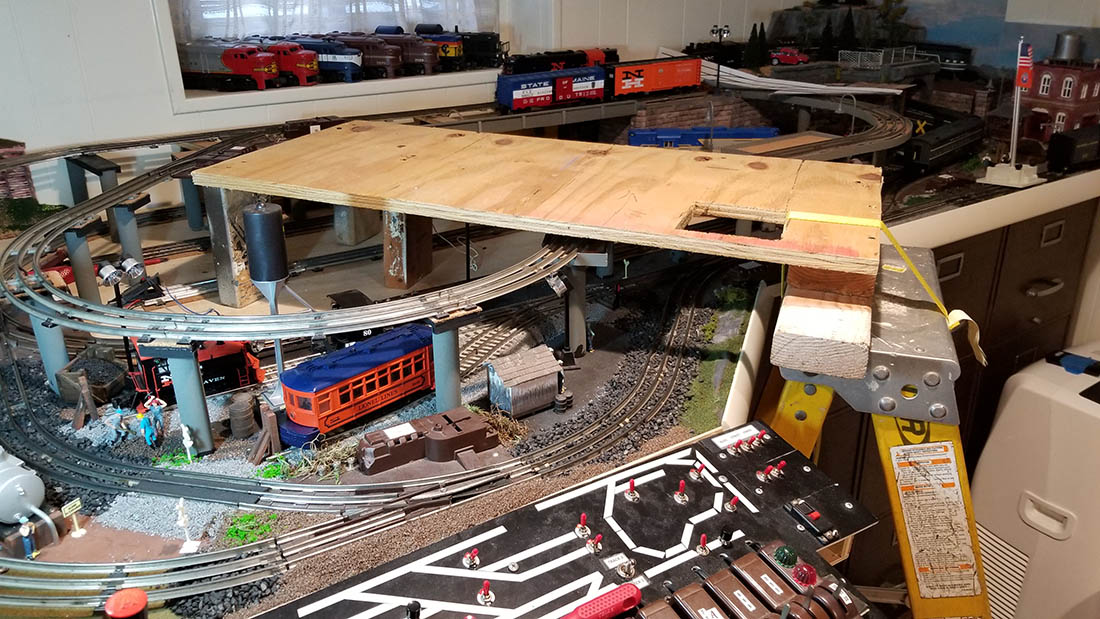
The next area to tackle was the back left corner. I have been procrastinating due to limited access. I’m 6’5″ but even my arms aren’t long enough to reach to the back of a 4X8 sheet of plywood. So just like Bob in Virginia, I had to build a platform first. I had a scrap of 3/4 plywood and cut a couple of blocks of 2X4 for legs. I balanced one end on my ladder and I was ready to go.
So, on to the good stuff. I used your wooden corner tunnel prints and developed my own O scale tunnel and retaining wall to fit the available space.
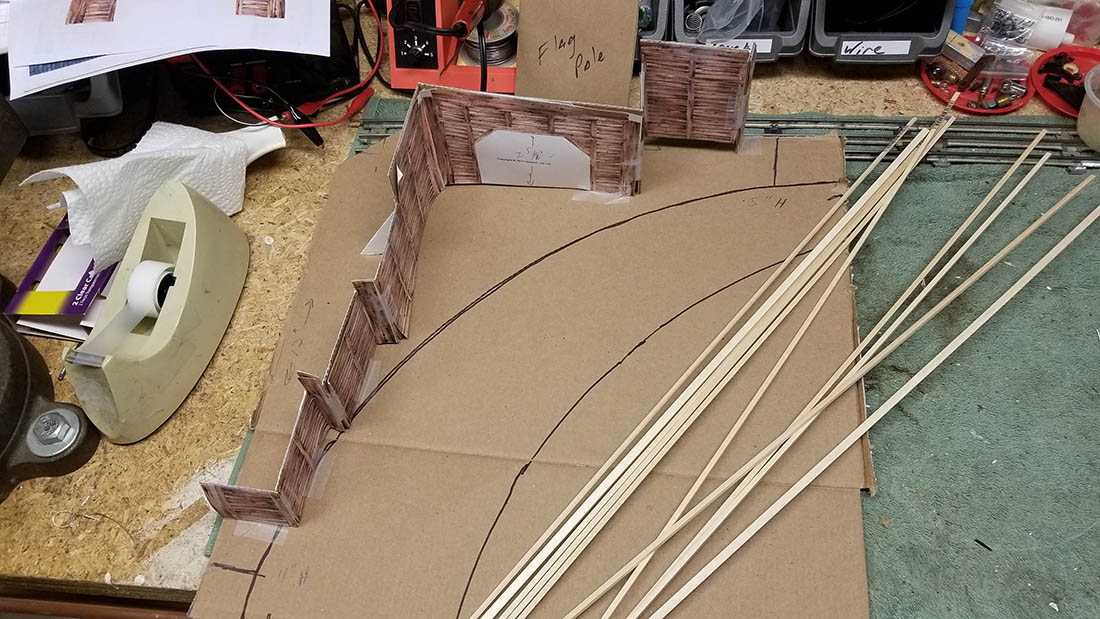
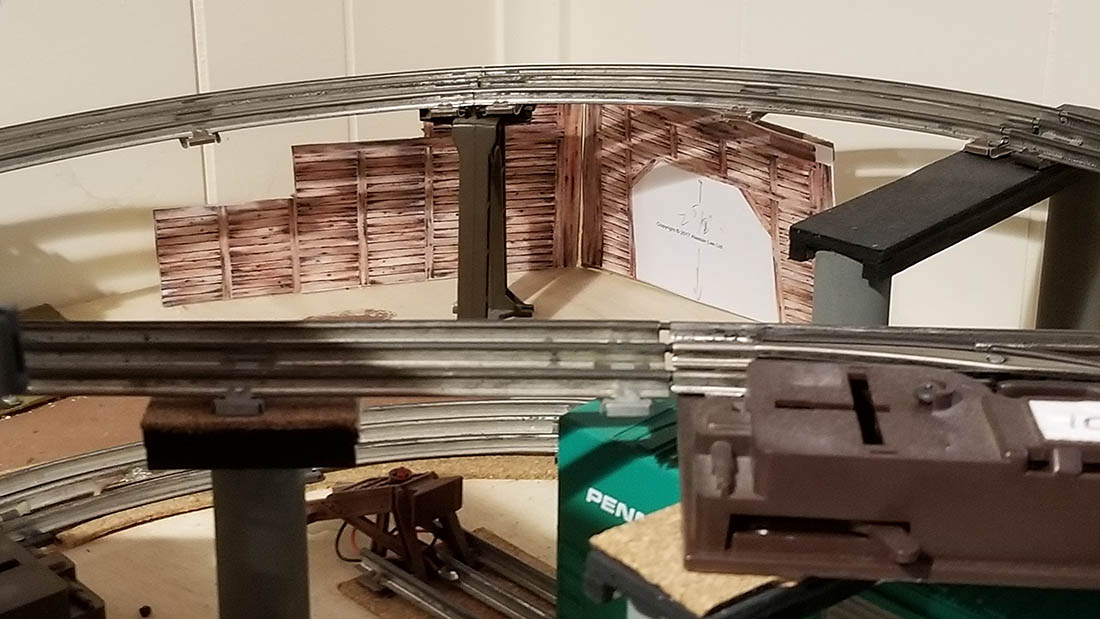
O gauge trains need a lot of space on 27″ curves so I’m always watching my clearances near the rails. Here’s the first mock up. The outer line is the elevated track and the inner is ground level.
As you can see I am working under the elevated line so I did a lot of test fitting as I went along.
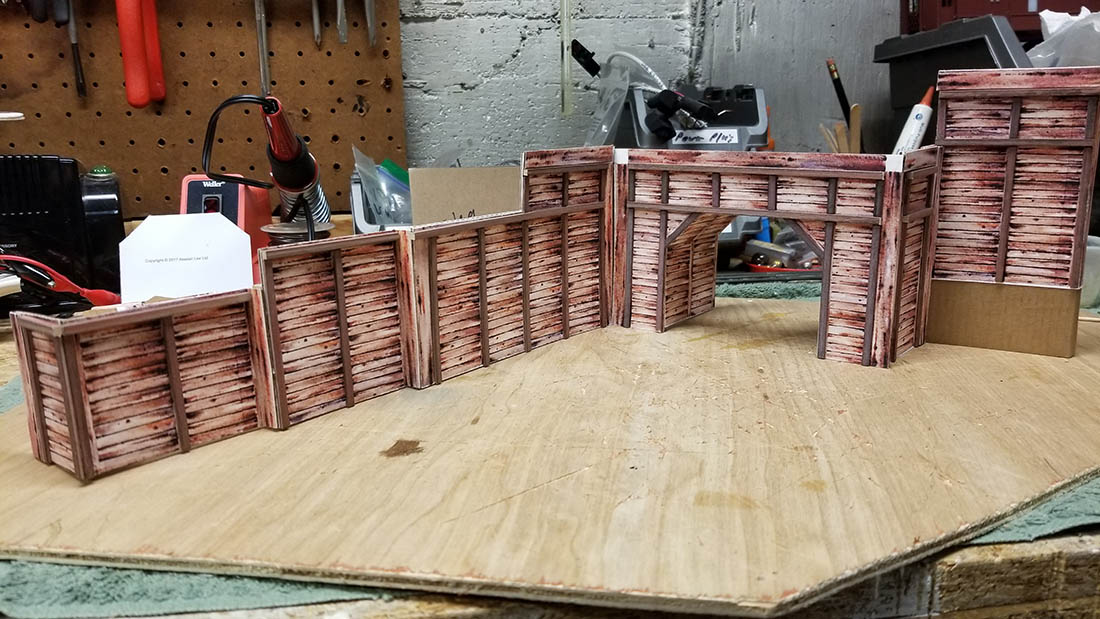
I printed and cut the wall sections as desired. I use matte card-stock paper and mount the prints to thin cardboard. I added balsa wood to the wall sections to add some detail. Extra pieces of the prints were used as well.
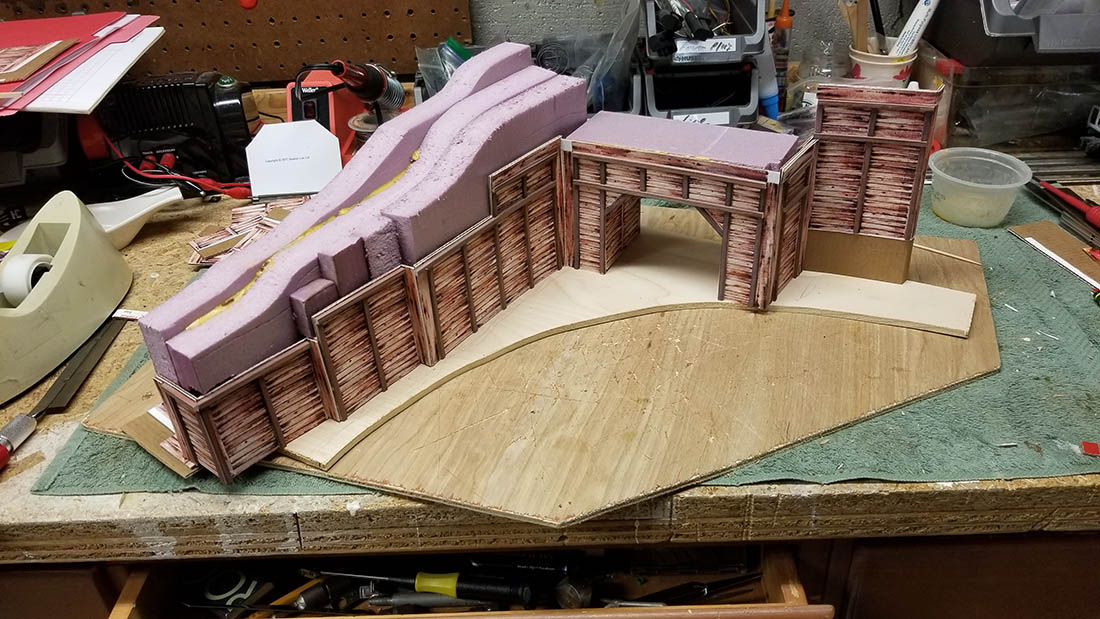
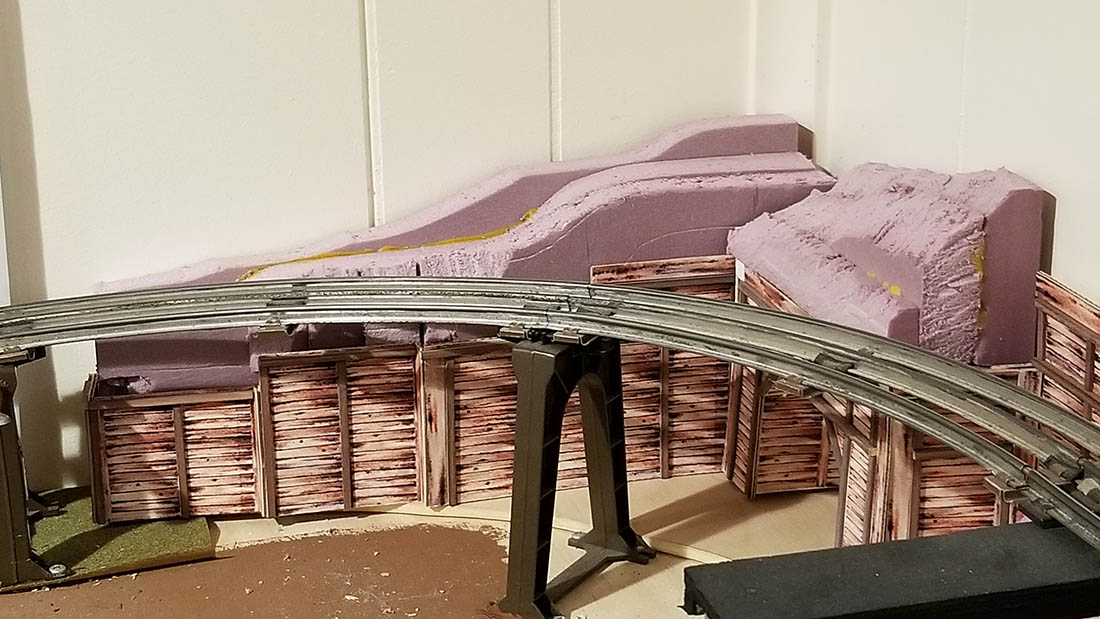
Next was to build the terrain behind the walls. I cut and carved blocks of rigid foam board to develop the hills.
Another trip up onto the layout to do a clearance check
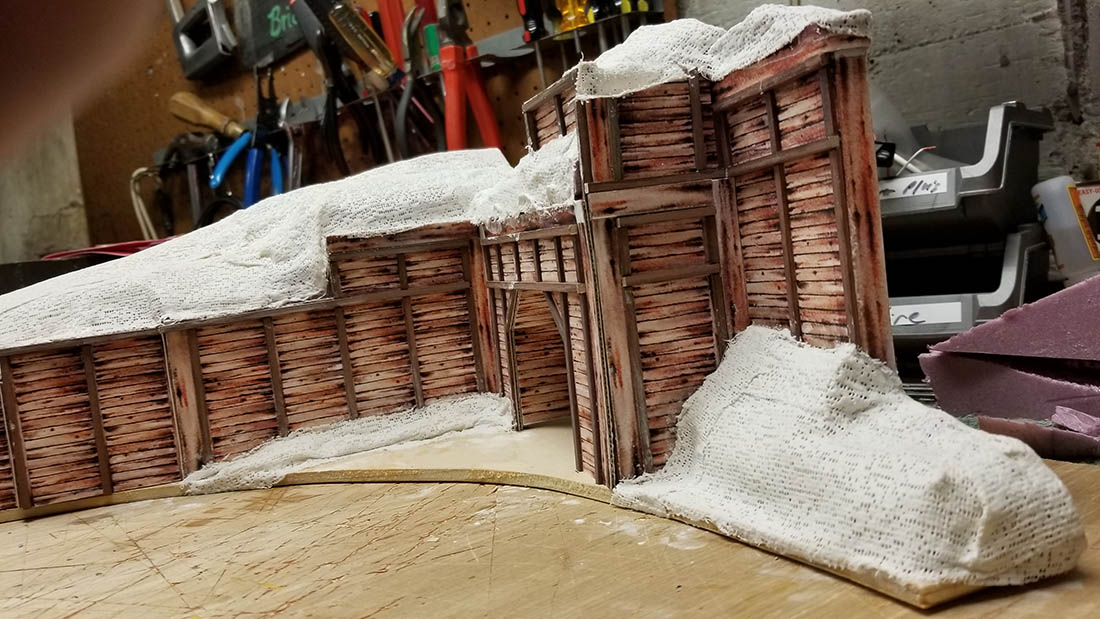
Once I had the overall shape I liked, I mounted the tunnel to a piece of 1/4″ plywood. This way I could build it as a diorama and place it on the layout when I was ready. I covered the foam with plaster cloth and began to add ground cover and detailing.
I have a Lionel Lighted American Flag that I wanted to use on top of the hill, but it was too big to fit. I took it apart and set the flagpole and three of the LED’s right into the foam.
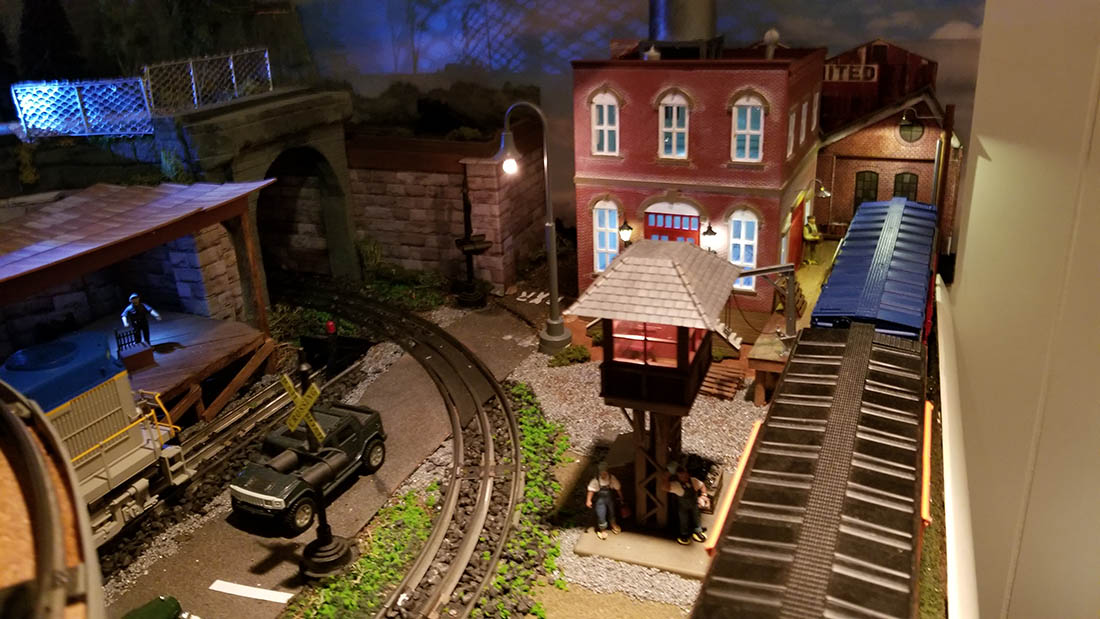
Once the flag was done I also added a scratch built light pole and started to get the diorama set on the layout.
I also wanted the road to look like it went somewhere. I found a print of a gravel road online that fit the bill perfectly.
Here’s the mostly finished product (is any project ever really finished? )
The last step was to put the elevated track back in place. I had to remove one of the supports so I made a small bridge to span the gap.
So there you have it. This was a fun project during a very cold and snowy February here in New York.
Thanks for all you do Al.
Bob in L.I., NY, USA”
A huge thanks Bob for sharing his O scale tunnel project.
You all know how much I love an update, and I love the way Bob has done this.
Course, I’m biased, but I think it looks fabulous.
If you want to buy the print out Bob used for this, it’s here right at the bottom.
All the prints are HO scale. FOr N scale just reduce the print size to 54%.
Most people play around with the print sizes.
Take Bob, he’s O scale, so asked him about that and he said:
“Al,
I went up 125% to get the proper scale. I based it on the tunnel height which is 11 scale feet. O gauge is loosely based around 1:48 scale.
I say loosely due to the various sizes of equipment built over the years. Especially post-war Lionel that was typically bigger or smaller depending on the model.
O gaugers have grown accustomed to these issues.”
That’s all for today folks.
Please do keep ’em coming.
Also, some of you have asked about the back drops. You can find them at the bottom of this post.
I really must get round to putting them in the store.
And don’t forget the Beginner’s Guide is here if you want to get going on your own layout.
Best
Al
PS Latest ebay cheat sheet is here.





A loooooooong time ago, linn Wescott told a story in an issue of Model Railroader. He was traveling with his wife to do a photo shoot. He had an extra day and there was a guy who sent in some amateur pictures of his O27 trains. I say trains, not railroad, because it was a mess. Loops of track making no sense laid on a kitchen table. So many engines and cars that you would never be able move them around. Linn told his wife “don’t go anywhere. I’ve seen this guy’s pictures. I’ll be back in an hour. ” Five hours later, he got back to his hotel. In his article he explained that this guy had a system to operate. Too crowded to move the cars? Let’s see you move that engine from the outer loop to the inner loop. Let’s see you block all those boxcars together. Linn was embarrassed to say that he was having so much fun that he lost track of the time.
The point is, model railroading takes place between your ears. You lay three feet (or meters) of track, but in your mind it’s a transcontinental railroad. The engine cranks out ozone, but you smell steam and grease. The engine has a tinny little speaker, but you hear a deep, rich diesel horn. Most importantly you loose track of the time because you are having so much fun.
Getting rid of the third rail doesn’t make it more realistic. It just makes it harder to wire. It’s a nice railroad Rob. I hope you are having fun.
Nice job looks good nothing else today in NY with the cold and snow so why not work on our Train Layouts..
Bob
Great job. The creativity and final output is outstanding.
Thanks for the effort it took to show us all how to do it. BTW 3 track brings back old memories and modeling does not mean make it exactly real because O is what it is.
Be well & safe
Your neighbor
George from LI, NY
As the saying goes, Necessity is the Mother of Invention. Great Idea for the Portable Platform attached to the step ladder so you can reach out across the layout. Liked the Details you added to the Tunnel Print Out. Especially the photo of a gravel road that continues the illusion of the road thru and out the other side of the tunnel. The scenic background also adds depth. Also liked the idea shown how to build a curved bridge unit to hold the track between the support structure. This idea can be used in any scale. Regarding the “Tin Plate Track”… folks should remember that to upgrade or update an existing O Scale or O27 Lionel layout can be an expensive proposition. You have two options. One is to buy K Line Track that is more realistic,, OR build up the ballast between the rails and add stained balsa wooded ties to fill the spaces between the rails and metal ties of the original tin plate track. The Third Option is to IGNORE the Critics.. After All This is Your Layout, and this is Supposed to be a HOBBY. HAPPY EASTER TO ALL … from Mike in N.H. USA Across the Pond…
Rich B. There is something about tinplate that brings out the child within. It brings back the wonder of youth, Christmas, and all the things that brought joy to our young life. While I model “scale”, I love watching tinplate at the shows when I have been able to go to them.
As one very wise person put it “We do not stop playing because we grow old, we grow old because we stop playing.”
Rob…
Your creativity is impressive. Very nice work with the print out scenery (the tunnel portals) I have built a few of Al’s kits myself and they are wicked fun to build! The whole of the hillside really looks fantastic and I envy what you have been able to do.
Pretty Neat.!!! I am going to do something like that but it going to be in HO scale.
I like the project….and you created the illusion of “something” beyond the surface or the walls, buildings and scenery. And not to overlook that you scratch built most of it and you built that section as you stated, as a diorama. How many modelers ever think to do that? You’re the first to have ever mentioned and executed that idea.
In regards to the track….we all know the third rail is not based on real track, but it’s classic hardware and we can’t just forget the Lionel brand. For many of us it’s the base for our model railroading tradition.
Very nice job. It adds a corner hide that is unusual nd interesting. By the way, what was your “scrap of 3/4 inch plywood”? It looks very much like the plywood back for a loudspeaker enclosure.
I think he just cut a hole in the ply so he could strap it to the ladder with what looks like a ratchet strap. Good thought, most would have just laid it on top and hoped for the best. I model in N scale, so the tinplate was at first jarring to me too, then the waves of nostalgia started and I began to see the beauty in it.
Thanks for all the comments folks.
Yes – 3-rail O is often frowned upon by many modelers but the track aside, the level of realism in some of the equipment is amazing. If you ever get a chance to see a O gauge Lionel Visionline Big Boy in action you will understand. I guess if Mr. Cowan had decided to mass produce outside 3rd rail track and trains we wouldn’t be having this discussion.
Some background on my layout. I grew up with HO trains. I had two different layouts, the second being a big 8×12. My Dad had a few sets of pre-war Lionel tinplate trains that we ran during the holidays. I was always impressed by Lionel trains but stayed with my HO until I got out of High School. Fast forward about 30 years when my In-laws came across a box of old tinplate litho-printed freight cars. That was all I needed to jump over the cliff and build a layout. After negotiation with the landlord, I was granted land rights to a small corner of the basement. Beggars can’t be choosers you know. This will not be my last layout for sure and when I do take this one down to build bigger, I will use better track, wider radius curves, and switches. I decided on this layout to accept the tight curves and tin-plate track, but build realistic as possible scenery.
The important part is that I’m having fun and am enjoying the greatest hobby in the world.
Bob
PS- Richard in NM- the plywood was actually left over subflooring from a bathroom renovation.
I work in O/027 for a few reasons and I think there are a lot of us out there. My parents started it in the late 1940 and added to it each Christmas. I still hove all of the Lionel trains, track and more all in 027. I am retired and didn’t want to put a lot of money into the layout. It is a good size layout with 18 switches and lots of track. I got all the track and switches at train shows some of it people gust gave in to me because it was 027 and most don’t want it. I spent my time cleaning and repairing it and added ties to all the track. I made some of All’s paper buildings and I think they came out great. My point is I would have loved to use better track and $100 switches but I didn’t have that kind of money. I had just as much fun building my beautiful layout as anyone else. Half the fun was making stuff I find look natural and fit in to my personal railroad.
Steve from Toms River NJ
Bob, a great addition to your layout. It looks great.. You did a super job on the scenery around it.
I always dreamed of a fully scenic-ed Lionel RR using my O gauge track. Of course, it never happened and I really enjoy seeing what other model railroaders have done with the Lionel items.
Well done!
Here we go again, an OG’r shows a beautiful layout and he made a tunnel and gets criticized for three rail? I tried HO once and couldn’t keep the cars on the tracks.
How boring it is to just watch little trains run ’round and ’round, no action, no toys.
The grand kids soon get tired of them. Realalism? I’ve seen plenty of beautiful three track layouts with log loaders, milk cars, etc. Why not compliment Bob for what he’s done?
I’m a died in the HO’er, but there is a philosophy from the 1960’s that is very true concerning Lionel. HO is a modeler’s scale, but you put Lionel on the tracks and it RUNS, every time, all the time. Drop it put it back on the track, and watch it run. I don’t look for how many rails are on the ties. I see a smiling face on the operator. I also remember seeing department store Christmas layouts that ran flawlessly all day, every day from the day after Thanksgiving til Christmas. Enjoy what you have, Bob.
Bob that’s a great idea I have a corner and I would like to do that too thank you for showing me and everybody else what you can really do with a dead-end corner I think your layouts great also thank you for sharing keep up the great work
Hey there Rob that is one heck of a lay out you really have your hands full there my friend keep up the great work & I agree with you too a job is never finished for we all want to change something or improve it, Love how you did the tunnel drive through looks great as if it goes on for ever well done mate.
As a Vietnam Vet I like the night pictures of the lighted US Flag.
But did I see a little dirt on the flag in the last flag picture?
Layout looks good. Have fun!!!!!
Love it Rob!!! Way to go!