Wayne’s been busy making loads for HO gondolas and building his sub-station too:
“Hi Al,
I continue to be inspired and educated by your generous postings of model railroaders.
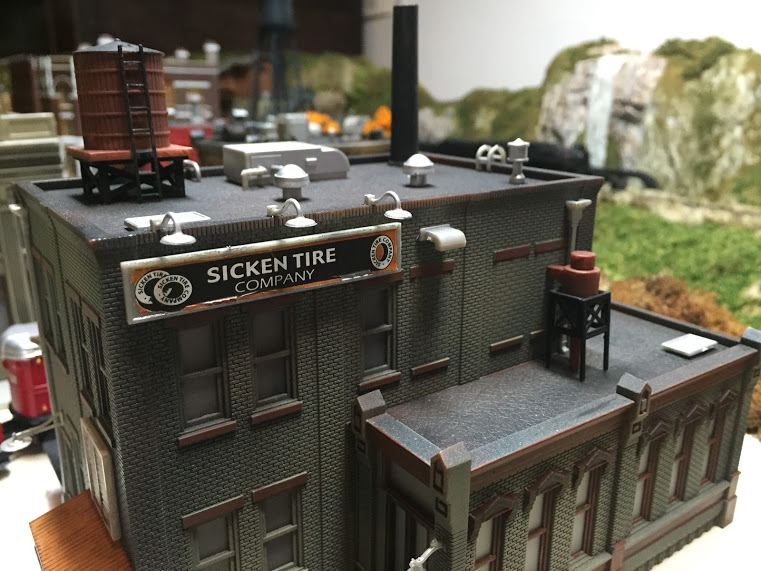
Thought I’d send some new pictures of buildings I have completed and some misc shots.
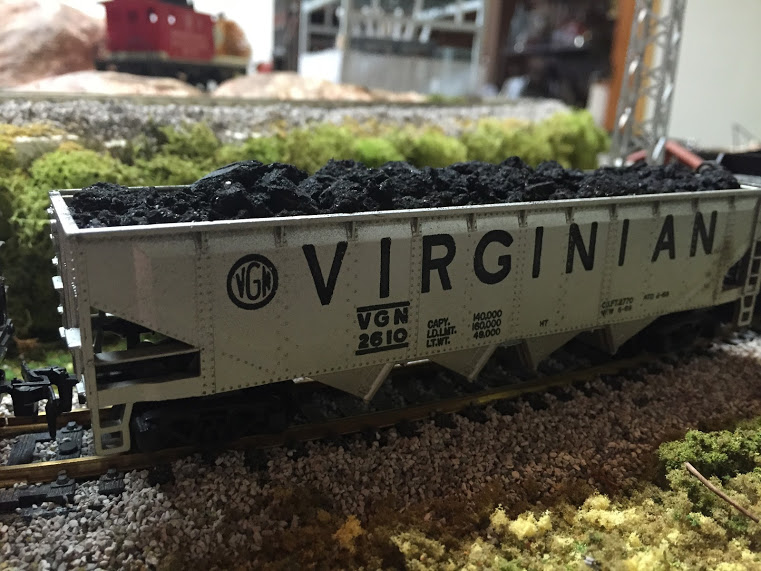
A tip I remembered from one of your followers showed his way of making loads for HO gondolas. Just break up charcoal briquettes and use the debris as coal loads. One picture has a gondola with the charcoal load. I used old poster board to make a false bottom in the car, painted it black, then sprinkled the charcoal over the board, adding droplets of 50/50 water and white glue to hold everything in place.
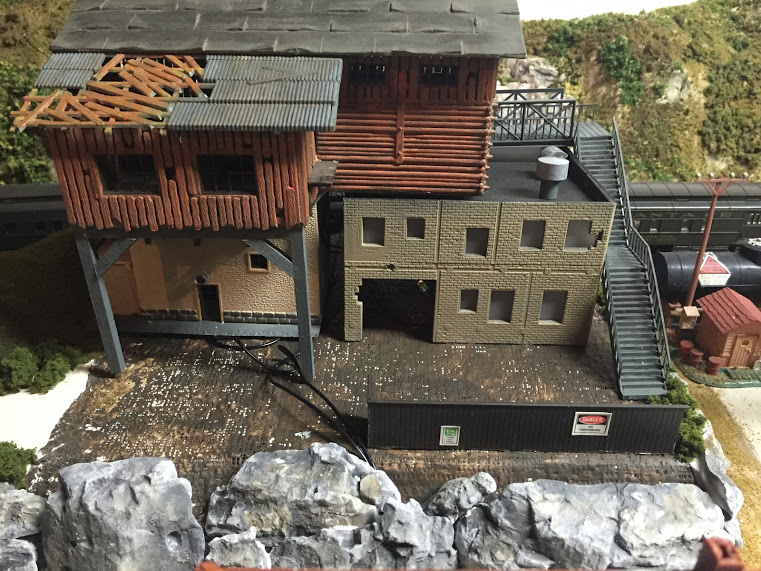
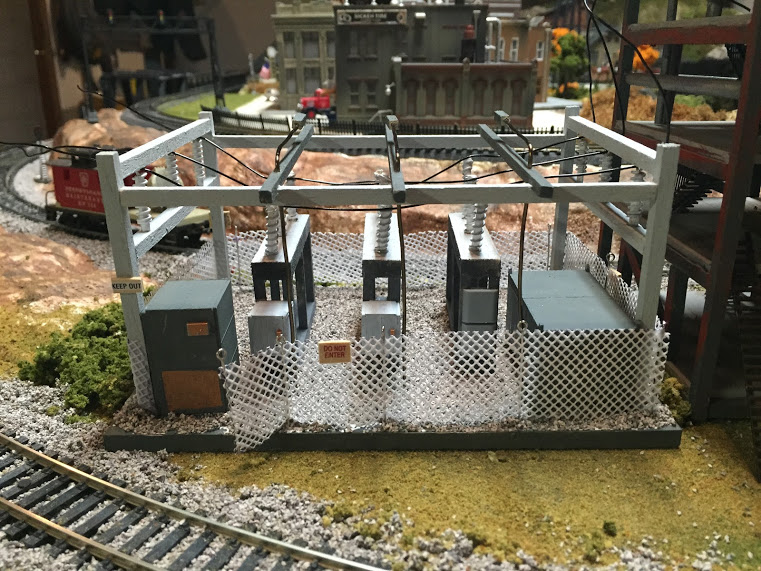
The electric sub-station pictured is hand made from balsa wood. The insulators are made from tiny springs I found in a local craft store, pulled apart a little with pliers, then inserted with a small dowel rod and painted white. The cyclone fence is made with Needle point cloth and posts are eye-pins also found in local craft store. The needle point cloth can be bent and folded which is how I created the gate entrance.
None of this is perfect but achieves the look I was going for. Again, I have incorporated a number of techniques I found from reading your posts. A little hint here and there and you simply let your imagination and experimentation take over.
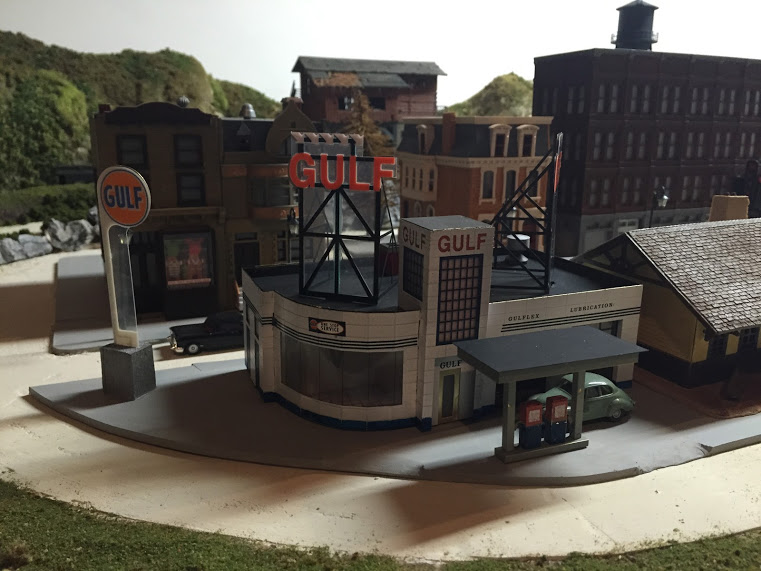
The Gulf Gas Station was my first attempt at an etched brass kit. After gaining some courage over the past year and a half, I dove in to the construction. A real challenge after building plastic kits and kit-bashing. These brass kits require the use of special glue. (super glue products); styrene glue won’t work. I made some mistakes during the process, not to mention getting super glue on my fingers but I am okay with the finished product and my fingers have healed nicely. I also purchased a light-up kit that goes with this station and it is quite striking when lit up. My only advice with brass kits is to very carefully follow the directions. These kits are not as forgiving as plastic. If anyone is interested, the brass kit and lighting are from Miller Engineering.
My layout is HO scale and I used actual photos of electric sub-stations and spec info I found on line to try to get to actual scale as I could.
Thanks for all you do. Hope you enjoy the pics.
Wayne”
A huge thank you to Wayne – it’s very satisfying to read about the blog helping folk with their layout. I thought his sub station is amazing – it just goes to show what you can create with a little imagination. Can’t wait to see the updates!
And now on to Dangerous Dave.
I get a steady trickle of emails asking why he’s called ‘Dangerous Dave’ – it’s because he’s rather accident prone.
(If you’re new to the blog and you’re wondering who he is, have a look in the Hall of Fame.)
Here he is, living up to his name, while building his stunning loft layout:
“Hi Al , just come across these pictures (clearing a few things out )… it’s when i decided to have a quick route from the loft ..LOL ..broke 3 ribs on the way down… now you know how the nickname got started
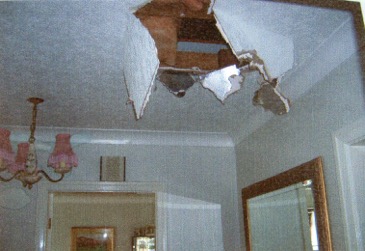


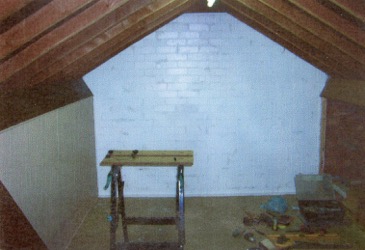
…4 months later as my ribs had healed and went back up there to continue, I accidentally drilled through a water pipe… unfortunately being a Sunday could not get a plumber, but repaired it myself, dried it all out new connections fitted, seemed to be OK, turned water back on, went outside to clean up , after half hour walked indoors to find a waterfall coming down from the loft in to the lounge, and this was 4 weeks before Xmas …
and of course a week later the plaster board started to drop had to shore the lot up with jacks and planks ,and then have a complete new ceiling fitted.. new plasterboard the lot… the nick name stuck… and 2 months later hit an electrical cable running under my new flooring… sort of blew all my lights… so now my wife insists on any work carried out is done by professionals LOL …
Regards
Dave (not as Dangerous now)
Well, I’m glad Dave persevered, but he’s made some fantastic videos and also been really helpful with the Beginner’s Guide too.
So here’s one of his videos with Dave at his best:
Latest ebay cheat sheet is here.
A big thanks to Wayne on the making loads for HO gondolas, and to Dave too.
That’s all for today folks.
Please do keep ’em coming.
And if today is the day you get started on your layout, the Beginner’s Guide is here.
Best
Al
PS Latest ebay cheat sheet is here.
PPS More HO scale train layouts here if that’s your thing.


Really enjoyed seeing Dave’s layout – his disco lights were a treat. Does his wife EVER see him?
Dave, now I understand where the nickname “Dangerous Dave” comes from. Glad all is okay now and you have healed. Brian Knysna South Africa
Nice job Wayne, didn’t know people were doing etched brass building kits now, seems a pretty costly way to go about it, result looks good though. The trick with superglued fingers is to have something nice on loop on the CD player, then you can just sit there listening to Billie Holliday until the natural oils and perspiration in your skin weaken its grip. Whatever you do, don’t just pull away – ouch!
Dave, it is not just you, I put a picture hook in the railway room wall once and all the lights went out. Oops. Also once put big hairy foot through landing ceiling while retrieving boxes from our loft.
Rod
Hi.
Dave’s layout is fabulous. I love the cable stayed bridge. Any chance of some close up photos to see how the cables are attached.
I am just starting my layout, about 9mtrs x 3mtrs. Are you interested in progress, photos etc.
Roger. France
I am always awed and inspired by the great artists you showcase. Thanks and I hope one day to be as accomplished as they. NJ Mark
Super job with the models Wayne and the gas station turned out beautifully. Keep up the great work! Dave your tale of construction woes gave me a good chuckle as the story of disaster unfolded – we’re just thankful you lived to tell the tale and persevere with the superb model that has been an inspiration to us all – thanks to both of you for your posts. Glyn
Great Layout, That Gulf Service Station and Tire Store Look Great
Wayne, I really like your pictures, and the Cyclone fence is great. As an 80-year old woman, I have a large closet filled with craft projects, and did try the needlepoint material. However, as another suggestion that I like a lot better, I used window screen turned on an angle to represent chain-link fencing. I love the look, and found a strip of nail gun nails to use as posts and braces. That was my first attempt at using what I had on hand when I couldn’t find what I wanted online. Of course, there is chain-link fencing out there now, but I still prefer the screen.
The second item I used from my craft closet was crochet thread. I was wanting something that looked like garden hose, and again, didn’t find anything online or in stores. As I was rummaging through the closet looking for something else, a ball of the thread fell at my feet. BINGO! It looked to be the right size, so I cut a piece, painted it green, and it looks great. I was able to glue the ends to a “faucet” on a barn and to the farmer’s hand, and coil the excess up on the ground.
Keep up the good work, Wayne. Lookin’ good!
Marion in Mississippi
Good show Dave
Love Wayne’s photo’s excellent workmanship on this layout, the power station, and derelict buildings are great as are the other buildings Thanks Wayne for posting. Dangerous Dan, please make sure all your insurance policies are up to date. Lol thank you for posting, It started my day off with a good laugh, sadly at your expense. Thank God you are able to laugh at yourself. Also thank God that your wife hasen”t killed you, lol
Great job Al, the layout is first class. I would take issue with the job you did on the ceiling. I think that the hole in my ceiling was larger than yours, aint it hell and NO body ever forgets. Glad you are feeling better..
I am sorry to hear of your fall from the attic. I’m very fortunate in having a large attic bedroom in my cottage that’s 25′ X 15′ but I have heard of other people falling through as you have done. Sorry to hear about your mishap with the water pipe, have you ever heard the song by Flanders and Swann? “twas on the Monday morning the gas man came to call, the tap had stuck and I couldn’t get gas at all.”
Hey Dave, my lovely little wifey thinks you and I must’ve conspired to see who the most dangerous is. I think, however that it must be a pretty close tie. While I have never fallen through the ceiling, I have fallen off ladders multiple times which just left me pretty stove up for a time without serious injury. I have broken/fractured ribs while working under my train room building when trying to correct a foundation settling issue (long story). I also am guilty of cutting into a live electrical line w/my Saws Everything (my cute name for a Sawzall), and I occasionally cause plumbing leaks the same way you did. I think the icing on the cake was when I cut into a (don’t even ask) refrigerant line on my mini fridge inside my train room. I’m 63 yrs old, have building this layout and outbuilding for nearly 5 yrs and have not yet laid a single piece of track. But one day…
I am new to this hobby. I have a hard time putting the rail joiners of the pieces of track. They are really really hard to push on. In some cases I can’t get them on. Is there some kind of secret to doing this? Any help would be appreciated for this novice. Thanks…John S.
Dave and Wayne both of y’all layouts are poetry in motion. I can only hope to build a layout 1/10th as great as yours.
Steve Lindhurst,
Wilmer, Alabama, USA.
great job Wayne they do look good. DD your videos always send me to the shed to do more on my layout thanks to you both for your input and also thanks to Al for the details on Dangerous Dave the stories are always good to here. the missing camera must have a unique DD story to it.
I would like to send a video of my layout filmed with my camera,but do I need to compress it
Hi John,
I used roco rail joiners on my HO peco track, easier to side on, but as with anything, tight fit means good electrical contact between rail joints, once i am happy with track joint, i always solder rail joiner and rail…
Have had plenty of glued fingers from super glue lol
Hot glue gun is the worst…working under layout and it drips on leg…
Cheers
Andrew
I have been a viewer for a long time now and thoroughly enjoy all of the “tips & tricks. I noticed the hint for coal loads above, thank you. Another suggestion, at least for those of us in countries that still use asphalt roofing materials, are the granules on black asphalt shingles. It is relatively easy to get if you know someone with such a roof, free and also a little cleaner and “scale-appropriate”, particularly of HO scale. Other colours could possibly be used for various types of ground cover as well. G
THANKS DAVE AGAIN…..
How do you get into your train room, I don’t see any doors.
THANK EVERYONE WHO ADDS TO MY ENJOYMENT OF MODEL TRAINS.
Hello Dave,
I would like to know how you built your great suspension bridge. Is it scratch built or purchased. as a whole or in part.
One small comment on your layout, and that is how dose that ruddy long canal barge ever get round that curve and under the tunnel or is it an articulated type.
keep up your great work of educating us beginners.
Allan, Down under.
I do appreciate seeing DD work/videos. One thing I’ve noticed though is that the train traffic is normally running at too high of a speed…just appears not quite right to be realistic. Thank you for the valuable information.
acetone removes super glue
Great Job. I love to see the railhead in Europe. It brings back great memories of living in Europe. What a special time it was. I have been back twice since I last lived in Europe and I still find it beautiful peaceful and lucky. Luckily I was able to live in Europe and go back. I know a lot of people who wish they had the means to go. I would love to do a layout from Europe but I am afraid I would not do it justice. Again great job, but you don’t need me to tell you that. Just look at all the great comments about your layout. Have a great weekend everyone.
Wayne; The coal load came out perfect. A great looking electric relay station too
The Critic
Given your (mis)adventures Dave, I think it best that you promise to stick with model trains, and not branch out to actual ones!
Wayne
Awesome work. Sicken Tire was great. My new store is Bad Bod & Behind next to Flat-u-lance Tire. That is my fun in addition to the modelling. Isn’t this great !
Not so dangerous Dave
Definition of a friend- someone who cares about what you do. Well you have made friends all over the world. Bless you & yours for your very thoughtful sharing & videos of both your layout, real trains and Coy pond. Your hard work does not go unappreciated.
And Big AL who produces all this- Many thanks
All be safe
George from LI,NY
Dave, you’re not “dangerous”, you’re “coordinationally challenged”. And I know – I speak from 60+ years of personal experience. Oh, the stories I could tell….
And those buildings…do you scratch build or kit-bash??? Either way, they are remarkable!
Nice looking coal load Wayne, Nice looking layout!
Pretty kool.
Wayne, I solder all my brass.Soldering is actually simple. The explanation is a bit lengthy to go into here, but I’m sure it’s available somewhere online. It takes a bit of practice. I didn’t just pick up an iron and magically solder. Try it. I think you will find it very useful.
I use a similar connector block that I got on Amazon, $10.59 for two. There is a slight difference, no LED light, not really needed, and connectors on each end that makes it easier to daisy change.
For those who are interested, Dave’s suspension bridge is from Hornby’s and called the “Grand Suspension Bridge” It’s a single track bridge and not cheap.
Here’s a link to how to put one together:
https://www.youtube.com/watch?v=UuwAni0sXDw
Dave,
Tell your wife that “professional” means that they get paid–it does not indicate any level of expertise!
BTW, super glue can be removed with acetone or Loctite glue remover.
Tom in Mississippi