Some of you will remember Rob’s Farland Howe layout. He has some wise words on model train curve radius and inclines.
I really enjoyed his video because it shows how you’ve just got to roll your sleeves up and get stuck in to your layout:
Dear Al,
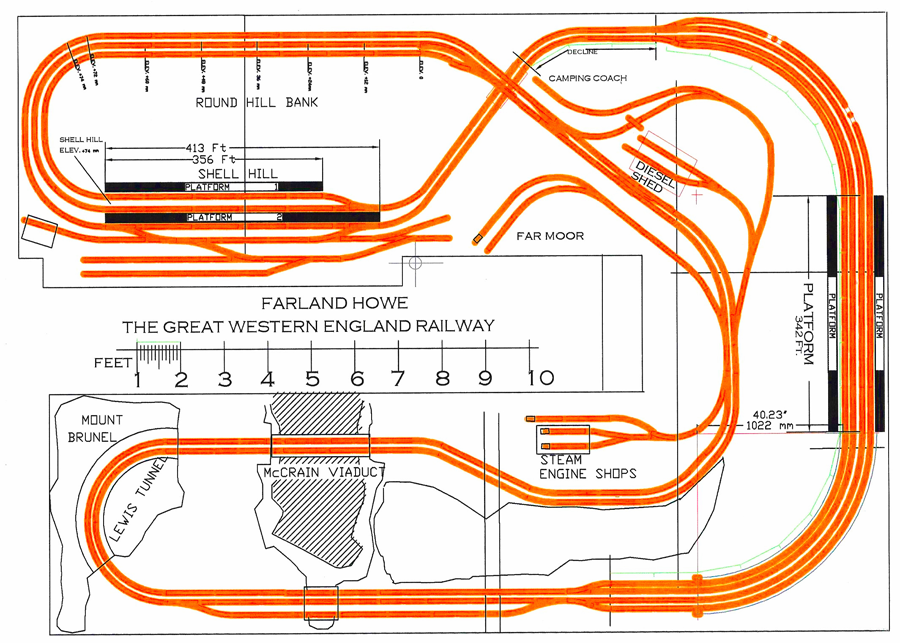
Your readers always are interested in track plans so I have attached one. It is fully up to date and accurate to the best of my knowledge.
I started this layout about 4 years ago. I had come into possession of a DCC locomotive with sound. I did not know what exactly that meant when I bought it. I brought it home and set up a circle of track on the dining table and tried it out. I was hooked.
I started dreaming of layouts and thinking of what I wanted in one. After 4 months of planning and thinking, I finally decided on a flipped over dog bone where at one end of the layout the loop would go over itself.
To illustrate this to yourself, just take a rubber band and twist one end. This I thought would give me an exciting place where trains could cross over each other. I saw one like this once and thought it looked fun.
During this early period before I started building the layout itself, I had a 1200 mm x 2400 mm (4-foot x 8-foot) sheet of plywood on legs in my basement with a loop of track. That way I had somewhere to run a train or two and dream.
Next I determined that 4 inches (100 mm or 25 scale feet in my case) was safe not knowing just exactly what to expect, to allow one track to cross over the other. In the end it turned out to be too much. I am modeling England and realized later I only really need 13- 17 feet or 70 mm maximum in my case.
My scale is 1:76 or about 4 mm to the foot. Originally the locomotives climbed this on a 3 in 100 slope and also went around a 180-degree curve during this climb. It was okay for diesels but steam locomotives struggled. With 2 coaches they were fine, but 3 was a struggle and 4 was impossible. Eventually I changed that but not yet.
I came up with a track plan after 3-4 months and started building. When I got the track laid, I started scenery. I did notice there were some problems with the model train curve radius incline – I talked about earlier – but kept moving forward.
In retrospect, that was a mistake. When I was quite far along on that part, I decided to make an extension and put a tunnel and mountain at the far end. The dog bone got much longer on one end.
This worked well, but the old original curves were just not up to par. I realized I needed larger curves. The large radius curves on the new part really worked well but I wanted some bigger ones. That was when the Big Curve project was born. They are still there and work marvelously.
The inside track of the Big Curves is a 40-inch radius or about 1000 mm. They slowly rise at 1.5 in 100 except where the platforms are. It worked great. I was also able to take out some short curves in an S turn by filling in a small area on one side. I now had smooth sweeping curves on four of the 90 degree curves making up parts of the model train curve radius dog bone.
When all this was working smoothly I found myself yearning for longer trains. Howe street Station was designed for 5 coach trains, but I could not run steam trains that long yet.
The next project was the Shell Hill extension. I extended another 5 feet (1500 mm) from where the original troublesome curves had been where they went around the hill and installed foam inclines at 2%. When that was done I had the layout I have now except for some fine tuning, which includes the addition of the Far Moor line, the camping siding, the steam shed and the diesel maintenance building.
That is the story of Farland Howe. It runs smoothly now and trains up to 7 coaches regularly round its spacious curves. The layout has grown to 22 ½ feet by 13 ½ in a U shape.
The most important thing I have learned with my experience is that model trains pulled by locomotives can only reasonably climb an incline at 1.5 in 100 to 2 in 100. Remember in the real world where they needed much more traction, they put more motors on more of the wheels like on subway car and tube trains or keep the inclines modest. Model trains don’t allow multiple motors throughout the train yet. If you cheat on this rule, you will be making compromises from that point on. Your layout will have problems. It is the basic physics of coefficients, weight to friction. It is nature and you just cannot cheat. The other thing is loading gauge. No time for that one now.
The attached video is a little old. Some time has passed since it was made, but I think there are several valuable nuggets in to for newer modelers, particularly with model train curve radius. It also explains the Farland Howe layout and how it evolved over time. It is my journey towards what exists now.
Thank you Al for all your good works and giving folks who are starting out a chance to hear from folks with experience and have already made a few mistakes. It is sharing at its best. My advice, if it doesn’t work as well as you want, tear it down and do it differently. No need to live with it.
All the best,
Rob”
A huge thank you to Rob for putting the video together and writing the narrative.
Who would have thought, one DCC loco would lead to all this?
Well, that’s what it’s all about: making a start and enjoying yourself.
Inspired? If so the Beginner’s Guide is here.
Best
Al
PS Latest ebay cheat sheet is here.
PPS More HO scale train layouts here if that’s your thing.


Amazing. Thank you for sharing with us.
I see a lot of “N” gauge layouts which is really great, but very few HO layouts on a 4 x 8 foot table. Is there any out there. Thanks
Al.
Thanks for all the videos and hints. Gives me an incentive to get back into it….
I have one question.Several of the videos showed a track level view, presumably the camera was mounted on a flat wagon. My question is: do you know where I can obtain the camera and other equipment I’d need to mount on a flat wagon on my layout?
Thanks in advance,
Trevor (in Olympia Washington USA)
Nice layout – seems to just keep growing. Keep up the good work and thanks for the info on the water, etc.
Carl, Port Hope, Ontario
Rob, how about turning that piece of wood with the angled side into a retaining wall by adding vertical thin strips of wood (like coffee stirrers) about every 10 scale meters to simulate sections and painting and weathering to look like old concrete?
Norm Lawrence from York, PA
President, York Connecting Railroad
Farland Howe was excellent. More of this, hopefully.
This is most helpful. Your question about the edging towards the end of the clip: a consideration may be clearance on the curve where your 08 class is sitting? There may be an overhang when your longer rolling stock takes the curve so the idea of the fence rather the embankment using the wooden batten may help visually.
I’ve also spent a lot of time planning my layout. Your comments on gradients have given me cause to think again as my steepest slope is about 3.5%. It worked on my old layout, but that was in a larger space and I now want my rakes to be more slow moving.
Huge respect for what you’ve done!
Rob,
I am assuming you want to add something along the edge of your layout which would keep the trains on the table in case of a derailment. I did some experimenting and found that a gentle hill of only an inch in height is all I needed. My goal was to keep the derail on the table while at the same time allowing as unobstructed a view at eye level as possible.
A chain link fence would be appropriate, as the railroad would like to keep out trespassers. Another alternative would be a split log fence. Good luck, and keep up the good work.
Still in training,
Carl in Kansas
Great layout. Lots of ideas we can use for our N layout. Good to know about the water. We will have a bridge over water and I will need a great looking cow pond. Thanks for sharing!
Rob, Funny how those Damn Layouts take on a Mind of their own…..!!!!!
Nice….Job…!!!!!!……..
Farland, great layout and video, a joy to watch! I always think of expanding a layout around the perimeter, you seem to have mastered expanding from the inside out, very cool to see the thought process and results. Cary, Crestwood KY
Your thoughts on gradients in the UK are interesting. The maximum on the UK network is 1 in 38 (Lickey Hill near Birmingham). You can access more information by googling gradients on UK rail networks. I experimented with steeper grades on my BR model (EM 4mm to 1 ft) and I in 28 was dooable but looked wrong. Its difficult as my model is at two levels (75mm apart) and the length required is considerable to get down to grade is considerable in excess of 2 metres.
Well done though difficult to model BR when living on the otherside of the world. You can access some excellent articles through the Model Railway Forum and of course magazines such as BMJ etc. Thanks for the info and tips. Jerry
Wonderful video! I only wish my layout could be at least half as good and interesting! Cheers! NJ Mark
Rob great narrative and video! As to your question about the edge of your extension, I would suggest using a strip of 3 to 4 inch wide clear plastic sheeting attached to the framing that would protect the area without blocking the view and give you room to add scenery to the foreground. Good luck with your project. Tim
Your track plan reminds me of the approach taken by one of the Greatgrandaddys of model railways, The Rev’d Edward Beal. His plans are laid out in his book on The West Midland. I’m influenced a lot by these old-timers who emerged at the very genesis of 00. I’ve started collecting their books:
John Ahern (3 books) Edward Beal (2 books) George Iliffe Stokes (1 book) P D
Hancock (1 book) Peter Denny (3 books) Henry Greenly (several books from 1924 ) Theo Pearson/Boyd Carpenter (1 book).
That was one of the best narratives I heard. Even had me giggling a few times. I like the idea one had about adding a clear plastic barrier after expanding the edge in question so it can be seen through. Little ones would like it for an eye level view. What ever you decide I’m sure it will be great.
An absolute inspiration. Rob sounds a really nice guy.
Nice layout well done keep up the great work
OUTSTANDING JOB! Thank you so much for sharing!
great work talking about the befores and afters was great made sense. but a layout is never finished cant wait to see the next instalment.
Rob builds one heck of a layout. Beautiful job and he’s a real character to listen to also. Thanks for showing us all of your wonderful ideas. Paul in Ohio USA
Rob Where your couch yard is .Take out the track and add about a foot wide for your couch’s. Then you can put your land back in. John from Milwaukee, Wisconsin.
One of the masters continues!
Thanks Rob for a fantastic video of your layout. I gained ideas from viewing it. Cheers Rossco South Australia
Great Video !!!!!!!!!
Great layout. I am a old rail worked on NKP, PRR, NYC, CONRAIL,UPRR and retired from AMTRAK. Started as a Telegrapher, Frt Agent, Sales, Dispatcher and then On Board EIC on AMTRTAK between LA to Chgo to Wash D. C. , LA to Seattle, LA to Orlando Fla.
All look great except need mile markers, train order boards, track numbers, control towers and yard limit signs, speed signs and etc. and maybe some signal stands overhead. over all great layout, good work..
Great job, there are a lot of new folks watching, such as I am, that would not know about the insirlators connecting at the V. I have read about it but to remember the insirlators, I will have to make notes about installing a track. Don’t understand it but as time goes on maybe I will, ha. I have a year pulse to start making my lay out, why, saleing ours to buy another one. At that time I have two different types of trains, Ogauge and HOgauge. I am going to try to put Ogauge right up front and HOgauge behind or I will have to make two tables. Still thinking about it. I see how much room you have just for your HOgauge, big room. It looks 👍 great. My father has an Ogauge and right now, about an 12×10 and a 5×11 added to the left bottom of the 12×10. Come to find out, my father is not happy on how it turned out. Crazy. He is not, that was my thought. Like I said before, Great job, I like it a lot. Thanks again for posting your video. Stephen Gispanski
One of your comments asked about HO on a 4 x 8 foot layout. I built mine on that size piece of plywood, built legs and the layout shares one side of a two car garage. I can run six trains by parking them on pull through sidings and isolating the power to each siding with toggle switches. Plastic pins keep the power from entering each siding. 4 x 8 is big enough for a lake, a tunnel, a forest, a town, a mining operation, and a farm. Not finished yet. You can do a lot on 4 x 8 feet.
Tricky Dick in Bakersfield
I just started out and learning as I design my first layout. This model is a little big for my space but I sure love it. I’m using Railmodller Pro to design and Kato unitrack. It is very helpful looking at different concepts that others have designed and picking up tips on design and wiring issues. Thanks for this Rob.
I always enjoy Rob’s contributions to Al’s site. He strikes me as a thoughtful, methodical and precise sort of a guy (my guess is that he is a retired engineer?).
I’m most impressed with how this American modeler has successfully and accurately captured the unique aura that surrounds British railway operations. I think it is extremely difficult to convey the sense of age, history, quaintness and patina that exists in and around British rail right-of-ways, and Rob has managed to do just that.
Myself, I’m a born-&-bred Canadian. However, my wife is Scottish, and we’ve made many trips “back home” over the years. That, and several business trips involving rail travel in England, have given this train enthusiast a pretty good grasp of UK land- and town-scapes. As an N scaler, my personal preference has always been to model British rail, but I had to accept that I could not, convincingly, pull off the hard-to-capture detail … the special “look & feel” … that European rail settings demand.
To Rob – good on ya mate – you’ve nailed it!
Rob,
Thank you for all your thoughts and advice on building model railroad layouts. Your thoughtful commentary on how you have expanded and rebuilt sections of Farland Howe over the past 4 years is very helpful. It shows that you share Dangerous Dave’s courage to tear apart a beautiful layout to improve both the operation and scenic aspects.
Your inclusion of the “final” layout track plan was very helpful in understanding the changes you have mad to the original plan. It reminds me of the first L-shaped layout I tried to build as a teenager 60 years ago from an Atlas book of track plans.
The high quality of your track plan allowed me to print it out and refer to it while watching the video, which made the video all the more informative. Thank you again for sharing your layout and experiences with those of us who can only hope to someday accomplish a fraction of what you have completed.
Pretty Kool.!!! Would like to see more.
Wow Awesome Comment on your Vid loved it and of course most of us have been there done that was Great to see how it all Grew thank you