Fred’s been in touch with a fantastic ‘how to’ on making model railroad trees.
He’s a man of few words, but his pics speak for him.
There are lots of tree ‘how to’ posts on the site, but this one really is spectacular.
“Hi I must say some cracking tips of late ….love them ..
Thought this might be of interest to some my take on a wire tree
Fred”
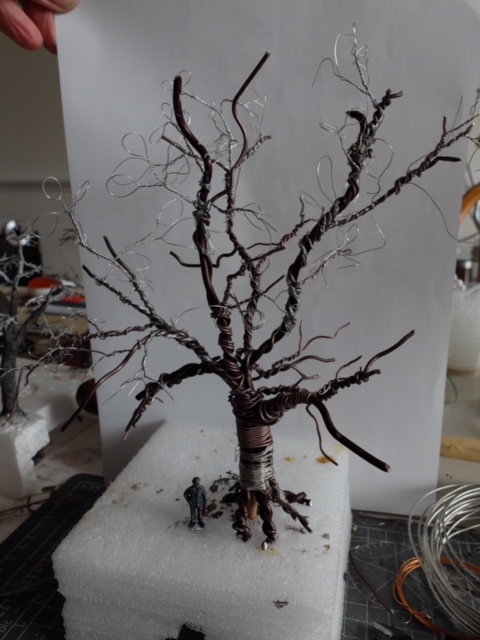
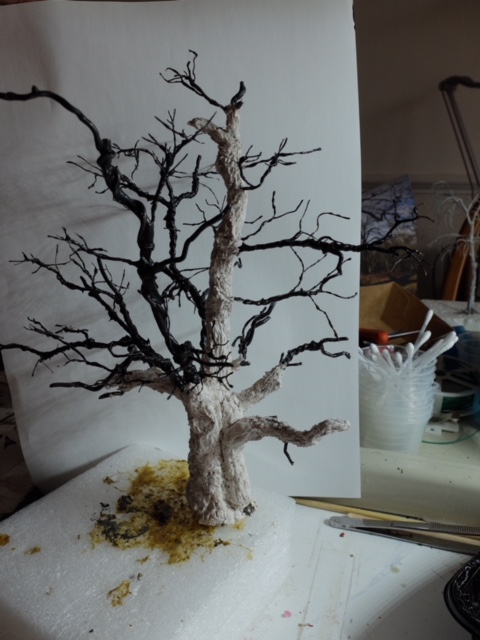
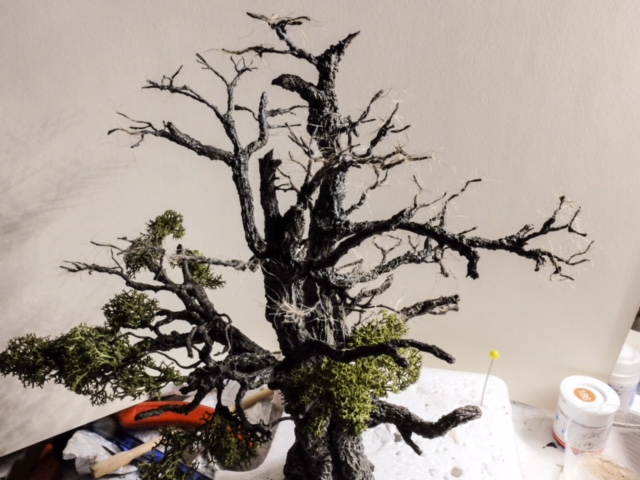
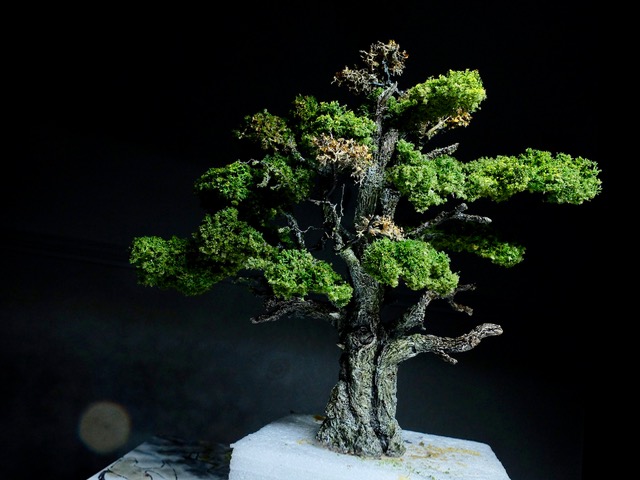
Fred’s also made a ‘Making model railroad trees’ youtube:
Fred’s post reminded me of Rob’s on trees too:
How to make model train trees.
In fact, there’s lots on making model railroad trees, on the blog. Here’s a few more:
Trees for a model train layout.
Now on to Michael who has been in touch again.
“Al,
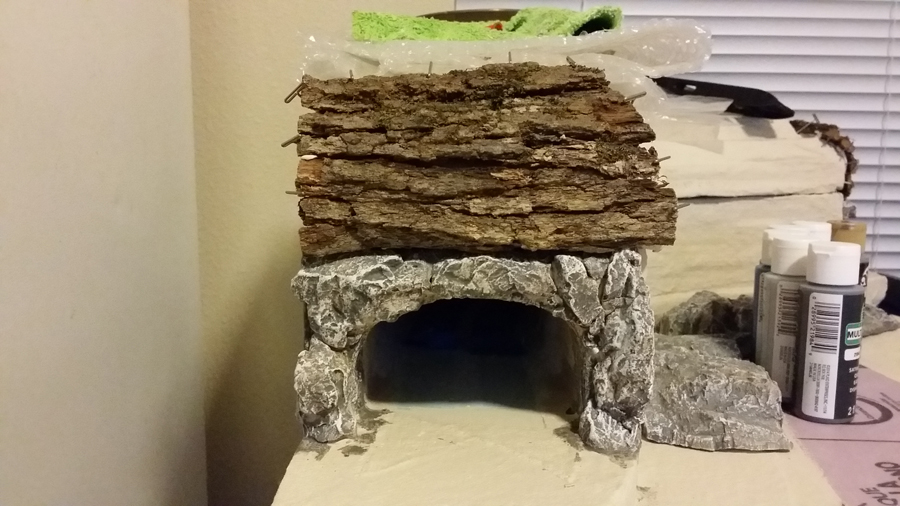
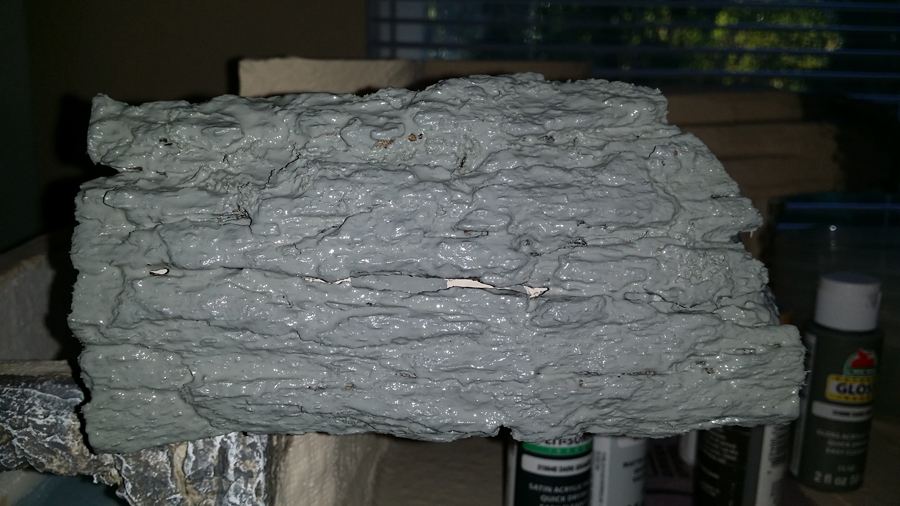
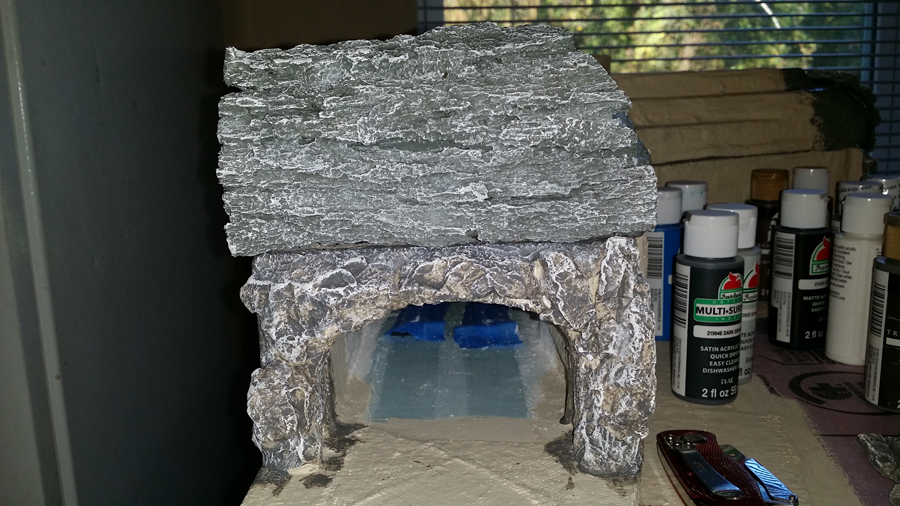
Here are a few pictures of my tunnel entrances, before and after assembly and the natural materials used.
I used tree bark from a white oak tree in the woods that I found and glued them (all 4 pcs.) to the top of the tunnel entrances, let them dry and painted them with a dark gray mixed with white paint and water.
Then dry brushed them with white paint.
Mickael”
“I have been reading this article for some time now and enjoy it very much. Unlike most on here, I run both O and S scale trains.
I thought I would share so hints I got from the old timers. Since I am 70 maybe I am the old timer now. I use a lot of wheat and rice bulbs with bare wire leads. I found nail polish make a good wire insulation after all connections are made. I also use it to lock on nuts to bolts and numerous other things. I prefer red so I can tell that everything is covered, but clear , black or any color will do.
The other hint is artificial coal. The original artificial coal was made from Bakelite which has some hazard properties. They then went to plastic which also has its draw backs. I found these lodged in motors and cut up belts using coal loaders. I also found black aquarium gravel worked better but still jammed up belts and was work to un-lodge from places. Try Grape Nuts cereal. Dry in microwave for 30 seconds then spray paint black. It takes a few spray times. Now if this gets caught in the motor or belts is crunches up and does not lodge as often as other materials. It takes just a little air and a brush to clean up Also safer for children and pets.
Your comments please….
Joseph”
“Well, seeing as how I am the least handy person on this planet, and cheap to boot, here are a couple:
Since my layout is in a permanent winter mode, I wrapped the plywood bases in white bedsheets —
It makes a a great “canvas” for laying down landscaping and a SUPERB conduit to run the wiring between the sheets and the wood – no drilling required.
The “snow” is actually a ceramic product: Duncan’s no-fire snow, available, among others, online at Amazon. You can paint or sculpt it on, and it dries to a plaster-like state.
More recently I wanted to add some ice-covered ponds, and as I dislike mixing chemicals, etc. for water effects, I went to the nearest drugstore and purchased a couple of ladies’ hand mirrors, you know, the kind they carry in their purses. I laid down some snow and partially buried them, feathering the edges with more snow.
But then I wanted a larger ice-covered swamp or pond, and here comes the cheapest solution of all: I headed to the kitchen, ripped off a good-sized sheet of food clingwrap (like Saran Wrap), painted the bedsheet in the colors I wanted to show through, and laid the wrap on top with a little landscape cement. You can make it smooth or rippled, and it looks great!
I hope these help.
Bill”
A huge thanks to Fred for his fab ‘how to’ on making model railroad trees, and to Mickael and Bill.
It just goes to show (again) that you should never throw anything out, and with a bit of thought and creativity, you can get stunning results.
That’s all for today, folks.
Please do keep ’em coming.
And if you want to take that first step with your very own layout, the Beginner’s Guide is here.
Best
Al


Fred
Very interesting tree, the wire part I’m with, got lots of aluminium wire lying around, but what do you apply over it, plaster filler? White glue with powder or saw dust? I’m sure many others are interested to know.
OK that wire tree has me hooked……….. NOW I gotta ask, the tree itself is what type of wire? (Gauge) and whats the “white” stuff that is being used as “bark”????
AMAZING work no-less!!!!! I got some that I need to build, that has no “leaves” as I want some of these type tree’s to be for a “Christmas Tree” display that will have a BIG Christmas Tree in the middle of it and the train goes around the bottom, I got the whole thing made and well I got PLENTY of Evergreen type tree’s but very few Deciduous trees to just have a light coat of “snow” (white paint and silver EXTRA FINE Glitter) on the tops of the branches, BUT, I need more of them SO that said I need to know how to make them like is seen right here!!!!! That would be a GREAT tree for what I have planned I just got to know whats all used!!!!
Fred, PLEASE see if Al will allow you to contact me directly, OR Al pass Fred’s e-mail to me and I’ll see if He & I can speak on how he does this!!!!
Great video as always Dave! I’m struggling to get into the loft to work on the OO Gauge layout as its either too hot in summer or too cold in the winter. Can’t persuade the Finance Manager to invest in insulation and roof windows!!!
Very impressed with carp feeding. Reminds me of my trip out to see Great Whites in South Africa and the boat skipper patted one on the nose – yes, really!!!!!
Keep them coming Dave.
Hi Dave, I notice some signs of weathering on the rake of wagons at the start of the running clip. Is this something new for you, are you doing it yourself or were they bought in that state? Another tutorial coming up? Best wishes from the Land of Song
Tony, Cardiff
What a great tree. How long did it take to make it?
Dave’s how to’s are excellent as he has tried several methods and explains the problems of each.
I have a smaller layout and used Sundeala board. It has many advantages, but there are a couple of things to be aware of.Gluing anything to it can be a problem as the top layer can peel off. I had an elevated section that rested on glued pillars. It needed only a slight knock to tip them over with the top layer of Sundeala; you need to use screws to attach all but the lightest things to the board.
I know Dave is frequently remodelling sections of his layout. If you use Sundeala removing anything you have glued also takes off the top layer leaving an untidy surface.
Dave, Love the koi pond and the garden. With the trains and outdoor stuff you must be quite busy. Cheers! NJ Mark
dangerous Dave, it’s always a pleasure to watch you at work. That garden is as well planned as your trains. Love them both. The Koi grow to the size container they are in. They have become very fine examples much like the ones I saw in Hawaii.
Well done Al – two nice and useful ‘how to’ items. Fred’s tree is stunning. I hope he will show us more detail about each stage. Also – how tall is the finished tree?
I always enjoy Dave’s videos – so useful and helpful. I guess Sundeala is inherently quieter and soft enough to pin into without pre- drilling. However it is a ridiculous price: One merchant told me the high price is because it is used in schools for pin boards! Anyway – another comment here pointed out that the top layer easily separates, so it is not ideal.
I wonder how easy it is to remove the track when held down with Copydex. Dave always makes light of these problems, and he never lets a little thing like that stop him tearing into a refurbishment! (Which he seems to do quite a lot!). Dave; do you sacrifice the track when you make a change, and just put down new, or can you get the track to come away from the cork cleanly, so you can re-use it?
Thanks for sending your videos – always a pleasure to watch, and nice to see such massive Koi taking food from your hand.
Dustyk UK
Need more info on the tree,great tree mined you . we need instructions to go along with the photos. looks realistic.
Yes Dave u’ve dunnit again Bravo!
In the states use homasote if you can find it. Nails push in. I need one of those nail holder /pusher tools Dave uses. Have to find one
Fred, the tree is beautiful work, but could you provide some info on what you used to create the bark, and maybe some of the other steps in making it?
Dave, another great video! I never tire of seeing what you’re doing. And I’m very impressed with your Koi pond. Your Babies are really tuned in to you. Love it!
Warren, AL, USA
Nice tree looks a lot like the Japanese Bonsai ones !!
Wow, nice! Looks like a bonsai tree. More details on the bark and foliage would be helpful.
Now if I could just find some n-scale (live) Koi…. that would be the topper
Worthy Bonsai standard !
Tony – Cardiff – Dave (returning pensioner!) Bridgend – would you accept an acolyte collecting TT and, if so could Alistair put us in touch ?
The tree in picture 3 looks ideal – the top of it totally dead.
Carl in Kansas
great looking tree will give it a go you made look easy. the video is great always learning and enjoy the trains. thanks for sharing.
Fred’s trees couldn’t be more life-like; splendid work! Thanks Al for the postings!
Really like the tree but without some text it’s just some pretty pictures that bring more questions than answers. Not all of us are as talented and really need a guide and some help to do this. Please provide this to all of us or I’d recommend not posting these in the future because technically they are incomplete posts and like I say just pretty pictures unfortunately.
Hi all from Aotearoa New Zealand.
Love all the tips and tricks, and featured layouts on this site. I am curious, though, whether others are also having trouble with things like missing videos on the post. For example, I see references to carp in the comments, but can’t see anything in the post above them; just the trees and the Joseph and Bill’s text.
Cheers
Bob
Hi Al and Fellow Modelers… Really Impressed me with how to model a large tree as was displayed here. How about Really Using LIVE Bonzi Trees on a Model RR? Has anyone actually done that to your knowledge? If you had a narrow shelf layout the Live Bonzi Trees could be along the background or even the foreground. (2.) liked the idea of using Tree Bark for rock formations.. it looks more realistic. And it is Lightweight as well.
From Mike on my 72nd Birthday in N.H. U.S.A.
I o really like all the tips and tricks and the lots of great advice comming from your Blog. Keep up the good work.