Slowly but surely there are more and more Arduino model train projects being submitted.
This is how Tim solved a problem with his turnouts:
“Al – I was inspired by a story you published about using servo motors to control turnouts. I did some research after reading this story and considered that using servos might be a viable option to replace the traditional solenoid motors in my current model railway.
I currently use the stud and probe method with nuts and bolts through my baseboard in the design of the track (photo below).
Solenoids were relatively expensive and due to the age of them, there were occasions when they would get stuck.
However, the method of controlling these servos seemed cost prohibitive given the cost of the controllers used to activate them. It seemed to me that the maximum numbers of servos that could be controlled by one control panel was 12 and they were expensive to purchase.
After doing further research (and with the aid of my extremely talented son) I believe that I have come up with a very cost effective solution.
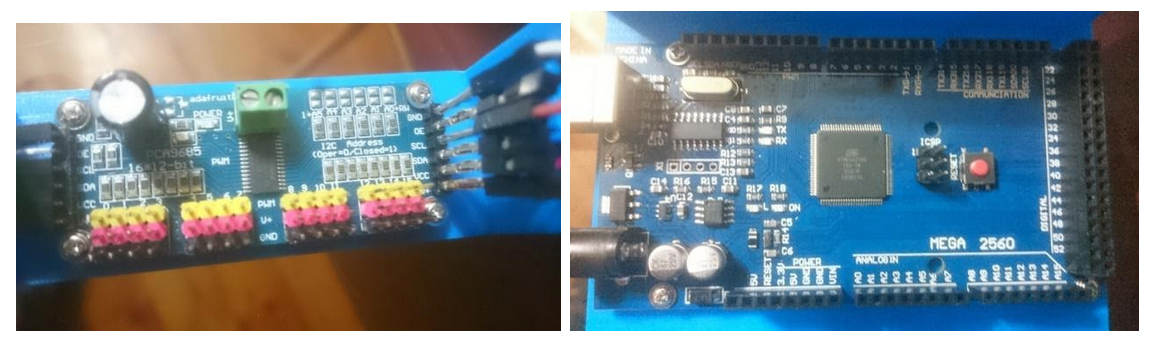
Firstly I purchased an Arduino mega for about AU$14.00. It has 54 inputs meaning that it can control 54 separate servos.
I have hooked the Arduino up to three PCA 9685 16 channel PWM servo drivers. These cost about AU$8.00 each. As the name suggests each board can control 16 servos. They can be hooked up in series so that the full 54 inputs of the Arduino can be used.
The servos cost about AU$2.00 each and with the costs of a power supply, dupont jumper cable connectors (so I could make my own wiring) and aluminium channel to house the servo, each turnout worked out to around about $5.00.
I used a straightened paper clip to connect the servo to the tie bar of the turnout to act as the lever to change the direction of the turnout. There are many internet articles about fitting servo motors.
My son has written some sketches (programs) to control the servo for various Arduino model train projects.
The first sets the servo at 90 degrees.
The second is to control a single servo – it is very useful to determine the angles required to change the point from straight ahead to turn.
The third sketch is to control up to 48 separate turnouts using the PCA 9685.
The input for each servo is the ‘stud’ part of the existing control set up with the probe being connected to the ‘ground’ input on the Arduino. Each time there is a connection between the stud and probe the servo moves in the opposite direction that it last moved.
Previously I had 2 studs per turnout – one for each direction. I now have one per turn out – each ‘press’ changes the turn out to the opposite side. The same results could be achieved by using press buttons although the wiring would be a little harder given that every button would need to have a common ground wire (this is achieved in my system with the probe)
The sketches (particularly the last one) allow for individual angles to be provided to each individual servo and the speed of the servo to be adjusted so that they change as fast or as slow as the modeller desires. They are down loaded to the Arduino and once downloaded the Arduino executes the program each time a button is pushed.
Replacing existing turnout motors was very simple. After removing the existing motor, I put the paperclip through the tie bar from above. I put a 90 degree bend in it so that it wouldn’t fall through. The aluminium channel was fitted from below the baseboard. I passed the paperclip through the appropriate hole and temporarily stuck the channel to the baseboard with a piece of doubled over electrical tape. After checking that moving the paperclip from side to side operated the turnout, the aluminium channel was secured to the baseboard using 2 screws.
I then put a ‘z bend’ into the bottom of the straightened paperclip, attached the servo motor and pushed it up into the aluminium channel. After checking that the servo worked the top of the paperclip was trimmed back to the tie bar level.
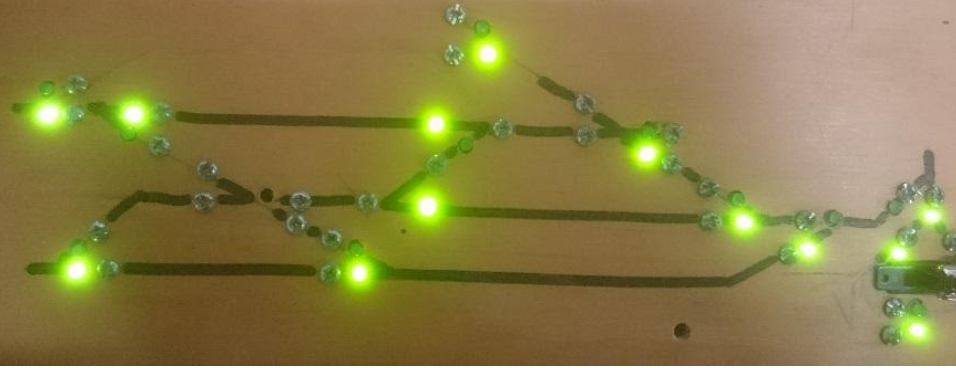
The LEDs have been wired to the side of the turnout. The inner rails of the turnout have been isolated so that the LED only comes on when the blade of the turnout is closed. That way I can see the direction and know that the blade of the turnout is closed.
This might impact on some business of the companies that have made turnout controllers but this system is far cheaper and thanks to the sketches already written it is very easy to install and control servo motors.
Hope this can be of assistance to the wider modelling community.
Regards,
Tim”
Now on to Cassio.
I don’t really publish pics on their own, but this one had me looking at it for a while, so I thought, why not?
You can see Cassio’s last post here.
“Hi Al , just had a day out up in North Yorkshire to see some Steam.
Thought some of the members might enjoy, as I say some saying they see too much of DMR with trains running.
Regards
Dave”
I often ask whether I’m posting too much of Dave’s stuff. I have to say the people who say ‘no’ are in the majority by a country mile, so I’ll continue to with Dave’s Model Railway.
That’s all for today.
A big thanks to Tim – I’m seem to be getting more and more Arduino model train projects, like Keith’s and John’s.
That’s all for today folks.
Please do keep ’em coming.
And don’t forget, if you want to take your first steps towards your own layout, the Beginner’s Guide is here.
Best
Al
PS Latest ebay cheat sheet is here.


Switching was not a problem for me. I got a “Train Electronics Book” from the 1960’s and it had a “Diode Switching Matrix” diagram that I copied and controlled 23 switches. More if I needed it. The Momentary-On double switch allowed me to switch up for open and down for closed. The circuit board with the diodes installed was 2″ x 3″ and installed behind my switch board. No one uses Diodes any more. They are so simple to configure.
Definitely, definitely NOT too much from Dangerous Dave – please keep them coming.
Tim’s Arduino servo control system sounds very promising. Having the Arduino sketch served up on a plate makes this a project which many modellers could try. It would be good to see some photos of the servo motor mounting system and the paperclip rod detail. I found this article about the PCA 9685, which might be useful:
https://learn.adafruit.com/16-channel-pwm-servo-driver?view=all
Hi Tim, I buy servo’s from Wish in China at around $2.00 each or sometimes 10 for $5.00 when they have them also the Arduino boards are very cheap at $2to $4.00 each
Hi Al, On the contrary, I find Dave’s post always enlightening and a source for great ideas..just watching how he has set up and operates his trains is a great inspiration. That’s not to say I don’t others’ work just as interesting, because I find everyone has something worthwhile to contribute. We see and we learn.
G’day Al, I enjoy Dave’s photos and videos, they provide ideas for my model railway. Living in Oz photos and videos like this show views of track-side items like the brick culvert bridge the locomotive crosses at 0.40 secs. I took a screen print to use as a template when I build one on my layout . Hope this makes sense as I could not copy and paste here to show what I mean. It’ll be a little bit of Yorkshire in Queensland, Best wishes to one and all Andrew in Oz
North Yorkshire footage soo evocative! And what is that lovely piece of music?
I loved this video, great to see steam engines in action
I like Dave’s video’s, keep them comeing. Thanks.
Dave’s pieces are an inspiration to me and many other model rail buffs. I would be greatly saddened if I could keep up with what Dave is up to next. Dave, lots of love and admiration from across the pond.
Rob — St. Goar & Murren Scenic Railway, Ann Arbor, Michigan, USA
Keep Dave’s video’s coming!!!
I so much look forward to anything Dave posts. Please keep them coming. Thank you and Dave.
I enjoy Dave’s videos so please keep them coming. And a big thanks to you, Al.
Tim, What type of servo did you use and where did you buy them
Thanks Al and Dave for posting.
Keep it up.
I lost my wife in 2018 and NYMR was the last full size that she visited. Lovely memories.
Don.t stop Dave.s videos both in his house or on the road they are very interesting and informative and a pleasure to watch. He is one of KIND. Thanks Ron from sunny Florida.
I’m always for a leaner solution: less moving parts / components. I like your reduction from two (2) to one (1) studs. But there is an issue with this flip-flop / toggling approach when you want to move onto more automation: your arduino program creating paths thru a network of turn outs: you cannot make it deterministic, because the previous state defines the next state of the turn out, and you have no way – without current hardware / wiring / switch setup / no input ports on the arduino – to know what state the turn out is. It is though easy to fix: if you want to go straight: consider a short button press / probe touch. If you want to turn, consider a long (longer) button press / probe touch.
Thank you all for your Support. ..Dangerous Dave
Roger ..that music was from YOUTUBE library Kevin Mcloud at the Shore Dangerous Dave
Absolutely NOT too much from Dangerous Dave. I’ve said it before and I’ll say it again: I’ll never get tired of videos of his wonderful layout––in its many incarnations! What will get ripped up next?! Love it!
Dave, I can never have too much of your excellent videos. Nice to see some live steam running again. The British countryside is so beautiful — it always looks like something out of a fairy tale to me. At last we get to see the lovely Deb. You’re a lucky man Dave. Keep the videos coming please. Such a welcome relief from all the sad news of C19.
Keep Daves DMR progress and info reports coming. I would like to see MORE