Kaustav’s been in touch with a wonderful ‘how to’ on N scale weathering.
“Hi Al,
Few weeks back you found and posted the part 1 of my barge making video and the response was very positive from your subscribers.
I just realised that I haven’t followed up on it and sent the part 2 and 3 of the build series, so here it goes.
Once the barge was built, it was time for painting and weathering. I used my airbrush for the base coat and top coat which was pretty easy and I did it pretty fast since I couldn’t wait to get to the next step – weathering!
Weathering an old sea vessel is like the holy grail of weathering in miniature. There are so many elements – dried algae, fading due to salt water, different types of chipping, dust, rust, heavy corrosion – whatever you can think of when you think of weathering can be found in an old vessel.
Moreover, unlike larger models, I had a very tight space to work with and had to hit that fine balance of the size vs. the right amount of weathering. You need to keep the scale in mind during weathering too.
So, this project is really a one stop shop of weathering techniques!
This was not the last part thought, after this one I had to add a ton of details to the barge to bring out the best in the model (which also includes a little bit of weathering on wood). But let’s keep that for my next entry.
But to be honest, it doesn’t matter what scale you model in, couplers can cause all sorts of problems, particularly derailments.
Have a look at the comments at the bottom of the page and you’ll see exactly what I mean.
In fact, reading the comment below could save you hours and hours of blood, sweat and tears. Especially the tears.
It doesn’t matter what type of HO scale coupler types you decide on – or any scale for that matter – as you’ll read.
“Hi Al,
Just posted this video showing a good running session, and also a problem I am having with couplings causing derailments, tried new couplings but this does not seem to work so far, maybe some members will have a few suggestions?
Well, Dave has given us all a lot of pleasure over the years, so it would be wonderful if we could do something for him. Can anyone help with his couplings?
If you can, please do leave a comment at the bottom of the page.
Now on to Tom:
“I thought I would pass this photo along to remind everyone that things get messy before they get good.
Tom”
Wise words from Tom, and it’s certainly something I’m always banging on about, so I thought it worth posting.
That’s all for today folks. Short and sweet today, but sometimes that’s the way it is: HO scale coupler types or any scale, they can be troublesome.
Gary’s been back in touch. He added some HO scale engine yard buildings to his layout. It’s really taking shape now!
“Hi Alastair.
It has been seven months since I sent you the first pictures of my layout of the PRR Sunnyside Yards in Queens, New York.
At that time I had completed the first phase of my project which was the track work and signal work on the passenger yard. My next phase was completing the track work and signal work for the engine yard.
Yesterday, I finally completed the track work, switch work and signal work and blocks for the engine yard.
I don’t know if I am just slow or if it takes a long time to work on a model railroad but it took me five months to complete the engine yard. I learned a lot.
All my signals are synced up with the switches. I installed a Circuitron Auto Reverse circuit (AR-2) that controls the polarity of the tracks that my engine for my work train runs on, which you will see running in the short video.
I also installed an under table magnetic uncoupler that is on the rail right next to the two main line rails. This is so I can uncouple the GG1 engine from the passenger train, run it into the engine yard, park it on one of the spurs and run another engine out to hook up to the passenger train and then run the train out onto the main line.
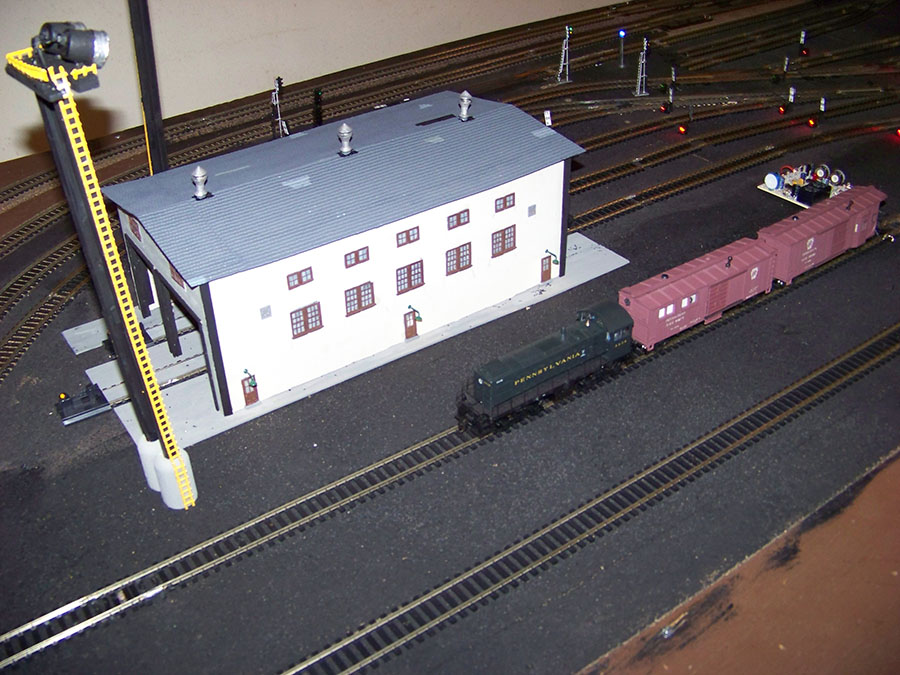
I also built my first SCRATCH building, the engine house.
I lost two months’ time in June and July due to knee surgery and I could not get under the layout table. So during that time I worked on building a scratch engine house which closely resembles the engine house in Sunnyside Yard and scratch built yard lighting towers.
I had to build the engine house from scratch because I could not find any model buildings that resembled it.
Here is a picture of one the HO scale engine yard buildings; each of the doors has an overhead lamp that light that you will see in the video.
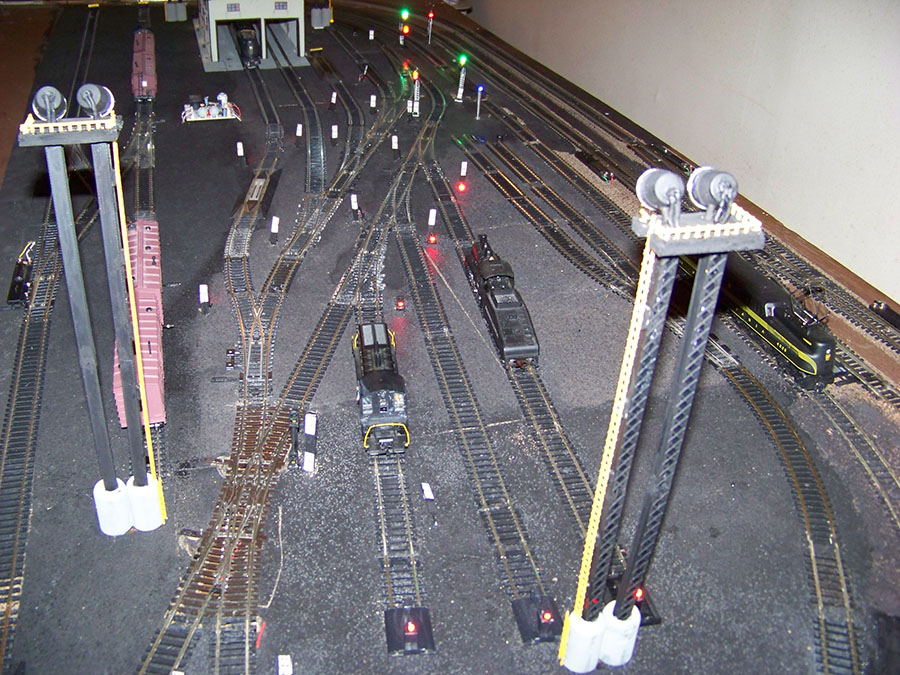
All the switches have either a dwarf signal or upright signal that is controlled with the same switch controller that throws the switch; so when the switch is heading straight, the signal will be green; when the switch is diverging, the signal will be either red or yellow depending on what color I used.
The engine yard has two main tracks going through it up to a slip switch which has a double signal (see pictures 2 and 3).
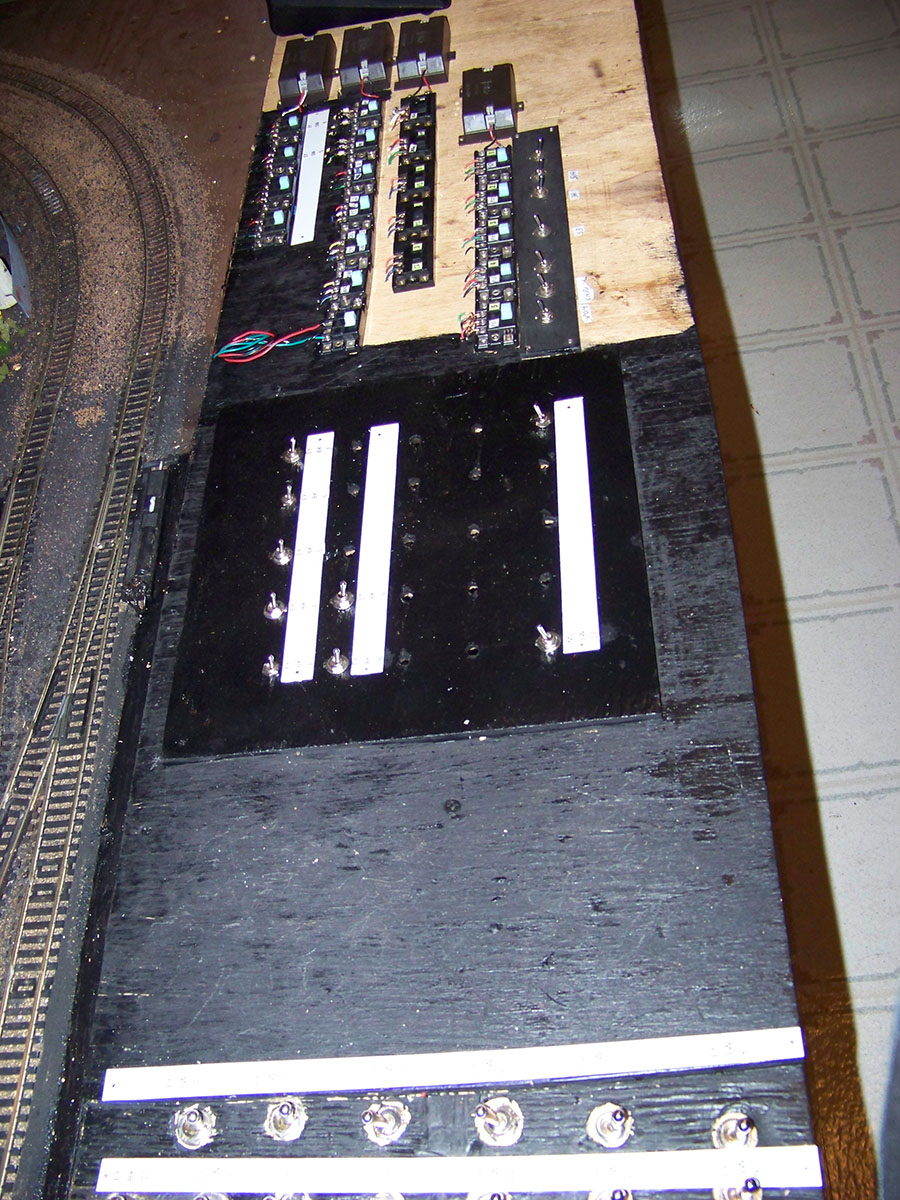
All of the seven spurs off these two tracks are blocks which have their power controlled by a toggle switch on my panel (see picture 4).
I have left a lot of space on the panel for future phases of the layout. All of the signals and switches are labeled and numbered, just like on a real railroad, and the panel toggles are labeled and numbered for the corresponding blocks and or switches. Those are the white markers you will see in the pictures.
Now that the track work is done I have to complete the following:
finish the ground work
complete the ballast
install a scene on a crew that is doing track work
install a scene for fuel and oil track for the engines
scratch build a railroad yard office to cover the Circuitron circuit
install switchman shanties throughout the yard
install electrical relay cabinets and boxes for the signals and switches
install a maintenance crew working on a GG1 engine out of the engine house
install maintenance platforms around the yard
add some ground cover around the yard
add maintenance waste and trash around the yard
add any more scenery scenes that would fitting for an engine yard
install main line crossing signals for street traffic into and out of the yard
When that is complete, here are the next phases:
add and complete to the center of the layout the commissary buildings with delivery trucks for products needed for a passenger train
add power station, yard master towers to the center of the layout
complete the center of the layout with main road for traffic, yard crews, passenger train crews and appropriate scenery details
complete the lighting for all the passenger cars
make up the trains with GG1 engines for the passenger yard
install service crews throughout the passenger yard working on the trains
Main Line improvements:
install blocks on the inner main line so that I can control trains for crossovers
install main line signal bridges over the main lines with working signals
Outside the yard:
build a garage scene in one corner of the layout
build a Harley Davidson motorcycle shop in one corner of the layout
scratch build a White Castle Hamburger restaurant in one corner of the layout (when I worked the night shift at Sunnyside Yards we always took our lunch breaks at a White Castle that was open 24 hours)
Engine Yard from the North Side:
Engine Yard from the South Side:
Panel:
Here is an overhead view of what the layout looks like now:
I know I have outlined a lot if not an enormous amount of work but I am having a ball doing this.
I welcome any suggestions from other model railroaders. As I finish each phase I will send you updates and pictures.
I also have drawings of the electrical projects I use for the layouts such as Tortoise wiring and voltage reduction. One fault I have is not knowing what resistors to use with what LEDs.
As you can see in the pictures some LEDs are brighter than others. If any of you former or current electricians out there can direct me to how I can get information on working with the intensity of the LEDs…….. I will be forever grateful.
Alastair, keep the emails coming; I enjoy reading the articles and pictures and tips you send from the other modelers.
Well, I think it should be me thanking, Gary for sharing his latest missive on his HO scale engine yard buildings. What an update and what a layout. Can’t wait to see the next instalment.