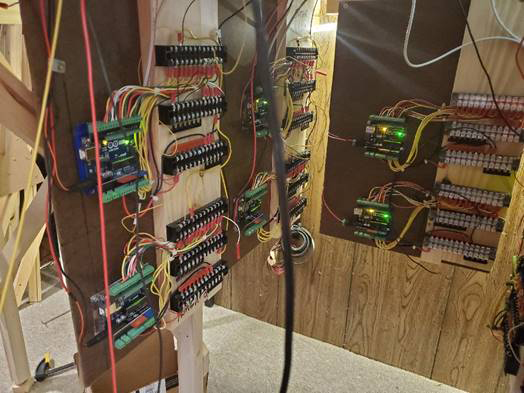
Bob’s been back in touch with a top for DC wiring model trains.
Just have a look at his wiring!
“Alastair,
The adage “necessity is the mother of invention” holds true.
In setting up my signaling on my new layout, I am using three-headed signal masts.
Telephone wire works great for these since each signal has a Black ground wire and Red, Green, and Yellow wires for the LEDs and that is what phone wire has.
That makes it easy to run wire from my signal control panels to the signals (first picture).
Now the IR sensors I am using only use three wires: positive, ground and data. I could use phone wire again band just not use the green wire, but I decided to use separate Red, Black, and Yellow wires.
It was going to be more work than using three different spools instead of one phone wire. Then the light came on.
I fashioned a spool rack using a ½ in dowel and some scrap wood(picture two).
It works great for DC wiring model trains. I just tape the ends of the three wires together and pull the wires together from the control panel to each sensor.

The spool rack is also a great way to store wire and it is portable.
Here it is on the floor where I am working but I also use it on my workbench when I am putting together and wiring the dwarf lights for my turnouts.
Bob in Virginia”
Now on to Ashley:
“Hi Al,
I have been enjoying your posts for a couple of years now. So it’s probably time I contributed something. As well as the modelling and running a layout I enjoy working on the controls side of things.
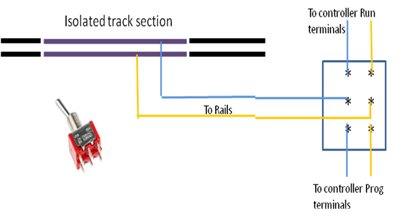
With DCC loco’s the reading and changing CV’s becomes tedious if you have to remove the engine and put it on a programming track each time. So I devised a simple improvement.
I made a section of track isolated and wired it to a switch that can connect either to the running output or programming output of the controller.
I simply run the engine onto the isolated section ( switch set to run) then switch to programme, read and change CV’s. Then switch back to Run and check it out.
I never have to takethe engine from the track.
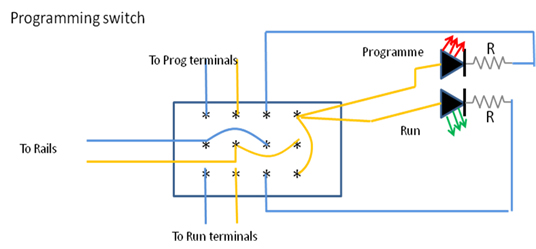
The diagram below shows a simple installation using a double pole double throw switch.
The second diagram shows how I added LED indicators. The resistor value depends on how bright you want the LED. between 270 Ohm and 1k Ohm will be ok.
As the track voltage is alternating the LEDs can be connected either way.
Ashley”
And now some pics from Cassio. His last post is here.
He’s a man of very few words, but we’ll make an exception again because of the language barrier:


“HI Al
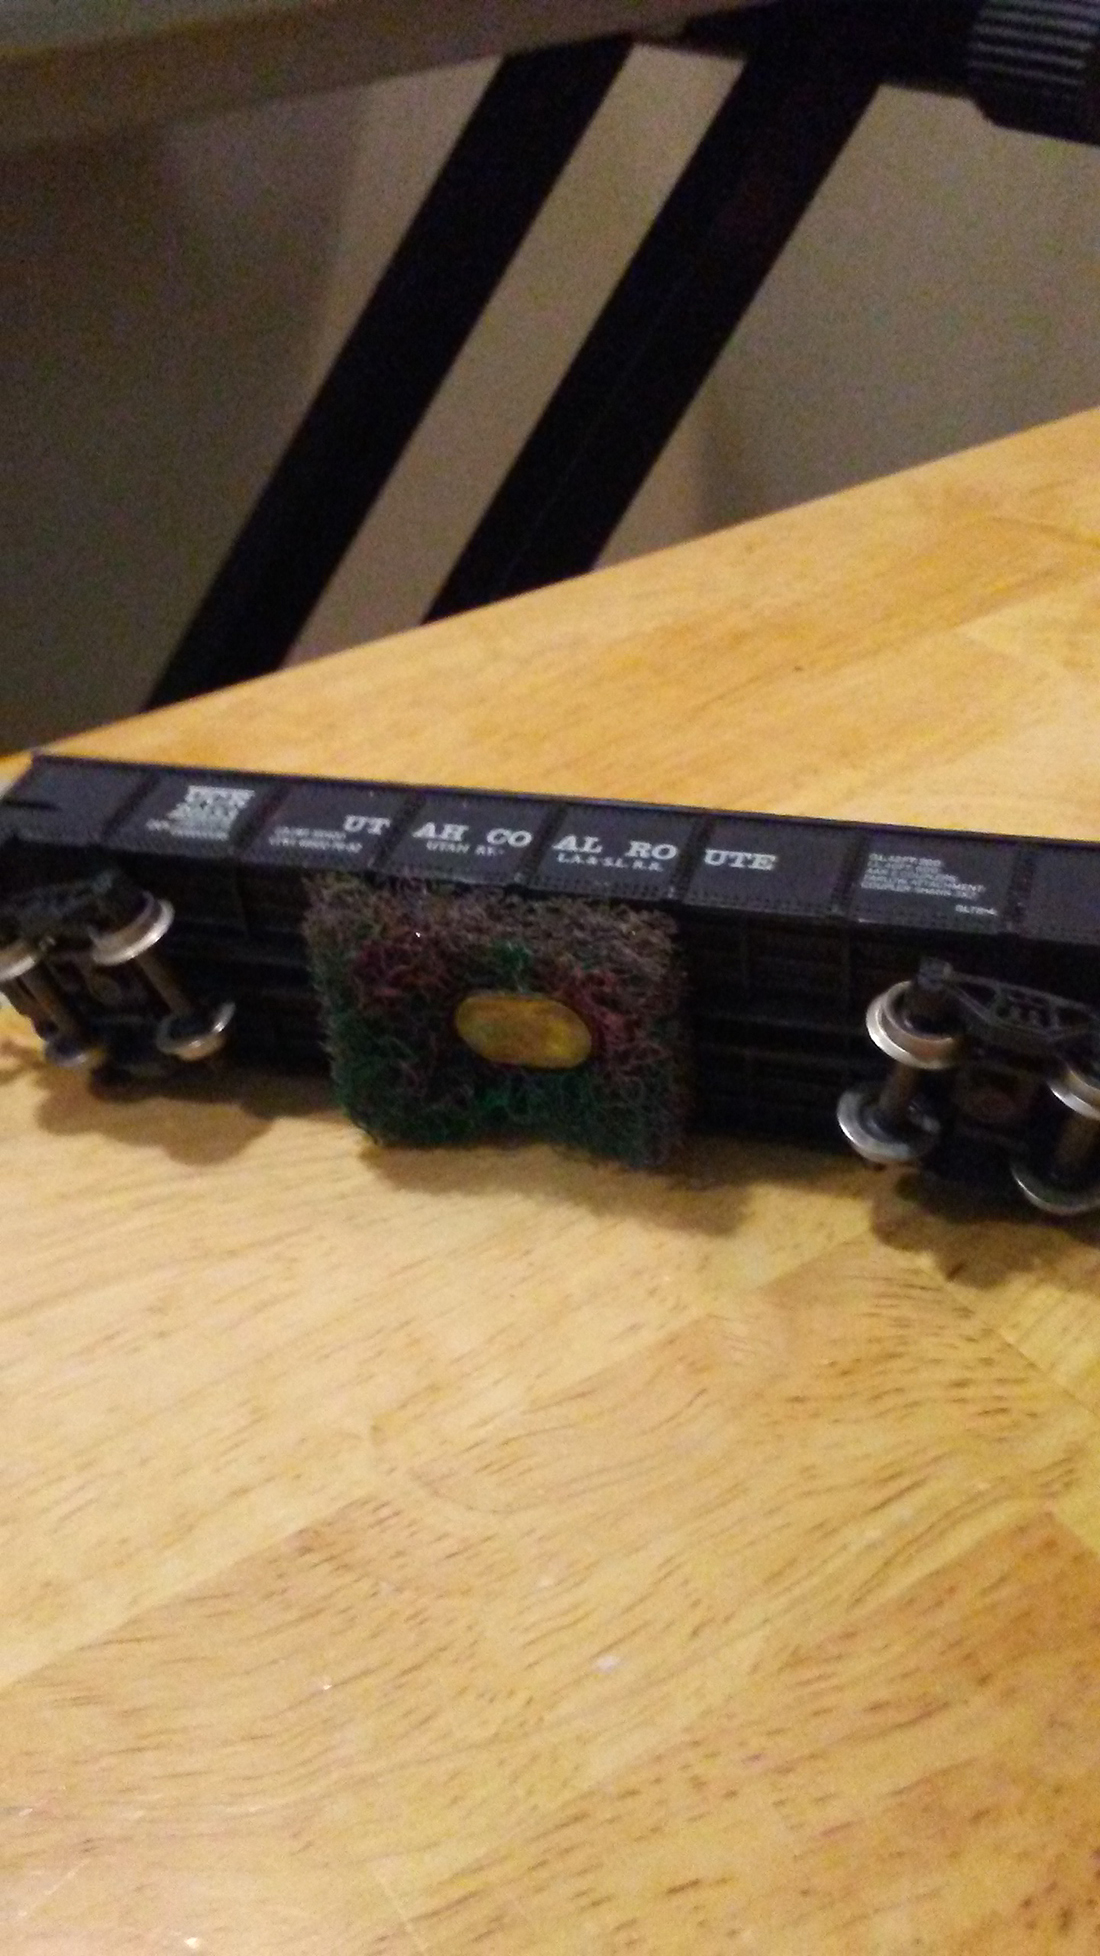
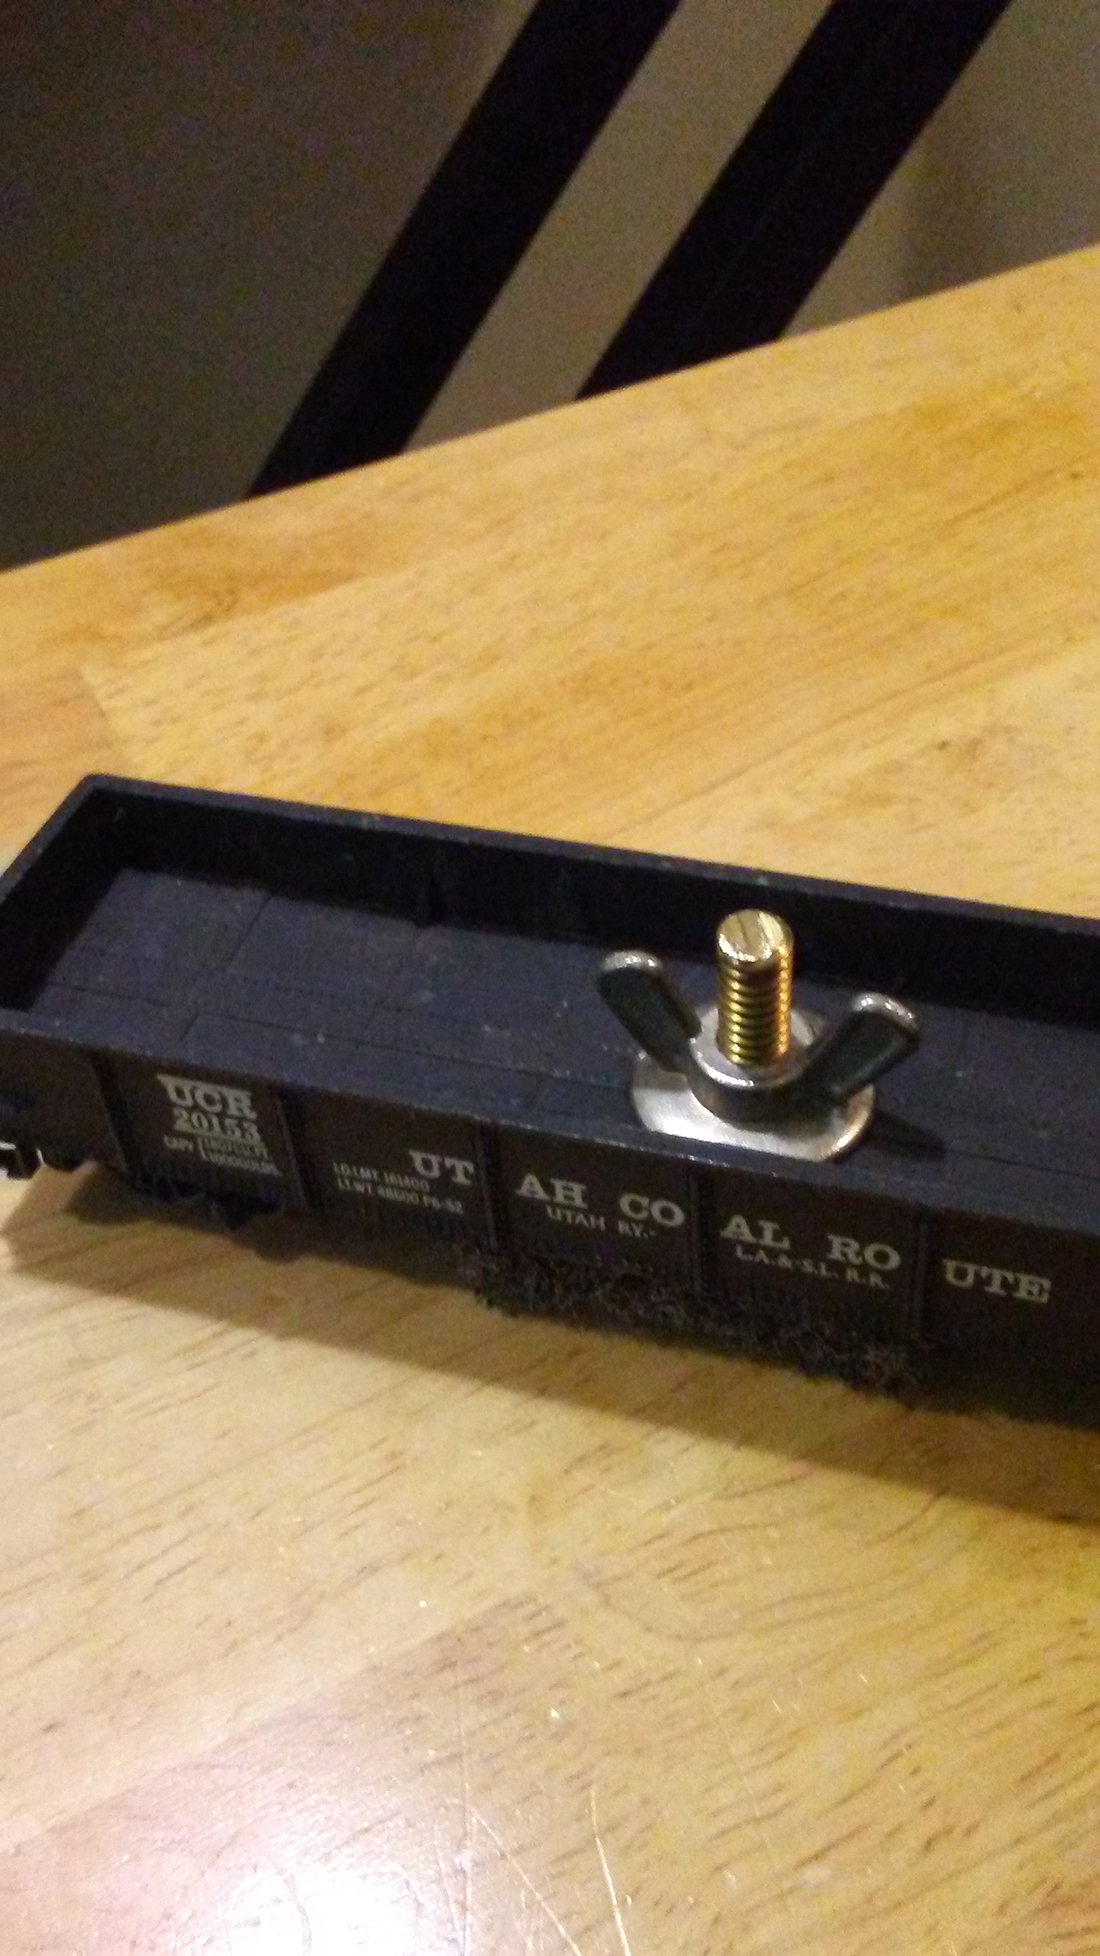
Robert here just made this track cleaner and works better then any store bought Simple to make track cleaning car.
Look for a gondola you won’t mind drilling a hole through the middle, drill through the weight. Get yourself a floor scrubbing pad and cut to size.
Your Home Depot / Lowes has 16” size or the paint isle has smaller hand held scrubbers.
You can buy a flat head bolt. Mine is from a toilet seat kit that i didn’t use.
For the cleaning liquid is your call. I use rubbing alcohol because it cleans and evaporates quickly. Buy any size cut to fit.
Enjoy
Robert”
“As an “Old School Modeler” I learned from my Dad a long Time ago that if you don’t have “good track work” as in “Your Track/Layout and connections are PERFECT… It won’t be fun to run the trains!”
This is exactly what my dad instilled in me over forty two years ago when I was in my pre/early teens.
Back then we had switched from American Flyer ‘S’ gage to HO, because back then we didn’t have “E-Bay” or the internet or “after markets” and “Re-Pops”. Sooo getting parts and stuff for those old American Flyer trains was alot more difficult!
So when we switched to HO… first off we could build alot bigger layouts with the tables we already had… and do alot more detailing! And it was pretty affordable too.
And I’ve always loves seeing what I could do with Smaller Trains and slot cars too! 🙂 so this was a win-win for us!
but… it also meant taking much more time to get things right!
In Smaller Scale… things like tight curves, gaps etc. get alot worse and made for attention to what we were doing much more critical!
If your track work does not work flawlessly, no amount of electronics. scenery, realism, operations, etc. will ever make you want to head for the train room. Take your time on the track work, make if bullet proof, and everything else will be a delight!”
However It wasn’t easy for me (as a Kid!) because my Dad and I had spent a good chunk of money getting all New Stuff! And of course being a kid I couldn’t wait to run it all! (Hell I’m still that way now! LOL 😀 )
So “patience” and “time taking” was something I really had to learn! But it did all pay off! Once we got ALL of the “bugs” worked out on the main layout… which also taught us a lot in just how “tight” we could make turns and how steeo we could make grades and such… and when we later added on the back “Train Yards” on the other side of our wreck room wall (And into the laundry/utility room!) it went down without a hitch including the “Round House” and “Repair Yards”!
What also Helped was using what we dubbed “The “Bitch” because it was a Steam Locomotive that would de-rail from a shadow it was so Sensitive!
So once “The Bitch” ran the entire Layout five times without a hitch or stopping or de-railing, then we knew it was all ready to nail down permanently!
I will also add to this… If you don’t have enough ‘power’ for your layout… especially if it’s a gin one like we ended up with… that too will add to frustrations!
So Power the tracks / trains with multiple power sources, add “bypass” wires from the Power Sources to multiple areas of the tracks to ensure continues power flow so you won’t get “dead Spots” and Power the “extras” (i.e. Lights. Switches, Etc.) with seperate power sources!
This will make for a much nicer time running things and if you have a “Snafu” in anything… you only have to mess with that circuit setup and not the entire layout.
Joe
Wisconsin”
That’s all for today folks. A big thanks to Joe, Robert, Ashley and to Bob for his DC wiring model trains ‘how to’.
Please do keep ’em coming – it’s all getting a bit thin on the ground again this end.
And if you want to your start, on your very own layout, the Beginner’s Guide is here.
Best
Al
PS Latest ebay cheat sheet is here.


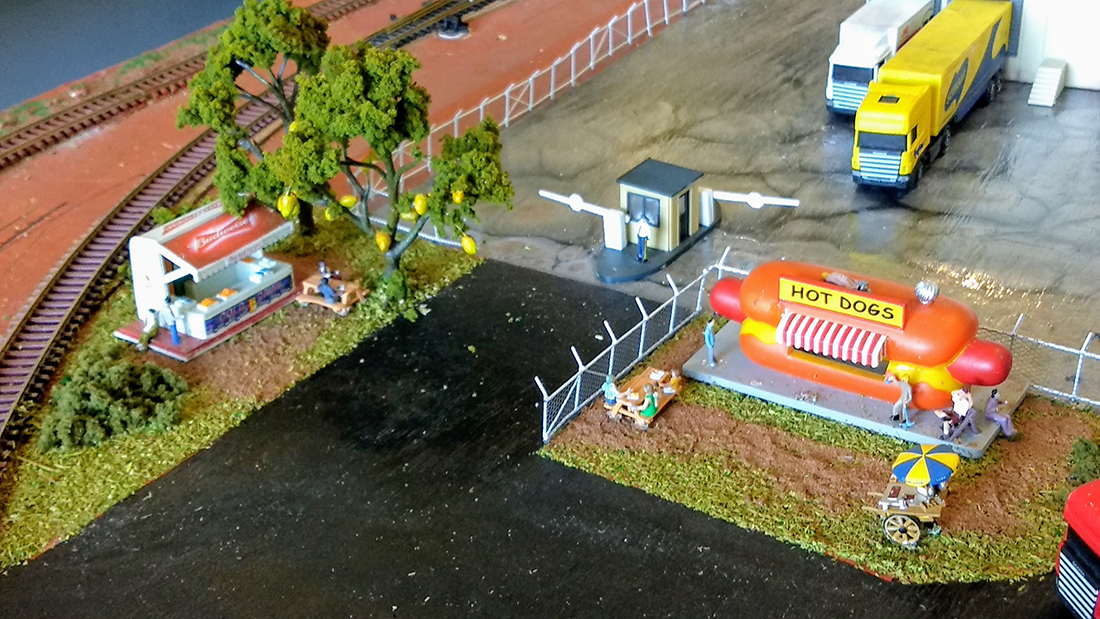
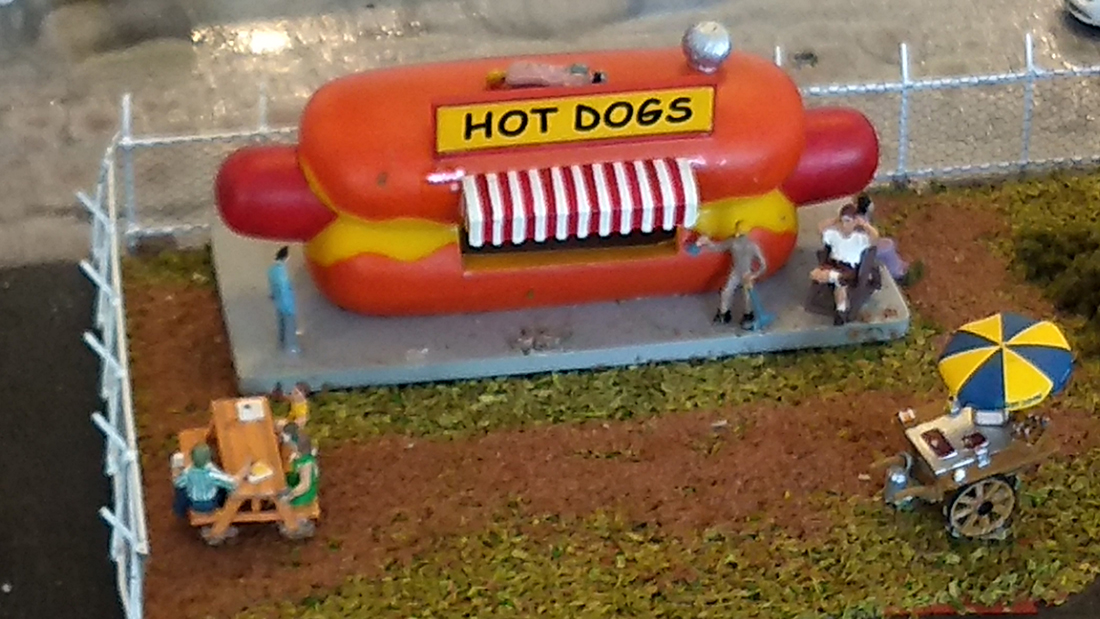
Really impressed by the spool idea and also the wiring from Bob and also the Hot Dog kiosk from Cassio.
Yo Bobby Glad ur an Electrician cause i’m sure not.If you have that many wires you must have one heck of a layout.Show us in Als next edition.
The Critic
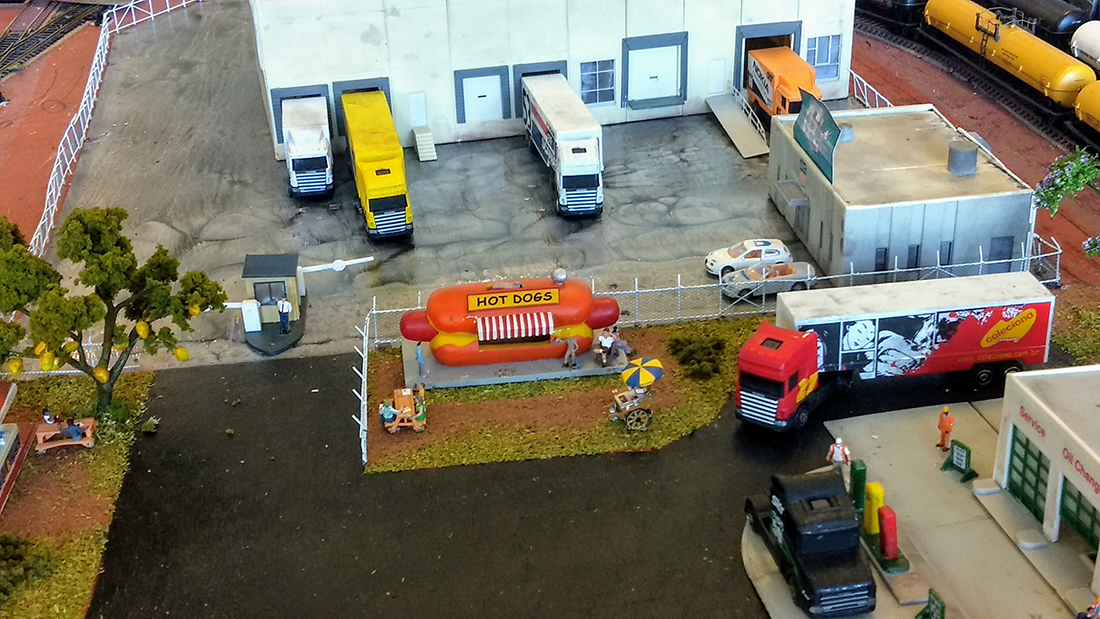
Cassio;Where did u get that wiener truck? I need one for my layout
Great edition
The Critic
A nice bit of Electrical work done there ….Dangeous Dave
Ashley,
Great idea and well implemented. However, what type of switch is the Programming one?
I love the wire spooling rack. I have one as well and it is so handy and portable too. You can take it to your work instead of guessing the length you need. Just pull it and snip it.
Rob McCrain – Farland Howe
Bob,
Great idea. I am borrowing this one. Cut a couple of carefully places slots on the back board and you can hang it on the wall and still be portable if necessary.
this is something i could use wiring tips for my train set when i get Lionel’s Legacy System
A question about “piano wire”… rather than order 1 of each diameter, would anybody suggest which sizes might be most useful to start with ? I expect to use it mostly for throw bars on switches but am sure there are lots more uses.
Any guidance would be most appreciated.
Thanks,
Dave in NY
Ashley when wiring your LED’s on a alternating current, do you protect them from the high reverse voltage on the negative cycle as this will eventually damage the LED. You need to connect a small signal diode across the LED in the opposite direction to clamp the voltage to below the reverse voltage of the LED.
Ashley Great Idea. Thanks
Yes, cable spool racks have been around since electricity was invented. Not saying at all that someone couldn’t conceive that idea on own. When you see someone spooling off cable and it resembles a coil spring…oh well. Telephone wire is the perfect choice for just about everything except power connections to rails. Intercom wire is excellent also with the gnd. and foil shielded pairs where it could be useful. Electricity follows the outer core of wiring, high voltage x-fmr. stations will use hollow copper conductors due to this phenomenon and aid with free air cooling. Um, was a master electrician at 24YO. 75YO now so hope I learned a bit over the years lol… too, remember to ground twisted shielded pairs at both ends🤔
Regards, Rich
Great advice on your track. Do it perfect the first time.
Lots of good stuff again today. And Joe you are spot on with your good message and experience regarding good track and enough power and patience to not get in a rush. Saves so much on costs, do overs, and frustrations.
I always look forward to see what Cassio has done, and liked Bob’s wiring article. Good stuff today. Looks like an easy and good working track cleaning car too. Perhaps a box car with removable body so one could hide the bolt from view would be nice. Or simply add a good looking load to the gondola to hide the wing nut and bolt from view if the owner/operator of the railroad thought it necessary. And Ashley thanks for that wiring diagram regarding the program track, That is something I will do to my layout.
.
Is that a watermelon tree near the Bud stand?
Can you use a 20 Amp DP DT switch for the program wiring
As an addendum to Bob’s wiring tip:
If you put one end of the three wires in the chuck of a hand drill, and secure the other end, winding the handle of the drill will twist the wires around each other rather than keeping them hanging loose.
Twisting signalling wires together may also help prevent them picking up interference from the track power.
I like that wire caddy. I built a similar one several years ago. They keep the wire neat, and you only have to move around one thing to bring all the wire colors to the current project area. Rob McCrain