John’s been in touch with his HO scale track layout.
I really enjoyed his narrative – I’m sure many of you will be nodding your heads in agreement:
“Hi Alastair,
I’ve subscribed to your daily emails for a few years now and finally have gotten the courage to submit something for your site. Hopefully you can use it.
I am in the fairly early stages of building my HO layout but thought I would share some info/photos of where I am some 20 months into the process.
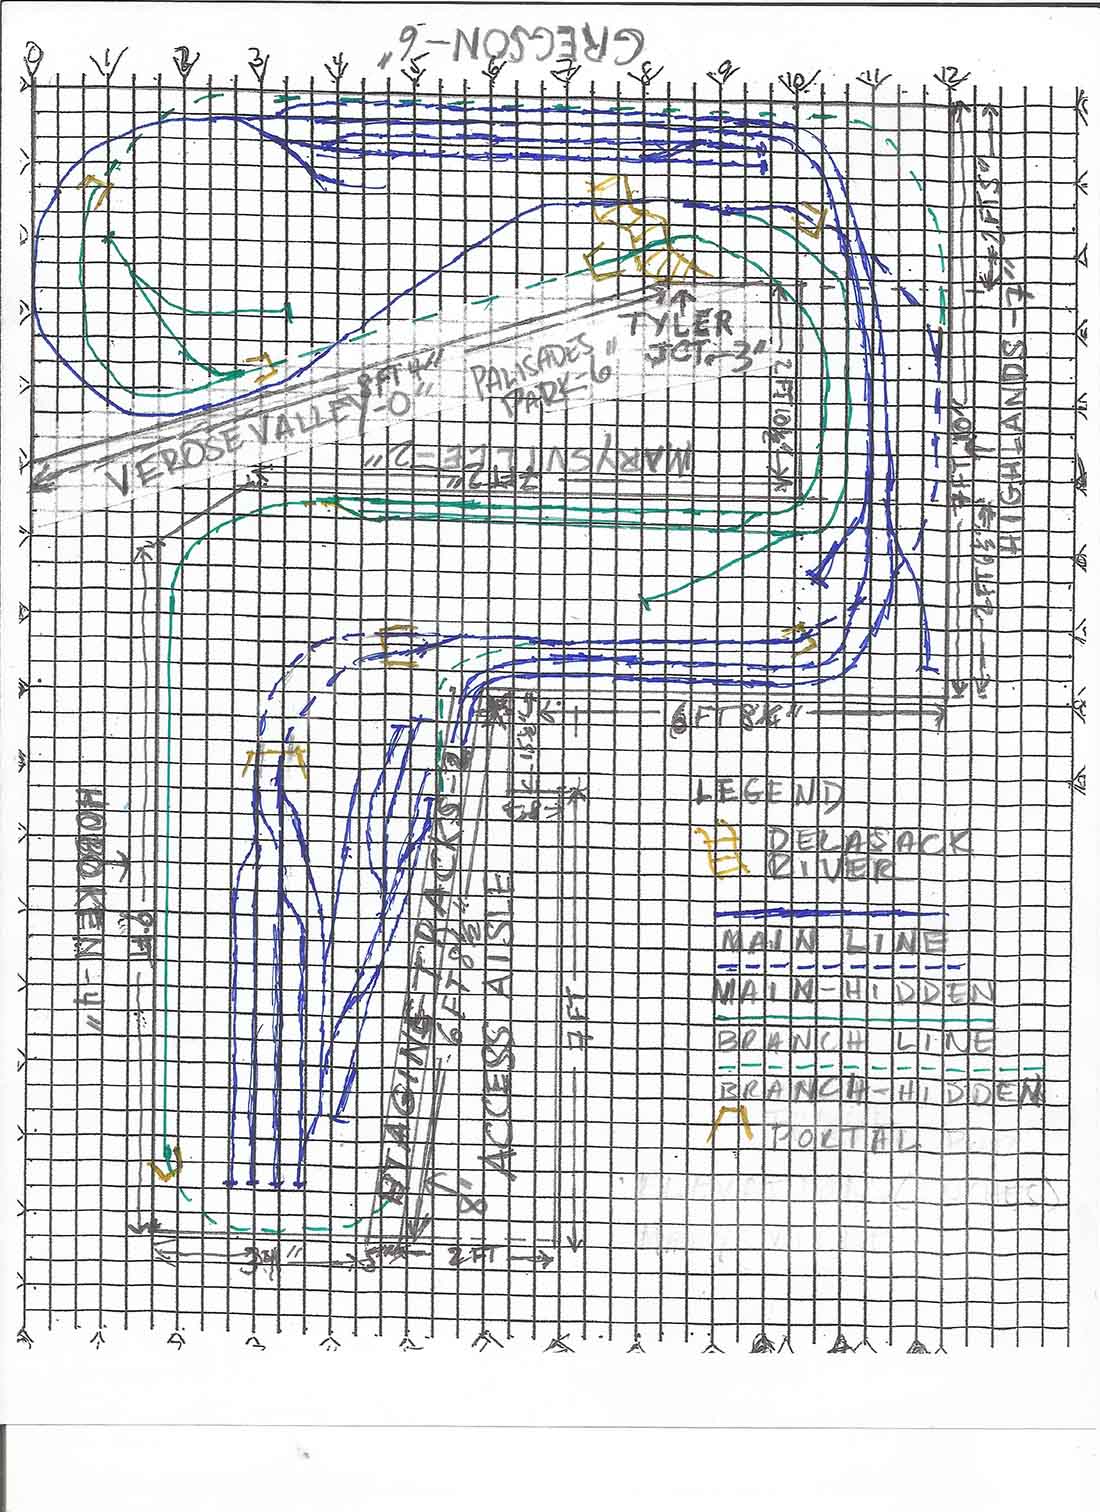
My railroad, the M&K Division of the Erie-Lackawanna Railroad, is an approximate 10′ x’15’ representation of a fictional division of the E-L located in the northern New Jersey-Pennsylvania-New York area.
It features a point-to-point main line (still under construction) and a branchline.
The branchline can function as a point-to-point via two connections to the mainline when I want to “operate” it, or as a large, self-contained loop to run trains for visitors.
I named the M&K in memory of the two people who were instrumental in developing my interest in model trains — my father-in-law, Joe Mandrick, and my dad, Otto Kampfe.
At this point, there are/will be 10 cities, towns and other points of interest on the layout.
With the exception of Hoboken, NJ, the actual eastern terminus of the E-L, and a 2-track hidden staging area representing Scranton, PA/Chicago at the other end of the main line, the rest are named after family members and places that are meaningful to me.
There will be a small amusement park with an operating carousel and ferris wheel, and a gazebo where there will be concerts for visitors. The carousel and ferris wheel kits are still in their boxes.
I began the planning process for the M&K shortly after my retirement in late October 2020. Although I had helped out my late father-in-law with his layout, a 4’x12′ oval, this was my first attempt at building my own.
I devised a track plan over that first post-retirement winter that was in the shape of a question mark, which was inadvertently appropriate given my lack of layout building experience.
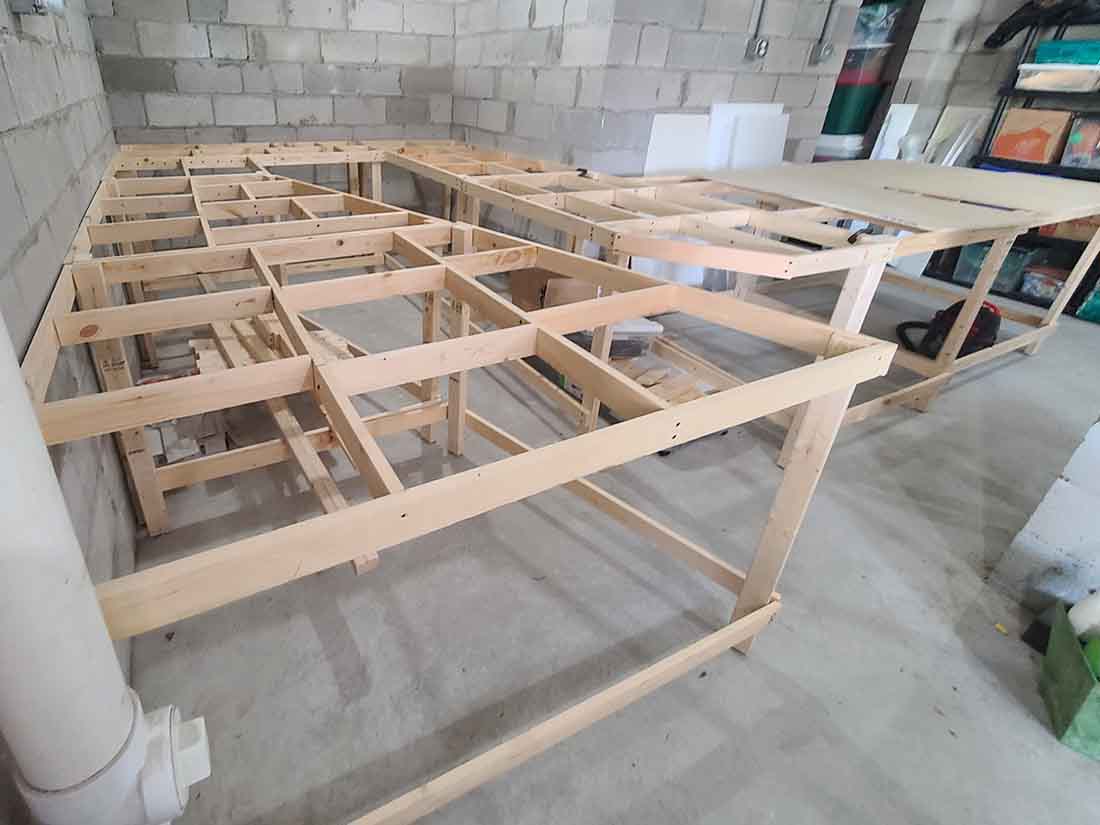
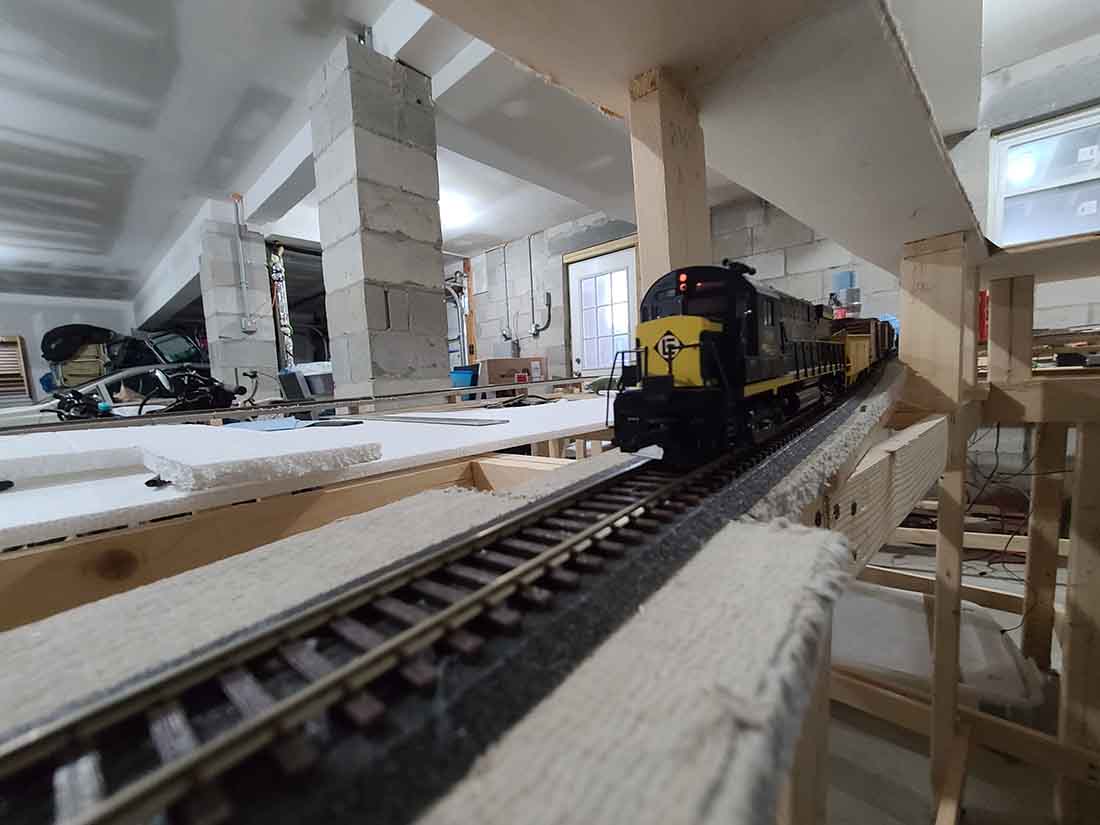
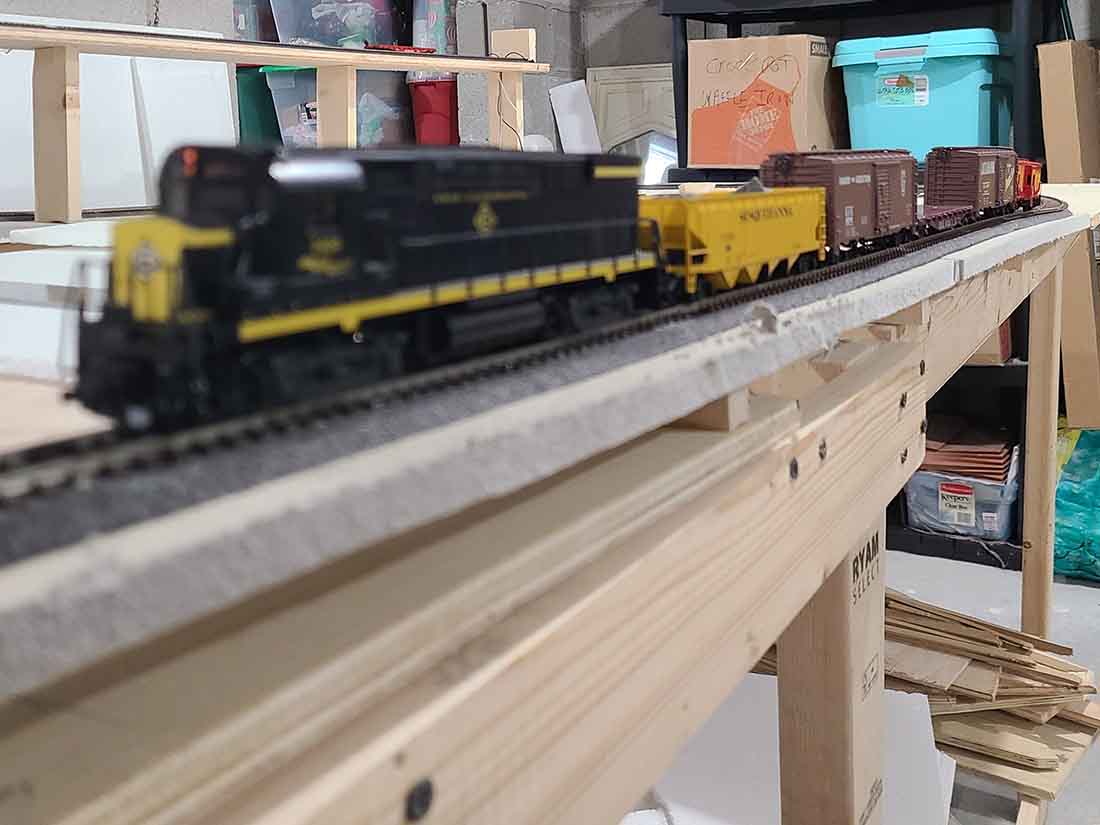
Construction on the benchwork began in early March 2021.The layout is a series of 7 smaller tables that were built using 1x3s for the frames and interior support braces, and 1x2s for the legs, which have adjustable feet. I also used 1x3s as leg braces.
The benchwork is 3 feet above the floor, which these days probably is a bit low. But I wanted to be able to stretch to reach the back corners of the layout..
I am far from being an even remotely accomplished carpenter. I watched some YouTube videos to get an idea of the basics of building benchwork and took it from there. All in all, it’s quite sturdy.
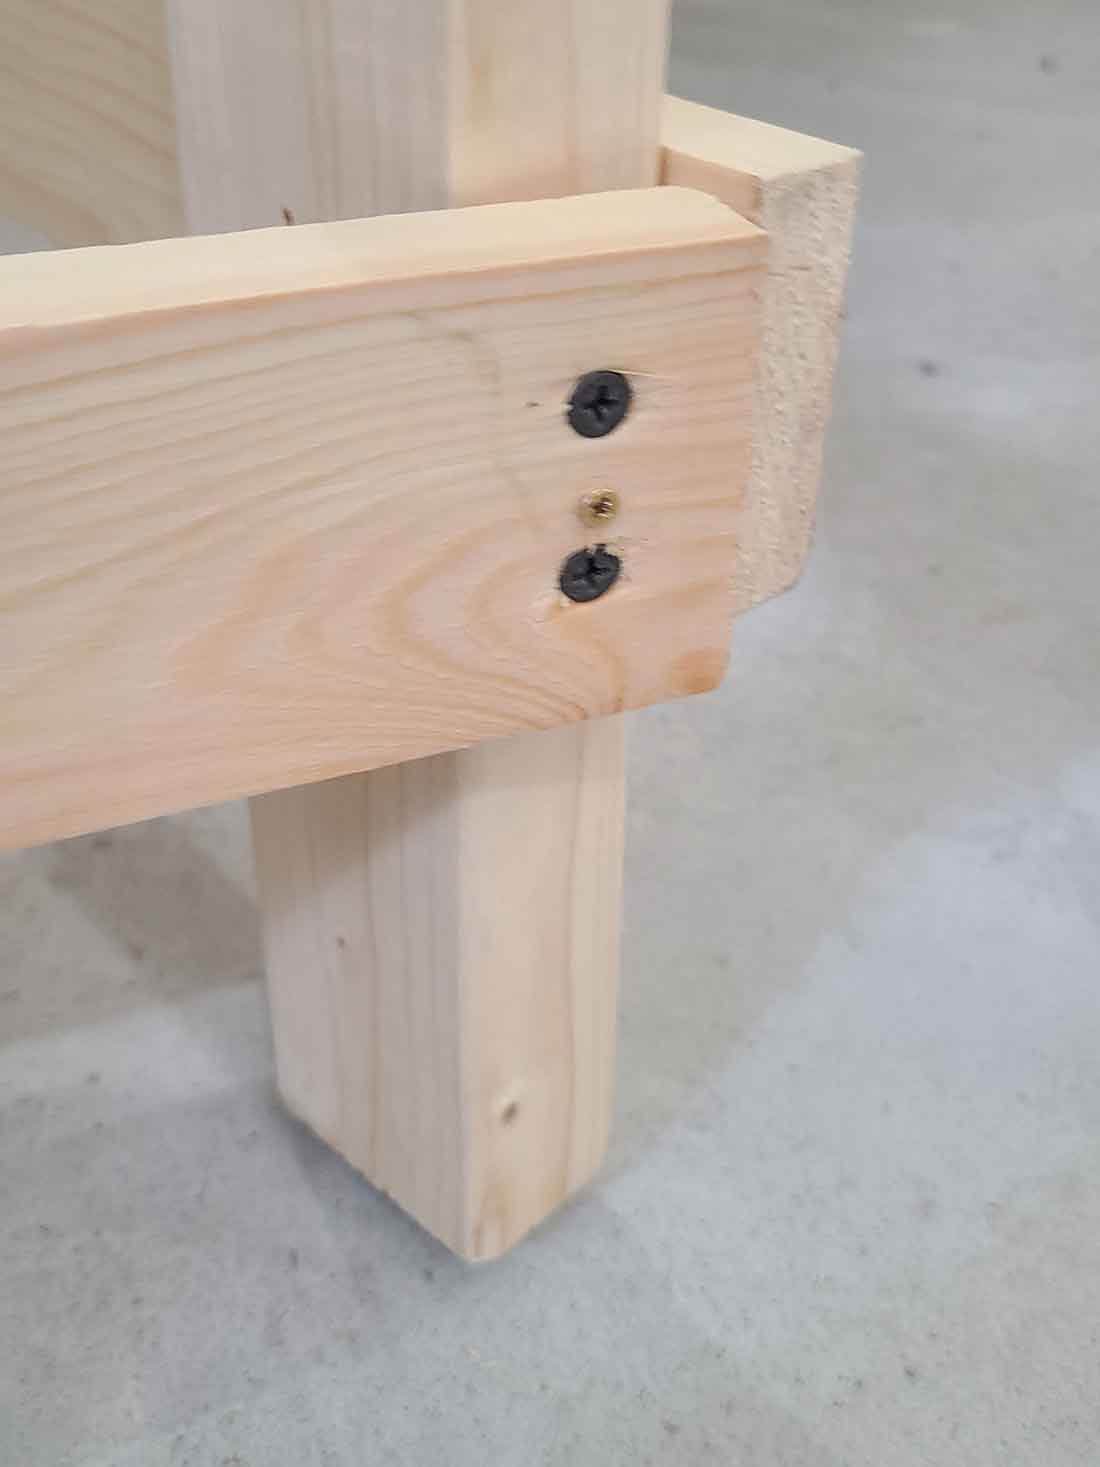
The benchwork was completed in late August 2021. I marked the milestone by inserting a “golden screw” (as opposed to a “golden spike”) in the area where the last screw was set into the benchwork.
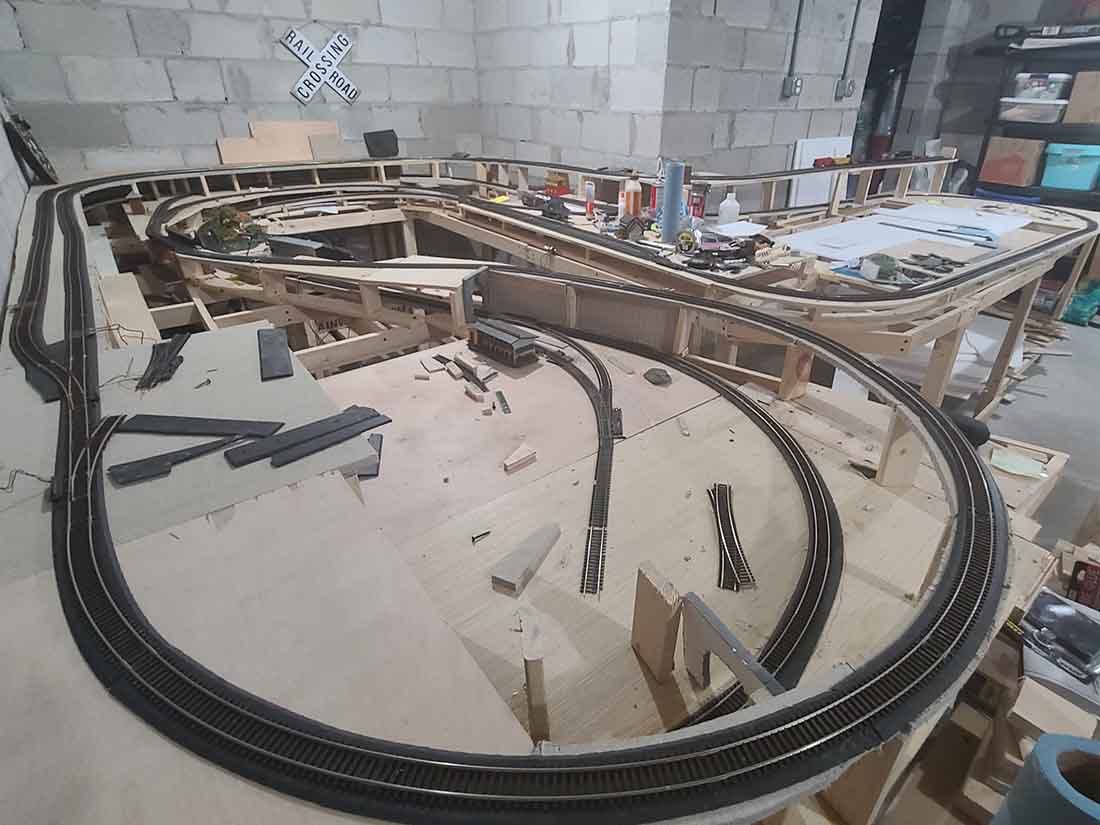
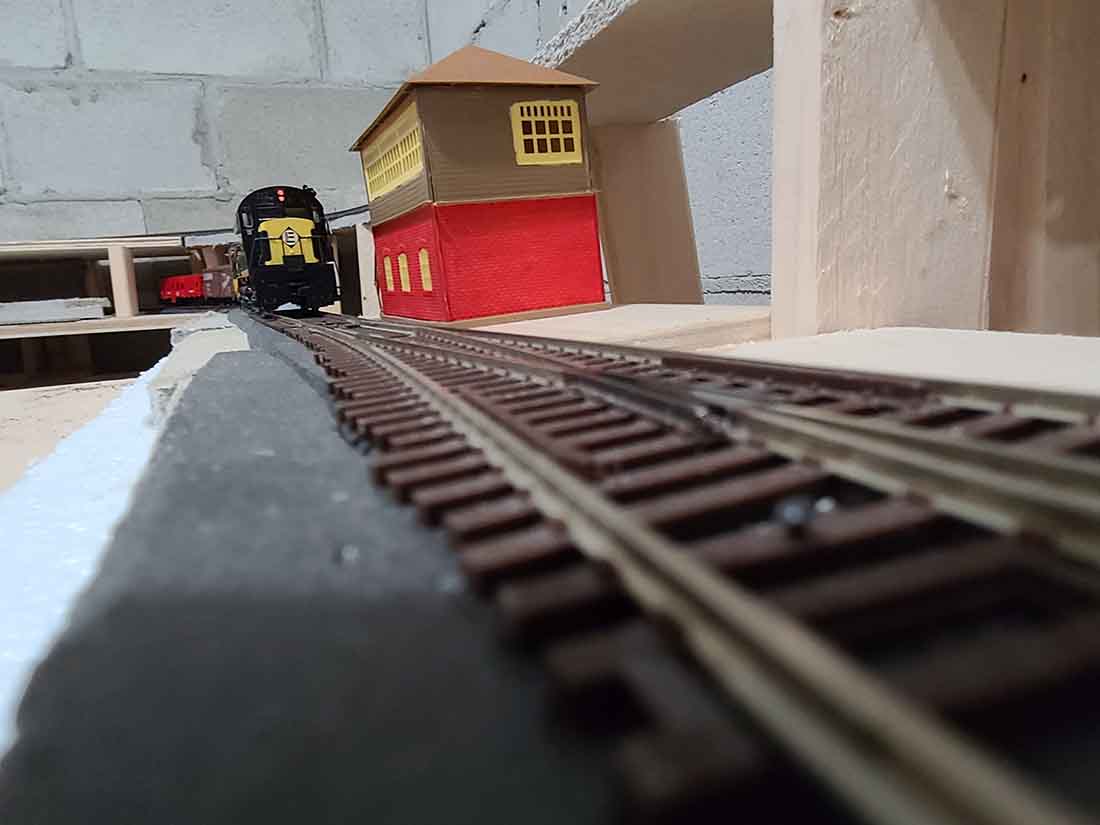
While the construction of the benchwork was easier than I anticipated, the laying of track has not been. The track plan is ambitious — probably overly so for a beginner — with several elevation changes as the track climbs to 8 inches above the benchwork at the hidden staging yard.
I have used 1″x3″ piers cut to varying lengths that are set on 1/2″ or 3/4″ thick bases. The piers support 1/2″ sub-roadbed between 3″ and 8″ wide. I started out using 1/2″ plywood for the sub-roadbed but, on the advice of a local model train store owner, have switched to using Homasote in most cases. It’s just much easier to drive track nails into the Homasote.
I have had to make several changes during the track laying process. Whoever coined the phrase “life is full of compromises” must have been a model railroader.
I’ve made many with regards to curve radii, grade, track routing, etc. Grades were my biggest issue.
In many instances, I made them too steep. For example, I had to rip out a long section of track and rebuild it complete with new piers and sub-roadbed after encountering many problems when trying to run test trains through the area. That set me back a good month or so.
There were other instances where I had to rip-and-replace on a smaller scale to rework the track grade, as well. I now seem to have it correct. I’ve adhered as close as possible to a 1″ gain in altitude for every 4 feet of track.
I also did not follow the expert advice I found online with regards to electrical power blocks. The general rule of thumb cited by most was to space blocks about 6 feet apart. I thought that was excessive. I set up blocks that were much further apart and the result was either a noticeable slowdown by locomotives or complete stalls.
Luckily for me, I am using terminal tracks to supply track power — sorry, soldering is just not my thing at this point — so I installed a few more of them at strategic points along the rights-of-way and operations are significantly better.
As of now, I am going the DC route to power the layout. My locomotive fleet is entirely DC and the M&K treasury just cannot sustain the conversion to DCC.
Capital construction costs related to the purchase of lumber, track, turnouts, etc. have been much higher than anticipated thanks to COVID-related inflation and supply chain issues. Which brings me to some advice to model railroaders who are about to take the plunge like I did and build a layout: make sure that the size of your layout matches the size of your budget!
All of the wiring I’ve done is temporary. This allowed me to run test trains on the layout to test electrical performance and find trouble spots where trains might derail, uncouple, or “bottom out” due to grades that are too steep as I progressed with the track laying phase.
I still do have 2 major pieces to build: Hoboken with a scaled down passenger terminal and yard; and the fictional city of Gregson, which will house the division’s main freight yard. Those items likely will have to wait until the spring.
Over the winter, I will build a control panel for the layout where I will locate switches for 2-cab power supply to the blocks along the main and branch lines and a few switches to remotely operate inaccessible turnouts.
Most turnouts, though, are easily accessible and, at least for now, I will throw them by hand. I just completed the table on which the control panel will sit. It is wide enough to accommodate 2 “engineers” sitting side-by-side. The remainder of the construction of the control panel and resultant permanent wiring should keep me busy over the winter.
Another project for this winter is to get moving on scenery.
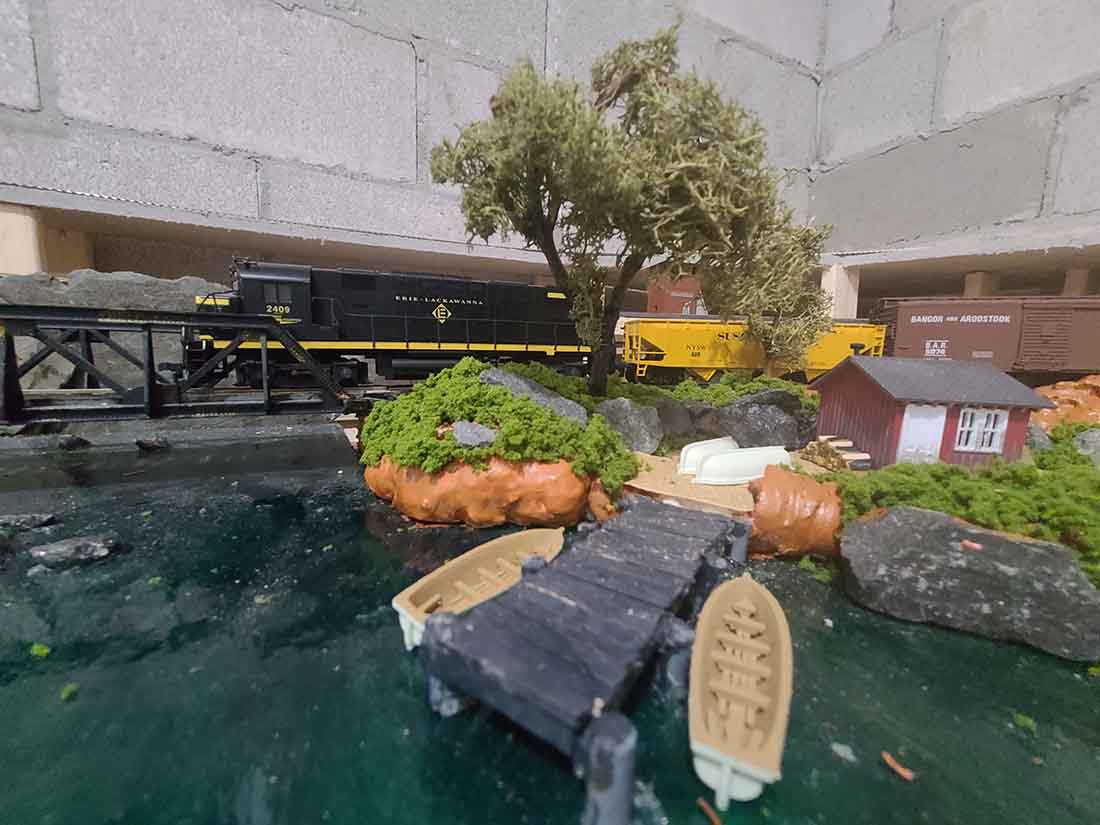
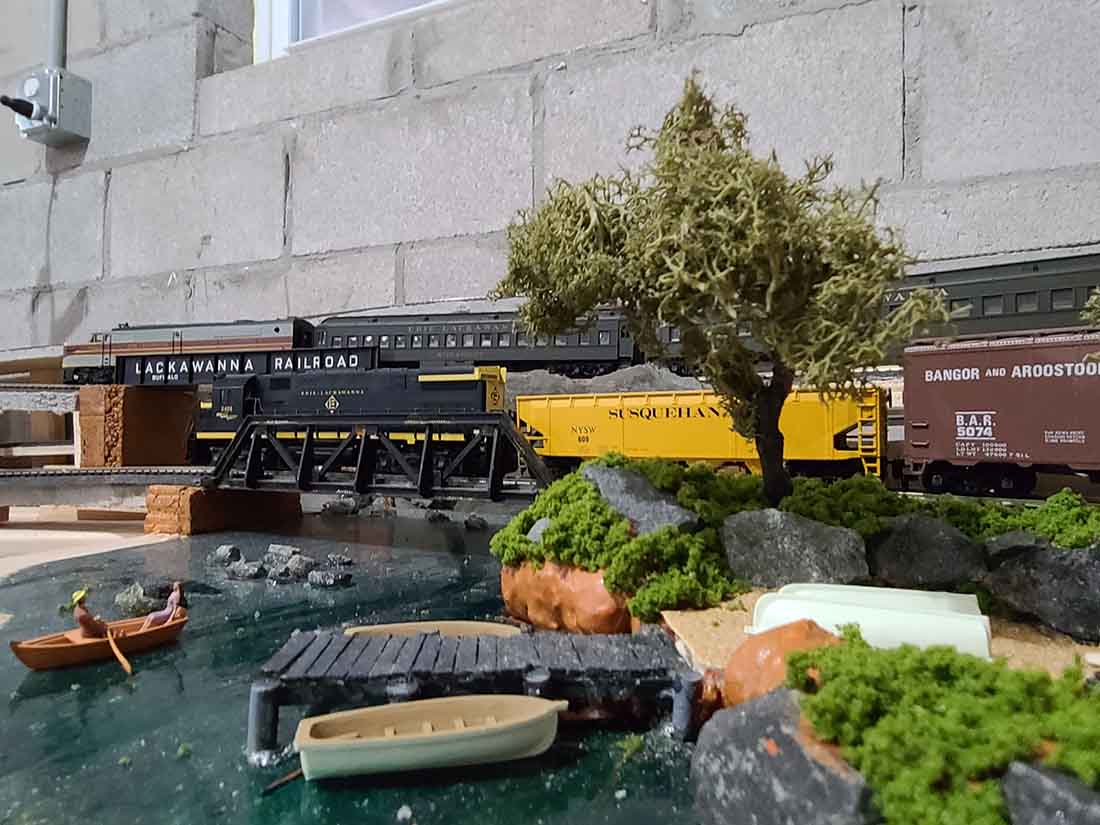
I have done a lot of work on an area named “Joe’s Landing,” where folks can rent rowboats to cruise on the “Delasack River.”
The Delasack name is a combination of the names of 2 prominent rivers the E-L crossed back in the day — the Delaware and the Hackensack.
Joe’s Landing features a scratchbuilt dock, a Woodland Scenics work shed (which serves as the rental office) and rowboats. The river itself is several layers of acrylic paint (brown, green and blue) topped with several coats of clear acrylic varnish. I learned this technique from a YouTube video produced by 2 modelers from the UK.
For the hills surrounding the property, I experimented by using spray foam insulation, an idea I gleaned from Alastair’s Beginner’s Guide.
I painted the insulation brown and am now in the process of adding ground cover to the hills.
Hopefully this works well enough for me to use it throughout the layout. The real-life area in the vicinity of Hoboken is punctuated by igneous rock bluffs, called the Palisades.
I am attempting to represent these for a stretch of the layout between the Delasack River and the town of Marysville using discarded pieces of slate roofing that I have found in my yard. We will see how that works out.
I have experienced plenty of highs and lows since taking on this project. There have been times when I considered scrapping the whole thing and, instead, using the tables to accommodate a layout of Lionel trains that I have inherited or accumulated over the years.
I’m sure I am not the first model railroader to want to throw in the towel. But, thankfully, those were relatively fleeting moments and I have moved forward, all-in.
Hopefully I will have an update on my progress on the M&K later this year.
Jersey Shore John”
Golden Spike!

A huge big thank you to Jersey Shore John for sharing his HO scale. If you want to fast forward to his next missive, it’s here: Erie Lackawanna model railroad.
I liked his narrative just as much as his pics – there are some pearls of wisdom in it.
I think at some point, everybody feels like throwing in the towel, or starting from scratch again. It’s all part of the journey. I’d really love to hear your thoughts on it, please do comment below.
That’s all for today folks.
Please do keep ’em coming.
And if today is the day you want to join in with the fun, the Beginner’s Guide is here.
Best
Al
PS More HO scale train layouts here if that’s your thing.
Need buildings for your layout? Have a look at the Silly Discount bundle.

Hi interesting it’s 11.52 in the uk and no comments posted. I particularly like the narrative in todays post. Indeed some words of wisdom imparted to other beginners. The track plan looks impressive and it is obvious that the first winter of the project was spent designing the track layout. As for the actual build I think that a John has produced some very good work. He has made good use of the larger pieces of stone in the cliff areas. His water looks very good as do most of not all of the other parts of his build. I assume he will be putting some for of backdrop to the layout. This will really jump the layout. Well done John.
To take a toy train and make it a model railroad requires a backstory to create the setting and the purpose of gne railroad. John you certainly have done that. You have a wonderful Railroad in progress there. Keep us posted with your progress.
John , really enjoyed your narrative and back story . Having a theme or objective adds to the excitement of the build , and you sure appear to have one exciting display .
Off to a great start , please share your progress as you’re moving along , will be looking forward to seeing it grow .
Great job sir .
I like the layout and is that in a basement or a bedroom? I do like how it is all laid out and the time is must of took. Good job
John, I really enjoyed your back story. I grew up in Bergen County and Dad took the EL commuter to Hoboken (we had two different stations in Glen Rock). The man across the street from me was an engineer for EL. I am sure that is where I got my interest in model railroading.
Just moved and I am currently planning a new layout to include the Waldwick to Hoboken lines. Also, I am planning to model part of the North Jersey Rapid Transit electric line that ran in the very early 1900’s as competition to the Erie line (pre EL).
Good luck and please post more as you progress.
Good to see the great work on the benchwork. Best model railroads have a solid foundation. Well done.
Your comment about inclines/declines I found interesting. That is the thing most frequently misunderstood by new model railroad builders. It seems like the problem is usually driven by someone wanting the track to make an elevation change, but how the track will arrive at this higher elevation is not given much thought. For a model train to rise 4 inches, it takes at least 10 feet and the best practice is more like 12 feet of run. If you really want your trains to be able to pull themselves up your hill easily with good-sized trains behind them it takes 13-14 feet. Those distances are for straight-a-ways too, runs without curves. If you add in curves the curve adds friction which will mean the length needs to be longer and the incline more gentle. It is simple physics and if you try to cheat it will not work out for you. 3% grades should be your maximum. To determine the length you’ll need to climb up your intended elevation change, just divide the rise by .03 for 3% or .025 for 2.5% grades.
Rob McCrain – Farland Howe
NJ John
Big thanks for telling it like it is and the effort for this presentation. I and I’m sure many others would love to hear more about your progress, aggravations- not to criticize but to learn also, and yahoo moments. It looks like you’ll have one hell of a layout so no short cuts and your rooting section cheers you on.
Big Al
Thanks
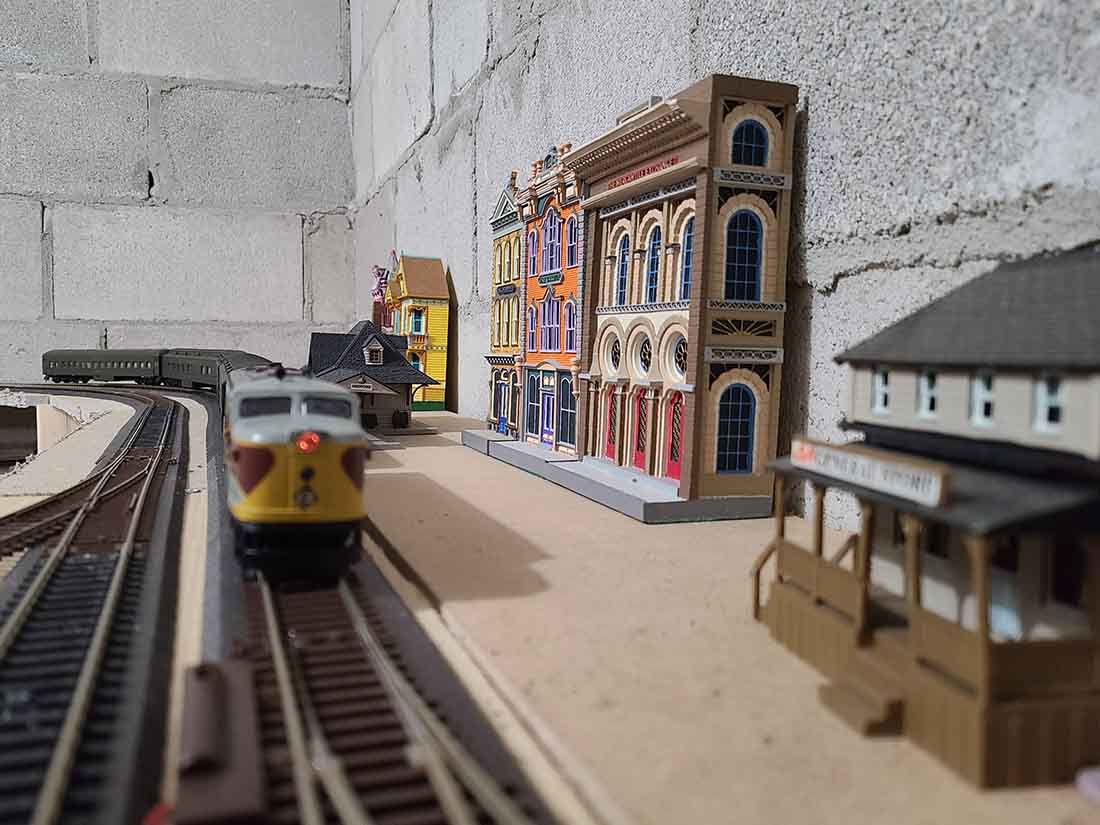
Hi Jon, Keep up the good work!! Your effort will reap good rewards. Don’t get too far before you cover the walls. It can be a real pain trying to reach over a finished project. Where did you find the half buildings against the wall?
I appreciate that you are true to the road names that you modeled. What a great layout
Jersey Shore John….. Wow…..great project…..jealous of all the room you have and especially your bench work. Send pictures as it grows.
John, I enjoyed the backstory of your modeling journey. I think the layout itself and the track plan look awesome, very good work! Keep on keeping on, and please post more pics in the future so we can see your progress! Ben From Chicago.
Maybe you’d want to do as many railroads have, name your big yard. I’d nominate the name of one who has helped many, many railroads built: Percy Vere.
Keep up the good work and never succumb to that great enemy of railroad building, Lack of Wanna . . . .
Thanks for all of the great comments! I sincerely appreciate them. Here are answers to the questions some of you posed:
Colin and Tom — YES!! Point well taken. I meant include about backdrops but I was bordering on “War and Peace” with the post so I left that out. Backdrops are high on the agenda — I likely should have started on that already. My wife, Mary Ann, is an artist and will help me with that.
James — It is an unheated basement/garage area. The fluctuation of exterior temperatures (track expansion/contraction) and humidity negatively impact train operations. Something I have to figure out.
Jim K — I grew up in southeast Bergen Ciunty less than a half-mile of the E-L North Branch, which was a former Erie branch. Hoping to someday kitbash a representation of the beautiful Englewood or Demarest stations, which are still standing along that now abandoned line.
Gary — I have had your latest post re your Pennsy layout open on my phone browser since you posted!
Rob — spot-on. In my case, I was familiar with the rule but decided to see how far I could stretch it to accomplish my original vision for the railroad! That folly cost me a good deal of time but was another painful but good learning experience!
Thanks again everyone
So fun to watch a new layout take shape and provide enjoyment and a sense of pride in the hobby. Keep up the good work! l
Size matters!
I’m pretty much at the stage you are at, having spent about 3 years on it so far. Disability is keeping me from working full time on my railroad. Notice I cal it “my railroad” because it is a fictional railroad situated in and around where I live which is a community called Vancleave, Ms. I am tailoring all the buildings, businesses to the railroad. Another quirk is; I am using Marklin track and trains. My storyline is: “A small Mississippi community called Vancleave has built a small railroad to serve the community by connecting to CSX trackage that runs along the coast from Florida to New orleans. The town planning commision made a decision to import foreign made trains from Germany in both new and used conditon.” At the moment, trackwork is being finished to serve the vatious industries in the area. This is certainly a huge leap in imagination, but it’s the only way I could meld together the usage of European trains with a U.S. backdrop, certainly not an impossible task.
Hey John,
Looking good so far. You got my interest up on your layout as when I was a kid I used to walk the Erie-Lackawanna line where it passes through Morristown NJ. I even picked up a few loose spikes from the line too.
Tom Appel — sorry I missed your question. The half buildings are part of the Lefton “Victorian Queens” collection. My wife’s aunt gave them to me 20-30 years ago. It looks like they are available on eBay.
nice track plan will look forward to seeing it sceniced
Great start there John. I echo Rob McCrain’s sage words of advice on grades. Any grade over 3% starts getting difficult for locals to climb and 4% is pushing the limits, especially if you have heavy constructs. Also beware of the junction between the grade and level track. Any slight elevation discrepancy will cause running problems at these junctions. It’s safest to keep those grades at 2 to 3% maximum. You’ve made a great start and we look forward to seeing ongoing progress. Well done.
gees. it never ends. what a layout. good work.
John: You seem to have things well in hand, nice start. A few observations, based on my basement experience. Winters in the Northeast, US are cold, and so I hope you have some kind of heat there. Comfort is always good but temperature changes can cause issues with expansion and contraction as well as adhesives giving way. I too have things at three feet, and I fine it a bit low, especially on ones back. I installed wheels, later on, on mine and raised the level several inches. Easy access is also important as sometimes the trains have minds of their own and derail in the worst spots.. In the end , as you can see, this is a great hobby and a wonderful international forum. I added a European village to accommodate British trains, thanks to dangerous Dave and Alastair, so leave some space for expansion. the best of luck.
Personally I would have finished the basement first. Now it’ll be double the work.
The Critic
I’m hooked! I enjoy getting in on the ground level of a new project. It looks very ambitious: kudos on your courage. And you’ve done some great detail work. Great start! I’m anxious to watch your progress!
John, your benchwork looks terrific! No wonder it was costly – that looks like a lot of clear pine boards. I loved the “golden screw” idea to celebrate completion of your benchwork. I think I would have installed drywall or some smooth surface over the concrete blocks before building the layout. It’s going to be hard, even for your talented wife, to work on the backdrop on the rough block walls while climbing over the layout.
Two other observations: (1) where you have the Verose Valley / Palisades text on your track plan, it looks like you’ve got a very narrow chokepoint in the aisle, which may be fine as long as only skinny people visit the layout. (2) The broad curve between Gregson and Verose Valley looks awfully close to the edge of the layout. I would add some kind of protection, like a piece of plexiglass, above the track level to keep trains from taking a 3-foot plunge to the floor.
I too enjoyed your backstory and construction frustrations. Been there, done that! Keep up the good work and send us more photos as your layout progresses.
You have been a very busy man with your railroad and I wish you the best and there is always for more improvement. The best of luck to you.
Great use of space. Good to have a basement. Envious. I had one in my home in NJ back in the day and actually built a studded u shaped wall. Then I built the framing for the deck with 2×4’s for strength knowing I’d be leaning and climbing on it. After moving to southern AZ , I thought about building my layout. But most houses here have no basements and no attics. So my garage was my only option. I built my layout again as I built my last one, i used 2×4’s with metal corner and T bracing and plywood. Then rigid 1” foam. Worked out great. Your layout planning looks really good. I would consider possibly reinforcing the legs. And as for the comments made about the issues with the block wall and a background, I would suggest using 1/4” foam core. That’s what I used. It’s thin and can be applied with double faced tape or Velcro. The surface is great for painting or preprinted vinyl backgrounds which is what I used. Happy railroading.
Jim AZ
sweet