If you missed Mal’s first post on how to stop derailments, it’s right here.
Now for part two:
“Following on from the first article which discussed the importance of track gauge and the correct relationship of the wheels to the track gauge.
One of the questions that arose was “if my train will go round many times without de-railing why does it then suddenly de-rail? And how can I stop derailments like this?”
That is a really good question and of course it is undoubtedly the thing that frustrates us modellers the most.
Just when you think everything is OK the train then seems to randomly jump off the track for no reason! We have all been there!
Well firstly, it clearly isn’t for no reason. There has to be a reason or it wouldn’t have done it.
As a reminder from part one, wheels too narrow may collide with check rails or point switch blades and wheels too wide may drift over the frog or outside of the far rail.
In either instance there are two positions the wheels can take up at their extreme of travel. Either hard up against the near rail or hard up against the far rail.
Both of these are the extremes of travel, the majority of the time they should sit exactly half-way between the two extremes. (warning! Warning! some maths coming up!).
The situation is governed by “standard Distribution” which applies to most things in the analogue world. Some of you may be familiar with the “Bell Curve” graph of standard distribution. It looks like this.
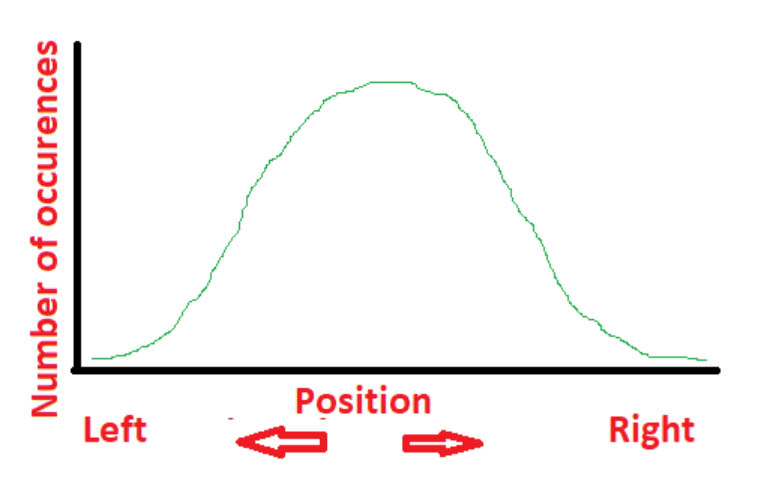
So for wheels that are not grossly out of gauge, you can see that they spend a lot of their time sitting somewhere between the two extremes. Hence, you don’t see the derailment all the time. This Assumes that no other factors come into play, that the track is perfectly level and perfectly straight! But the real world is not like this is it?
There are, however, other factors that affect the position of the wheels in relation to the rails. That skews the graph and leads to more regular derailments.
Perhaps a look at how a railway wheel should work will help will help us stop derailments.
The theory of the railway wheel:
Unlike a cars wheel the surface of the railway wheel is not flat/square to the ground. We all know that it is sloping. Why? What is the reason behind this?
Try this experiment for yourselves:-
Take a cylinder of some kind (a beer can will do just nicely! Be sure to empty it first!) Now take two broom poles and lay them out on the floor (like they were rails).
Place the beer can on the “rails” and push it along the “rails”. Chances are it didn’t get to the far end without wandering off to the left or right.
You would have to be very lucky if it started and ended exactly dead centre. This is because there is no force acting on the flat surface of the can to steer it, there is no stability in the system.
What you need is a double cone (see below) to stop derailments.
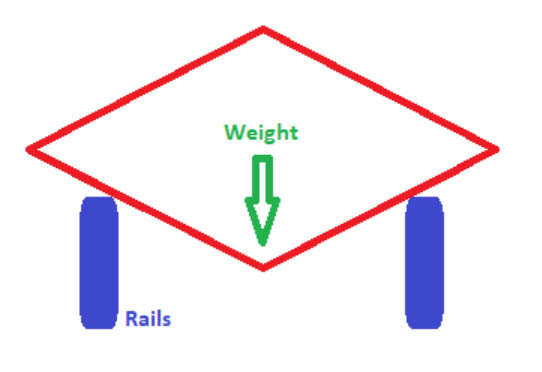
This now has stability and will self-correct if knocked off course and will try to sit perfectly in the middle at all times.
Now the eagle-eyed will have realised that we don’t need a solid cone in order to achieve this effect.
The pointy bits are relatively superfluous and the great lump in the middle is just wasted material. So we can cut bits off this cone and thin down the middle whilst still maintaining the shape, till it looks like this:
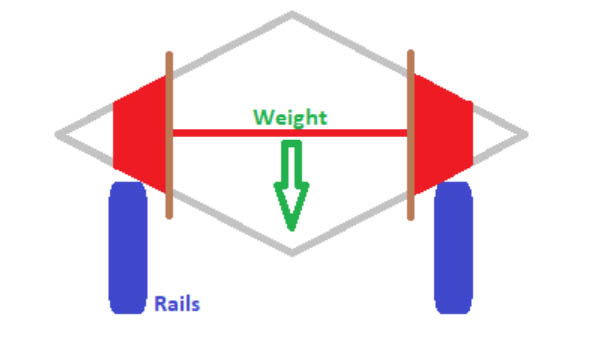
The original cone is in grey, and the brown additions are the flanges of the wheel which limit the amount of travel the cone (wheels) can make left or right in the diagram. We have, in actual fact produced a trains wheel and explained why it is the shape it is. Cone shaped!
The purpose of this shape is for the wheel to ride exactly between the two rails and without the flanges touching the rails at all! Now it is important that you remember this last fact. The flanges should not touch the rails at all. In this perfect position a de-railment is highly unlikely to occur.
In the real world, the track is slightly banked in curves (this is called superelevation) so that the forces all balance back out when the train negotiates the curve at the design speed for the track.
The design speed is the speed assumed by the engineers to be the optimum speed trains will negotiate the curve. If the train travels at that speed then the picture above will apply. Neither flange will be touching any rails and the wheels will sit perfectly balanced between the two rails.
If the train goes too slow the wheels will drift downhill towards the inside rail and the inside flange will be the only thing stopping them from falling off the track.
Now hands up anyone who has ever heard a freight train squealing away as it slowly rounds a curve? This is because it is going slower than the design speed of the curve which was probably set for a faster passenger service.
What if the train exceeds the design speed? i.e. goes too fast? Well, the whole train will ride up towards the outside rail and it is the outside wheel flange that will be forced to prevent the train just leaving the tracks to the outside of the curve.
To assist with keeping the wheels on the track engineers sometimes include a check rail on the inside rail to catch the flat back of the inside wheels flange. Thus, trains going too fast around a curve squeal too!
So in short, flange squeal is a bad sign. It means that the wheels are not in their intended balanced position exactly half-way between the rails.
All very interesting, but what has this got to do with my model railway Mal? I hear you all say!
Well most model railways break most of the rules when it comes to curves. Let’s look at these and why they may cause your de-railments, and more importantly, how you can stop derailments.
i) Most model railways the curves are unrealistically tight compared to real world railways.
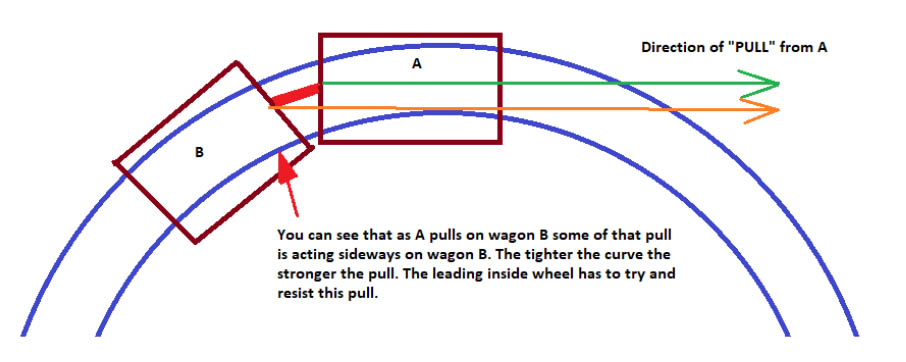
If the curve is tight it means that the preceding wagon is having to pull sideways on the wagon that is following it – in order to get it to follow. That sideways load pulls the wagon to the inside of the curve.
Thus, the flanges are likely hard up against the rail, just desperate to jump over and de-rail towards the inside. All it then requires is either a sudden jolt or a slight dip in the track to allow the tiny little flange to escape over the top. (see the diagram)
There are a few things we can do to help this situation.
a) Design the layout with the widest radius curves you can possibly get away with. Make this your focus when designing and then fit everything else in after getting all the curves as wide as possible.
b) be very careful laying the track. Don’t have dips or rises in either rail. Keep them parallel/level.
c) don’t put light weight wagons in front of heavier ones. The loaded/heavy vehicles at the back resist being pulled along. When it gets to curves they act like brakes. The loco pulls at the front and the train stretches out. In fact it tries it’s best to straighten into a straight line. The casualty is the light wagon which literally gets pulled up and over the inner rail.
ii) Most model railways do not implement transition curves, where the straights gradually transition into the curve (following a set mathematical model which I won’t go in to here but if anyone wants to know how then let Al know and I will oblige). Instead, we expect our wagons to go instantly from straight to a constant radius!
a) Plan for transition curves. Don’t just expect your train to jump from straight to curved track instantly. After all, if the real thing did that most of the passengers would exit via the windows!
b) If you absolutely have to use set-track, and go from straight to curved, then choose the widest radius possible. Give it a fighting chance!
iii) Most model railways lay their track flat on the curves (no superelevation)
OK I am not even going to risk getting the wrath of either side here!
Some modellers swear by level track in the curves. Some prefer superelevation.
I have both! Superelevation on the mainlines where the speeds are generally higher and flat in the sidings and off scene.
Guess where I get most of my de-railments? Yup! On the flat stuff!
iv) Most modellers who do superelevation don’t scale it for the weight and speeds involved they copy the real railway and physics just doesn’t work like that!
The amount of bank required in the rail is governed by the same principles that govern the amount of bank that an aircraft needs in order to complete a turn at any given speed around a given radius. I should know being an Airline Captain!
It is, therefore, quite simple to determine the amount of bank that would be required for an object to traverse around a railway track of a given radius at a given speed. The maths is hard but the answer is “hardly any!” Almost imperceptible. The 2mm or so that looks right in relation to the real world is way too much for a model. 1mm will suffice and will impose less load on the inside flanges.
Hands up! I did 2mm and on my superelevated sections certain trains can de-rail if they go too SLOW! They pull off the inside rail. My own fault, I will know better for next time!
v) Freeplay in the axles of the wagons/coaches.
Look at the little experiment below using one of my mid-sized wagons. I chose this one as it is easy to refer to by name! (altogether now – it’s Mal’s Llanfairpwllgwyngyllgogerychwyrndrobwllllantysiliogogogoch wagon – you have to hand it to the Welsh, they sure know how to keep it short and snappy!)
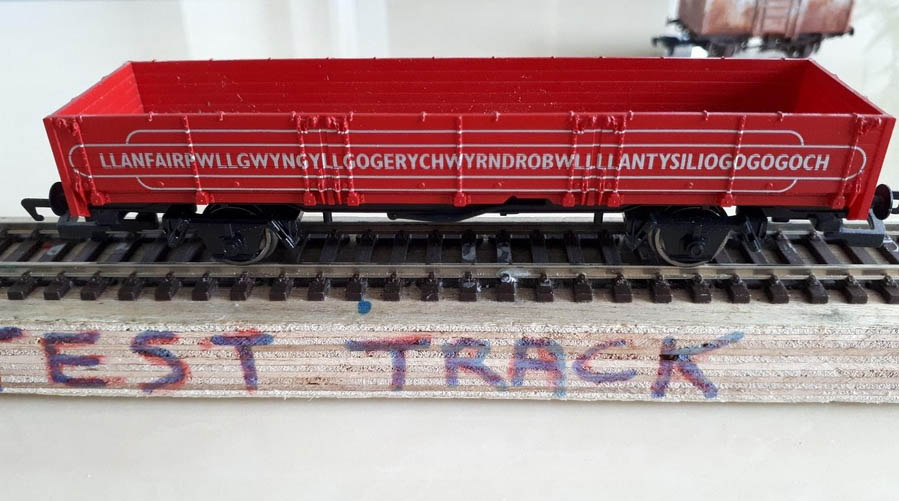
We can see the effect of the free play in the axle boxes and the effect of the tolerance between the scale wheels and the scale track.
I set up this little jig to highlight the problem. It’s a very helpful way to stop derailments.

And we can see what the situation looks like in the centrally riding position in the picture below
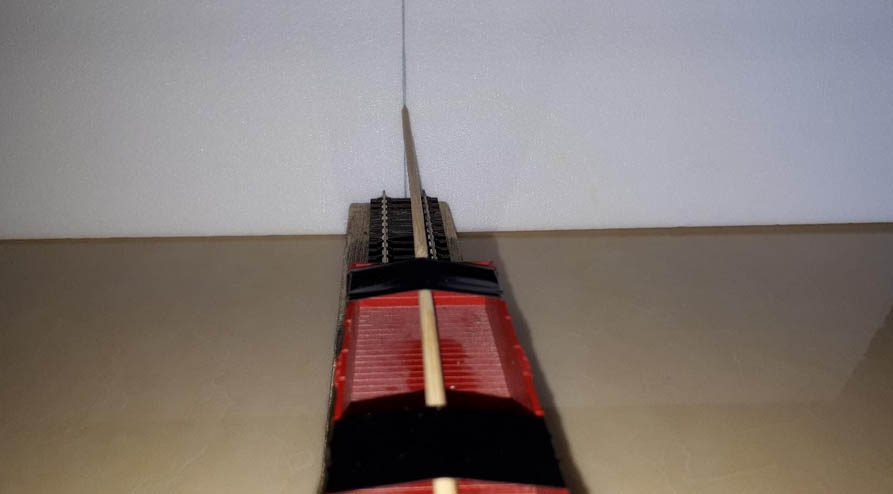
Now for the variations:-
a) Pushed all the way to the near rail
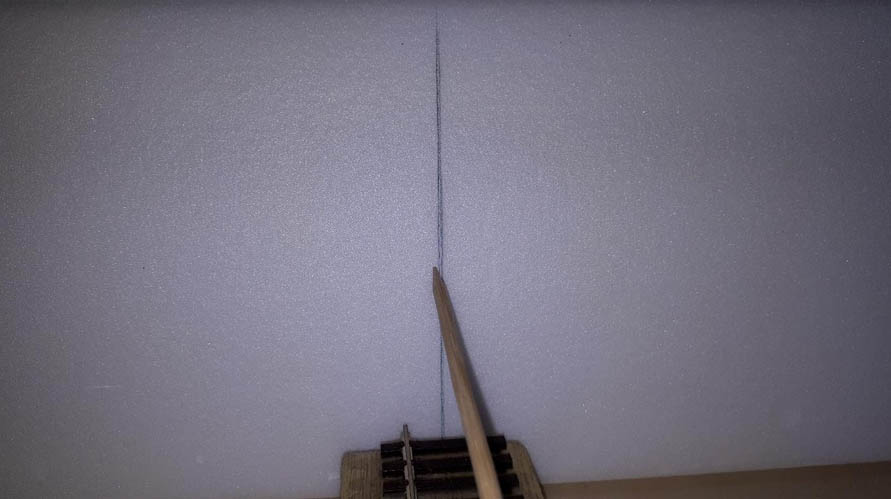
b) Pushed all the way to far rail

c) rotated clockwise as far as it will go
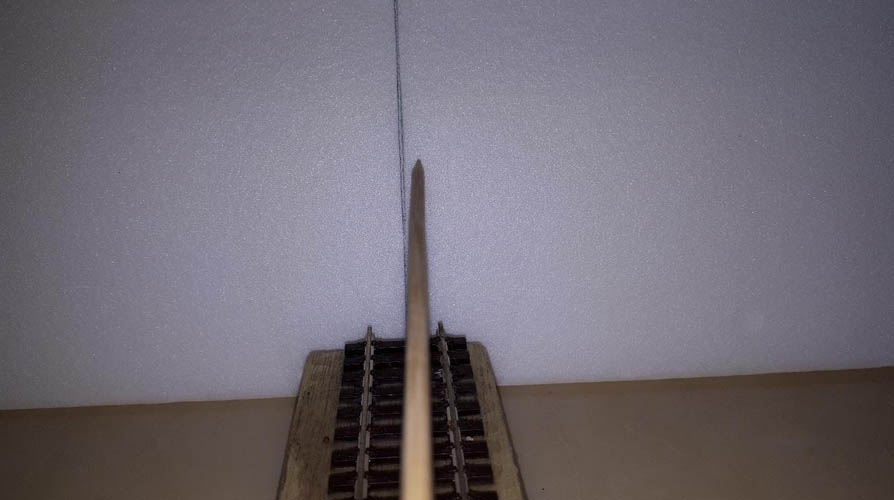
d) rotated ant-clockwise as far as it will go
You can see that this presents a huge variation in the possible alignment of the wagon at any point on the track. Such “sloppiness” would condemn this wagon on a real railway to the scrap yard, yet this is brand new on my railway.
Now let us look at what happens when we “reverse” a train of wagons and how this variation can play out to cause derailments.

You can clearly see how the vectors are out of alignment and how much sideways and twisting forces are being applied to each wagon in this set.
By the time we get up to ten wagons there is next to no chance that this train is going to go smoothly in reverse! That is the sad reality for me, this set of wagons is particularly difficult to shunt in reverse.
It has a great tendency to twist and concertina itself off the track. It only serves to remind me how bad I am at making wagon kits!!!
BUFFER LOCK
Buffer lock is when the buffers of one car get behind the faces of the buffers of the next car whilst going round a bend. Then when the train arrives on the straight one car literally pushes the other sideways off the track. As below.
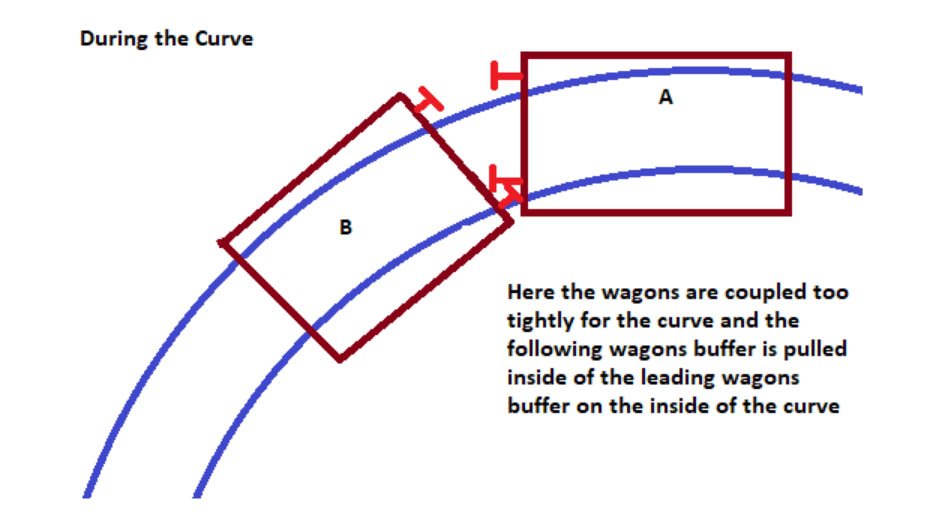
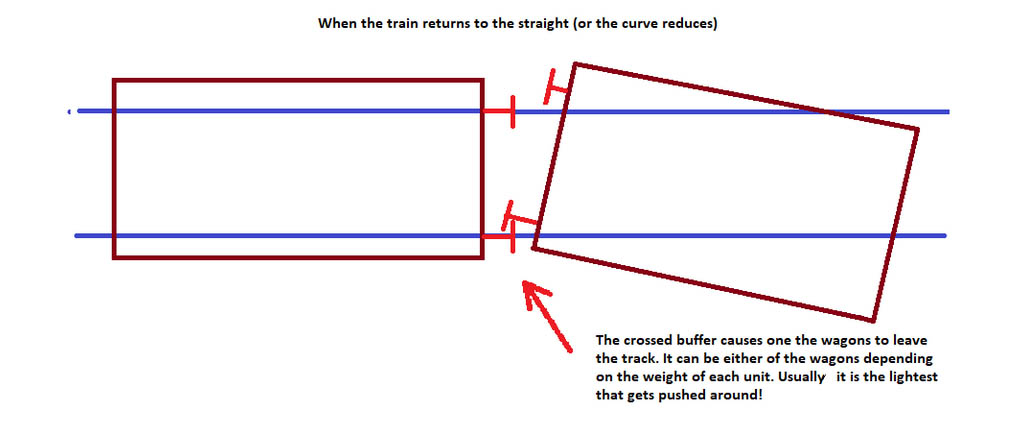
The cures are either:-
i) use longer couplings so the buffers don’t sit so close together
ii) Increase the radius of you curves.
INCLINES!
Remember, the locomotive is pulling on one end of the train, the weight of the train is acting like a brake. Therefore, the tendency is to stretch the train out as far as it will go.
When the loco goes forward you see each coupling stretched to it’s maximum before pulling on the next wagon etc. etc.
So the train wants to form a straight line between two points, and then you go and introduce an incline! This is what is happening at the start of the incline.
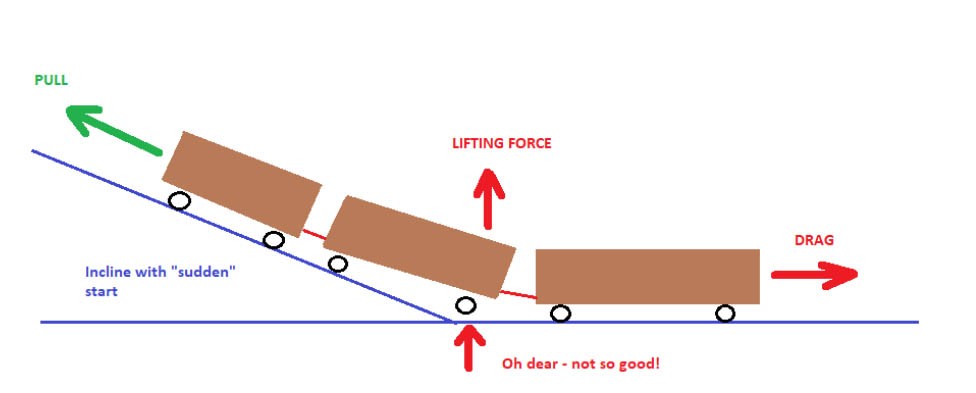
You can see that the train is struggling to maintain its weight on the track at the abrupt start of the incline. If you add an incline into a curve then you have pretty much written de-railments in to the fabric of your layout.
If you really must go up hill you need to do it as gently as possible forming a very shallow curve into the slope and certainly not jumping straight to the final gradient. Avoid starting the incline near a curve. You want the whole train on the slope before you attempt to round a curve.
And finally… (or is it? You decide!)
One of the comments on part one raised a really good point about how we lay the track in the first place to stop derailments. I glue mine down with instant carpet adhesive.
I spray the area, leave for two minutes till tacky and then carefully press the track onto the glue. I find this is extremely useful when laying flexible track as you can create and maintain complex curves quite easily (e.g. Transition curves)
However, for those who pin the track down, you may very well be introducing an error in the track gauge by being over enthusiastic with the persuading stick! (hammer for the purists)
If you drive the pin in too far you risk bending the tie/sleeper which in turn rotates the rails inwards making de-railing much more likely.
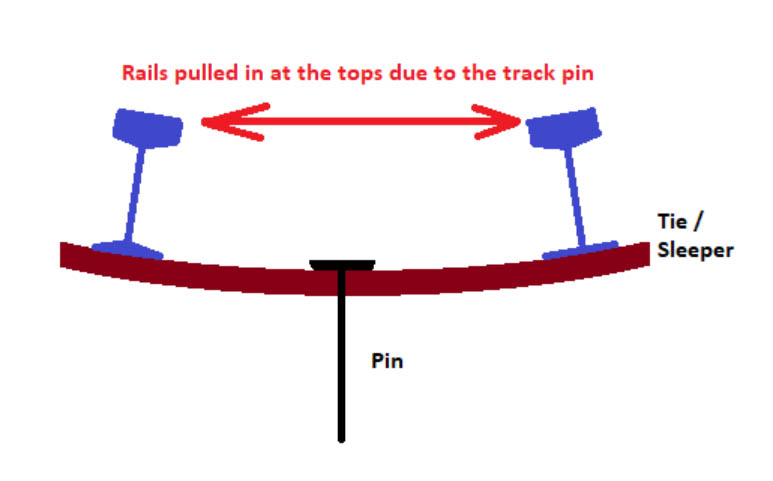
The advice given was to pin the ties / sleepers at their ends. This will help minimise the bowing effect but remember, if you are too enthusiastic with that you will bend the rails outwards!
The secret is taking care and only drive the pin in sufficiently to hold the track in position, you are pinning down model railway track – it is not a structural member of your house!
Well that’s the thoughts of Chairman Mal for part two of how to stop derailments!
I hope this has provided the information required for you to figure out which of the laws of physics are making your trains jump the tracks and even if you can’t cure them on this layout, at least you know what to avoid when you make that start on your next one.
I’m off to try and fix my Class 45 which keeps exiting stage left on the curve out of the station…it’s a constant battle…
Happy modelling everyone.
Mal
North Wales”
A huge thanks to Mal for a wonderful explanation on how to stop derailments. It’s a subject that drives us all mad at some point.
Please do leave a comment below if it’s been helpful.
That’s all for today folks.
Please do keep ’em coming.
And don’t forget, the Beginner’s Guide is here if you want to get going on your very own layout. Don’t let the start stop you…
Best
Al
PS If you missed part one how to stop derailments, it’s right here.

Phew! I have just skimmed Mal’s amazing article and look forward to settling down tonight to improve my education! Thanks Mal.
You can check the transition from level to going up hill by stretching a srting or thread from a point on the level track to a point on the track some place up the hill. If you let it hang loose it will define a vertical curve for you.
While I agree with everything Mal has said in his excellent article I’ve suffered derailments from two causes not so far mentioned and they are probably rare. One of my models, although rated for radius 2 curves which are slightly under 18 inch, would not run around an 18 inch curve without derailing. The cause was that the loco did not have enough side play on the axles. I cured this by filing the frames and the inside of the dummy axle boxes to give more freedom of movement.
The second was on a tender (again rated for radius 2 curves) that kept derailing on turnouts but the loco didn’t. I checked the back-to-back and it was correct but when I measured over the flanges the measurement was 16.48mm. This meant that the tender wheels had no freedom of movement and they would bind on all but a very large curve and because the flanges were very close to scale the tender would ride up. This was actually cured by moving the wheels closer together on the axles allowing the tender to negotiate curves and turnouts without riding up and still run through turnouts smoothly.
Really useful and concise explanations – thanks a lot!!
Brilliant! Thank you
Thanks Mal,
Super helpful, transition curves, yes we need them
Mal’s article was very informative and clearly enumerated with relevant diagrams – thank you.
Absolutely brilliant explanation. I comefrom a Railroad family, three generations starting in the late 1800’s. I worked for Pettibone Mulliken and so,d track material. I thought I was well versed in the physics of track to wheel. You pointed out an overlooked reality. I always thought squeal was braking sounds…. The idea of heavy cars before lighter cars had not occurred to me to be a cause of cars jumping the rails… great article mate.
Very interesting article, sir. Well done explanation!
Thank you Mal for an amazing article, that im sure will help us all!!
To stop getting very frustrated!
Do you have any tips on couplings and stopping them from parting??
Peter
A lot of useful information in your Post Mal ….a lot should find this very interesting and useful …Dangerous Dave
I’m printing this off and disappearing up to my shed first thing tomorrow. What a terrific explanation. Thanks Mal.
Bravo Mal, Thank you for the time you took to give us ideology and informative instruction. This will go along way ,literally, meaning across the pond.
The Critic
WELL!!!! What a fantastic insight! If kids were taught like this at school they’d be there at 5am and not wanting to go home!! Absolutely brilliant – everything explained so understandably. Great job – Well Done👍
I will p v a all my track in future. I am guilty of hammering the tacks in. O was thinking of going back to fixed curves rather than flexi.
Mal
Absolutely required reading by all in modeling. Many thanks for the input.
Best
George from LI, NY
Interesting and well written tutorial; good job!
Hi Mal. Could you come and sit my Higher Grade Maths paper for me. Thanks
Heaviest cars first, then lighter cars to the rear. Never really thought about that. It makes great sense. I’m just a retired copper who throws track down, use 10 Penny nails, 3 to a section and hope for the best. Not really that haphazardly, but pretty close. It’s the little things we don’t know that cause the greatest grief. Thanks, Mal. My pike is 40×16 ft, with lots of curves and a bit of elevation. Three main lines and lots of turnouts. Your advice has got me thinking. Let the fun begin.
Very interesting and informative article. I’m just starting a new layout and have a couple of curves laid out for N gauge. I ran a brand new field loco around the curve and discovered it came of the track at one spot. Adjusting the track corrected the problem. My point is… even if the track is not glued down, just pinned, don’t glue it down until you know it is going to keep the big loco on the track. I have not built a layout for many years, and this article was very informative. Thanks Mal.
good article, my brain has now gone into overload !!
Thanks, Mal,
I am at the point of attaching my rails to the bed and almost forgot about “superelevating” my curves. I actually learned about it from another source when I was “re-learning” how to do model railroading.
So a big THANKS for reminding me before I went too far!
This must be one of the clearest and most detailed explanations I have seen. Well done Mal, and thanks.
How about Mail putting the transition curve mathematics into your blog? As a long retired math major, I would appreciate seeing the mathematics.
I didn’t even know that.
Great information. I’m an engineer and this was pure science. Thanks for your tutorial.
Well written, comprehensive article. Thanks Mal. I’ve had luck using a latex adhesive caulk temporarily held in place with push or foam pins and weighted down with whatever’s available- soup cans work. After drying, I remove the pins and ballast.
great article. Could relate to the proplems.very clear and easy to underdtand
Well written & very understandable. I really learned a lot. Many thanks.
Great post on what to look out for. I’m going to put some of that advice to work and check out some my troublesome cars. Thanks for posting!!
I think you hit the nail on the head. I have a problem that I can correct I hope .thanks for the good info.
Mal has confirmed my suspicions on a number of fronts… with great diagrams and explanations. Thank you Mal!
I always thought wheel squeel was the wheel/axle torquing on a curve, where the outside wheel is trying to catch up with the inside wheel which is a differential issue.
Mal, have you attended prototype Rail Wheel Interface courses?
So much useful information. I can’t wait to try some of his advice and to see some improvement in how my trains run.
I assume that the 1mm rule is for HO or OO gauge trains. what amount or conversion should on e use for other gauges. I run S gauge which is half way between O and HO.
I like long fright trains and high speed passengers so I need to get this right.
Thanks Larry
A very fine discussion of the physics involved in rail. Also a good discussion on derailment prevention. We should ALL take the time to inspect our layouts, As a Fandydancer for a few live steam model layouts, I have to be careful in my working on the rails to prevent accidents. I have a few tools (rail gages) that I’ve used for years without knowing this much of the physics. Dumb luck I haven’t caused any mishaps! Thanks for the info!
I specialize in too tight turns. Lol! Inspirational to understand the forces on wheels that result in derailments. I will have to try a few ways to bolster track in troublesome spots. Thanks for the detailed instruction.
very interesting article Mal. In the real world, as the train approaches speeds greater than 15 mph the centrifugal forces acting on the wheel will balance out between wheels thus entering the axle between the rails. The surface area of a new wheel in contact with the rail is about the size of a 5 pence coin.
Tip of the cap to Captain Mal….had I read his lessons before starting I probably would have taken up another hobby for the myriad of variables!! Too late – and I now find his lessons indispensable!! No math major myself, I find his lessons clear and easy to understand.
He should consider combining the two parts, incorporating other knowledge I am sure he possesses and write a book !! Of consider teaching! A video channel??
Cheer,
lol, I found it way easier to just go ahead and place the derailed car back on track with my fingers…I never got past the beer can thingy…
Having read this article now MAKES me want to get started on a new project!
like the content, like the easy humour and like the fact that I have learnt something interesting and new even at the age of 63!!
Mal, I have really enjoyed your lessons on how to avoid derailments. A few items I knew about but added many lessons I had not thought about. Great article on the subject and I am going to start right away checking my layout for problem areas.
Thanks
Best *and easiest to understand) article that I have read on the subject. Thank you very much.
I had similar problems with track distortion. I solved this using 30mm Double Sided Foam Tape, this had dual roles as being noise supressant and good flexible trackbed being flexible enough to allow cambering on corners.
the track I Spot Welded with cheap Spot Welding Sets* online using a low
voltage (12V dc car battery or similar stepped down current rated supply)
for my Permanent trackwork leaving the Fish Plates for the Modular joints.
and I haven’t got those ugly blobs of solder on my rails.
*BangGood.com and AliExpress.com Priced around 30 – 50 GB Pounds (on
your selection)
And another thing, I used Transit Curves leading ‘into’ my main Curves as it leqads them smoothly into the curve instead of the sudden ‘veer off’ in another direction causing the, (usually) ‘pony’ wheels to jump and eases the long wagons around the corner. Looks good too when you are behind watching them running into and around the corner
For Lawrence Rascop;
To convert scale dimension from
HO to S gauge – multiply by 1.361
this may not be conversion for the superelevation but from 1 milllimeter to 1.36 millimeter doesn’t seem to be a significant change. I did find an explaination paper for the full size railroads in “Fundamentals of Railway Curve Superelevation” https://www.jghtech.com/assets/applets/LFLSRM-Fundamentals-of-Railway-Curve-Superelevation-current.pdf
or on wikipedia for Cant
https://en.wikipedia.org/wiki/Cant_(road/rail)
Another thought on curves is that the inside wheel on a curve will have a shorter distance to travel than the outside wheel which are both attached to a single axle. This would cause one of the wheels to always squeal on a curve. To prevent this in the real world, the wheels are tapered slightly such that the portion closest to the flange will be larger in diameter than the portion farthest from the flange. This allows the wheel assembly to move slightly towards the outer rail so that the inner wheel is riding on a smaller diameter than the outer rail. Thus allowing both wheels to rotate evenly thru a curve without squeal. However, for a particular wheel taper this only works for a particular curve radius.
In automobiles if both rear wheels were connected to a single axle one of the tires would squeal, if the car was able to turn. To prevent this a differential is used to provide different speeds to each wheel.
Great article. I was aware but Mal puts it in the right light. Very helpful
Great article, and very useful.
Another point about transitioning slopes is that if you don’t, the longer carriages and locos will lever their couplings in opposite directions and if you use Kadees, they can lever themselves apart. Your lovely rake of expensive birdcage coaches starts downward at maximum speed…
If we carefully lay a rail on the inside of each siding rail, would that prevent wagons derailing when backing a long string of wagons into the siding?? The diagram of wagons going in reverse shows the forces causing a derailment. The “guide rails” installed inside and close to track may prevent the flanges from being pushed over the track’s rails when backing up. See Mal”s original sketch. It may not look like real world, but if it helps run our RR why not.
Mal, your two articles on how to stop derailments was just what I needed to help fix things. You mentioned several things to look for that I had not thought about. I will be checking these issues to solve my derailments.
I am very thankful that you took the time to share them with us.