Brian’s blown off the dust on one of his Walthers HO scale buildings:
“Hi Alastair,
made a change from my usual wooden buildings and assembled/kit bashed a plastic building.
This is a Walthers HO scale plastic Sunrise Feed mill one that I have had stacked away amongst my unbuilt kits for a very long time.
I really liked this kit and said to myself that I would build it someday.
This is what it would have looked like if assembled as per the instructions.

I temporarily assembled the main building to see what needed to be done if I wanted to modify it.

I placed a card stock floor in it in case I decided to open a door or two later on in the build. (Another mistake that I made, should have cut out the door first).
Satisfied with it so far, I sprayed it white and would weather it later.

The roof was cast in black plastic and I was not happy with it looking the way it did.
I sprayed it with a coat of Matt grey and once that was dry, I sprayed it Matt black. Again when dry I used a very old worn sanding block and proceeded to lightly sand it to bring out the edges of the tar paper. Small top roof sprayed but not sanded yet.

Added my usual weathering techniques to the roof and main building after all the windows were inserted.
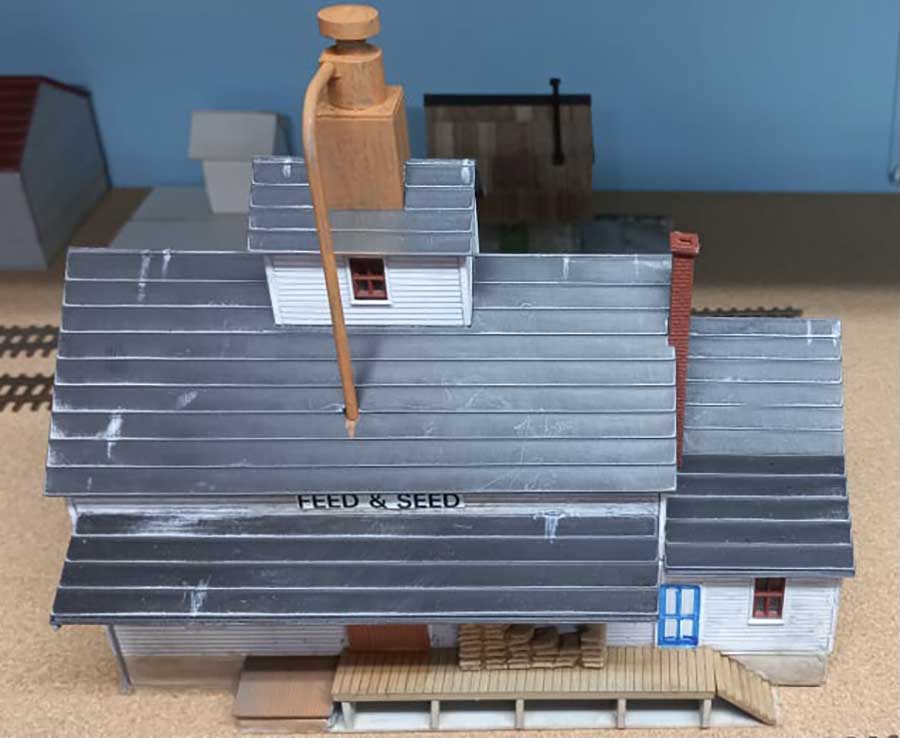
I rusted up the metal (plastic) parts ready for the final weathering. The wood (plastic) deck got the same treatment and the chimney on the side office was added. The foundation was painted a concrete colour and weathered later.
Signage was added in the following photos.


Need to add more details once placed on the layout.

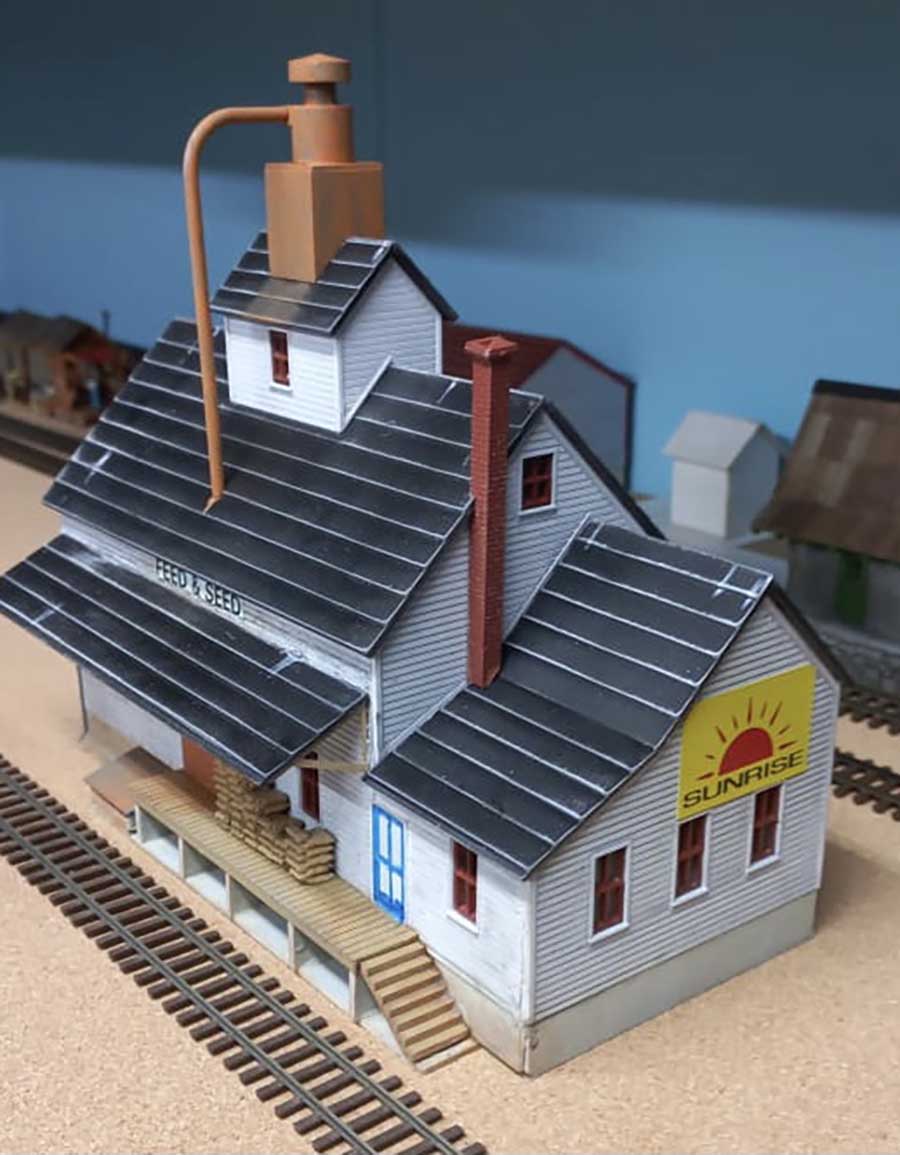
The next part of the build was the (I call it the storage/warehouse) that would go next to the above on the left hand side.
Because this building would be next to the main building, a full wall was not in the kit. No problem to me, I matched the siding of the main walls and found the same wood siding in my stock of wood.
Marked it out using the opposite side as a template and then glued the structure together. This is where I made another mistake, forgot to cut out the door on the front side but managed to do so without any damage.
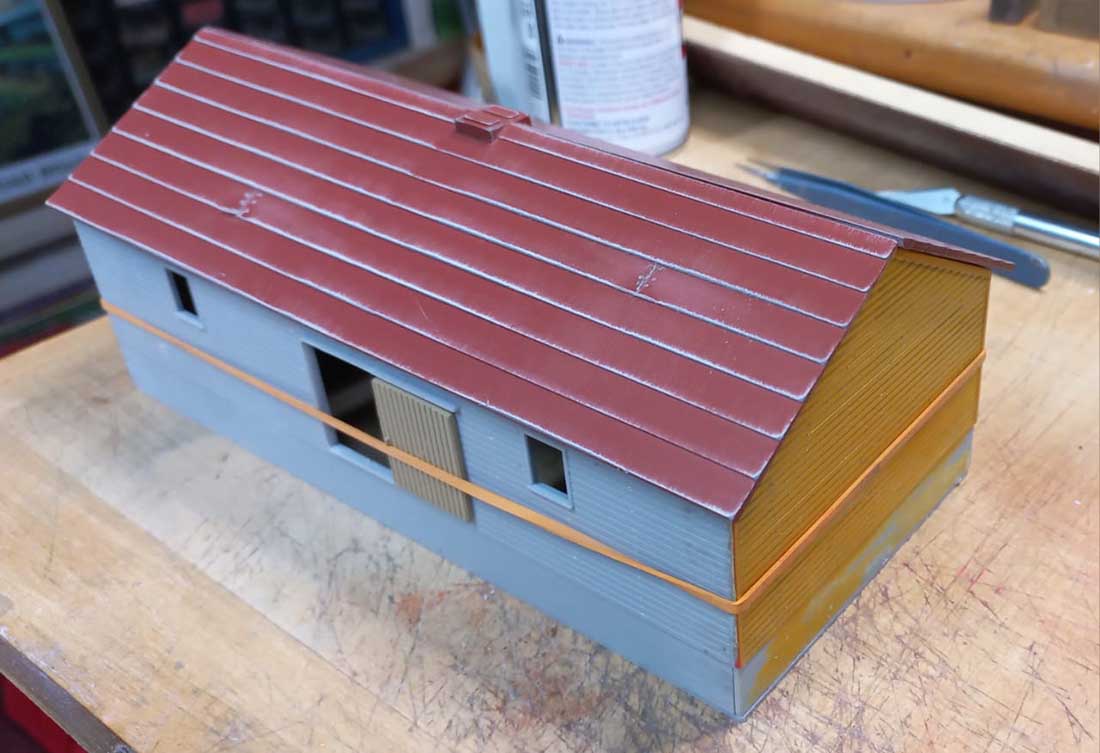
Same method used here for the roof. Sprayed the black roof with grey paint and once dry, sprayed It with a red paint. Before the painting was done, I cut a few joins and lifted the corners on the tar paper to represent different lengths. I sanded the roof again using a fine sanding stick to bring out the edges. – Note the elastic band keeping it together to make sure it all fits together properly before gluing it together.
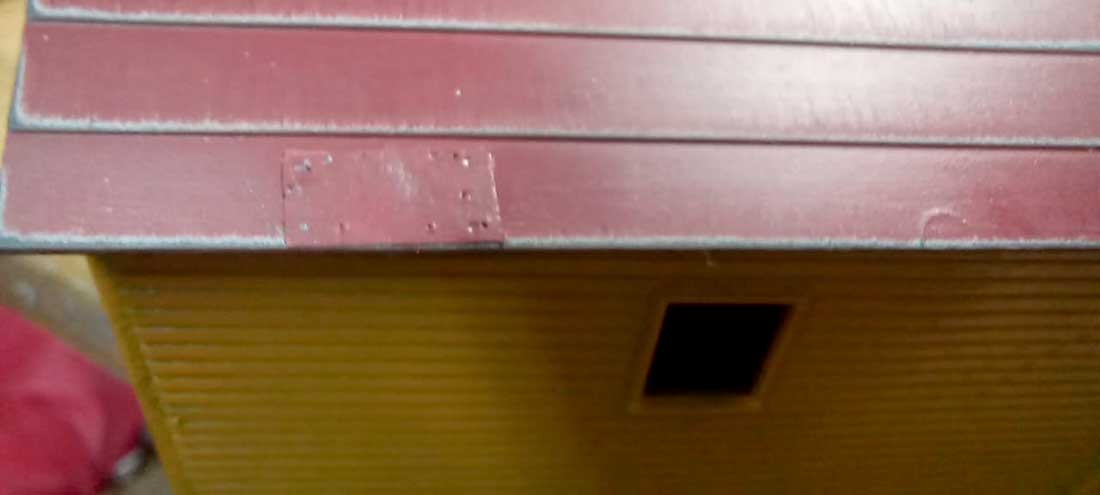
A flaw in the moulding process was quickly patched to show repairs on the roof.
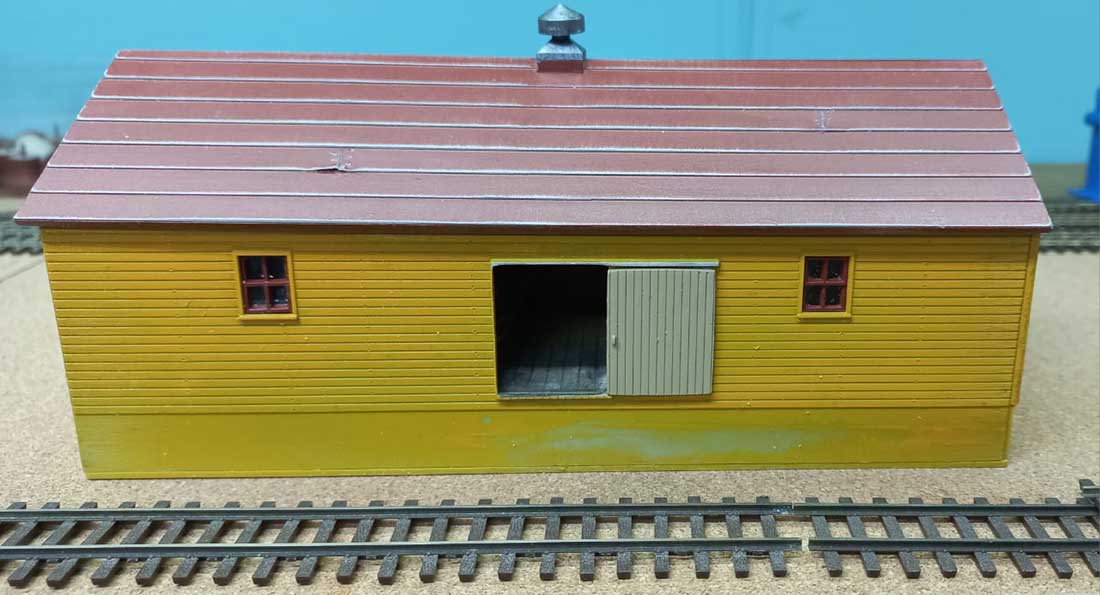
The structure was sprayed yellow for a change. The foundation will be painted a concrete color and weathered.

A dummy floor was added inside and a few details put close to the open door. The wood deck on the dock was added as well as pilings under it. Details were added to the deck ready to be weathered.
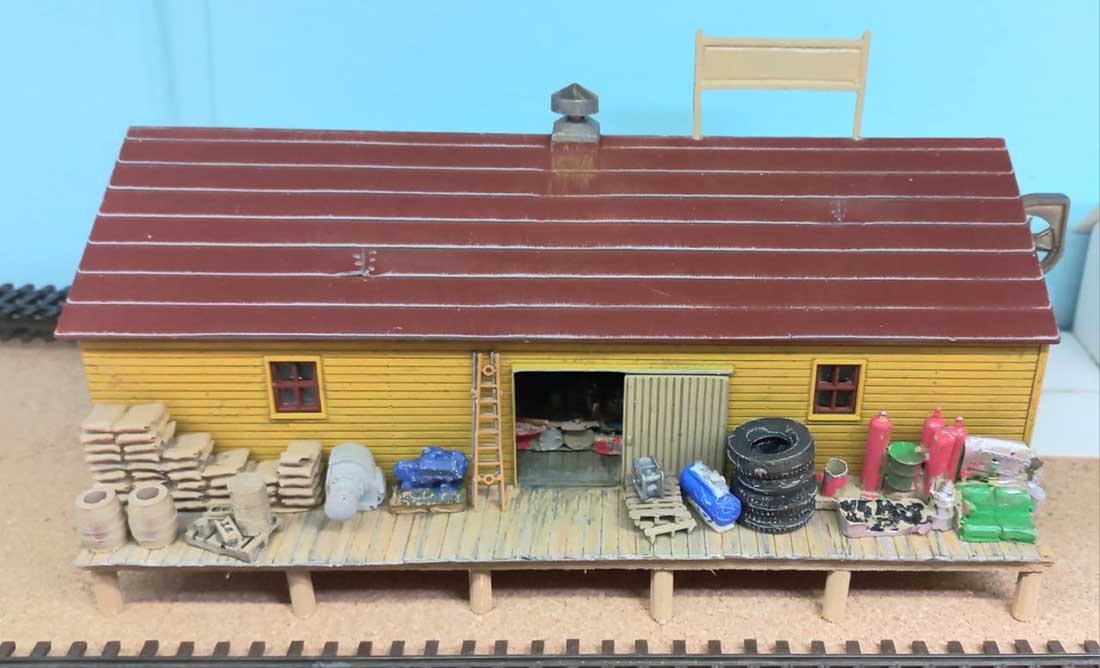
Finally I will add signage to it once I have figured out a name for it.

Waiting for the sign writer to add his bit on the roof sign.
I was not that happy working with this plastic kit and in future will stick to scratch building in wood.
Until next time – keep modelling.
The HOn3 guy in Knysna RSA”
A big thanks to Hall of Fame member, Brian for sharing his Walthers HO scale kitbash. I do love his stuff.
And now on to another Hall of Famer, Dave:
“Hi Al..
I have been having a few track problems after the hot summer weather due to expansion etc, its something we all get and is a constant part of keeping them running smoothly doing repairs.
I have shown on here replacing some track adding new points and also soldering between joints on the points (crossovers), something I don’t usually do, but this has left it running far smoother, so something I shall probably do in the future.
Also I show laying ballast, then adding grass ,and then using my CMX track cleaner
Regards
Dave”
A huge big thanks to Brian and Dave.
That’s all for today’s missive.
Please do keep ’em coming.
And if today is the day you stop dreaming and start doing, the Beginner’s Guide is here.
Best
Al
PS Latest ebay cheat sheet is here.


nicely done work on the buildings & Daves video was great too.
very nice.
What’s nice about this hobby is that you can do whatever you wish with your layout , your buildings or kits and your scenery . What’s even more nice about this hobby is the genuine enthusiasm and encouragement that the fellow modelers exhibit . If one does something another may not , so what ? No need to be rude or degrading . What kind of childhood and upbringing results in such shallow existence? Get a life even .
I think the kit would look fine either way , most impressed that you took the time and effort to add details . Furthermore exposing the process in case someone else may be as inclined . For those modelers that may not be inclined the kits are indeed designed to use out of the box . I’m sorry ole boy doesn’t like or appreciate your kit and efforts. I’d wager a bet he doesn’t even have a display . Doesn’t sound like he even has friends with that attitude . Hey , but God bless you anyhow .
Once again a disgruntled observer inputs criticism where it doesn’t belong.
The building was detailed as the builder preferred.
Maybe Rich B & Robert Brady can form a critic tag team (the RB’s) and BASH (not kit bash) everyone’s efforts.
As for me, I will continue to respect the projects posted, whether it is my particular taste or not.
Brian
Always excited to see a submission from you. I suppose you have a large inventory of that stuff which really makes a super building. Do you 3D print it? I have a hard time getting “stuff” for my S scale. The plastic kits are for us mortals and the constraints of those kits are not for an artist like you so unto creations made of wood it is.
Dave
Much thanks for the video. Be well
Big Al
Coffee, Brian & Dave, -just right. Danka
Brian, I greatly appreciate you taking the time to send in the article about your kit building. It’s informative and provides many useful ideas.. please don’t let a detractor stop you from future postings. I would agree with the other commenter that if you don’t like what someone else has taken time to produce, just don’t comment on it. This forum is not the place to cut people down.
Dave, you made my day again with your video! Please keep posting.
Rob Schweitzer
St. Goar & Murren Scenic Railway
Ann Arbor, Michigan, USA
Thank all of you for the kind comments. I do enjoy the constructive, positive criticism but not destructive ones, as it always improves my future modelling.
An answer to George Z, no I do not 3D print anything but I do make a master of what I want and if I need a few of said item, I make a silicone mold and cast them in resin and paint accordingly.
Alastair has published some time back on how I made my silicone molds and resin castings.
Brian – the HOn3 guy in Knysna. RSA
Nice work!!
I’m just amazed at the level of detail and the great lengths and efforts put into so many of y’all’s layouts . Most impressive indeed . Inspiring to the remaining of us novice folks … thank you .. all if you .
That was a nice build sad when people demean what others do the only thing I would have done different is the rust on the cyclone and its piping would be to paint over the rust color with silver because those pipes and cyclones are galvanized and sand off the silver at the pipe joints a bit and where parts connect that is where they rust in real life i live in farm country (south Indiana in the US ) and see a LOT of these mills . Welder Dave