Laurence has been in touch with his take on model train light wiring:
“Hi Al,
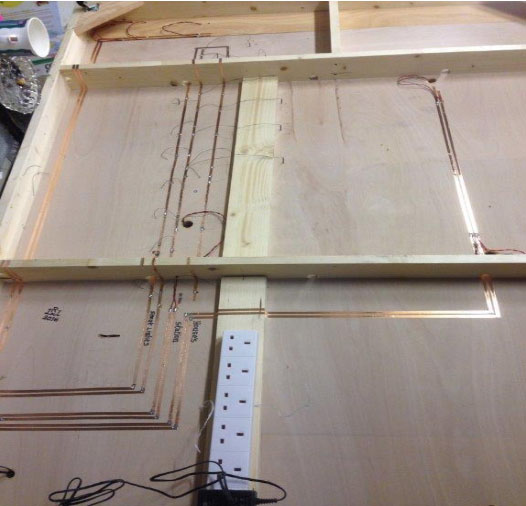
I haven’t seen many wiring how too’s for some time so I thought your readers may like this compilation of pictures where using self adhesive copper tape instead of wires can be used.
It’s easy to use and makes it easier to connect your lighting too instead of trying to join wires together and insulate them.
Install Your lights first with the wires pushed through the baseboard. Plan where the tape has to go and what voltage.
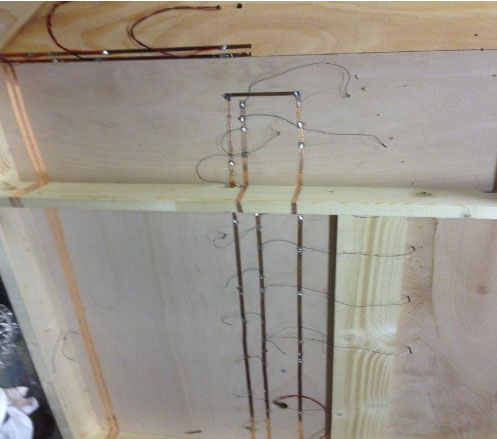
After sticking the tape into position, press down with a credit card. Any joins ” ie” corners have to be soldered. The solder flows quickly on the copper tape so don’t overheat. If you have to cross the tape, place a piece of insulating tape over the part your crossing.
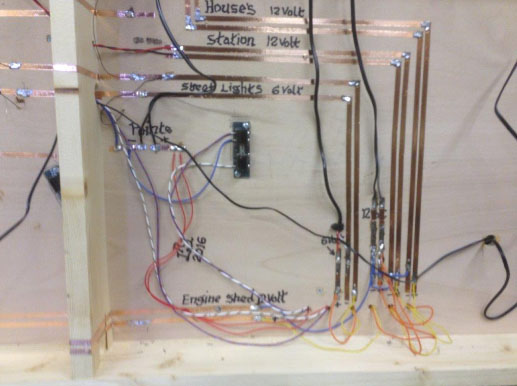
Lable what tapes are for what and what voltage they carry. This may help if you have to check the circuit’s at any time.
Fit an adaptor to take the transformers this way you only have one wire trailing from the baseboard. Cut the wires of the transformers and after checking the polarity solder to the appropriate cicuit.
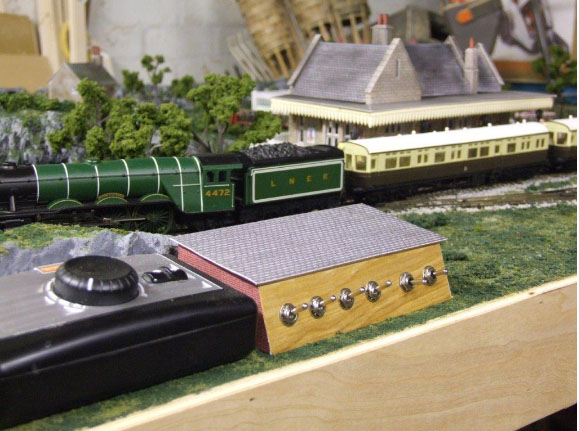
A box made to mount the switches for lights and points motors.
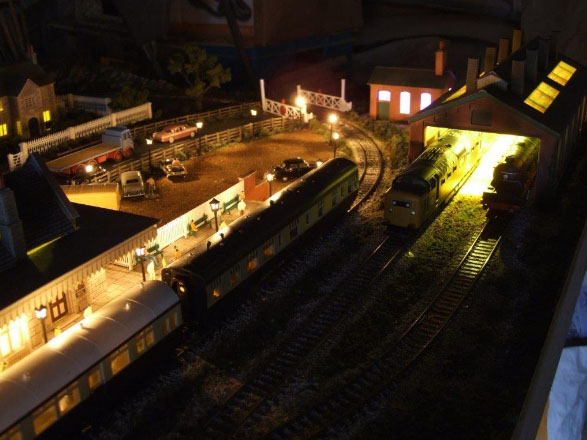
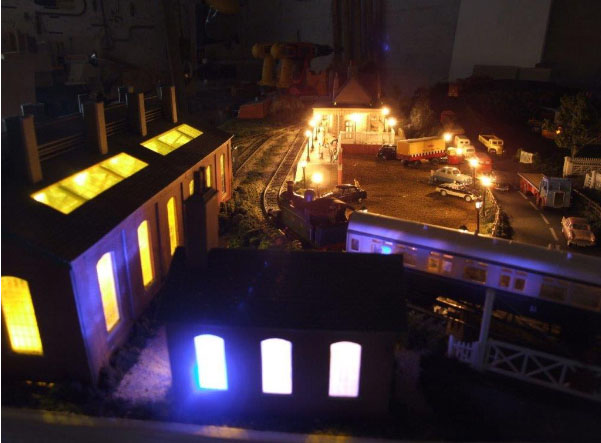
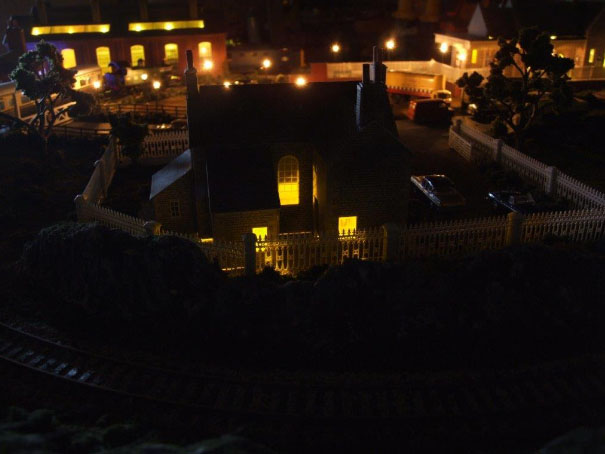
The end result. Switches will operate different buildings and street lights.
Use different LEDs for different buildings ie warm white or yellow for old type buildings
Street lights are bright white other buildings are warm white.
See what your readers think, I would love to hear their comments.
Keep up the good work Al.
Best Wishes,
Laurence”
A huge thank to Laurence for sharing his model train light wiring ‘how to’.
If you missed his earlier post, it’s here.
Lighting is another subject where there are quite a few posts on the blog now:
Then there’s Fred, who takes LED light to another level:
Model railroad building lighting
That’s all for today folks, please do keep ’em coming.
And if Laurence has inspired you and want to get going on your layout, the Beginner’s Guide is here.
Best
Al
PS More HO scale train layouts here if that’s your thing.
Need buildings for your layout? Have a look at the Silly Discount bundle.


What a brilliant idea of using copper tape underneath the layout. So much neater and easy to work out what goes where. I am guessing that all that was done while the layout was upside down on a surface. If it was, it makes life so much easier. Well done and thanks for the heads up. Brian
Your wiring is nice and neat. Having it so at the very beginning of the process makes later additions to the circuitry much easier. The “night” shots are very impressive with the mix of bright and warm lights. Thanks for the inspiration. Cheers! NJ Mark
Great idea makes it very easy to add on or expand lighting circuits. Thanks for sharing.
I have used copper tape in the previous control box I built, but it wasn’t on this scale. Running the copper tape under the baseboards is a great idea, slightly more expensive than bus wires etc. But a very clean and efficient job it looks underneath. Be interested to read how much tape you actually used in voltages. Cracking job, well done.
Very Nice Indeed !!!
Boy I am jealous. I look under my layout and it looks like a commercial for a wire company. I don’t have to worry about someone taking my job under there. When I started my layout I don’t have a set location for buildings and even street lights. I kind of started at one end and just keep going. I guess if I do another layout I will be able to plain ahead. One question? How hard is it to add new buildings? To solder upside down is tough. I can see you are having fun and that is the name of the game enjoy.
Steve from Toms River
Wish I had seen this post ten years ago ….
Sheldon, Phoenix
only issue i see with that is would be easy to get a short ,by accidentally being touch or better yet if you spilled something on the table My only issues
Gerry L
Is this copper tape the same that is used for stained glass?
Man that is a really nice package on your wiring set up. I am going to redo all my lighting on my big set up like yours. Can you tell us where you got your copper tape from and if they make connector we can use on the tape. Really a very neat job and thank you very much, Dave in Savannah, Ga. USA
Nicely done. Makes me want to pull all mine out and start over. Especially liked the switch box to control the buildings and other lighting.
THANKS MANY THANKS learning new stuff all the time for great modelers like yourself. Very clean looking and neat.
you never know how much you don’t know, untill you come on this site. this is a great article and so easy to understand. thank you.
Laurence has a neat easy to trace wiring system.
I have one comment using adhesive backed copper tape. While laying the tape directly on wood or composition board you have the problem of the base material sucking out the adhesive over the years and then the copper tape will come loose.
To prevent this from happening you should seal the space between the wood and adhesive by sealing the space under the copper with a thin layer of shellac or any wood sealer. Simply paint a strip of sealer under the intended route and this will lessen the chance of the adhesive drying out over the years.
You did a marvelous job of routing your circuits and I would hate to see any foreseeable problems.
Cheers
Bill Londell – K2CZD
Colonia, NJ, USA
This is superb. I have a similar control panel, but like a signal box. I am going to replace mine with copper tape too. You can also run it under the track for track feeds.
My problem will be, getting under the board in the first place !
Great idea using copper tape , have seen this used for BUS wire and may try this myself someday …well done ..Dangerous dave
Grew up with a late 1950s Lionel factory demo layout.
They used 16awg wire runs neatly stapled under the train board. To attach an accessory, you just stripped back some of the cloth insulation and soldered on the leads. Great current ( get it?) adaptation of a terrific idea.
Andy in Yakima,WA.
Laurence,
Great job. I love it.
Could you just fold over the corners then solder?
How do yo deal with the oxidation of the copper?
Jim Plastow
Utah, USA.
Hi Laurence! Great wiring concept. You’ve done a wonderfully neat job of powering your layout’s electrical needs.
With the adhesive eventually drying out over time on an unfinished, porous surface like wood, it can come loose. As someone already suggested, painting a trail of shellac or urethane on the wood for the tape to hold longer could prevent premature drying of the tape’s adhesive over time.
While the use of the copper tape is time saving and easier to apply, it would optimally require, as in your case, a smaller layout and/or one that can be accurately anticipated for the precise location of powered scenic elements. This allows for working with the layout benchwork bottom side up as you’ve done. Nice solution to easier wiring! And this prevents having to handle wiring jobs from beneath the layout and risking burns from hot solder or other mayhem…
But alas, as in my case, my layout uses many scenic/terrain elements and structures whose location could not have been precisely pre-determined. So they needed to be constructed first and then later electrified. So nearly all of my wiring had to be done from below the layout. And as the layout grew over the years, subsequent wiring and rewiring became a bit treacherous and a nightmare.
However, thanks for sharing your ideas as it can prove to be a tremendous help for many modelers, especially those planning a new layout. — Arnie
I also have concerns over the long term viability of the adhesive on the copper tape, expansion, contraction, moisture etc will weaken it. The shellac probably will help but expansion and contraction unless you live in a constant humidity environment are probably the biggest enemies.
Where are you getting your copper tape from?
I like what you did with the copper handshake to all of the devices on your table. I wish that the pictures where more clearer when you zoom in to the work that you did, I can make out some of it. I think I need new glasses. Lol. I can see useing your technique in the future. Thank you for your inpute.
Stephen G
I have used copper tape for making slotcar tracks. Never thought about using it like you have. Only problem I see is it can break. It’s not has reliable as wire. And it’s expensive and the adhesive does let go sometimes.
Great idea! Just designing my HO layout and will employ your excellent idea. All I have to do is find out where to purchase self sticking copper tape.
Very interesting, thank you. Not quite so much help for a layout like mine which is formed of seven baseboards for going to exhibitions, so all the connections have to come to plug connectors to cross the board joints and links to the control panels, but nice work. Love all the lighting effects in the night shots.
Rod
Very nice.. would like to know highest recommended transformers…. Also, is it practical to attach transformer wires to more than one place on the layout.. to insure there is enough power for the locomotive to pull cars over hills/mountains !! Thank you.. Mike
Al, hanks for spending your time and efforts to bring this site to us. T his is the first time I have commented but have enjoyed, learned and lerned much over the years that I have been reading it.
I have learned several thing today. 1. never previously heard of copper tape. 2. Would never have thought of using for train board hook up. I would have expected the tape to stay in place for centuries with out deteriorating..
Thanks to Laurance an dAll and all of those who have commented.
I was toying with the idea of bulk buying cheap plastic rulers to screw up against the copper strip to support and insulate it. The scales on the rulers would be an excellent guide to space street lights etc.
To attach wiring for various purposes simply carefully drill a 1/4″ hole in the ruler and a much smaller hole for the fires. Soldering would be a cinch.
Tom
You can purchase the copper tape from eBay. A 5mm x 50m for around£
£10 +postage. If your worried about the adhesive you can always add a few spots of glue from a glue gun.
I used it on a 6ft x 4ft board 4 years ago and have had no problems so far.
I’ve also used it on dolls houses and even fancy bird tables but will admit I don’t fancy doing it on my back, I’ve always put the base on it’s side.
Hope this is of some use to you.
Best Wishes,
Laurence
What a wonderful site! I want to thank everyone for their ideas and input that makes this such a joy to read. A special thanks to Al for all he does to promote this hobby, Al, you should be made Model Railroad Man of the Year!
Best wishes to all,
Clint H.
Wilmington Ohio, USA
I do so like the compactness and the idea of the copper strip. I compared my layout’s wiring with Laurence’s technique and all I saw was his neatness compared to my bowl of spaghetti! Talk about being jealous, it makes me want to modify my wiring right now. Thank you Laurence for sharing.
Regards, Tom (USA)
Laurence:
Great idea.
I have done a couple of doll houses for my grand kids which of course had to have lights. There is a two color insulated flat wire the sticks on to the wood and is connected by punching holes through the two pieces you want to connect. The transformers are up to 40 watts so they will work for our purposes as well. I had not thought of if but it will work well.
It is more expensive than the stained glass tape but solves the crossing problem and gives you both conductors is one roll.
Just a thought.
Jim Bea.
The only problem, with that, is that the foil will detach, from the wood, over time. For best results, use some kind of sealant, on the wood, first (paint, etc).The foil was meant to adhere to glass.
Jolly good idea and work. Only problem I see is for old farts like myself, lying on your back underneath the table doing the work, unless we can talk a young whippersnapper into doing it for us ! Love the final effects at night, one of the best I’ve seen. Aloha R
It’s certainly very tidy and I might use that technique for my next layout. Probably useful if you are using DCC though check its maximum current. However, I could never use it for my current layout (lighting was done last). But not for DC control. My 6’x2′ Z scale layout has nearly 100 track circuits, cross linked to signals and pointwork, and route selected so underneath it’s a real rats’ nest, in spite of having two matrix boards. Yes, anything to reduce wires. Chris, UK/.
Nice. Interesting method of wiring.
Such a good Idea but I do have a few observations.
Firstly I would be very wary about having mains voltage cables going onto the layout baseboard, I would not do that.
Also, how sticky is the adhesive on the copper tape and does it keep stuck?
Aside from that I think that I will give it a go with copper tape.
Nice job!
Nice idea on the strips… until the wiring begins, still looks very busy. In early years made aircraft harnesses and let me say it opens another world to the untrained tech. Combing the wires per se, routing groups together, occasional ty-rap. Not downing anybody certainly but very easy to discern levels of wiring experiences.
Don’t believe tape would ever get hot enough to catch wood on fire… say 120v accidentally was introduced, stranger things have occurred.
Label makers work great with wiring as such also. Can be folded over wires themselves for ID. If we’re happy with our results- it’s all good though.
Regards, Rich
Nice work. I am make my new layout using L-girders and joist. There will be about 42 inches of clearance to work under the layout. I am thinking about running a wire bus along the perimeter of the L-girders and using copper tape mounted on the vertical surface of the joint to tap into the bus.
Bob in Virginia.
Self adhesive copper tape. What a Brilliant idea! Fabulous!
The is the best site for model builders. I learn something new every day—using copper tape.. Thanks to the great contributors and Alastair who runs the site.
I will look into it . I am glad I read comments though, will look at adhesive fix before it becomes a problem.
Awesome idea, I’m just starting a layout and this looks like the way to go. Thank you for sharing your idea.
That is the Neatest wiring I have seen, and thirty two years with the Bell System,that’s saying something! great job.
Danny Marso,Warwick,Rhode Island
I have been offering rolls of copper tape on my small scenery stall at model railway exhibitions for the past 3 years. I advise people to consider running ‘on top’ of the baseboard if possible. It gets rid of the trying to solder upside down. Paint & scatter easily covers the tape to hide it.
Copper tape is a neat idea, but, I would hate to do a very large layout this way. One other thing I did notice, your power board fixed upside down. It is better to fix them facing out & not down, as a lot of power adapters can be a bit heavy, and gravity will have an effect (Murphy’s Law), and if they did fall out, could pull the copper tape off of the board.
I have used this method for years, and some of it has been on my layout for most of that time with no seperation. I live in rural wiltshire england, and I can tell you my garage is always either red hot or damp! I did find if you varnish over the joints and corners with a clear glue, such as UHU this pretty much stops any circuit breaks, as any seperation at all starts at these points.
as for adding new circuits to it, I fit the the wire onto the tape by holding it against the tape, and putting a dab of supoerglue on the insulation of the wire as close to the tape edge as I can, Then when soldering the joint, the wire doesnt pull away from the tape while you solder it.
Excellent “How Too” advice and very helpful for planning my build.
Ken
Great Falls, VA
I assume that the copper tape clean on both sides and not brittle
If so the easiest corners can be made by folding the copper over
This also can be used for angle other than 90 degrees as well
All without the need for soldered joints
for slight direction changes it is simply a matter of slightly pleating the inside edge of the corners, Not quite as neat, but better electrically.
If any of this needs explaining pictorially then bear with me AND give me a clue as to getting picture to you, As I have read the posts here without any idea of how to post the pictures
In the US, most craft stores will carry the copper tape. The ones that I have seen and used have a protective film on the foil side covering the copper. I have seen the tape at Michael’s. It is OK at 12 volts and I believe rated for 16 volts. If you have a very large layout, make a couple of different circuits so you don’t overload the tape. To solder to it, I had to remove a little of the film at the area I wanted to solder.
As for maneuvering under the table, I bought a small furniture dolly and added 1X4’s to the center so I could sit and be comfortable, as well as scoot around.
Super great idea. I plan on using telephone poles to carry my wiring and “sub-stations” to branch the wires out to their intended locations. But I can see where their will be circumstances where your copper tape will make more sense in some areas of the layout.
A big “thanks” for sharing.
I never thought about using copper tape under the layout. This is a great idea and can be used in many other applications. Kepp up the great ideas.
nice idea. i may try this.
Laying on the floor and trying to soder to tape over your head sounds like a dangerous situation
Doing this on a removal train board woul work, but seems problematic for a perminate installation.
I have used copper tape for lighting for a number of years. It makes things so simple as one merely adds the lighting and then solders the wires to the tape. No fuss, no bother.
awesome
That is a great solution to what is normally a messy problem under the layout. Thank you for posting.
I used this copper tape (NOT copper wire ) in wiring all my switches on my new layout. Certainly was easier and saved a lot of time and money. Copper tape via Amazon is SO cheap. Another advantage is that you can use plain old masking tape to cover a wire when you run a new circuit without having to worry about short circuits. A warning however–on a large layout like mine, be sure to label each wire several times between the power source and the destination because if there’s a problem later you’ll be able to identify the circuit and the problem. On my layout i have 2 or 3 critical points identified so if for some reason the circuit doesn’t work, I can go to them and see if it works up to that point and then trace the circuit back until it doesn’t work and you’re able to find and fix the problem.
Terrry/Idaho USA
Absolutely brilliant. Labelling the runs and voltages also a great feature. Dollhouse hobby supply has tape available
Excellent idea Laurence- I’m about to add lighting to my layout and will give it a go. I also liked the idea of sealing the baseboard to prevent adhesive loosening with time. Thanks for the great tip.